
Categorie popolari
State cercando un filato?


Commenti / Domande (48)
![]() Annette ha scritto:
Annette ha scritto:
Hej jag stickar Olivia väst, jag har gjort 19 ökningar på ärmar, bak och framstycke, nu har jag två ökningar kvar på fram o bakstycke, mellan vilka markörer ökas det då?
12.02.2026 - 15:27DROPS Design ha risposto:
Hei Annett Da øker du før 1. og 3. merke og etter 2. og 4. merke og det økes slik at de stemmer med økningene fra forrige pinne med økninger på for- og bakstykket (i forhold til A.1). mvh DROPS Design
13.02.2026 - 09:21
![]() Annette ha scritto:
Annette ha scritto:
Jag stickar Olivia väst i garnet flora det blir så tunnt,kan man sticka den i tjockare garn?
09.02.2026 - 10:26DROPS Design ha risposto:
Hei Annette. Denne vesten er skrevet for garn i garngruppe A (Alpaca, Nord, Flora, Baby Merino osv). Om du ønsker å bruke et tykkere garn, må du finne en oppskrift som er tilpasset den tykkelsen du ønsker å strikke med. mvh DROPS Design
09.02.2026 - 13:51
![]() Louison ha scritto:
Louison ha scritto:
Bonjour, est-ce que le diagramme se trouve sur les côtés du cardigan, une fois fini? On ne voit pas assez les détails sur les photos...Merci
12.09.2024 - 19:41DROPS Design ha risposto:
Bonjour Louison, les 11 mailles du diagramme A.1 sont les 11 mailles des raglans que l'on va donc tricoter à chaque transition entre le dos/les devants et les manches; la maille avec le marqueur doit correspondre à la maille centrale de A.1 - cf explications écrites et RAGLAN. Bon tricot!
13.09.2024 - 08:39
![]() Joane Gosselin ha scritto:
Joane Gosselin ha scritto:
Bonjour je veux commencer le patron no 164-43 , modèle z-712 et j'ai une question au départ. Je ne vois pas au sujet du collet si je dois tricoter des cotes 2-2 (2 end- 2 env..) Également quel genre de montage de maille suggérez vous Merci.
09.07.2024 - 03:31DROPS Design ha risposto:
Bonjour Mme Gosselin, le col de ce modèle se tricote au point mousse (3 côtes au point mousse, soit 6 (rangs endroit); vous pouvez utiliser votre technique de montage préférée, aucune n'est particulièrement recommandée/nécessaire, pensez juste à ne pas trop serrer, comme c'est l'usage. Bon tricot!
02.08.2024 - 15:15
![]() Margaret ha scritto:
Margaret ha scritto:
After putting sleeves on the stitch holder does the A1 pattern stop? Also, I don’t understand the directions for the bottom of the body while working 3 ribbing rows “…with 5 band sts in garter st and 2K in each side towards mid front.” Where exactly are the 2K stitches supposed to be? Thanks for your help.
14.01.2024 - 22:31DROPS Design ha risposto:
Dear Margaret, yes, you start the body with garter stitch and the purled bands, so you don't work A.1 anymore. On the bottom of the body: start the row with 5 band sts in garter stitch, then work the rib (k2, p2) until 7 sts remain on the row, finish the row with k2 and 5 band sts in garter stitch. Happy knitting!
14.01.2024 - 23:35
![]() Lise Girard ha scritto:
Lise Girard ha scritto:
Bonjour, pour les augmentations devant /dos/manche/ pour la grandeur M augmenter 21 fois tous les 2 rangs et 11 fois tous les 4 rangs. Est-ce que je dois premièrement augmenter 21 fois et après augmenter 11 fois ???
30.07.2023 - 01:08DROPS Design ha risposto:
Bonjour Mme Girard, oui tout à fait, vous augmentez pour le dos et les devants d'abord 21 fois tous les 2 rangs puis 11 fois tous les 4 rangs, et, en même temps, vous augmentez pour les manches 19 fois tous les 2 rangs puis 12 fois tous les 4 rangs. Autrement dit, vous augmentez à un rythme différent pour le dos/les devants et pour les manches, et pendant quelques rangs vous augmenterez alternativement 4 mailles (dos et devants seulement tous les 2 rangs quand on doit commencer à augmenter tous les 4 rangs pour les manches) et 8 mailles (dos, devants et manches). Bon tricot!
31.07.2023 - 10:42
![]() Almut Dietzfelbinger ha scritto:
Almut Dietzfelbinger ha scritto:
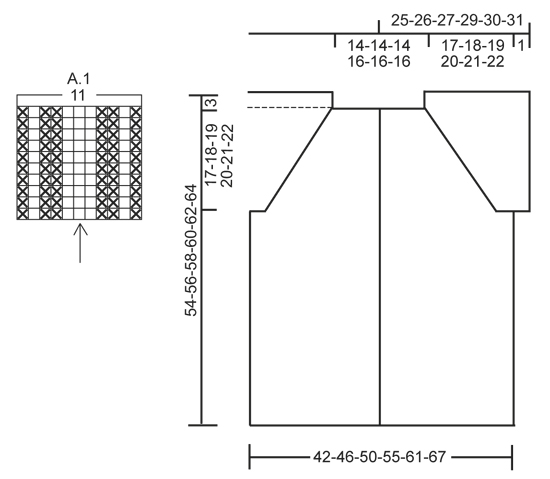
BITTE BEACHTEN: am Rumpfteil und an den Ärmeln wird in unterschiedlichem Rhythmus zugenommen: RUMPFTEIL: in jeder 2. R (d.h. in jeder Hin-R) insgesamt 13 x und dann in jeder 4. R (d.h. in jeder 2. Hin-R) insgesamt 14 x. ÄRMEL: in jeder 2. R insgesamt 17 x und dann in jeder 4. R insgesamt 12 x. Heisst das, dass ich an den A1 Übergängen zur Brust bzw. zum Rücken hin anders zunehme? Also kein gleichmässiges Raglan in den Reihen? Danke Euch
18.05.2023 - 10:59DROPS Design ha risposto:
Liebe Frau Dietzfelbinger, es bedeutet, daß man (je nach der Größe) abwechslungsweise 8 Maschen (= beim Rumpf und Ärmel) und 4 Maschen (= in jeder 2. Reihe beim Rumpf aber in jeder 4. Reihe bei den Ärmel), und dann wieder 8 Maschen (= beim Rumpf und Ärmel in jeder 4. Reihe) zunimmt. Die Zunahmen entstehen dann vor und oder nach den Markierungen. Viel Spaß beim stricken!
19.05.2023 - 08:06
![]() De Iorio Grazia ha scritto:
De Iorio Grazia ha scritto:
Buongiorno, vorrei sapere come regolarmi per gli aumenti raglan, nel senso , quali sono dei 4 segnapunti quelli riferiti alle maniche (forse quelli vicini al davanti?) a quali segnapunti corrispondono quelli del corpo (forse i due che delimitano il dietro) visto che gli aumenti sono diversi, grazie e buon lavoro
25.02.2023 - 13:03DROPS Design ha risposto:
Buongiorno Grazia, i 4 segnapunti delimitano il passaggio tra il davanti/dietro e le maniche, per cui deve aumentare in modo diverso all'interno o esterno dei segnapunti. Buon lavoro!
26.02.2023 - 14:56
![]() Claudia Biyik ha scritto:
Claudia Biyik ha scritto:
Ist das richtig das in jeder zweiten Reihe 8 Maschen zugenommen werden .
08.07.2022 - 22:27DROPS Design ha risposto:
Liebe Frau Biyik, also nicht immer, die Zunahmen werdern um einen unterschiedlichen Rythmus bei den Ärmeln und bei den Vorderteilen/Rückenteil gestrickt. Sie werden entweder 8 Maschen (Rumpfteil + Ärmel) zunehmen, und dann nur 4 Maschen (z.B. wenn mann für den Rumpfteil in jeder 4. Reihe aber immer noch in jeder 2. Reihen bei den Ärmeln zunimmt). Viel Spaß beim stricken!
11.07.2022 - 09:06
![]() Susanne ha scritto:
Susanne ha scritto:
Ich habe einige Fragen zu dem Übergang von der Raglanpasse zum Rumpfteil: wie verteile ich die Maschen vom Muster (A1)? Gehören sie 6/5 zu Vorderteil und Ärmel oder alle zum Vorderteil? Endet das Muster einfach? Und sind bei den 61 Maschen des Vorderteils die 5 Maschen der Blende enthalten? Vielen Dank!
29.01.2021 - 19:14DROPS Design ha risposto:
Liebe Susanne, in L bestehen alle de 61 Maschen für das Vorderteil aus die 5 BlendeMaschen+die 19 Maschen + die 36 Raglanzunahmen + die Masche mit der Markierung = 61. (Rückenteil = 38 M + 72 Zunahmen + die 2 Maschen mit der Markierung beidseitig = 110 Maschen ; Ärmel = 20 M + 64 Zunahmen = 84 M). Nach der Passe wird A.1 nicht mehr gestrickt. Viel Spaßbeim stricken!
01.02.2021 - 07:55
|
|||||||
Sweet Olivia Vest#sweetoliviavest |
|||||||
|
|
|||||||
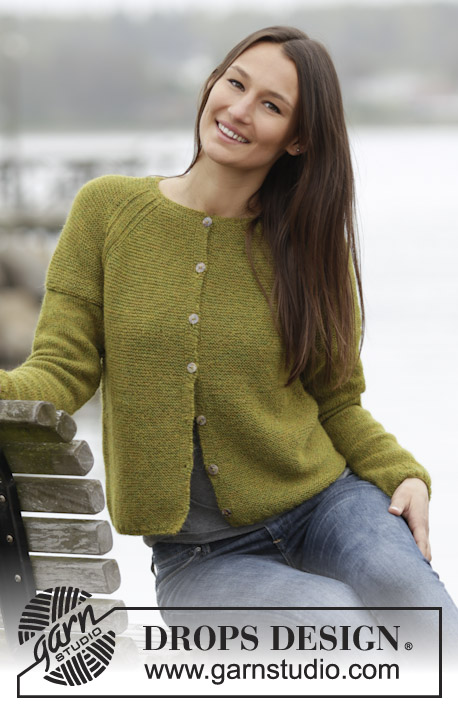
Gilet DROPS lavorato ai ferri a maglia legaccio con raglan, lavorato dall’alto in basso (top down) in "Alpaca". Taglie: S - XXXL.
DROPS 164-43 |
|||||||
|
M LEGACCIO (avanti e indietro): Lavorare tutti i f a dir. 1 “costa” a m legaccio = 2 f dir. M LEGACCIO (lavorato in tondo): * 1 giro dir e 1 giro rov *, ripetere *-*. 1 “costa” a m legaccio = 2 giri. MOTIVO: Vedere il diagramma A.1. Il diagramma mostra tutti i f del motivo visti dal diritto del lavoro. ASOLE: Diminuire per le asole sul bordo destro. 1 asola = lavorare fino a quando rimangono 3 m sul f (visto dal diritto del lavoro), fare 1 gettato, 2 m insieme a dir e lavorare a dir l’ultima m. Diminuire per le asole quando il lavoro misura: TAGLIA S: 2, 9, 16, 24, 32, 40 e 48 cm TAGLIA M: 2, 10, 18, 26, 34, 42 e 50 cm TAGLIA L: 2, 10, 18, 26, 34, 42 e 50 cm TAGLIA XL: 2, 10, 18, 26, 34, 43 e 52 cm TAGLIA XXL: 2, 10, 18, 27, 36, 45 e 54 cm TAGLIA XXXL: 2, 11, 20, 29, 38, 47 e 56 cm RAGLAN: Aumentare 1 m a ogni lato delle 11 m del raglan. Aumentare lavorando 2 m nella m prima e dopo le 11 m del raglan (= 2 aumenti per ogni A.1). Tutti gli aumenti vengono fatti dal diritto del lavoro. SUGGERIMENTO PER LE MISURE: A causa della m legaccio il capo risulterà più lungo quando indossato. Tutte le misure di lunghezza devono essere tenendo l’indumento appeso. ---------------------------------------------------------- GILET: Lavorato avanti e indietro sui f circolari dal centro davanti, lavorato dall’alto in basso (top down). SPRONE: Avviare 106-106-106-114-114-114 m (comprese 5 m per il bordo a ogni lato verso il centro davanti) con i f circolari n° 2,5 mm con Alpaca. Lavorare 3 coste a M LEGACCIO – leggere la spiegazione sopra. Passare ai f circolari n° 3 mm e lavorare 1 f dir dal diritto del lavoro e ALLO STESSO TEMPO distribuire 24 aumenti in modo uniforme - NOTA: Lavorare a rov le 5 m più esterne a ogni lato verso il centro davanti e non aumentare su queste m (= m del bordo) = 130-130-130-138-138-138 m sul f. Inserire 4 segnapunti nel lavoro come segue (dal rovescio del lavoro): 5 m rov (= m del bordo), 19-19-19-21-21-21 m dir (= davanti destro), inserire 1 segnapunti nella m successiva, 20 m dir (= manica), inserire 1 segnapunti nella m successiva, 38-38-38-42-42-42 m dir (= dietro), inserire 1 segnapunti nella m successiva, 20 m dir (= manica), inserire 1 segnapunti nella m successiva, 19-19-19-21-21-21 m dir (= davanti sinistro) e finire con 5 m rov (= m del bordo). LEGGERE TUTTA LA SEZIONE SEGUENTE PRIMA DI CONTINUARE: Poi lavorare a “coste” a m legaccio (1° f = diritto del lavoro) ma in ogni punto di passaggio tra il corpo e le maniche lavorare A.1 (= 11 m - NOTA: La m con il segnapunti deve combaciare con la m con la freccia nel diagramma), lavorare a rov le 5 del bordo a ogni lato verso il centro davanti su ogni f fino alla fine del lavoro. FARE ATTENZIONE ALLA TENSIONE DEL LAVORO! E ricordarsi di diminuire per le ASOLE sul bordo destro – leggere la spiegazione sopra. ALLO STESSO TEMPO sul 1° f dal diritto del lavoro aumentare per il RAGLAN – leggere la spiegazione sopra. NOTA: Aumentare in modo diverso sul corpo e sulle maniche: CORPO: Aumentare a f alterni (cioè su ogni f dal diritto del lavoro) per un totale di 13-21-26-34-42-53 volte e poi ogni 4 f (cioè a f alterni dal diritto del lavoro) per un totale di 14-11-10-7-4-0 volte. MANICA: aumentare a f alterni per un totale di 17-19-18-20-18-21 volte, e ogni 4 f per un totale di 12-12-14-14-16-16 volte. Alla fine di tutti gli aumenti per il raglan ci sono 354-382-402-438-458-498 m sul f e il lavoro misura circa 20-21-22-23-24-25 cm dalla spalla. Lavorare il f successivo come segue dal rovescio del lavoro: lavorare 52-57-61-68-73-80 m (= davanti destro), trasferire le 78-82-84-88-88-94 m successive su un fermamaglie (= manica), avviare 6-6-8-8-10-10 nuove m (= sotto manica), lavorare 94-104-112-126-136-150 m (= dietro), trasferire le 78-82-84-88-88-94 m successive su un fermamaglie (= manica), avviare 6-6-8-8-10-10 m (= sotto manica), lavorare le 52-57-61-68-73-80 m rimaste (= davanti sinistro). CORPO: = 210-230-250-278-302-330 m. Continuare a lavorare a m legaccio avanti e indietro e lavorare a rov le m del bordo – ricordarsi delle asole sul bordo destro. Quando il lavoro misura 33-34-35-36-37-38 cm, misurati da dove sono state divise le maniche sotto le manica (o la lunghezza desiderata) – LEGGERE IL SUGGERIMENTO PER LE MISURE, lavorare 1 f rov dal rovescio del lavoro e allo stesso tempo distribuire 2 aumenti in modo uniforme = 212-232-252-280-304-332 m sul f. Passare ai f circolari n° 2,5 mm e lavorare 3 f a coste (= 2 m dir/2 m rov) con 5 m per il bordo a m legaccio e lavorare 2 m dir a ogni lato verso il centro davanti (visto dal diritto del lavoro). Poi intrecciare le m SENZA STRINGERE con dir su dir e rov su rov. Tutto il gilet misura circa 54-56-58-60-62-64 cm dalla spalla. MANICA: Lavorata in tondo con i f a doppia punta. Riportare le 78-82-84-88-88-94 m dal fermamaglie a un lato del lavoro sui f a doppia punta n° 3 mm e inoltre avviare 6-6-8-8-10-10 nuove m al centro sotto la manica = 84-88-92-96-98-104 m. Lavorare 2 coste a M LEGACCIO in tondo – leggere la spiegazione sopra (assicurarsi di continuare secondo lo sprone). Passare ai f a doppia punta n° 2,5 mm e lavorare 1 giro dir. Poi lavorare 4 giri a coste = 2 m dir/2 m rov. Poi intrecciare SENZA STRINGERE con dir su dir e rov su rov. Ripetere attorno all’altra manica. CONFEZIONE: Cucire le aperture sotto le maniche. Attaccare i bottoni sul bordo sinistro. |
|||||||
Spiegazioni del diagramma |
|||||||
|
|||||||
 |
|||||||
Avete terminato questo modello?Allora taggate le vostre foto con #dropspattern #sweetoliviavest o inviatele alla #dropsfan gallery. Avete bisogno di aiuto con questo modello?Troverete 20 video tutorial, una sezione per i commenti/domande e molto altro guardando il modello su www.garnstudio.com © 1982-2026 DROPS Design A/S. Ci riserviamo tutti i diritti. Questo documento, compreso tutte le sue sotto-sezioni, è protetto dalle leggi sul copyright. Potete leggere quello che potete fare con i nostri modelli alla fine di ogni modello sul nostro sito. |
|||||||


Con oltre 40 anni di esperienza nel design di modelli di maglia e uncinetto, DROPS Design offre la più estesa collezione di modelli gratuiti su internet - tradotti in 17 lingue. Ad oggi vi possiamo fornire 324 cataloghi e 12290 modelli - 9561 dei quali sono tradotti in Italiano.
Ci stiamo impegnando molto per darvi il meglio che vi possiamo offrire in termini di maglia e uncinetto, ispirazioni e consigli così come filati di grande qualità ad un prezzo incredibile! Volete utilizzare i nostri modelli per qualcosa d'altro oltre al vostro uso personale? Potete leggere tutto ciò che è consentito nel testo sul Copyright in basso su tutte le pagine dei nostri modelli. Buon lavoro!
Lasciare un commento sul modello DROPS 164-43
Noi saremmo felici di ricevere i tuoi commenti e opinioni su questo modello!
Se vuoi fare una domanda, fai per favore attenzione a selezionare la categoria corretta nella casella qui sotto per velocizzare il processo di risposta. I campi richiesti sono indicati da *.