
Categorie popolari
State cercando un filato?


Commenti / Domande (174)
![]() Christel Hanson ha scritto:
Christel Hanson ha scritto:
Hej! Första frågan, kommer säkert fler… Vill inte göra fel från början… Ska de 5 kantmaskorna i varje sida stickas aviga från 1:a varvet eller är det först när jag har ökat de 24 m som jag börjar sticka de de 5 yttersta aviga, alltså ska knappkanten vara slätstickning?
01.02.2024 - 16:33DROPS Design ha risposto:
Hei Christel. Legg opp og deretter strikker du 6 pinner RÄTST (= rett på alle pinnene). Deretter øker du 24 masker og fra nå av skal stolpe maskene strikkes kun vrang (aviga), både fra retten og fra vrangen til ferdig mål. mvh DROPS design
12.02.2024 - 10:00
![]() Ellen Røsjø ha scritto:
Ellen Røsjø ha scritto:
Hvor mange nøster går med til denne jakka? Kan ikke se det står noe sted...
29.01.2024 - 14:08DROPS Design ha risposto:
Hei Ellen, Drops Alpaca er i 50 g nøster. Antall er avhengig av størrelsen du strikker men, som eksempel, hvis du strikker størrelse S trenger du 350 g som er 7 nøster. God fornøyelse!
30.01.2024 - 06:46
![]() Anette Pettersson ha scritto:
Anette Pettersson ha scritto:
Hej! Är det någon som stickat denna kofta med Drops Flora som kan vara ett alternativ garn? Kan man även lägga till kid silk garn och använda detta mönster?
23.01.2024 - 09:38DROPS Design ha risposto:
Hej Anette. Det går bra att använda Flora till detta mönster och du kan även lägga till en tråd kidsilk så länge du får stickfastheten att stämma. Mvh DROPS Design
24.01.2024 - 14:23
![]() Holly Bernstein ha scritto:
Holly Bernstein ha scritto:
I have four extra stitches after doing the first set of markers Band 5 K 19 Marker K 20 Marker K 38 Marker K 20 Marker K 19 Band 5 Totals 126 stitches
19.01.2024 - 19:06
![]() Annamaria ha scritto:
Annamaria ha scritto:
Salve credo che sulla spiegazione ci sia un errore perché le maglie non combaciano. La spiegazione dice di avviare 106 m e poi aggiungere 24 aumenti quindi 130 m in tutto, nel momento di mettere i marker da 5m per bordo dx+ 19m per il davanti dx+ 20 ma per la manica+ 38m per il dietro+20m per l'altra manica+ 19m per il davanti sx e 5m per l'altro bordo che in tutto fanno 126m per cui restano fuori 4m mi spiegate come mai??? Grazie....
26.11.2023 - 18:34DROPS Design ha risposto:
Buonasera Annamaria, ha inserito i segnapunti NELLE maglie come indicato e non TRA le maglie? le 4 maglie che mancano sono le maglie con i segnapunti. Buon lavoro!
26.11.2023 - 23:13
![]() Greetje Van Hulst ha scritto:
Greetje Van Hulst ha scritto:
Dag Greetje, Heb je de markeerders in de steken geplaatst en niet tussen 2 steken? Mogelijk verklaart dit het verschil van 4 steken...? Antwoord: 18.09.2023 kl. 20:20 Ik heb ze er tussen geplaatst: (5 steken,markeerder,21 steken,markeerder, 20 steken, markeerder, 42 steken, markeerder, 20 steken, markeerder, 21 steken, markeerder, 5 steken Dat zijn er nog steeds 134
18.09.2023 - 20:39DROPS Design ha risposto:
Dag Greetje,
Heb je de markeerders in de steken geplaatst en niet tussen 2 steken? Mogelijk verklaart dit het verschil van 4 steken...?
05.10.2023 - 06:24
![]() Greetje Van Hulst ha scritto:
Greetje Van Hulst ha scritto:
In het patroon begin je de pas na het meerderen met 138 steken. Als je de markeerders plaatst volgens de aanwijzingen kom je op 134 steken (5+21+20+42+20+21+5= 134). Waar laat ik de overgebleven 4 steken ?
17.09.2023 - 21:29DROPS Design ha risposto:
Dag Greetje,
Heb je de markeerders in de steken geplaatst en niet tussen 2 steken? Mogelijk verklaart dit het verschil van 4 steken...?
18.09.2023 - 20:20
![]() Beatrix Windolph-Leicht ha scritto:
Beatrix Windolph-Leicht ha scritto:
Laut Anleitung erfolgt Zunahme an Rumpf und Ärmel im unterschiedlichen Rhythmus. Aber die Zunahme in jeder 4. Reihe ist bei Größe M ab Rumpf (21. Zunahme ) und Ärmel (19. Zunahme +4 Reihen, also dann gleiche Reihe wie Rumpf) identisch. Ist das korrekt?
18.08.2023 - 17:54DROPS Design ha risposto:
Liebe Frau Windolph-Leicht, in M wird es beim Rumpf in jeder 2. Reihe 21 Mal dann in jeder 4. Reihe 11 Mal zugenommen; und gleichzeitig bei den Ärmeln in jeder 2. Reihe 19 Mal dann in jeder 4. Reihe 12 Mal zugenommen, dh es wird entweder 8 Maschen (Rumpf und Ärmel) oder nur 4 Maschen (wenn man in jeder 2. Reihe noch beim Rumpf zunimmt aber in jeder 4. Reihe bei den Ärmeln zunehmen soll) zunehmen. Viel Spaß beim stricken!
21.08.2023 - 08:37
![]() Susanne ha scritto:
Susanne ha scritto:
Ich habe diese Jacke inzwischen 8 x gestrickt- in verschiedenen Größe und Farben- und somit meine lieben Freundinnen , Tochter und Mutter beglückt, da meine eigene Jacke stets bewundert wurde. Ein herrliches Stück und immer dabei! Besonders liebe ich das Federgewicht , womit diese ein täglicher Begleiter ist. Danke für die Strickanleitung und die wundervolle Wolle!
30.05.2023 - 08:47
![]() Janneke Van Gaal ha scritto:
Janneke Van Gaal ha scritto:
Een vraagje over de kleur: is het 7233 geel/groen of 7238 donker olijfgroen? Alvast dank!
18.04.2023 - 13:38
|
|||||||
Sweet Olivia Cardigan#sweetoliviacardigan |
|||||||
|
|
|||||||
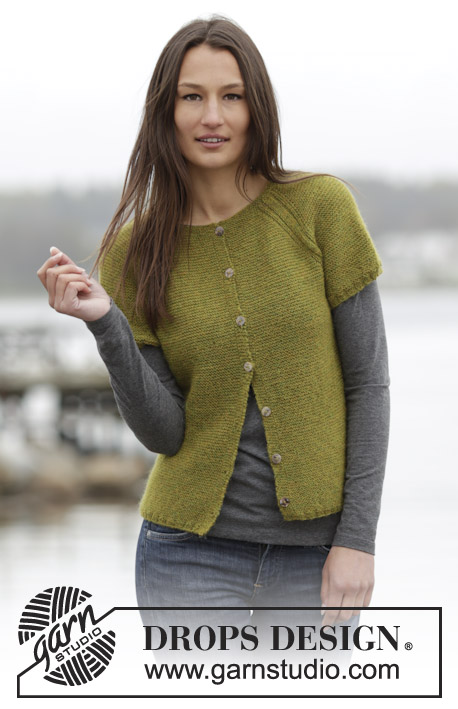
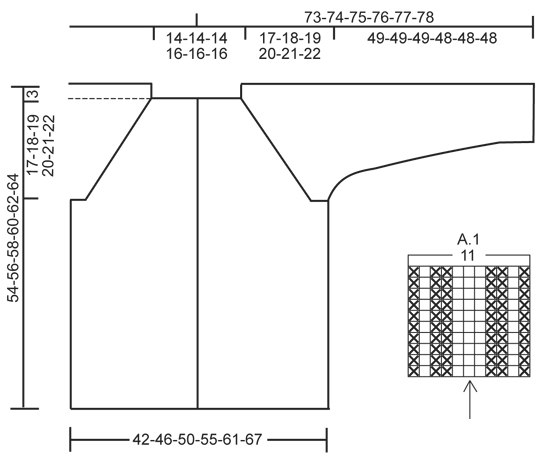
Cardigan DROPS lavorato ai ferri a maglia legaccio con raglan, lavorato dall’alto in basso (top down) in "Alpaca". Taglie: S - XXXL.
DROPS 164-42 |
|||||||
|
M LEGACCIO (avanti e indietro): Lavorare tutti i f a dir. 1 "costa" a m legaccio = 2 f dir. MOTIVO: Vedere il diagramma A.1. Il diagramma mostra tutti i f del motivo visti dal diritto del lavoro. ASOLE: Diminuire per le asole sul bordo destro. 1 asola = lavorare fino a quando rimangono 3 m sul f (visto dal diritto del lavoro), fare 1 gettato, 2 m insieme a dir e lavorare a dir l’ultima m. Diminuire per le asole quando il lavoro misura: TAGLIA S: 2, 9, 16, 24, 32, 40 e 48 cm TAGLIA M: 2, 10, 18, 26, 34, 42 e 50 cm TAGLIA L: 2, 10, 18, 26, 34, 42 e 50 cm TAGLIA XL: 2, 10, 18, 26, 34, 43 e 52 cm TAGLIA XXL: 2, 10, 18, 27, 36, 45 e 54 cm TAGLIA XXXL: 2, 11, 20, 29, 38, 47 e 56 cm RAGLAN: Aumentare 1 m a ogni lato delle 11 m del raglan. Aumentare lavorando 2 m nella m prima e dopo le 11 m del raglan (= 2 aumenti per ogni A.1). Tutti gli aumenti vengono fatti dal diritto del lavoro. SUGGERIMENTO PER LE MISURE: A causa della m legaccio il capo risulterà più lungo quando indossato. Tutte le misure di lunghezza devono essere tenendo l’indumento appeso. ---------------------------------------------------------- CARDIGAN: Lavorato avanti e indietro sui f circolari dal centro davanti, lavorato dall’alto in basso (top down). SPRONE: Avviare 106-106-106-114-114-114 m (comprese 5 m per il bordo a ogni lato verso il centro davanti) con i f circolari n° 2,5 mm con Alpaca. Lavorare 3 coste a M LEGACCIO – leggere la spiegazione sopra. Passare ai f circolari n° 3 mm e lavorare 1 f dir dal diritto del lavoro e ALLO STESSO TEMPO distribuire 24 aumenti in modo uniforme - NOTA: Lavorare a rov le 5 m più esterne a ogni lato verso il centro davanti e non aumentare su queste m (= m del bordo) = 130-130-130-138-138-138 m sul f. Inserire 4 segnapunti nel lavoro come segue (dal rovescio del lavoro): 5 m rov (= m del bordo), 19-19-19-21-21-21 m dir (= davanti destro), inserire 1 segnapunti nella m successiva, 20 m dir (= manica), inserire 1 segnapunti nella m successiva, 38-38-38-42-42-42 m dir (= dietro), inserire 1 segnapunti nella m successiva, 20 m dir (= manica), inserire 1 segnapunti nella m successiva, 19-19-19-21-21-21 m dir (= davanti sinistro) e finire con 5 m rov (= m del bordo). LEGGERE TUTTA LA SEZIONE SEGUENTE PRIMA DI CONTINUARE: Poi lavorare a "coste" a m legaccio (1° f = diritto del lavoro) ma in ogni punto di passaggio tra il corpo e le maniche lavorare A.1 (= 11 m - NOTA: La m con il segnapunti deve combaciare con la m con la freccia nel diagramma), lavorare a rov le 5 del bordo a ogni lato verso il centro davanti su ogni f fino alla fine del lavoro. FARE ATTENZIONE ALLA TENSIONE DEL LAVORO! E ricordarsi di diminuire per le ASOLE sul bordo destro – leggere la spiegazione sopra. ALLO STESSO TEMPO sul 1° f dal diritto del lavoro aumentare per il RAGLAN – leggere la spiegazione sopra. NOTA: Aumentare in modo diverso sul corpo e sulle maniche: CORPO: Aumentare a f alterni (cioè su ogni f dal diritto del lavoro) per un totale di 13-21-26-34-42-53 volte e poi ogni 4 f (cioè a f alterni dal diritto del lavoro) per un totale di 14-11-10-7-4-0 volte. MANICA: aumentare a f alterni per un totale di 17-19-18-20-18-21 volte, e ogni 4 f per un totale di 12-12-14-14-16-16 volte. Alla fine di tutti gli aumenti per il raglan ci sono 354-382-402-438-458-498 m sul f e il lavoro misura circa 20-21-22-23-24-25 cm dalla spalla. Lavorare il f successivo come segue dal rovescio del lavoro: lavorare 52-57-61-68-73-80 m (= davanti destro), trasferire le 78-82-84-88-88-94 m successive su un fermamaglie (= manica), avviare 6-6-8-8-10-10 nuove m (= sotto manica), lavorare 94-104-112-126-136-150 m (= dietro), trasferire le 78-82-84-88-88-94 m successive su un fermamaglie (= manica), avviare 6-6-8-8-10-10 m (= sotto manica), lavorare le 52-57-61-68-73-80 m rimaste (= davanti sinistro). CORPO: = 210-230-250-278-302-330 m. Continuare a lavorare a m legaccio avanti e indietro e lavorare a rov le m del bordo – ricordarsi delle asole sul bordo destro. Quando il lavoro misura 33-34-35-36-37-38 cm, misurati da dove sono state divise le maniche sotto le manica (o la lunghezza desiderata) – LEGGERE IL SUGGERIMENTO PER LE MISURE, lavorare 1 f rov dal rovescio del lavoro e allo stesso tempo distribuire 2 aumenti in modo uniforme = 212-232-252-280-304-332 m sul f. Passare ai f circolari n° 2,5 mm e lavorare 3 f a coste (= 2 m dir/2 m rov) con 5 m per il bordo a m legaccio e lavorare 2 m dir a ogni lato verso il centro davanti (visto dal diritto del lavoro). Poi intrecciare le m SENZA STRINGERE con dir su dir e rov su rov. Tutto il cardigan misura circa 54-56-58-60-62-64 cm dalla spalla. MANICA: Lavorata in tondo con i f a doppia punta. Riportare le 78-82-84-88-88-94 m dal fermamaglie a un lato del lavoro sui f a doppia punta n° 3 mm e inoltre avviare 6-6-8-8-10-10 nuove m al centro sotto la manica = 84-88-92-96-98-104 m. Inserire 1 segnapunti – ORA MISURARE IL LAVORO DA QUI. Lavorare a m rasata in tondo. ALLO STESSO TEMPO dopo 3 giri diminuire 2 m al centro sotto la manica. Ripetere le diminuzioni ogni 4 giri 4-4-4-5-5-5 volte in totale e poi ogni 4½-3½-3-3-3-2 cm 9-11-12-13-13-16 volte in totale = 58-58-60-60-62-62 m. Quando le maniche misurano 48-48-48-47-47-47 cm (o alla lunghezza desiderata), lavorare 1 giro dir e ALLO STESSO TEMPO distribuire 2-2-4-0-2-2 diminuzioni in modo uniforme = 56-56-56-60-60-60 m sul f. Lavorare a m 3 giri a coste (= 2 m dir/2 m rov). Poi intrecciare SENZA STRINGERE con dir su dir e rov su rov. Lavorare l’altra manica nello stesso modo. CONFEZIONE: Cucire le aperture sotto le maniche. Attaccare i bottoni sul bordo sinistro. |
|||||||
Spiegazioni del diagramma |
|||||||
|
|||||||
 |
|||||||
Avete terminato questo modello?Allora taggate le vostre foto con #dropspattern #sweetoliviacardigan o inviatele alla #dropsfan gallery. Avete bisogno di aiuto con questo modello?Troverete 21 video tutorial, una sezione per i commenti/domande e molto altro guardando il modello su www.garnstudio.com © 1982-2026 DROPS Design A/S. Ci riserviamo tutti i diritti. Questo documento, compreso tutte le sue sotto-sezioni, è protetto dalle leggi sul copyright. Potete leggere quello che potete fare con i nostri modelli alla fine di ogni modello sul nostro sito. |
|||||||


Con oltre 40 anni di esperienza nel design di modelli di maglia e uncinetto, DROPS Design offre la più estesa collezione di modelli gratuiti su internet - tradotti in 17 lingue. Ad oggi vi possiamo fornire 324 cataloghi e 12290 modelli - 9561 dei quali sono tradotti in Italiano.
Ci stiamo impegnando molto per darvi il meglio che vi possiamo offrire in termini di maglia e uncinetto, ispirazioni e consigli così come filati di grande qualità ad un prezzo incredibile! Volete utilizzare i nostri modelli per qualcosa d'altro oltre al vostro uso personale? Potete leggere tutto ciò che è consentito nel testo sul Copyright in basso su tutte le pagine dei nostri modelli. Buon lavoro!
Lasciare un commento sul modello DROPS 164-42
Noi saremmo felici di ricevere i tuoi commenti e opinioni su questo modello!
Se vuoi fare una domanda, fai per favore attenzione a selezionare la categoria corretta nella casella qui sotto per velocizzare il processo di risposta. I campi richiesti sono indicati da *.