
Categorie popolari
State cercando un filato?


Commenti / Domande (174)
![]() Sally Foster ha scritto:
Sally Foster ha scritto:
When you switch to 2.5mm and work 3 rows in rib (K2/P2) with band sts in garter st and 2 K in each side mid front, what does the last instruction mean, 2K in each side mid front?
27.04.2026 - 20:01DROPS Design ha risposto:
Hi Sally, The 2 knitted stitches (purled from the wrong side) are after the first band and before the second band (7 stitches at each end of the row not worked in rib). Regards, Drops Team.
28.04.2026 - 05:38
![]() Lene Johansen ha scritto:
Lene Johansen ha scritto:
Maskeantallet, når man sætter de første markører, passer ikke. Man har (str M) 130 masker og inddeler arbejdet i 5+19+20+38+20+19+5 = 126 masker. Altså har man 4 i overskud ?
14.04.2026 - 18:38DROPS Design ha risposto:
Hej Lene, har du talt de 4 masker med som du sætter markørerne i :)
15.04.2026 - 07:43
![]() Gina ha scritto:
Gina ha scritto:
Hej! Jag ska börja med ärmen och undrar om man verkligen ska maska av efter tre varv och sedan vidare allt eftersom ärmen stickas, ska det inte bara minskas genom att sticka ihop två maskor på vardera sidan om mittmaskan?
02.04.2026 - 11:32DROPS Design ha risposto:
Hej Gina, jo du minsker 2 masker under ærmet på hver 4 omgang :)
09.04.2026 - 12:13
![]() Freitag ha scritto:
Freitag ha scritto:
Je tricote le modèle Drops no z-713 A la fin des augmentations du raglan, je dois augmenter 6 m (sous la manche) où se trouve les 11 m. Du dessin. Je suis un peu perdue Merci pour votre aide
13.01.2026 - 18:01DROPS Design ha risposto:
Bonjour Mme Freitag, lors de la division de l'ouvrage, vous montez ces 6 mailles pour remplacer les mailles des manches, ces 6 mailles sont sur les côtés, retrouvez ici, en photos, comment on divise pour les manches, à partir de la photo 9. Bon tricot!
14.01.2026 - 10:28
![]() Inger M Røed ha scritto:
Inger M Røed ha scritto:
Hei! Lurer på om det bare er 3 omganger med 2rett/2vrang som avslutning nede? Ikke 3 cm som ville vært mer naturlig? Synes det virker veldig lite!
26.11.2025 - 19:21DROPS Design ha risposto:
Hei Inger, Denne jakka har små kanter slik som beskrevet. Men selvfølgelig, kan du strikke kantene som du ønsker sjøl. Hilsen Drops Team.
27.11.2025 - 06:52
![]() Åsa ha scritto:
Åsa ha scritto:
”FRAM- OCH BAKST: Öka på vartannat v (dvs på varje v från rätsidan) totalt 13-21-26-34-42-53 ggr och sedan på vart 4:e v (dvs på vartannat v från rätsidan) totalt 14-11-10-7-4-0 ggr. ÄRM: Öka på vartannat v totalt 17-19-18-20-18-21 ggr och sedan på vart 4:e v totalt 12-12-14-14-16-16 ggr.” Ändra beskrivningen: byt plats på dessa meningar. Logiskt att beskriva ärmar först, eftersom det är lätt att missa ändring i ökning på dem. De ska ju göras färre gånger.
18.11.2025 - 10:46
![]() Wenche Gjelsten ha scritto:
Wenche Gjelsten ha scritto:
Det står at stolpene skal strikkes vrang. Betyr det at de fem maskene skal strikkes vrang samtidig som resten av bolen strikkes rett?
18.11.2025 - 07:25DROPS Design ha risposto:
Hej Wenche. Ja det stemmer. Bolen strikkes i riller frem og tilbake og stolpene i vrang. Mvh DROPS Design
19.11.2025 - 14:25
![]() Michaela ha scritto:
Michaela ha scritto:
- Die Raglanzunahme soll beidseits von A1 erfolgen - wie kann ich dann im Körper & Ärmel unterschiedlich zunehmen? - die Markierer werden in der Rückreihe gesetzt -> nächste Reihe = Hinreihe = Reihe 1 -> Raglanzunahme in jeder 2ten Reihe wäre die Rückreihe; nicht die Hinreihe.
01.11.2025 - 12:59DROPS Design ha risposto:
Liebe Michaela, die Zunahmen erfolgen immer bei einer Hinreihe, so für Vorderteile und Rückenteil nehmen Sie so zu: vor 1. A.1 (linkes Vorderteil), nach 2. A.1 (Anfang Rückenteil), vor 3. A.1 (Ende Rückenteil) und nach 4. A.1 (Anfang rechtes Vorderteil), für die Ärmel nehmen Sie so zu: nach 1. A.1 + vor 2. A.1 für den linken Ärmel und nach 3. A.1 + vor 4. A.1 für den rechten Ärmel. Viel Spaß beim Stricken!
18.11.2025 - 11:00
![]() Barbro ha scritto:
Barbro ha scritto:
Hej! Jag får inte ihop maskantalet. Om jag har 130 m innan jag börjar med raglan och ska öka först 26 ggr, sen 10 ggr så får jag det till 418 maskor inte 402. Jag ökar ju 8 maskor varje varv det ska ökas. 130 + 208 (26x8) + 80 (10x8) får jag till 418. Var i mönstret gör jag fel?
06.09.2025 - 11:18DROPS Design ha risposto:
Hej Barbro. Ökningarna till raglan på fram- och bakstycke är 4 stycken och ökning till raglan på ärm är 4 stycken. Så när du ökar på både fram- & bakstycke och ärmar så blir det 8 ökningar på ett varv. Ökningar på fram- och bakstycke blir alltså: (26x4)+(10x4) = 144, ökningarna på ärm blir alltså: (18x4)+(14x4)= 128. 130+144+128= 402 maskor. Mvh DROPS Design
09.09.2025 - 10:53
![]() Viviane ha scritto:
Viviane ha scritto:
Bonjour,je ne comprend pas ou arrive le raglan quand viens le temps de diviser l’ouvrage en 4 partis quand on a fait toute les augmentations , je fais la taille large je dois avoir 61 mailles pour le devant, avec ou sans le raglan ?ou est situer le raglan dans l’ouvrage? Est-il diviser entre le dos et le devant? Il ne se divise pas en 2 puisqu’il a 11 mailles, pouvez vous m’aider à comprendre
30.08.2025 - 17:15DROPS Design ha risposto:
Bonjour Viviane, vous devez avoir 61 mailles pour le devant, avec ou sans le raglan? - pas importe, divisez comme vous voyez dans les explications. La seule chose qui compte est le nombre de mailles exacte avant le division (402 dans votre cas). Bon tricot!
19.09.2025 - 11:13
|
|||||||
Sweet Olivia Cardigan#sweetoliviacardigan |
|||||||
|
|
|||||||
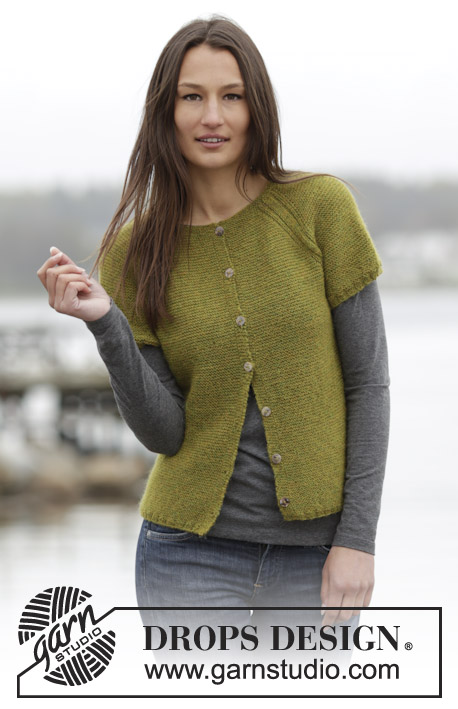
Cardigan DROPS lavorato ai ferri a maglia legaccio con raglan, lavorato dall’alto in basso (top down) in "Alpaca". Taglie: S - XXXL.
DROPS 164-42 |
|||||||
|
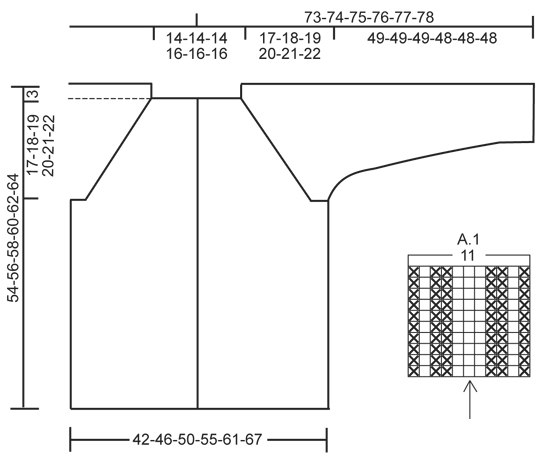
M LEGACCIO (avanti e indietro): Lavorare tutti i f a dir. 1 "costa" a m legaccio = 2 f dir. MOTIVO: Vedere il diagramma A.1. Il diagramma mostra tutti i f del motivo visti dal diritto del lavoro. ASOLE: Diminuire per le asole sul bordo destro. 1 asola = lavorare fino a quando rimangono 3 m sul f (visto dal diritto del lavoro), fare 1 gettato, 2 m insieme a dir e lavorare a dir l’ultima m. Diminuire per le asole quando il lavoro misura: TAGLIA S: 2, 9, 16, 24, 32, 40 e 48 cm TAGLIA M: 2, 10, 18, 26, 34, 42 e 50 cm TAGLIA L: 2, 10, 18, 26, 34, 42 e 50 cm TAGLIA XL: 2, 10, 18, 26, 34, 43 e 52 cm TAGLIA XXL: 2, 10, 18, 27, 36, 45 e 54 cm TAGLIA XXXL: 2, 11, 20, 29, 38, 47 e 56 cm RAGLAN: Aumentare 1 m a ogni lato delle 11 m del raglan. Aumentare lavorando 2 m nella m prima e dopo le 11 m del raglan (= 2 aumenti per ogni A.1). Tutti gli aumenti vengono fatti dal diritto del lavoro. SUGGERIMENTO PER LE MISURE: A causa della m legaccio il capo risulterà più lungo quando indossato. Tutte le misure di lunghezza devono essere tenendo l’indumento appeso. ---------------------------------------------------------- CARDIGAN: Lavorato avanti e indietro sui f circolari dal centro davanti, lavorato dall’alto in basso (top down). SPRONE: Avviare 106-106-106-114-114-114 m (comprese 5 m per il bordo a ogni lato verso il centro davanti) con i f circolari n° 2,5 mm con Alpaca. Lavorare 3 coste a M LEGACCIO – leggere la spiegazione sopra. Passare ai f circolari n° 3 mm e lavorare 1 f dir dal diritto del lavoro e ALLO STESSO TEMPO distribuire 24 aumenti in modo uniforme - NOTA: Lavorare a rov le 5 m più esterne a ogni lato verso il centro davanti e non aumentare su queste m (= m del bordo) = 130-130-130-138-138-138 m sul f. Inserire 4 segnapunti nel lavoro come segue (dal rovescio del lavoro): 5 m rov (= m del bordo), 19-19-19-21-21-21 m dir (= davanti destro), inserire 1 segnapunti nella m successiva, 20 m dir (= manica), inserire 1 segnapunti nella m successiva, 38-38-38-42-42-42 m dir (= dietro), inserire 1 segnapunti nella m successiva, 20 m dir (= manica), inserire 1 segnapunti nella m successiva, 19-19-19-21-21-21 m dir (= davanti sinistro) e finire con 5 m rov (= m del bordo). LEGGERE TUTTA LA SEZIONE SEGUENTE PRIMA DI CONTINUARE: Poi lavorare a "coste" a m legaccio (1° f = diritto del lavoro) ma in ogni punto di passaggio tra il corpo e le maniche lavorare A.1 (= 11 m - NOTA: La m con il segnapunti deve combaciare con la m con la freccia nel diagramma), lavorare a rov le 5 del bordo a ogni lato verso il centro davanti su ogni f fino alla fine del lavoro. FARE ATTENZIONE ALLA TENSIONE DEL LAVORO! E ricordarsi di diminuire per le ASOLE sul bordo destro – leggere la spiegazione sopra. ALLO STESSO TEMPO sul 1° f dal diritto del lavoro aumentare per il RAGLAN – leggere la spiegazione sopra. NOTA: Aumentare in modo diverso sul corpo e sulle maniche: CORPO: Aumentare a f alterni (cioè su ogni f dal diritto del lavoro) per un totale di 13-21-26-34-42-53 volte e poi ogni 4 f (cioè a f alterni dal diritto del lavoro) per un totale di 14-11-10-7-4-0 volte. MANICA: aumentare a f alterni per un totale di 17-19-18-20-18-21 volte, e ogni 4 f per un totale di 12-12-14-14-16-16 volte. Alla fine di tutti gli aumenti per il raglan ci sono 354-382-402-438-458-498 m sul f e il lavoro misura circa 20-21-22-23-24-25 cm dalla spalla. Lavorare il f successivo come segue dal rovescio del lavoro: lavorare 52-57-61-68-73-80 m (= davanti destro), trasferire le 78-82-84-88-88-94 m successive su un fermamaglie (= manica), avviare 6-6-8-8-10-10 nuove m (= sotto manica), lavorare 94-104-112-126-136-150 m (= dietro), trasferire le 78-82-84-88-88-94 m successive su un fermamaglie (= manica), avviare 6-6-8-8-10-10 m (= sotto manica), lavorare le 52-57-61-68-73-80 m rimaste (= davanti sinistro). CORPO: = 210-230-250-278-302-330 m. Continuare a lavorare a m legaccio avanti e indietro e lavorare a rov le m del bordo – ricordarsi delle asole sul bordo destro. Quando il lavoro misura 33-34-35-36-37-38 cm, misurati da dove sono state divise le maniche sotto le manica (o la lunghezza desiderata) – LEGGERE IL SUGGERIMENTO PER LE MISURE, lavorare 1 f rov dal rovescio del lavoro e allo stesso tempo distribuire 2 aumenti in modo uniforme = 212-232-252-280-304-332 m sul f. Passare ai f circolari n° 2,5 mm e lavorare 3 f a coste (= 2 m dir/2 m rov) con 5 m per il bordo a m legaccio e lavorare 2 m dir a ogni lato verso il centro davanti (visto dal diritto del lavoro). Poi intrecciare le m SENZA STRINGERE con dir su dir e rov su rov. Tutto il cardigan misura circa 54-56-58-60-62-64 cm dalla spalla. MANICA: Lavorata in tondo con i f a doppia punta. Riportare le 78-82-84-88-88-94 m dal fermamaglie a un lato del lavoro sui f a doppia punta n° 3 mm e inoltre avviare 6-6-8-8-10-10 nuove m al centro sotto la manica = 84-88-92-96-98-104 m. Inserire 1 segnapunti – ORA MISURARE IL LAVORO DA QUI. Lavorare a m rasata in tondo. ALLO STESSO TEMPO dopo 3 giri diminuire 2 m al centro sotto la manica. Ripetere le diminuzioni ogni 4 giri 4-4-4-5-5-5 volte in totale e poi ogni 4½-3½-3-3-3-2 cm 9-11-12-13-13-16 volte in totale = 58-58-60-60-62-62 m. Quando le maniche misurano 48-48-48-47-47-47 cm (o alla lunghezza desiderata), lavorare 1 giro dir e ALLO STESSO TEMPO distribuire 2-2-4-0-2-2 diminuzioni in modo uniforme = 56-56-56-60-60-60 m sul f. Lavorare a m 3 giri a coste (= 2 m dir/2 m rov). Poi intrecciare SENZA STRINGERE con dir su dir e rov su rov. Lavorare l’altra manica nello stesso modo. CONFEZIONE: Cucire le aperture sotto le maniche. Attaccare i bottoni sul bordo sinistro. |
|||||||
Spiegazioni del diagramma |
|||||||
|
|||||||
 |
|||||||
Avete terminato questo modello?Allora taggate le vostre foto con #dropspattern #sweetoliviacardigan o inviatele alla #dropsfan gallery. Avete bisogno di aiuto con questo modello?Troverete 21 video tutorial, una sezione per i commenti/domande e molto altro guardando il modello su www.garnstudio.com © 1982-2026 DROPS Design A/S. Ci riserviamo tutti i diritti. Questo documento, compreso tutte le sue sotto-sezioni, è protetto dalle leggi sul copyright. Potete leggere quello che potete fare con i nostri modelli alla fine di ogni modello sul nostro sito. |
|||||||


Con oltre 40 anni di esperienza nel design di modelli di maglia e uncinetto, DROPS Design offre la più estesa collezione di modelli gratuiti su internet - tradotti in 17 lingue. Ad oggi vi possiamo fornire 324 cataloghi e 12290 modelli - 9561 dei quali sono tradotti in Italiano.
Ci stiamo impegnando molto per darvi il meglio che vi possiamo offrire in termini di maglia e uncinetto, ispirazioni e consigli così come filati di grande qualità ad un prezzo incredibile! Volete utilizzare i nostri modelli per qualcosa d'altro oltre al vostro uso personale? Potete leggere tutto ciò che è consentito nel testo sul Copyright in basso su tutte le pagine dei nostri modelli. Buon lavoro!
Lasciare un commento sul modello DROPS 164-42
Noi saremmo felici di ricevere i tuoi commenti e opinioni su questo modello!
Se vuoi fare una domanda, fai per favore attenzione a selezionare la categoria corretta nella casella qui sotto per velocizzare il processo di risposta. I campi richiesti sono indicati da *.