
Categorie popolari
State cercando un filato?


Commenti / Domande (165)
![]() Eva ha scritto:
Eva ha scritto:
Nach der 5. Runde steht in der Anleitung die 4. und 5. Runde fortlaufend wiederholen - heißt das ich arbeite jede Runde wieder 7x oder arbeite ich bis ich am Ende Runde bin ( ich würde dann nämlich bei der 1. Wiederholung der 4. Runde 14x arbeiten). 2te Frage: in jeder Runde ein D-Stb +1 Lm mehr zunehmen - bedeutet das wirklich nur mit einer Farbe ein D-Stb+1Lm oder mit beiden Farben - also 2 DStb+2lm/Runde
24.01.2021 - 09:02DROPS Design ha risposto:
Liebe Eva, es wird wie zuvor gehäkelt: 1 Runde = 7 Mal mit jeder Wolle und gleichzeitig immer wie zuvor zunehmen, d.h. bei der 6. Runde (= wie 4. aber mit mehr Maschen zwischen Zunahmen): * je 1 D-Stb + 1 Lm in die 2 nächsten D-Stb, 1 D-Stb + 1 Lm + 1 D-Stb + 1 Lm in das nächste D-Stb *, von *-* insgesamt 7 x arb usw. Viel Spaß beim häkeln!
25.01.2021 - 09:42
![]() Eva ha scritto:
Eva ha scritto:
Hallo, ich würde gerne statt der 2 Farben - 3 verschiedene Farben verwenden - wie gehe ich da am besten vor ? danke und lg Eva
20.01.2021 - 16:42DROPS Design ha risposto:
Liebe Eva, leider können wir nicht jede Anleitung nach jeder Anfrage anpassen - vielleicht könnnen Sie mal jede Runde entweder Halb mit jeder Farbe hier, jeweils 1/3 mit jeder Farbe? hier zeigen wir mit 4 Farben. Am besten versuchen Sie mit einer Maschenprobe, wie Sie es machen können. Viel Spaß beim häkeln!
21.01.2021 - 07:32
![]() Petra ha scritto:
Petra ha scritto:
Hallo, ich habe die 4. Und 5. Runde wie in der Anleitung beschrieben weiter gehäkelt bis ich die 140 DStb habe. Die Maschenmakierer sind so jeweils gegenüberliegend. Jetzt kommen die Armausschnitte und ich verstehe nicht wie weiter. Ich fange also mit irgendeiner Farbe an und wann wechsel ich zu der anderen? Das steht da nicht. Oder muss jeder Schritt in der anderen Farbe gemacht werden? 20 DStb in Karisma und dann die LM mit Big Delight?
21.10.2020 - 21:57DROPS Design ha risposto:
Liebe Petra, bei der nächsten Runde, weiter wie zuvor mit dem Farbwechsel häkeln, aber keine Zunahmen bei dieser nächsten Runden arbeiten: die ersten 20 D-Stb mit 1 Lm wie zuvor, dann 32 Lm häkeln und die nächsten 20 Stb überspringen (= 1. Armloch), weiter wie zuvor bis 40 D-Stb vor der Ende der Runde bleiben, 32 Lm häkeln und die nächsten 20 Stb überpsringen (= 2. Armloch) und die Runde enden (= 20 Dstb mit 1 Lm dazwischen). Farbe/Garne wechseln Sie wie zuvor, die Hälfte der Runde muss - wie zuvor- mit je einer Farbe/einem Garn gehäkelt werden. Viel Spaß beim häkeln!
22.10.2020 - 10:22
![]() Kathy Tier ha scritto:
Kathy Tier ha scritto:
Hi. Lovely pattern. I just wanted to check, this uses a combination of an aran weight & DK yarn, as the yarns don't look a different weight in the photos. Also, you are using a washable yarn with a hand-wash yarn. Can you suggest an alternative mix that is all washable? Thanks.
28.09.2020 - 12:15DROPS Design ha risposto:
Dear Mrs Tier, this pattern is worked with 2 different kind of yarn to get the right result - we use here DROPS Big Delight to play with colours - if you like a superwash yarn group C you can use instead DROP Big Merino or 2 strands DROPS Fabel (to play with colours too), but remember that it will look different because fibers/yarns are different - read more about alternatives here - you can use the yarn converter to check the other suggested alternatives. Happy knitting!
28.09.2020 - 12:40
![]() Millicent ha scritto:
Millicent ha scritto:
Working on this one now, this is so pretty - still working on the circle, then to the sleeves. Can't wait to complete and wear, and then do the Circle Jacket. Lovely patterns. Thank you for the tutorials they really help me get started.
08.08.2020 - 03:51
![]() Kris ha scritto:
Kris ha scritto:
I am stuck in the section were we are chaining in for the sleeves. I have 112 tr from the section before.And no matter what I do I end up with extra 16. I can't figure out were they go reading the instructions. Leave it for the front. Turn and start back or continue? Help confused!!!
05.05.2020 - 00:46DROPS Design ha risposto:
Dear Kris, next round for armholes will be worked with the two yarns/colours as before but you won't increase on this round as you did before: Work 1 tr + 1 ch in each of the first 16tr, work 24 loose ch for armhole, skip the next 16 tr (this create a hole for armhole), work 1 tr + 1 ch in every tr until 32 tr remain on round, work 24 loose ch for armhole, skip the next 16 tr (2nd hole for 2nd armhole), work 1 tr + 1 ch in each of the last 16 tr. On next round, work as before with both yarns and increasing as explained for this round. Happy crocheting!
05.05.2020 - 11:28
![]() Jennifer ha scritto:
Jennifer ha scritto:
Bonjour Terminer le cercle ainsi: Continuer avec le fil de la même couleur que le dernier tour. Crocheter 1 DB dans chacune des 2 DB suivantes, 1 B dans chacune des 2 DB suivantes, 1 dB dans chacune des 2 DB suivantes, 1 ms dans la DB suivante, 1 mc dans la DB suivante, arrêter. .. Faut-il le faire a chaque cercle d\'augmentation après les emmanchures ou juste le tout dernier ? et cela sera-t-il placé devant ou derrière le gilet ? Merci
03.01.2020 - 21:36
![]() Clarice Merritt ha scritto:
Clarice Merritt ha scritto:
How to increase to size 5x size?
31.12.2019 - 05:03DROPS Design ha risposto:
Dear Mrs Merritt, to get a larger jacket you will have to adjust the number of stitches to your own size. Should you need any individual assistance, please contact the store where you bought the yarn, even per mail or telephone. Happy knitting!
31.12.2019 - 17:29
![]() Laura Robles ha scritto:
Laura Robles ha scritto:
1st. I'd like to thank you for the pattern. What I need to know is: on the sleeve decrease, am I to decrease 2 times every decrease round? What I mean is do I decrease in the middle of the sleeve then at the end again. Please help I'm not getting 32 tr after decreasing 1plus 6 times.
19.12.2019 - 03:04DROPS Design ha risposto:
Dear Mrs Robles, you should decrease 2 sts mid under sleeve, ie 1 st at the beg of the round + 1 st at the end of the round a total of 7 times = you should have 14 sts less after all decreases are worked. Happy crocheting!
19.12.2019 - 08:20
![]() Roussey ha scritto:
Roussey ha scritto:
Bonjour je ne comprend pas quand vous dîtes Crocheter comme les tours 4 et 5 mais à chaque tour, crocheter 1 DB + 1 ml de plus entre chaque augmentation = 14 DB + 14 ml augmentées tous les tours. Continuer jusqu'à ce que le cercle mesure 52-54-56-58-60-62 cm depuis le centre (= 104-108-112-116-120-124 cm de diamètre, ou taille souhaitée).je ne sais pas où sont les augmentations si elles sont à la fin du de chaque tour?
18.11.2019 - 08:18DROPS Design ha risposto:
Bonjour Mme Roussey, les augmentations vont se faire les unes au-dessus des autres, vous augmentez 14 double-brides par tour: au tour 6, vous allez crocheter: *1 DB, 1 ml dans les 3 DB suivantes, puis 1 augmentation (= 1 DB, 1 ml, 1 DB, 1 ml) dans la DB suivante*, et répéter de *-* (en changeant de laine comme avant). Au tour 7, vous crochèterez *1 DB, 1 ml dans les 4 m suivantes, 1 augmentation*, et ainsi de suite. Bon crochet!
18.11.2019 - 11:00
|
|
Gypsy Blue#gypsybluejacket |
|
 |
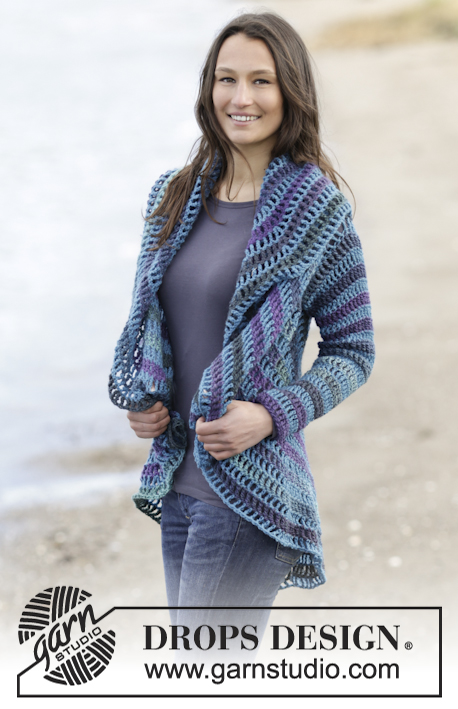 |
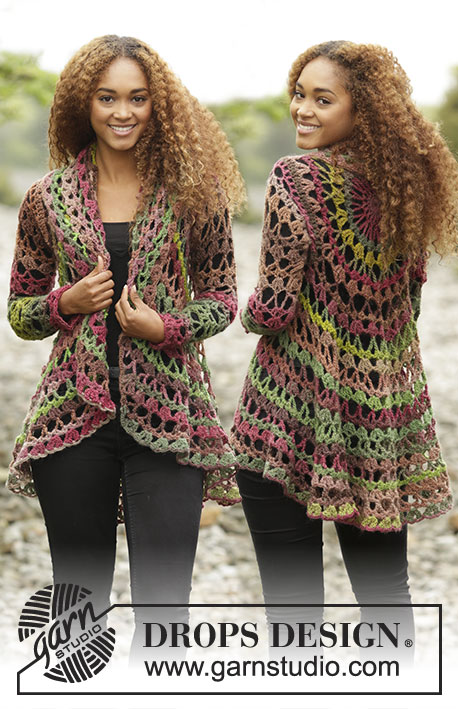
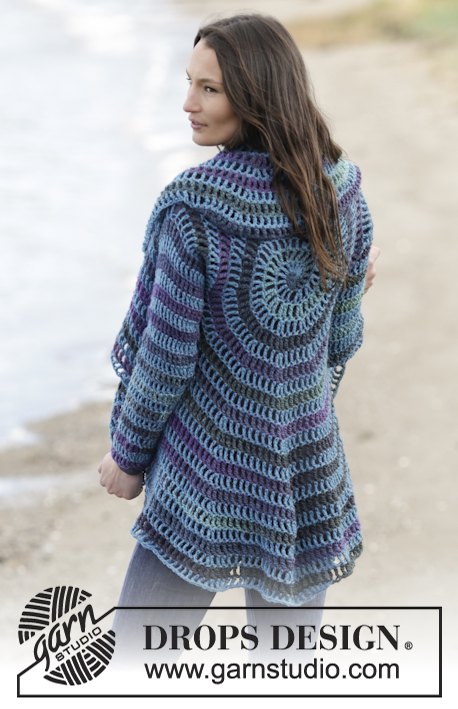
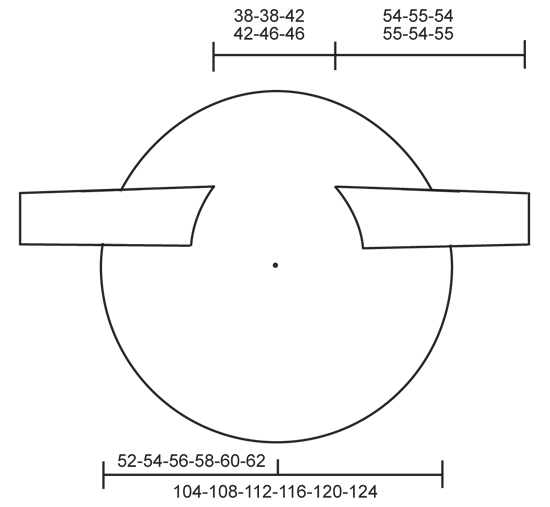
Cardigan DROPS lavorato a cerchio all’uncinetto in "Big Delight" e "Karisma". Taglie: S - XXXL.
DROPS 165-40 |
|
|
SUGGERIMENTO PER LE DIMINUZIONI: 2 m.a.d insieme a 1 m.a.d come segue: lavorare 1 m.a.d ma aspettare con l’ultimo gettato e far passare il filo attraverso, lavorare 1 m.a.d nella m successiva ma far passare l’ultimo gettato attraverso tutte e 3 le m sull’uncinetto. SUGGERIMENTO PER IL LAVORO: Sostituire la 1° m.a.d sul giro con 4 cat. Finire con 1 m.bss nella 4° cat dall’inizio del giro. ---------------------------------------------------------- CERCHIO: Quando si lavora in tondo, iniziare con questa tecnica per evitare un buco al centro (invece dell’anello di cat) usando Big Delight: tenere l’estremità del filo e avvolgerla 1 volta attorno all’indice per fare un occhiello. Tenere l’occhiello con il pollice e medio sinistro, mettere il filo sul indice sinistro. Inserire l’uncinetto nell’occhiello, fare un gettato e far passare il filo attraverso l’occhiello, lavorare 1 cat, lavorare attorno all’occhiello come segue: GIRO 1: 1 cat, 1 m.b, 2 m.m.a, 2 m.a, 2 m.a.d. Inserire 1 segnapunti nell’occhiello sull’ultima m.a.d in modo che non si disfi e mettere il filo da parte. Passare a Karisma e lavorare come segue nell’occhiello: 1 m.b, 2 m.m.a, 2 m.a, 2 m.a.d. Inserire un segnapunti all’inizio del giro. Far passare l’estremità del filo per stringere l’occhiello. Affrancare l’estremità sul dietro. GIRO 2: (Continuare con Karisma). Lavorare 1 m.a.d + 1 cat in ognuna delle prime 7 m (= 1 m.b, 2 m.m.a, 2 m.a e 2 m.a.d lavorate con Big Delight). Inserire 1 segnapunti nell’occhiello sull’ultima m.a.d in modo che non si disfi e mettere il filo da parte. Continuare con Big Delight. Lavorare 1 m.a.d + 1 cat in ognuna delle 7 m successive (= 1 m.b, 2 m.m.a, 2 m.a e 2 m.a.d lavorate con Karisma) = 14 m.a.d + 14 cat. GIRO 3: (Continuare con Big Delight.) lavorare 1 m.a.d + 1 cat + 1 m.a.d + 1 cat in ognuna delle prime 7 m.a.d, inserire 1 segnapunti nell’occhiello sull’ultima m.a.d in modo che non si disfi e mettere il filo da parte. Continuare con Karisma, lavorare 1 m.a.d + 1 cat + 1 m.a.d + 1 cat in ognuna delle 7 m.a.d successive = 28 m.a.d + 28 cat. GIRO 4: (Continuare con Karisma). * lavorare 1 m.a.d + 1 cat nella m.a.d successiva, lavorare 1 m.a.d + 1 cat + 1 m.a.d + 1 cat nella m.a.d successiva *, ripetere *-* 7 volte. Inserire un segnapunti nell’occhiello sull’ultima m.a.d in modo che non si disfi e mettere il filo da parte. Continuare con Big Delight. * lavorare 1 m.a.d + 1 cat nella m.a.d successiva, lavorare 1 m.a.d + 1 cat + 1 m.a.d + 1 cat nella m.a.d successiva *, ripetere *-* 7 volte = 42 m.a.d + 42 cat. GIRO 5: (Continuare con Big Delight.) * lavorare 1 m.a.d + 1 cat in ognuna delle 2 m.a.d successive, lavorare 1 m.a.d + 1 cat + 1 m.a.d + 1 cat nella m.a.d successiva *, ripetere *-* 7 volte. Inserire 1 segnapunti nell’occhiello sull’ultima m.a.d in modo che non si disfi e mettere il filo da parte. Continuare con Karisma. * Lavorare 1 m.a.d + 1 cat in ognuna delle 2 m.a.d successive, lavorare 1 m.a.d + 1 cat + 1 m.a.d + 1 cat nella m.a.d successiva *, ripetere *-* 7 volte = 56 m.a.d + 56 cat. Ripetere il 4° e 5à giro ma su ogni giro lavorare 1 m.a.d + 1 cat in piu tra ogni aumento = 14 m.a.d + 14 cat aumentate su ogni giro. Continuare fino a quando ci sono 112-112-126-126-140-140 m.a.d + 112-112-126-126-140-140 cat sul giro, il cerchio misura circa 20-20-23-23-25-25 cm dal centro (= 40-40-46-46-50-50 cm di diametro). Lavorare il giro successivo come segue: (Continuare con la spirale e il cambio di colore ma senza aumenti). Lavorare 1 m.a.d + 1 cat in ognuna delle prime 16-16-18-18-20-20 m.a.d, lavorare 24-24-28-28-32-32 cat lasse per lo scalfo, saltare le 16-16-18-18-20-20 m.a.d successive, lavorare 1 m.a.d + 1 cat in ogni m.a.d fino a quando rimangono 32-32-36-36-40-40 m.a.d sul giro, lavorare 24-24-28-28-32-32 cat lasse per lo scalfo, saltare le 16-16-18-18-20-20 m.a.d successive, lavorare 1 m.a.d + 1 cat in ognuna delle ultime 16-16-18-18-20-20 m.a.d. Lavorare il giro successivo come segue: * lavorare 1 m.a.d + 1 cat in ognuna delle 7-7-8-8-9-9 m.a.d successive, lavorare 1 m.a.d + 1 cat + 1 m.a.d + 1 cat nella m.a.d successiva *, ripetere *-* 2 volte, lavorare 18-18-20-20-22-22 m.a.d con 1 cat tra ogni arco di cat, * lavorare 1 m.a.d + 1 cat in ognuna delle 7-7-8-8-9-9 m.a.d successive, lavorare 1 m.a.d + 1 cat + 1 m.a.d + 1 cat nella m.a.d successiva *, ripetere *-* 3 volte. Inserire 1 segnapunti nell’arco sull’ultima m.a.d in modo che non si disfi e mettere il filo da parte. Cambiare filato. * Lavorare 1 m.a.d + 1 cat in ognuna delle 7-7-8-8-9-9 m.a.d successive, lavorare 1 m.a.d + 1 cat + 1 m.a.d + 1 cat nella m.a.d successiva *, ripetere *-* 3 volte, lavorare 18-18-20-20-22-22 m.a.d con 1 cat tra ogni arco di cat, * lavorare 1 m.a.d + 1 cat in ognuna delle 7-7-8-8-9-9 m.a.d successive, lavorare 1 m.a.d + 1 cat + 1 m.a.d + 1 cat nella m.a.d successiva *, ripetere *-* 2 volte = 126-126-140-140-154-154 m.a.d + cat sul giro. Lavorare come il 4° e 5° giro ma su ogni giro lavorare 1 m.a.d + 1 cat in più tra ogni aumento = 14 m.a.d + 14 cat aumentate su ogni giro. Continuare fino a quando il cerchio misura 52-54-56-58-60-62 cm dal centro (= 104-108-112-116-120-124 cm di diametro, o la misura desiderata). Finire il cerchio come segue: Continuare con lo stesso filato come sull’ultimo giro. Lavorare 1 m.a.d in ognuna delle 2 m.a.d successive, 1 m.a in ognuna delle 2 m.a.d successive, 1 m.m.a in ognuna delle 2 m.a.d successive, 1 m.b nella m.a.d successiva, 1 m.bss nella m.a.d successiva, chiudere e affrancare. Lavorare nello stesso modo dall’altro lato. MANICHE: Lavorare in tondo dallo scalfo verso il basso. Usare l’uncinetto n° 6 mm e iniziare con il colore opposto con cui è stata lavorata una delle ultime m.a.d attorno agli scalfi. Lavorare a strisce, cioè lavorare 1 giro con Karisma e 1 giro con Big Delight – LEGGERE IL SUGGERIMENTO PER IL LAVORO. Lavorare 36-38-40-42-44-46 m.a.d attorno all’apertura per la manica, l’inizio del giro dev’essere sotto la manica. Poi lavorare 3 giri con 1 m.a.d in ogni m.a.d. Continuare con 1 m.a.d in ogni m.a.d – ALLO STESSO TEMPO diminuire 2 m.a.d al centro sotto la manica – LEGGERE IL SUGGERIMENTO PER LE DIMINUZIONI. Ripetere le diminuzioni ogni 8 cm altre 6 volte = 22-24-26-28-30-32 m.a.d. Continuare a lavorare fino a quando la manica misura 54-55-54-55-54-55 cm. Chiudere e affrancare. |
|
 |
|
Avete terminato questo modello?Allora taggate le vostre foto con #dropspattern #gypsybluejacket o inviatele alla #dropsfan gallery. Avete bisogno di aiuto con questo modello?Troverete 8 video tutorial, una sezione per i commenti/domande e molto altro guardando il modello su www.garnstudio.com © 1982-2026 DROPS Design A/S. Ci riserviamo tutti i diritti. Questo documento, compreso tutte le sue sotto-sezioni, è protetto dalle leggi sul copyright. Potete leggere quello che potete fare con i nostri modelli alla fine di ogni modello sul nostro sito. |
|


Con oltre 40 anni di esperienza nel design di modelli di maglia e uncinetto, DROPS Design offre la più estesa collezione di modelli gratuiti su internet - tradotti in 17 lingue. Ad oggi vi possiamo fornire 324 cataloghi e 12290 modelli - 9561 dei quali sono tradotti in Italiano.
Ci stiamo impegnando molto per darvi il meglio che vi possiamo offrire in termini di maglia e uncinetto, ispirazioni e consigli così come filati di grande qualità ad un prezzo incredibile! Volete utilizzare i nostri modelli per qualcosa d'altro oltre al vostro uso personale? Potete leggere tutto ciò che è consentito nel testo sul Copyright in basso su tutte le pagine dei nostri modelli. Buon lavoro!
Lasciare un commento sul modello DROPS 165-40
Noi saremmo felici di ricevere i tuoi commenti e opinioni su questo modello!
Se vuoi fare una domanda, fai per favore attenzione a selezionare la categoria corretta nella casella qui sotto per velocizzare il processo di risposta. I campi richiesti sono indicati da *.