
Categorie popolari
State cercando un filato?


Commenti / Domande (165)
![]() Jennifer Thurber ha scritto:
Jennifer Thurber ha scritto:
When I am completing the round with the arm holes, I have only 9 rounds, but it matches the 9-inch direction. I'm not sure I have enough triple crochets to suit the directions for the next round. Could you clarify? I'm using a 5.5mm hook, so I don't think that's the problem? Thank you!
13.10.2015 - 01:30DROPS Design ha risposto:
Dear Mrs Thurber, have you checked and keep your gauge? You should get 12 tr in width x 4.5 tr vertically alternately with 1 round Big Delight and 1 round Karisma = 4'' x 4'' (10 x 10 cm). Happy crocheting!
13.10.2015 - 09:40
![]() Au3 ha scritto:
Au3 ha scritto:
I've made this onze with big delight 05 (chocolate/ banana) and karisma 52 (mustardyellow). Very Nice pattern and a Nice result. Because of the combination of colours it turned out very 70's, but i like that. I didn't Replace first dtr on round with 4 ch , because it wasn't necessary when working in spirals. It turned out really ok.
12.10.2015 - 15:26
![]() Barbara Sturm ha scritto:
Barbara Sturm ha scritto:
Ich habe eine Frage zu der Runde mit den Arm ausschnitten. Da komme ich nciht ganz hin entweder ich verstehe es nicht oder es geht nicht auf so wie es beschrieben ist. Vllt kann man mir da ein wenig weiter helfen wäre schön. lg Barbara
26.09.2015 - 14:38DROPS Design ha risposto:
Es sollte eigentlich genau so aufgehen, wie es beschrieben ist. Für den 2. Armausschnitt häkeln Sie ja so lange, bis noch 32-32-36-36-40-40 D-Stb in der Rd übrig sind, dann häkeln Sie den 2. Armausschnitt wie den ersten.
03.10.2015 - 10:28
![]() Lidia ha scritto:
Lidia ha scritto:
Ik ben voor de 4de keer opnieuw begonnen met het vest. Als ik nu naar m'n haakwerk kijk werk ik in een spiraal. Als ik een nieuwe toer begin met 4 losse ipv een dstk dan krijg ik een gat in m'n haakwerk. Ik heb die 4l niet gedaan en m'n werk trekt (nog) niet. Doe ik iets fout?
24.09.2015 - 16:00DROPS Design ha risposto:
Hoi Lidia. Wij raden aan om met 4 l te beginnen ter vervanging van het eerste dstk. Maar heb je een andere manier, die een mooi resultaat oplevert, dan mag je dat natuurlijk gebruiken
14.10.2015 - 13:21
![]() Linda ha scritto:
Linda ha scritto:
Ik ben van plan om het cirkel vest Gypsy Blue (model db-053), gehaakt met Big Delight en Karisma, te haken. Mijn vraag is: hoeveel van elk heb ik nodig voor maat L? E
18.09.2015 - 10:17DROPS Design ha risposto:
Hoi Linda. Dat staat bovenaan het patroon: Maat: S - M - L - XL - XXL - XXXL Materiaal: DROPS BIG DELIGHT van Garnstudio 300-400-400-500-500-500 gr. kleur nr. 09, atlantis DROPS KARISMA van Garnstudio 250-300-300-350-350-400 gr. kleur nr. 60, petroleum. Maat L is de derde, dus 400 gr Big Delight en 300 gr Karisma
18.09.2015 - 10:23
![]() Grace ha scritto:
Grace ha scritto:
I am having problems - when I make up the pattern I seem have too many stitches, and the work becomes " frilly " and I don't know what I'm doing wrong! Can you help?
17.09.2015 - 17:33DROPS Design ha risposto:
Dear Grace, when working the spiral, you work each round alternately with each quality, so that you work the sts in the sts worked on previous round with the other colour (1 round = half sts with Karisma + half sts with Big Delight). Happy knitting!
17.09.2015 - 18:26
![]() Micheline Baetens ha scritto:
Micheline Baetens ha scritto:
"Herhaal 4e en 5e toer maar haak elke toer 1 dstk en 1 l meer tussen elke meerdering = 14 dstk en 14 l gemeerderd elke toer." Wat wordt hiermee bedoelt aub? Welke meerdering? Bedankt, Micheline
06.09.2015 - 18:57DROPS Design ha risposto:
Hoi Micheline. Bij het haken van de toer 4 en 5 heb je 1 steeds 1 dstk meer bij (TOER : * Haak 1 dstk en 1 l in elke van de volgende 2 dstk, haak 1 dstk en 1 l en 1 dstk en 1 l in volgende dstk *). Dus toer 6 heb je dan * Haak 1 dstk en 1 l in elke van de volgende 3 dstk, haak 1 dstk en 1 l en 1 dstk en 1 l in volgende dstk *
07.09.2015 - 16:32Rose ha scritto:
Wish the comments were in English
05.09.2015 - 08:53
![]() Marian De Meijer ha scritto:
Marian De Meijer ha scritto:
Bij het vest in cirkelvorm, moet dan iedere toer niet beginnen met 1 losse in plaats van dubbel stokje gaat het anders niet trekken en rond staan ?
19.08.2015 - 09:52DROPS Design ha risposto:
Hoi Marian. Nee, je haakt in de ronde met dstk, dus dat betekent dat je elke toer moet beginnen met 4 l (ter vervanging voor het eerste dstk). Haak je maar 1 l, dan ga je werk trekken
24.08.2015 - 14:48
![]() EM ha scritto:
EM ha scritto:
Undrar bara om det går lika bra att använda ett garnnystan istället för, som i mönstret, två olika. Fungerar beskrivningen då?
24.07.2015 - 11:01DROPS Design ha risposto:
Hej EM, Karisma är lite tunnare än Big Delight, så väljer du enbart Karisma blir arbetet lite mindre och väljer du enbart Big Delight blir arbetet lite större än virkfastheten i beskrivningen. Men välj garn och gör ett virkprov så du får virkfastheten enligt beskrivningen, så går det bra. Lycka till!
28.07.2015 - 12:23
|
|
Gypsy Blue#gypsybluejacket |
|
 |
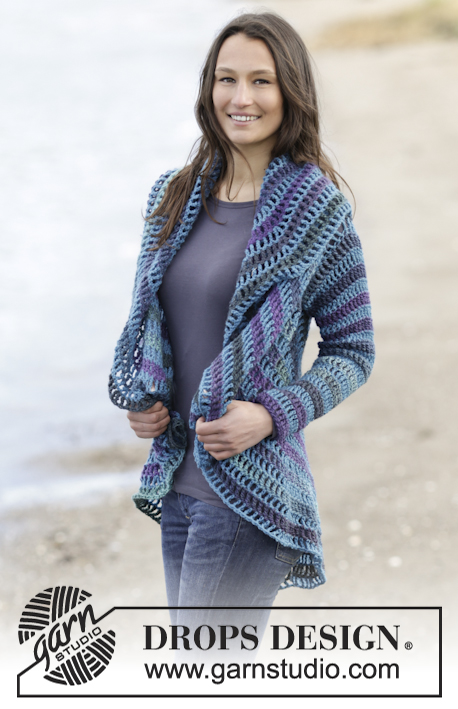 |
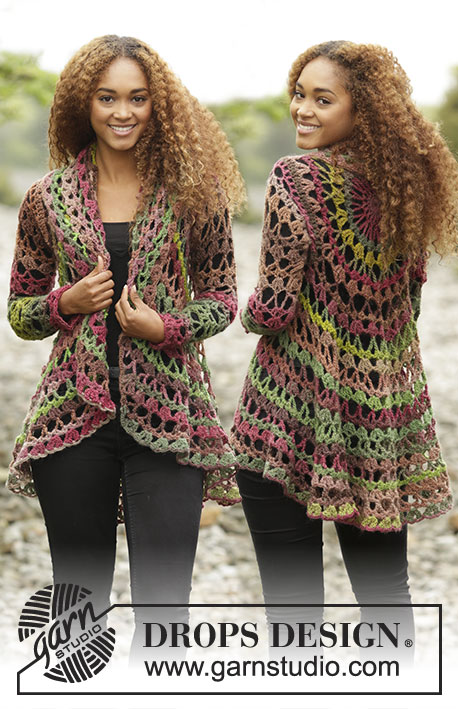
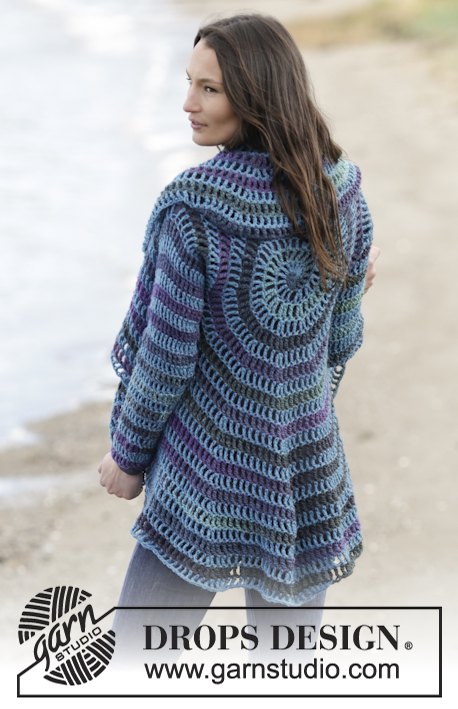
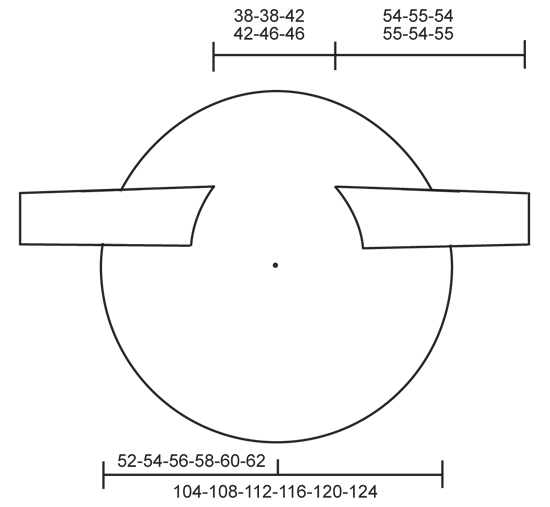
Cardigan DROPS lavorato a cerchio all’uncinetto in "Big Delight" e "Karisma". Taglie: S - XXXL.
DROPS 165-40 |
|
|
SUGGERIMENTO PER LE DIMINUZIONI: 2 m.a.d insieme a 1 m.a.d come segue: lavorare 1 m.a.d ma aspettare con l’ultimo gettato e far passare il filo attraverso, lavorare 1 m.a.d nella m successiva ma far passare l’ultimo gettato attraverso tutte e 3 le m sull’uncinetto. SUGGERIMENTO PER IL LAVORO: Sostituire la 1° m.a.d sul giro con 4 cat. Finire con 1 m.bss nella 4° cat dall’inizio del giro. ---------------------------------------------------------- CERCHIO: Quando si lavora in tondo, iniziare con questa tecnica per evitare un buco al centro (invece dell’anello di cat) usando Big Delight: tenere l’estremità del filo e avvolgerla 1 volta attorno all’indice per fare un occhiello. Tenere l’occhiello con il pollice e medio sinistro, mettere il filo sul indice sinistro. Inserire l’uncinetto nell’occhiello, fare un gettato e far passare il filo attraverso l’occhiello, lavorare 1 cat, lavorare attorno all’occhiello come segue: GIRO 1: 1 cat, 1 m.b, 2 m.m.a, 2 m.a, 2 m.a.d. Inserire 1 segnapunti nell’occhiello sull’ultima m.a.d in modo che non si disfi e mettere il filo da parte. Passare a Karisma e lavorare come segue nell’occhiello: 1 m.b, 2 m.m.a, 2 m.a, 2 m.a.d. Inserire un segnapunti all’inizio del giro. Far passare l’estremità del filo per stringere l’occhiello. Affrancare l’estremità sul dietro. GIRO 2: (Continuare con Karisma). Lavorare 1 m.a.d + 1 cat in ognuna delle prime 7 m (= 1 m.b, 2 m.m.a, 2 m.a e 2 m.a.d lavorate con Big Delight). Inserire 1 segnapunti nell’occhiello sull’ultima m.a.d in modo che non si disfi e mettere il filo da parte. Continuare con Big Delight. Lavorare 1 m.a.d + 1 cat in ognuna delle 7 m successive (= 1 m.b, 2 m.m.a, 2 m.a e 2 m.a.d lavorate con Karisma) = 14 m.a.d + 14 cat. GIRO 3: (Continuare con Big Delight.) lavorare 1 m.a.d + 1 cat + 1 m.a.d + 1 cat in ognuna delle prime 7 m.a.d, inserire 1 segnapunti nell’occhiello sull’ultima m.a.d in modo che non si disfi e mettere il filo da parte. Continuare con Karisma, lavorare 1 m.a.d + 1 cat + 1 m.a.d + 1 cat in ognuna delle 7 m.a.d successive = 28 m.a.d + 28 cat. GIRO 4: (Continuare con Karisma). * lavorare 1 m.a.d + 1 cat nella m.a.d successiva, lavorare 1 m.a.d + 1 cat + 1 m.a.d + 1 cat nella m.a.d successiva *, ripetere *-* 7 volte. Inserire un segnapunti nell’occhiello sull’ultima m.a.d in modo che non si disfi e mettere il filo da parte. Continuare con Big Delight. * lavorare 1 m.a.d + 1 cat nella m.a.d successiva, lavorare 1 m.a.d + 1 cat + 1 m.a.d + 1 cat nella m.a.d successiva *, ripetere *-* 7 volte = 42 m.a.d + 42 cat. GIRO 5: (Continuare con Big Delight.) * lavorare 1 m.a.d + 1 cat in ognuna delle 2 m.a.d successive, lavorare 1 m.a.d + 1 cat + 1 m.a.d + 1 cat nella m.a.d successiva *, ripetere *-* 7 volte. Inserire 1 segnapunti nell’occhiello sull’ultima m.a.d in modo che non si disfi e mettere il filo da parte. Continuare con Karisma. * Lavorare 1 m.a.d + 1 cat in ognuna delle 2 m.a.d successive, lavorare 1 m.a.d + 1 cat + 1 m.a.d + 1 cat nella m.a.d successiva *, ripetere *-* 7 volte = 56 m.a.d + 56 cat. Ripetere il 4° e 5à giro ma su ogni giro lavorare 1 m.a.d + 1 cat in piu tra ogni aumento = 14 m.a.d + 14 cat aumentate su ogni giro. Continuare fino a quando ci sono 112-112-126-126-140-140 m.a.d + 112-112-126-126-140-140 cat sul giro, il cerchio misura circa 20-20-23-23-25-25 cm dal centro (= 40-40-46-46-50-50 cm di diametro). Lavorare il giro successivo come segue: (Continuare con la spirale e il cambio di colore ma senza aumenti). Lavorare 1 m.a.d + 1 cat in ognuna delle prime 16-16-18-18-20-20 m.a.d, lavorare 24-24-28-28-32-32 cat lasse per lo scalfo, saltare le 16-16-18-18-20-20 m.a.d successive, lavorare 1 m.a.d + 1 cat in ogni m.a.d fino a quando rimangono 32-32-36-36-40-40 m.a.d sul giro, lavorare 24-24-28-28-32-32 cat lasse per lo scalfo, saltare le 16-16-18-18-20-20 m.a.d successive, lavorare 1 m.a.d + 1 cat in ognuna delle ultime 16-16-18-18-20-20 m.a.d. Lavorare il giro successivo come segue: * lavorare 1 m.a.d + 1 cat in ognuna delle 7-7-8-8-9-9 m.a.d successive, lavorare 1 m.a.d + 1 cat + 1 m.a.d + 1 cat nella m.a.d successiva *, ripetere *-* 2 volte, lavorare 18-18-20-20-22-22 m.a.d con 1 cat tra ogni arco di cat, * lavorare 1 m.a.d + 1 cat in ognuna delle 7-7-8-8-9-9 m.a.d successive, lavorare 1 m.a.d + 1 cat + 1 m.a.d + 1 cat nella m.a.d successiva *, ripetere *-* 3 volte. Inserire 1 segnapunti nell’arco sull’ultima m.a.d in modo che non si disfi e mettere il filo da parte. Cambiare filato. * Lavorare 1 m.a.d + 1 cat in ognuna delle 7-7-8-8-9-9 m.a.d successive, lavorare 1 m.a.d + 1 cat + 1 m.a.d + 1 cat nella m.a.d successiva *, ripetere *-* 3 volte, lavorare 18-18-20-20-22-22 m.a.d con 1 cat tra ogni arco di cat, * lavorare 1 m.a.d + 1 cat in ognuna delle 7-7-8-8-9-9 m.a.d successive, lavorare 1 m.a.d + 1 cat + 1 m.a.d + 1 cat nella m.a.d successiva *, ripetere *-* 2 volte = 126-126-140-140-154-154 m.a.d + cat sul giro. Lavorare come il 4° e 5° giro ma su ogni giro lavorare 1 m.a.d + 1 cat in più tra ogni aumento = 14 m.a.d + 14 cat aumentate su ogni giro. Continuare fino a quando il cerchio misura 52-54-56-58-60-62 cm dal centro (= 104-108-112-116-120-124 cm di diametro, o la misura desiderata). Finire il cerchio come segue: Continuare con lo stesso filato come sull’ultimo giro. Lavorare 1 m.a.d in ognuna delle 2 m.a.d successive, 1 m.a in ognuna delle 2 m.a.d successive, 1 m.m.a in ognuna delle 2 m.a.d successive, 1 m.b nella m.a.d successiva, 1 m.bss nella m.a.d successiva, chiudere e affrancare. Lavorare nello stesso modo dall’altro lato. MANICHE: Lavorare in tondo dallo scalfo verso il basso. Usare l’uncinetto n° 6 mm e iniziare con il colore opposto con cui è stata lavorata una delle ultime m.a.d attorno agli scalfi. Lavorare a strisce, cioè lavorare 1 giro con Karisma e 1 giro con Big Delight – LEGGERE IL SUGGERIMENTO PER IL LAVORO. Lavorare 36-38-40-42-44-46 m.a.d attorno all’apertura per la manica, l’inizio del giro dev’essere sotto la manica. Poi lavorare 3 giri con 1 m.a.d in ogni m.a.d. Continuare con 1 m.a.d in ogni m.a.d – ALLO STESSO TEMPO diminuire 2 m.a.d al centro sotto la manica – LEGGERE IL SUGGERIMENTO PER LE DIMINUZIONI. Ripetere le diminuzioni ogni 8 cm altre 6 volte = 22-24-26-28-30-32 m.a.d. Continuare a lavorare fino a quando la manica misura 54-55-54-55-54-55 cm. Chiudere e affrancare. |
|
 |
|
Avete terminato questo modello?Allora taggate le vostre foto con #dropspattern #gypsybluejacket o inviatele alla #dropsfan gallery. Avete bisogno di aiuto con questo modello?Troverete 8 video tutorial, una sezione per i commenti/domande e molto altro guardando il modello su www.garnstudio.com © 1982-2026 DROPS Design A/S. Ci riserviamo tutti i diritti. Questo documento, compreso tutte le sue sotto-sezioni, è protetto dalle leggi sul copyright. Potete leggere quello che potete fare con i nostri modelli alla fine di ogni modello sul nostro sito. |
|


Con oltre 40 anni di esperienza nel design di modelli di maglia e uncinetto, DROPS Design offre la più estesa collezione di modelli gratuiti su internet - tradotti in 17 lingue. Ad oggi vi possiamo fornire 324 cataloghi e 12290 modelli - 9561 dei quali sono tradotti in Italiano.
Ci stiamo impegnando molto per darvi il meglio che vi possiamo offrire in termini di maglia e uncinetto, ispirazioni e consigli così come filati di grande qualità ad un prezzo incredibile! Volete utilizzare i nostri modelli per qualcosa d'altro oltre al vostro uso personale? Potete leggere tutto ciò che è consentito nel testo sul Copyright in basso su tutte le pagine dei nostri modelli. Buon lavoro!
Lasciare un commento sul modello DROPS 165-40
Noi saremmo felici di ricevere i tuoi commenti e opinioni su questo modello!
Se vuoi fare una domanda, fai per favore attenzione a selezionare la categoria corretta nella casella qui sotto per velocizzare il processo di risposta. I campi richiesti sono indicati da *.