
Categorie popolari
State cercando un filato?


Commenti / Domande (165)
![]() Elin ha scritto:
Elin ha scritto:
Hej, jag undrar hur många varv efter ärmhålen koftan på modellen är virkad i?
29.01.2016 - 10:12DROPS Design ha risposto:
Hej Elin, Antal varv kan variera beroende på virkfastheten. Men du ser måttet i beskrivningen. Lycka till!
08.03.2016 - 11:48
![]() Hilary.savage ha scritto:
Hilary.savage ha scritto:
Please can you explain the last row of the circle. Which point do I do the last 8 stitches. Under the bit starting with ' finish circle as follows'. It gives. Instructions for eight stitches and then fasten off. It then says work the same way in the other side. So am confused about where this bit is on the circle. And what is the other side
23.01.2016 - 00:15DROPS Design ha risposto:
Dear Mrs Savage, on last row of circle, continue with the colour of last round and work these 8 sts. Then work these 8 sts with the 2nd colour (it will be on the other side, where yarn is). Happy crocheting!
25.01.2016 - 10:48
![]() Gaby M ha scritto:
Gaby M ha scritto:
Hallo! Gibt es für diese schöne Kreisjacke keine Häkelschrift? Mit geschriebenen Anleitungen tu ich mir schwer. Ich möchte auch mit einer Farbverlaufswolle häkeln und nicht immer absichtlich die Farbe wechseln. LG
20.01.2016 - 22:24DROPS Design ha risposto:
Nein, leider haben wir für diese Anleitung keine Häkelschrift. Es sieht aber auch schlimmer aus, als es ist, wenn Sie erst einmal bei jeder Rd sehen, was zu tun ist, wird Ihnen das Häkeln nach der Anleitung kaum schwerer fallen als nach einer Häkelschrift.
24.01.2016 - 20:36
![]() Anne Margrethe Tveit ha scritto:
Anne Margrethe Tveit ha scritto:
Hei! Takk for morsom oppskrift. Jeg mener det er liten feil når det f eks i omgang 4 og 5 står "gjenta 7 ganger " . Hvis en gjentar 7 ganger, blir det 8 ganger til sammen. Kanskje det kunne stått " gjenta 6 ganger, til sammen 7 ganger " eller liknende. Jeg fant jo ut av det, men vil bare formidle at jeg ble litt forvirret. Mvh Anne Margrethe
16.01.2016 - 11:57Debi Cortés ha scritto:
Gracias por sus patrones son bellos, pero me gustaría saber si tienen los patrones en dibujos se me hace más fácil. Gracias
09.01.2016 - 00:15DROPS Design ha risposto:
Hola Debi. Cada vez añadimos más patrones con diagramas (en primer lugar los modelos con dibujos más complicados). El espacio limitado de la web no nos permite añadir diagramas para todos los patrones.
14.01.2016 - 09:32
![]() Nikki ha scritto:
Nikki ha scritto:
I can't get the recommended yarns where I am located. would red heart boutique unforgettable be a good substitute for Big delight?
08.01.2016 - 19:22DROPS Design ha risposto:
Dear Nikki, you can order our yarns online to our DROPS Superstore in U.S, click here for more information. Happy crocheting!
11.01.2016 - 09:22
![]() Bianca Hulshorst ha scritto:
Bianca Hulshorst ha scritto:
Ik zou dit vest graag maken met garen voor nld 8, in 1 kleur. kan dat of wordt dat te dik? Wat moet ik dan aanpassen in het patroon? En hoeveel meter zou ik ongeveer nodig hebben?
04.01.2016 - 21:11DROPS Design ha risposto:
Hoi Bianca. Je kan een proeflapje maken met nld 8 en de stekenverhouding controleren en omdat het een cirkel is zou ik gewoon beginnen en dan meten onderweg hoe groot hij moet zijn voordat je de armsgaten maakt. Voor de mouwen heb je de stekenverhouding nodig om het ca aantal st te berekenen. Je kan ongeveer te berekenen hoeveel je nodig hebt met deze formule
05.01.2016 - 15:20
![]() Peggy ha scritto:
Peggy ha scritto:
When decreasing on sleeve every 3 1/4",do you mean down the sleeve or around the sleeve?
12.12.2015 - 08:44DROPS Design ha risposto:
Dear Peggy, this mean "down the sleeve", ie work 3 1/8" and make a new dec. Happy crocheting!
14.12.2015 - 09:33
![]() Sandra ha scritto:
Sandra ha scritto:
What's wrong: the video or my interpretation of it? When I crochet the first 3 rounds from the pattern, my work is nice and flat and the amount of stitches is correct. But the work on the video is like a small bowl instead of anything I would use as a jacket... I keep on counting and wondering.... And I can't understand how the work of the video doesn!t look like the pattern...????
05.12.2015 - 00:40DROPS Design ha risposto:
Dear Sandra, the video is worked with 2 yarn same thickness (Eskimo) while pattern is worked with 2 yarns different thickness so that the "curly" effect appears in our video showing the technique earlier than it will appears working with the recommanded yarn. Happy crocheting!
07.12.2015 - 09:47
![]() Corissa T ha scritto:
Corissa T ha scritto:
Silly question: Can someone clarify the directions for the round starting the sleeves/creating the armholes. Doesn't clearly say were to stop/start the colors, is one armhole chain made from each color?
18.11.2015 - 23:35DROPS Design ha risposto:
Dear Corissa, the chain for armholes will be worked each in each color, work round for armhole changing colors as before and follow instruction for your size at the same time. 1st row on sleeve is then worked with the opposite colour. Happy crocheting!
19.11.2015 - 09:30
|
|
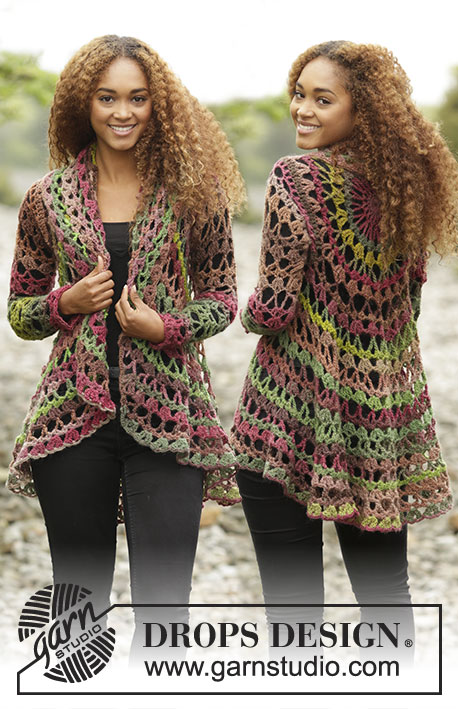
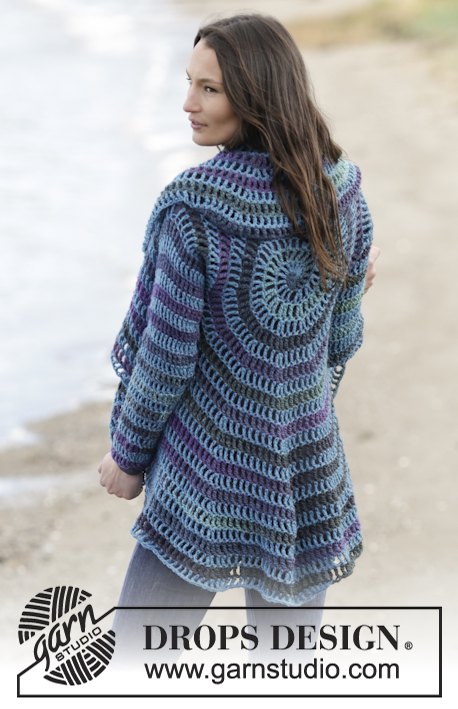
Gypsy Blue#gypsybluejacket |
|
 |
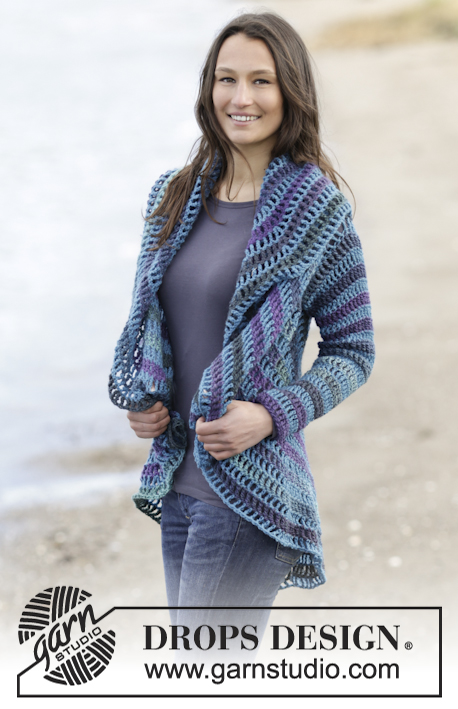 |
Cardigan DROPS lavorato a cerchio all’uncinetto in "Big Delight" e "Karisma". Taglie: S - XXXL.
DROPS 165-40 |
|
|
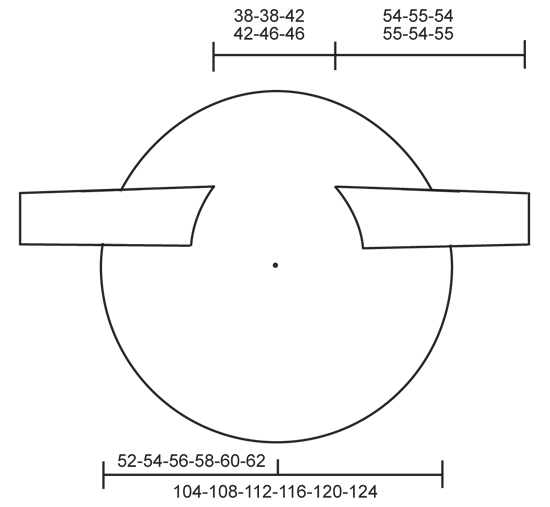
SUGGERIMENTO PER LE DIMINUZIONI: 2 m.a.d insieme a 1 m.a.d come segue: lavorare 1 m.a.d ma aspettare con l’ultimo gettato e far passare il filo attraverso, lavorare 1 m.a.d nella m successiva ma far passare l’ultimo gettato attraverso tutte e 3 le m sull’uncinetto. SUGGERIMENTO PER IL LAVORO: Sostituire la 1° m.a.d sul giro con 4 cat. Finire con 1 m.bss nella 4° cat dall’inizio del giro. ---------------------------------------------------------- CERCHIO: Quando si lavora in tondo, iniziare con questa tecnica per evitare un buco al centro (invece dell’anello di cat) usando Big Delight: tenere l’estremità del filo e avvolgerla 1 volta attorno all’indice per fare un occhiello. Tenere l’occhiello con il pollice e medio sinistro, mettere il filo sul indice sinistro. Inserire l’uncinetto nell’occhiello, fare un gettato e far passare il filo attraverso l’occhiello, lavorare 1 cat, lavorare attorno all’occhiello come segue: GIRO 1: 1 cat, 1 m.b, 2 m.m.a, 2 m.a, 2 m.a.d. Inserire 1 segnapunti nell’occhiello sull’ultima m.a.d in modo che non si disfi e mettere il filo da parte. Passare a Karisma e lavorare come segue nell’occhiello: 1 m.b, 2 m.m.a, 2 m.a, 2 m.a.d. Inserire un segnapunti all’inizio del giro. Far passare l’estremità del filo per stringere l’occhiello. Affrancare l’estremità sul dietro. GIRO 2: (Continuare con Karisma). Lavorare 1 m.a.d + 1 cat in ognuna delle prime 7 m (= 1 m.b, 2 m.m.a, 2 m.a e 2 m.a.d lavorate con Big Delight). Inserire 1 segnapunti nell’occhiello sull’ultima m.a.d in modo che non si disfi e mettere il filo da parte. Continuare con Big Delight. Lavorare 1 m.a.d + 1 cat in ognuna delle 7 m successive (= 1 m.b, 2 m.m.a, 2 m.a e 2 m.a.d lavorate con Karisma) = 14 m.a.d + 14 cat. GIRO 3: (Continuare con Big Delight.) lavorare 1 m.a.d + 1 cat + 1 m.a.d + 1 cat in ognuna delle prime 7 m.a.d, inserire 1 segnapunti nell’occhiello sull’ultima m.a.d in modo che non si disfi e mettere il filo da parte. Continuare con Karisma, lavorare 1 m.a.d + 1 cat + 1 m.a.d + 1 cat in ognuna delle 7 m.a.d successive = 28 m.a.d + 28 cat. GIRO 4: (Continuare con Karisma). * lavorare 1 m.a.d + 1 cat nella m.a.d successiva, lavorare 1 m.a.d + 1 cat + 1 m.a.d + 1 cat nella m.a.d successiva *, ripetere *-* 7 volte. Inserire un segnapunti nell’occhiello sull’ultima m.a.d in modo che non si disfi e mettere il filo da parte. Continuare con Big Delight. * lavorare 1 m.a.d + 1 cat nella m.a.d successiva, lavorare 1 m.a.d + 1 cat + 1 m.a.d + 1 cat nella m.a.d successiva *, ripetere *-* 7 volte = 42 m.a.d + 42 cat. GIRO 5: (Continuare con Big Delight.) * lavorare 1 m.a.d + 1 cat in ognuna delle 2 m.a.d successive, lavorare 1 m.a.d + 1 cat + 1 m.a.d + 1 cat nella m.a.d successiva *, ripetere *-* 7 volte. Inserire 1 segnapunti nell’occhiello sull’ultima m.a.d in modo che non si disfi e mettere il filo da parte. Continuare con Karisma. * Lavorare 1 m.a.d + 1 cat in ognuna delle 2 m.a.d successive, lavorare 1 m.a.d + 1 cat + 1 m.a.d + 1 cat nella m.a.d successiva *, ripetere *-* 7 volte = 56 m.a.d + 56 cat. Ripetere il 4° e 5à giro ma su ogni giro lavorare 1 m.a.d + 1 cat in piu tra ogni aumento = 14 m.a.d + 14 cat aumentate su ogni giro. Continuare fino a quando ci sono 112-112-126-126-140-140 m.a.d + 112-112-126-126-140-140 cat sul giro, il cerchio misura circa 20-20-23-23-25-25 cm dal centro (= 40-40-46-46-50-50 cm di diametro). Lavorare il giro successivo come segue: (Continuare con la spirale e il cambio di colore ma senza aumenti). Lavorare 1 m.a.d + 1 cat in ognuna delle prime 16-16-18-18-20-20 m.a.d, lavorare 24-24-28-28-32-32 cat lasse per lo scalfo, saltare le 16-16-18-18-20-20 m.a.d successive, lavorare 1 m.a.d + 1 cat in ogni m.a.d fino a quando rimangono 32-32-36-36-40-40 m.a.d sul giro, lavorare 24-24-28-28-32-32 cat lasse per lo scalfo, saltare le 16-16-18-18-20-20 m.a.d successive, lavorare 1 m.a.d + 1 cat in ognuna delle ultime 16-16-18-18-20-20 m.a.d. Lavorare il giro successivo come segue: * lavorare 1 m.a.d + 1 cat in ognuna delle 7-7-8-8-9-9 m.a.d successive, lavorare 1 m.a.d + 1 cat + 1 m.a.d + 1 cat nella m.a.d successiva *, ripetere *-* 2 volte, lavorare 18-18-20-20-22-22 m.a.d con 1 cat tra ogni arco di cat, * lavorare 1 m.a.d + 1 cat in ognuna delle 7-7-8-8-9-9 m.a.d successive, lavorare 1 m.a.d + 1 cat + 1 m.a.d + 1 cat nella m.a.d successiva *, ripetere *-* 3 volte. Inserire 1 segnapunti nell’arco sull’ultima m.a.d in modo che non si disfi e mettere il filo da parte. Cambiare filato. * Lavorare 1 m.a.d + 1 cat in ognuna delle 7-7-8-8-9-9 m.a.d successive, lavorare 1 m.a.d + 1 cat + 1 m.a.d + 1 cat nella m.a.d successiva *, ripetere *-* 3 volte, lavorare 18-18-20-20-22-22 m.a.d con 1 cat tra ogni arco di cat, * lavorare 1 m.a.d + 1 cat in ognuna delle 7-7-8-8-9-9 m.a.d successive, lavorare 1 m.a.d + 1 cat + 1 m.a.d + 1 cat nella m.a.d successiva *, ripetere *-* 2 volte = 126-126-140-140-154-154 m.a.d + cat sul giro. Lavorare come il 4° e 5° giro ma su ogni giro lavorare 1 m.a.d + 1 cat in più tra ogni aumento = 14 m.a.d + 14 cat aumentate su ogni giro. Continuare fino a quando il cerchio misura 52-54-56-58-60-62 cm dal centro (= 104-108-112-116-120-124 cm di diametro, o la misura desiderata). Finire il cerchio come segue: Continuare con lo stesso filato come sull’ultimo giro. Lavorare 1 m.a.d in ognuna delle 2 m.a.d successive, 1 m.a in ognuna delle 2 m.a.d successive, 1 m.m.a in ognuna delle 2 m.a.d successive, 1 m.b nella m.a.d successiva, 1 m.bss nella m.a.d successiva, chiudere e affrancare. Lavorare nello stesso modo dall’altro lato. MANICHE: Lavorare in tondo dallo scalfo verso il basso. Usare l’uncinetto n° 6 mm e iniziare con il colore opposto con cui è stata lavorata una delle ultime m.a.d attorno agli scalfi. Lavorare a strisce, cioè lavorare 1 giro con Karisma e 1 giro con Big Delight – LEGGERE IL SUGGERIMENTO PER IL LAVORO. Lavorare 36-38-40-42-44-46 m.a.d attorno all’apertura per la manica, l’inizio del giro dev’essere sotto la manica. Poi lavorare 3 giri con 1 m.a.d in ogni m.a.d. Continuare con 1 m.a.d in ogni m.a.d – ALLO STESSO TEMPO diminuire 2 m.a.d al centro sotto la manica – LEGGERE IL SUGGERIMENTO PER LE DIMINUZIONI. Ripetere le diminuzioni ogni 8 cm altre 6 volte = 22-24-26-28-30-32 m.a.d. Continuare a lavorare fino a quando la manica misura 54-55-54-55-54-55 cm. Chiudere e affrancare. |
|
 |
|
Avete terminato questo modello?Allora taggate le vostre foto con #dropspattern #gypsybluejacket o inviatele alla #dropsfan gallery. Avete bisogno di aiuto con questo modello?Troverete 8 video tutorial, una sezione per i commenti/domande e molto altro guardando il modello su www.garnstudio.com © 1982-2026 DROPS Design A/S. Ci riserviamo tutti i diritti. Questo documento, compreso tutte le sue sotto-sezioni, è protetto dalle leggi sul copyright. Potete leggere quello che potete fare con i nostri modelli alla fine di ogni modello sul nostro sito. |
|


Con oltre 40 anni di esperienza nel design di modelli di maglia e uncinetto, DROPS Design offre la più estesa collezione di modelli gratuiti su internet - tradotti in 17 lingue. Ad oggi vi possiamo fornire 324 cataloghi e 12290 modelli - 9561 dei quali sono tradotti in Italiano.
Ci stiamo impegnando molto per darvi il meglio che vi possiamo offrire in termini di maglia e uncinetto, ispirazioni e consigli così come filati di grande qualità ad un prezzo incredibile! Volete utilizzare i nostri modelli per qualcosa d'altro oltre al vostro uso personale? Potete leggere tutto ciò che è consentito nel testo sul Copyright in basso su tutte le pagine dei nostri modelli. Buon lavoro!
Lasciare un commento sul modello DROPS 165-40
Noi saremmo felici di ricevere i tuoi commenti e opinioni su questo modello!
Se vuoi fare una domanda, fai per favore attenzione a selezionare la categoria corretta nella casella qui sotto per velocizzare il processo di risposta. I campi richiesti sono indicati da *.