
Categorie popolari
State cercando un filato?


Commenti / Domande (36)
![]() Katie ha scritto:
Katie ha scritto:
I bought the yarn today to make this dress. Rows 1 and 2 for the yoke worked real easy. Then I got to the paragraph which begins: "Continue to work as follows: Work A.1 over the first 6 dc," and so on. If I do all the stitches that it says to do by going back to the diagram, I end up with well over 300 stitches.
31.01.2016 - 01:07DROPS Design ha risposto:
Dear Katie, you start with first row in all diagrams, ie A.6 over the first 6 sts, then A.2 over the next 12-24 sts (ie 2-4 times, see your size), A.3 over the next 12 sts (= 2 times in width), then A.2 over the next 6-12 sts (= 1-2 times in width) etc..Start reading diagrams from the bottom corner on the right side and read towards the left. Happy crocheting!
01.02.2016 - 10:19
![]() Marianne Alfstad ha scritto:
Marianne Alfstad ha scritto:
Jeg er ferdig med A.3 en gang i høyden (staver på siste omgang). Når jeg fortsetter med 6. og 7. omgang (bol) på A.1 og A.2 får jeg tre omganger med staver. Er det riktig? På bildet ser det kun ut som det er to omganger med staver.
08.11.2015 - 15:03DROPS Design ha risposto:
Hej Marianne, Der kan være forskel på antal omgange med staver i de forskellige størrelser, god fornøjelse!
26.11.2015 - 09:49
![]() Lynne ha scritto:
Lynne ha scritto:
Is there a sizing chart for patterns? The one I am trying to use just says s, m, l....etc
29.10.2015 - 14:52DROPS Design ha risposto:
Dear Lynne, you will find a measurement chart at the bottom of the pattern, compare these to a similar garment you have and like the shape - read more about sizing here. Happy crocheting!
29.10.2015 - 17:10
![]() Póczos Helga ha scritto:
Póczos Helga ha scritto:
Can you pls write me clearly how to crochet exactly the body part? Itcs confuse mmeas it's in the instruction now... Thank you in advance! Br, Helga
05.10.2015 - 21:47DROPS Design ha risposto:
Dear Mrs Póczos, follow written pattern and diagram step by step, row by row as it is stated. You are welcome to ask here any question. For any further individual assistance, remember you can get help from your DROPS store. Happy crocheting!
06.10.2015 - 09:07Oshy Valdez ha scritto:
Bellisimo.
23.09.2015 - 22:07
![]() Britt Sølvi Aronsen ha scritto:
Britt Sølvi Aronsen ha scritto:
Hei! Har nå begynt å hekle denne nydelige kjolen. Problemet er bare at nå aner jeg ikke hva jeg skal gjøre. Når jeg begynner på avsnittet med mønster, så forstår jeg kun den første omgangen, som førøvrig kun er staver. Forstår ikke dette med ang ganger hver mønsterbit skal hekles. Jeg har spurt flere av mine hekleglade venninner, men vi blir ikke så mye klokere. Når begynner jeg egentlig på mønsteret og kan forholde meg til et av mønsterne?
22.09.2015 - 08:44DROPS Design ha risposto:
Hej Britt, Du ser på stjernen ud for selve diagrammet hvor 1.omg begynder (1.omg er også forklaret i opskriften). Næste omg starter med en kjm og så A.1 over de første 6 st, A.2 over de næste 6-6-6-12-12-12 st (= 1-1-1-2-2-2 ganger alt efter hvilken str du hækler) således fortsætter du med at følge forklaringen samtidig som du kigger på 2 omg i diagrammet. God fornøjelse!
23.09.2015 - 15:59Akiko ha scritto:
Cute! I should have found this decades ago! :-) or maybe change the color then still ok for me. Not only this pattern, but I'm really enjoying whole your website of treasures! Thank you.
10.07.2015 - 03:27
![]() Debora Bonaldi ha scritto:
Debora Bonaldi ha scritto:
Bellissimi!!!!!!
02.06.2015 - 07:47
![]() Rebecca Gibbs ha scritto:
Rebecca Gibbs ha scritto:
Beautiful!!!!!!! I can not wait to crochet this pattern. wonderful for all ages.
28.05.2015 - 21:18
![]() Anja Fix-Boerdijk ha scritto:
Anja Fix-Boerdijk ha scritto:
Ik houd van tunieken en zo te zien is deze van boven naar beneden gehaakt? Ik hoop dat het patroon ook in grote maten is? Mooie kleur ook.
28.05.2015 - 12:28
|
|||||||||||||||||||||||||||||||
Toulouse#toulousedress |
|||||||||||||||||||||||||||||||
|
|
|||||||||||||||||||||||||||||||
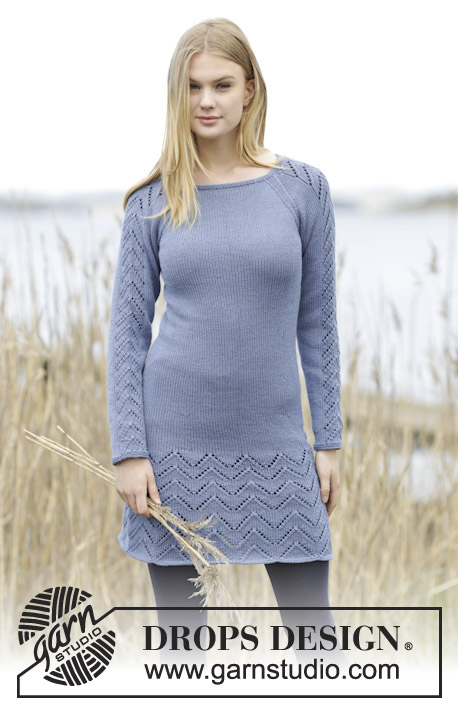
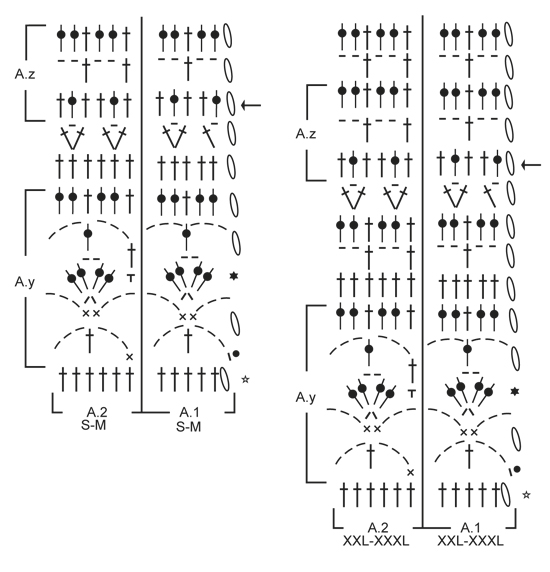
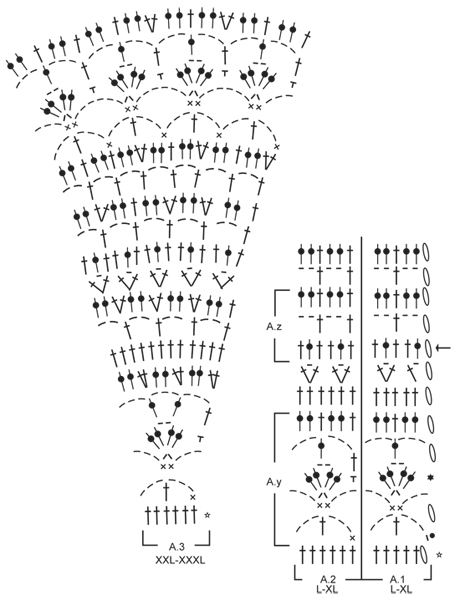
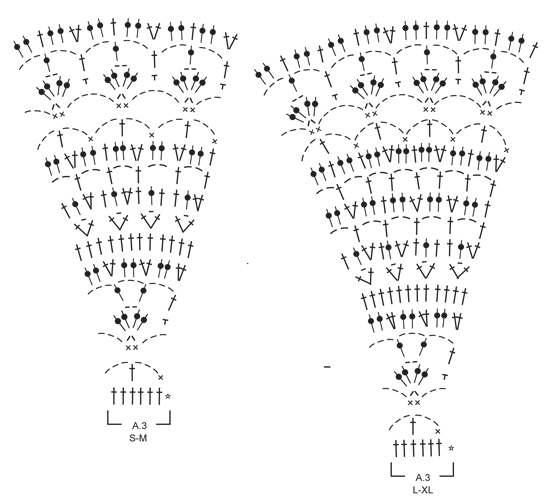
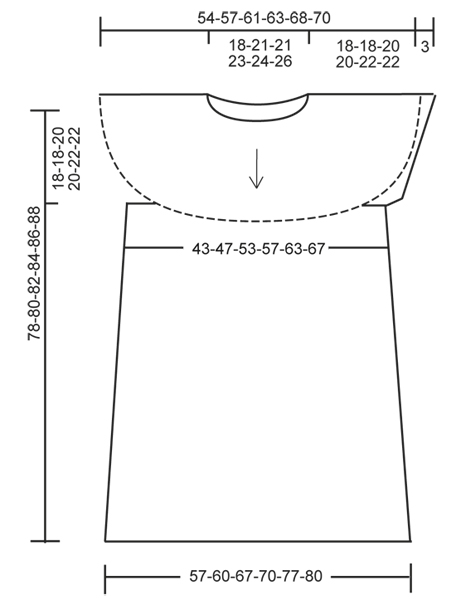
Vestito DROPS lavorato all’uncinetto con motivo traforato e sprone rotondo, lavorato dall’alto in basso (top down) in ”Cotton Merino”. Taglie: S - XXXL.
DROPS 165-36 |
|||||||||||||||||||||||||||||||
|
INFORMAZIONI PER IL LAVORO: Su ogni giro a m.a, sostituire la 1° m.a con 3 cat e finire il giro con 1 m.bss nella 3° cat dall’inizio del giro. SUGGERIMENTO PER GLI AUMENTI: Aumentare 1 m.a lavorando 2 m.a in 1 m.a. MOTIVO: Vedere i diagrammi A.1-A.3. Scegliere il diagramma per la taglia corretta. A.1 mostra come inizia e finisce il motivo. ---------------------------------------------------------- SPRONE: Lavorato in tondo, dall’alto in basso (top down), iniziando dal centro dietro. Avviare 128-138-138-163-168-173 cat con l’uncinetto n° 4 mm con Cotton Merino e formare un anello con 1 m.bss nella 1° cat. Lavorare il giro successivo come segue: lavorare 3 cat (= 1 m.a) – LEGGERE LE INFORMAZIONI PER IL LAVORO, 1 m.a nella 1° cat dall’anello di cat, 1 m.a in ognuna delle 2 cat successive, * saltare 1 cat, 1 m.a in ognuna delle 4 cat successive *, ripetere *-* per tutto il giro, finire con 1 m.bss nella 3° cat all’inizio del giro = 104-112-112-132-136-140 m.a. Sul giro successivo distribuire 16-20-20-24-44-52 aumenti in modo uniforme – LEGGERE IL SUGGERIMENTO PER GLI AUMENTI = 120-132-132-156-180-192 m.a. Continuare a lavorare come segue: lavorare A.1 sulle prime 6 m.a, A.2 sulle 12-12-12-18-24-24 m.a successive (= 2-2-2-3-4-4 volte in totale), A.3 sulle 12 m.a successive (= 2 volte in totale), A.2 sulle 6-6-6-12-12-12 m.a successive (= 1-1-1-2-2-2 volte), A.3 sulle 12 m.a successive (= 2 volte), A.2 sulle 30-36-36-42-54-60 m.a successive (= 5-6-6-7-9-10 volte), A.3 sulle 12 m.a successive (= 2 volte), A.2 sulle 6-6-6-12-12-12 m.a successive (= 1-1-1-2-2-2 volte), A.3 sulle 12 m.a successive (= 2 volte), A.2 sulle ultime 12-18-18-18-24-30 m.a (= 2-3-3-3-4-5 volte). NOTA: Nelle taglie S+XL+XXL iniziare il giro un pò verso un lato in modo che combaci il motivo. Continuare il motivo in questo modo. FARE ATTENZIONE ALLA TENSIONE DEL LAVORO! Quando A.1/A.2 sono stati lavorati una volta in verticale, ripeterli verso l’alto. Quando A.3 è stato lavorato 1 volta in verticale, ci sono 240-252-292-316-340-352 m.a sul giro. Il lavoro misura circa 18-18-20-20-22-22 cm (misurati dal bordo del collo). Ora lavorare come segue (= 6° giro in A.1/A.2): lavorare 1 m.a in ognuna delle prime 39-39-44-50-56-56 m.a (= metà dietro), lavorare 6-6-8-8-8-8 cat, saltare 48-48-58-64-64-64 m.a (= scalfo), lavorare 1 m.a in ognuna delle 72-78-88-94-106-112 m.a successive (= davanti), work 6-6-8-8-8-8 cat, saltare 48-48-58-64-64-64 m.a (= scalfo), lavorare 1 m.a in ognuna delle ultime 33-39-44-44-50-56 m.a = 144-156-176-188-212-224 m.a e 6-6-8-8-8-8 cat a ogni lato del lavoro (= 156-168-192-204-228-240 m in totale). Inserire un segnapunti nel lavoro, ORA MISURARE IL LAVORO DA QUI. CORPO: Lavorare il giro successivo come segue (= 7° giro di A.1/A.2): lavorare A.1 1 volta, poi lavorare A.2 sulle 150-162-186-198-222-234 m.a/cat rimaste (= 25-27-31-33-37-39 volte in totale in larghezza). Continuare a lavorare il motivo in verticale. ALLO STESSO TEMPO sul giro con la freccia nel diagramma aumentare 12 m.a in modo uniforme (cioè lavorare 2 m.a in ogni 13°-14°-16°-17°-19°-20° m.a) = 168-180-204-216-240-252 m.a. Ripetere A.2 altre 2 volte in larghezza. Ripetere gli aumenti ogni 10 cm, aggiustarlo ad aumentare su un giro a m.a, altre 3 volte = 204-216-240-252-276-288 m.a. Per ogni aumento, ripetere A.2 altre 2 volte in larghezza. Dopo l’ultimo, ripetere A.2 33-35-39-41-45-47 volte in totale in larghezza. Quando il lavoro misura circa 44-46-46-48-48-50 cm (dal segnapunti) – aggiustarlo in modo che l’ultimo giro sia un giro a m.a, lavorare A.y 3 volte in totale in verticale. Poi lavorare A.z 1 volta in verticale. Il lavoro misura circa 78-80-82-84-86-88 cm in totale dal bordo del collo. Chiudere e affrancare. BORDO DELLA MANICA: Lavorato in tondo. Iniziare al centro sotto la manica. Lavorare 1 m.bss nella 4° cat al centro sotto la manica, 3 cat, 1 m.a in ognuna delle 2-2-4-4-4-4 cat successive, 1 m.a in ognuna delle 48-48-58-64-64-64 m.a per la manica, ALLO STESSO TEMPO diminuire 6-6-4-4-0-0 m.a in modo uniforme e 1 m.a in ognuna delle ultime 3 cat avviate sotto la manica = 48-48-62-68-72-72 m.a. Lavorare 2 giri con 1 m.a in ogni m.a. Chiudere e affrancare. Lavorare un bordo della manica sull’altra manica. |
|||||||||||||||||||||||||||||||
Spiegazioni del diagramma |
|||||||||||||||||||||||||||||||
|
|||||||||||||||||||||||||||||||
 |
|||||||||||||||||||||||||||||||
 |
|||||||||||||||||||||||||||||||
 |
|||||||||||||||||||||||||||||||
 |
|||||||||||||||||||||||||||||||
Avete terminato questo modello?Allora taggate le vostre foto con #dropspattern #toulousedress o inviatele alla #dropsfan gallery. Avete bisogno di aiuto con questo modello?Troverete 10 video tutorial, una sezione per i commenti/domande e molto altro guardando il modello su www.garnstudio.com © 1982-2026 DROPS Design A/S. Ci riserviamo tutti i diritti. Questo documento, compreso tutte le sue sotto-sezioni, è protetto dalle leggi sul copyright. Potete leggere quello che potete fare con i nostri modelli alla fine di ogni modello sul nostro sito. |
|||||||||||||||||||||||||||||||


Con oltre 40 anni di esperienza nel design di modelli di maglia e uncinetto, DROPS Design offre la più estesa collezione di modelli gratuiti su internet - tradotti in 17 lingue. Ad oggi vi possiamo fornire 324 cataloghi e 12290 modelli - 9561 dei quali sono tradotti in Italiano.
Ci stiamo impegnando molto per darvi il meglio che vi possiamo offrire in termini di maglia e uncinetto, ispirazioni e consigli così come filati di grande qualità ad un prezzo incredibile! Volete utilizzare i nostri modelli per qualcosa d'altro oltre al vostro uso personale? Potete leggere tutto ciò che è consentito nel testo sul Copyright in basso su tutte le pagine dei nostri modelli. Buon lavoro!
Lasciare un commento sul modello DROPS 165-36
Noi saremmo felici di ricevere i tuoi commenti e opinioni su questo modello!
Se vuoi fare una domanda, fai per favore attenzione a selezionare la categoria corretta nella casella qui sotto per velocizzare il processo di risposta. I campi richiesti sono indicati da *.