
Categorie popolari
State cercando un filato?


Commenti / Domande (36)
![]() Afshan Raheel ha scritto:
Afshan Raheel ha scritto:
How many stitches after row 2?
27.09.2017 - 18:43DROPS Design ha risposto:
Dear Mrs Afsha, after row 1 you will have the same number of sts as you will not increase in row 1 - It can be a good idea to insert a marker between each repetition so that you can easily follow your work and the diagram. Happy crocheting!
28.09.2017 - 09:31
![]() Afsha Raheel ha scritto:
Afsha Raheel ha scritto:
Plz help me with 2nd row of yoke. It will be double crochet in each stich ? If we do not divide in a1 a2 a3? And 3rd row. What is above a1 6 dc? If its according to diagram then what does row 2 mentions a2 4 time a3 2 time????
27.09.2017 - 18:22DROPS Design ha risposto:
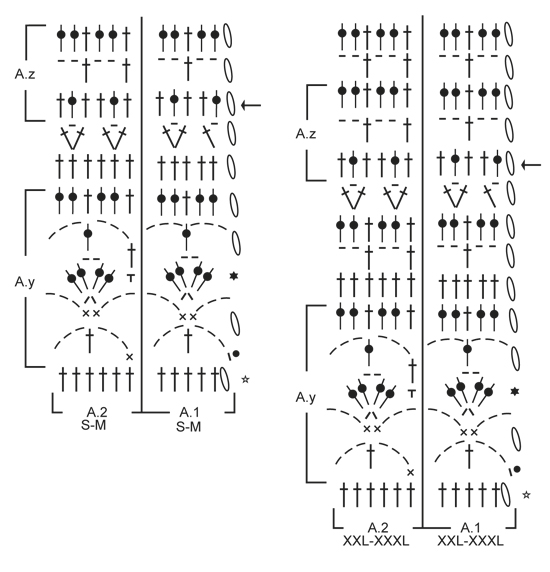
Dear Mrs Afsha, on 2nd round on yoke you will work 1st row in each diagram as stated, ie in the 2 larger sizes you will work 2nd round as follows: A.1 over the first 6dc, A.2 over the next 24dc (= 4times in total = repeat 4 times in width row 1 in A.2)), A.3 over the next 12dc (= 2times in total), A.2 over the next 12 dc (= 2 times), A.3 over the next 12 dc (= 2 times), A.2 over the next 54-60 dc (= 9-10 times), A.3 over the next 12 dc (= 2 times), A.2 over the next 12 dc (= 2 times), A.3 over the next 12 dc (= 2 times), A.2 over the last 24-30 dc (= 4-5 times). Happy crocheting!
28.09.2017 - 09:30Asraa ha scritto:
Hi. I have just completed A3 and the 5th rounds of A1 and A2 for the size medium. However the count of my tr stitches is only 196.If I count the chain stitches in between then the stitch count goes well over 252. However if I apply some mathematics and get the stitch by multiplying the number of tr stitches in each mode (A1,A2,A3) by the number of times they are repeated it comes out as 196= 2 (for A1) +26(for A2) +168(for A3). Kindly help me with this.
30.08.2017 - 19:22DROPS Design ha risposto:
Dear Asraa, by the time you finish the last row of pattern A.3 you should have the following stitch counts: A.1 (6 sts), A.2 (12 sts), A.3 (2 x 21= 42 sts), A.2 (6 sts), A.3 (42 sts), A.2 (36 sts), A.3 (42 sts), A.2 (6 sts), A.3 (42 sts) A.2 (18 sts) that adds up to 252 sts, hich is the number of stitches you have to continue to work with. I hope this helps. Happy Crocheting!
31.08.2017 - 06:12Asraa ha scritto:
Hi. I have just started this pattern and I am a bit confused in the 3rd round for the yoke. It says to work A1 in the first 6 trebles. Am I supposed to the entire A1 as is showed in the diagram i.e. the entire vertical line? Or am I supposed to do the first rows of each A1, A2 and A3 for this round and then proceed to the next rows in the upcoming rounds?
28.08.2017 - 17:59DROPS Design ha risposto:
Dear Asraa, work the first row in A.1 over the firt 6 tr, then work first row of A.2, A.3 etc.. on same row, you will work diagrams row by row. Happy crocheting!
29.08.2017 - 09:05
![]() Mai Kruse ha scritto:
Mai Kruse ha scritto:
Hejsa, jeg er netop blevet færdig med A1 og A2 i højden. Nu skal jeg færdiggøre A3 i højden og fortsætte forfra med A1 og A2. Men så vil mønstret jo ikke gå op? Mvh mai
06.07.2017 - 00:00DROPS Design ha risposto:
Hej Mai, jo du fortsætter alle 3 diagrammer, det er samme mønter hele vejen rundt, men A.3 viser hvordan du tager ud. God fornøjelse!
12.07.2017 - 14:07
![]() Sunny ha scritto:
Sunny ha scritto:
Hello, I am at the body part, size M. What is it mean by "Repeat A.2 2 times more in width"? does it mean to do 2 rows of A.2? or A.2 needs to be done twice for every A.2 pattern by looking at the beginning of the YOKE (A.1, A.2, and A.3 are listed) thank you!
23.03.2017 - 15:41DROPS Design ha risposto:
Dear Sunny, you have just inc 12 sts evenly, and A.2 = 6 sts in width, so that you have now enough room to work 2 more repeats of A.2 in width over the 180 sts = work A.1 1 time in width, then repeat A.2 29 times in total in width = 180 sts. Happy crocheting!
23.03.2017 - 16:17
![]() Darlene Wick ha scritto:
Darlene Wick ha scritto:
Hi, Iam having trouble with this pattern. I have done every row like it says but where I get confused is It says after you do A.3 you are supposed to have 252 sts. then it tells you on row 6 to do the arm part. Well Am I supposed to do A1 and A.2 all the way and then do A.3. Be cause if I do there will be to many sts. Please help me.
07.08.2016 - 04:56DROPS Design ha risposto:
Dear Mrs Wick, when you have crocheted A.1 and A.2 1 time in height repeat these both diagrams in height while continuing crocheting A.3. So that when A.3 has been worked 1 time in height, next row will be row 6 in A.1 and A.2. Happy crocheting!
08.08.2016 - 09:42
![]() Sandra Karinsdotter ha scritto:
Sandra Karinsdotter ha scritto:
Fin modell, men skulle vilja virka den med betydligt djupare och vidare urringning, så att "ärmarna" hasar ner lite, och sedan virka fast två snoddar som löper över axlarna och håller klänningen uppe = en bit av axeln lämnas bar. Förstår att det borde funka om jag börjar virka "en bit in i mönstret", men har svårt att beräkna på vilket ställe det isf är lämpligt att börja, och hur många fler maskor jag då borde starta med, i stl S?
28.07.2016 - 22:30DROPS Design ha risposto:
Hej Sandra, Du kan fråga om hjälp till at räkna om mönstret om du går till DROPS butiken där du har köpt garnet. Vi har inte möjlighet at ändra på våra mönster. Lycka till!
22.12.2016 - 09:44
![]() Michelle ha scritto:
Michelle ha scritto:
Hej. Jeg forstår ikke række 4/5 i diagram A1 og a2. Man skal hækle stangmasker i luftmasker, (ovenover de to fastmasker.) men kan ikke se hvor de to luftmasker kommer fra. Skal de laves i mellem de 2 fastmasker??
30.06.2016 - 07:55DROPS Design ha risposto:
Hej Michelle. Du har lavet de to luftmasker i omg för mellem de to fastmasker.
10.11.2016 - 16:21
![]() Katie ha scritto:
Katie ha scritto:
I did not mean to enter the question when it happened, and I did not mean to enter it twice. It sounds like the directions are telling me to dc in first 6 stitches like A.1, and dc in next 12 stitches two times, like in A.2, but when I do that and go around, it makes over 300 stitches in row two, but there is only 132 stitches in row two. So how do I do that. Is there a place where a new row begins that is not made clear in that paragraph?
31.01.2016 - 02:02DROPS Design ha risposto:
Dear Katie, in size M or L (132 sts) work as follows: A.1 over the first 6 dc, A.2 over the next 12 dc (= 2 times in total), A.3 over the next 12 dc (= 2 times in total), A.2 over the next 6 dc (= 1 time), A.3 over the next 12 dc (= 2 times), A.2 over the next 36 dc (= 6 times), A.3 over the next 12 dc (= 2 times), A.2 over the next 6 dc (= 1 time), A.3 over the next 12 dc (= 2 times), A.2 over the last 18 dc (= 3 times)= 6+12+12+6+12+36+12+6+12+18=132 sts. Happy crocheting!
01.02.2016 - 10:23
|
|||||||||||||||||||||||||||||||
Toulouse#toulousedress |
|||||||||||||||||||||||||||||||
|
|
|||||||||||||||||||||||||||||||
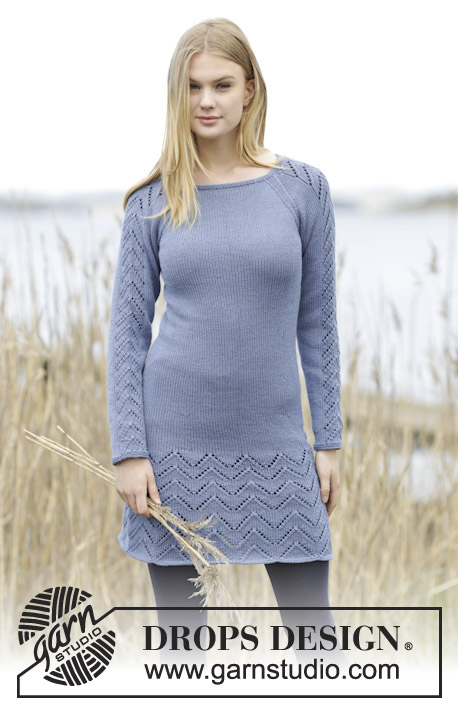
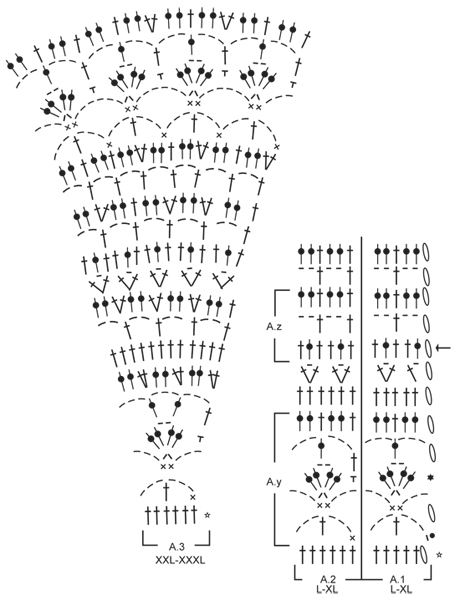
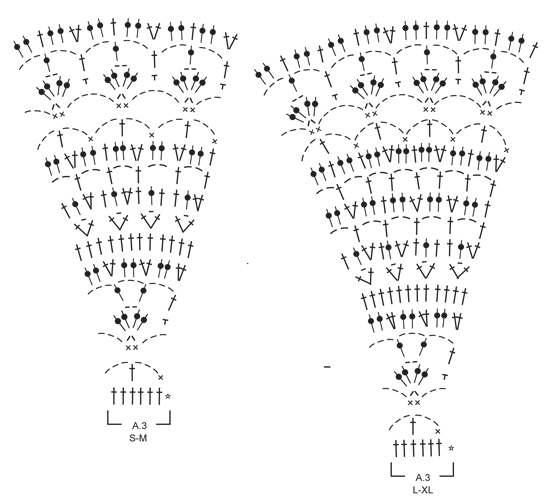
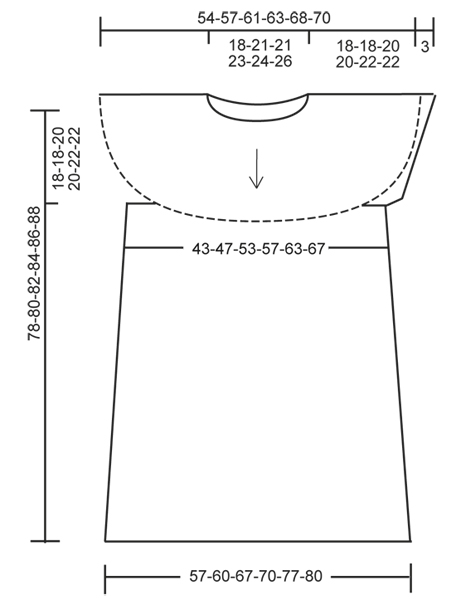
Vestito DROPS lavorato all’uncinetto con motivo traforato e sprone rotondo, lavorato dall’alto in basso (top down) in ”Cotton Merino”. Taglie: S - XXXL.
DROPS 165-36 |
|||||||||||||||||||||||||||||||
|
INFORMAZIONI PER IL LAVORO: Su ogni giro a m.a, sostituire la 1° m.a con 3 cat e finire il giro con 1 m.bss nella 3° cat dall’inizio del giro. SUGGERIMENTO PER GLI AUMENTI: Aumentare 1 m.a lavorando 2 m.a in 1 m.a. MOTIVO: Vedere i diagrammi A.1-A.3. Scegliere il diagramma per la taglia corretta. A.1 mostra come inizia e finisce il motivo. ---------------------------------------------------------- SPRONE: Lavorato in tondo, dall’alto in basso (top down), iniziando dal centro dietro. Avviare 128-138-138-163-168-173 cat con l’uncinetto n° 4 mm con Cotton Merino e formare un anello con 1 m.bss nella 1° cat. Lavorare il giro successivo come segue: lavorare 3 cat (= 1 m.a) – LEGGERE LE INFORMAZIONI PER IL LAVORO, 1 m.a nella 1° cat dall’anello di cat, 1 m.a in ognuna delle 2 cat successive, * saltare 1 cat, 1 m.a in ognuna delle 4 cat successive *, ripetere *-* per tutto il giro, finire con 1 m.bss nella 3° cat all’inizio del giro = 104-112-112-132-136-140 m.a. Sul giro successivo distribuire 16-20-20-24-44-52 aumenti in modo uniforme – LEGGERE IL SUGGERIMENTO PER GLI AUMENTI = 120-132-132-156-180-192 m.a. Continuare a lavorare come segue: lavorare A.1 sulle prime 6 m.a, A.2 sulle 12-12-12-18-24-24 m.a successive (= 2-2-2-3-4-4 volte in totale), A.3 sulle 12 m.a successive (= 2 volte in totale), A.2 sulle 6-6-6-12-12-12 m.a successive (= 1-1-1-2-2-2 volte), A.3 sulle 12 m.a successive (= 2 volte), A.2 sulle 30-36-36-42-54-60 m.a successive (= 5-6-6-7-9-10 volte), A.3 sulle 12 m.a successive (= 2 volte), A.2 sulle 6-6-6-12-12-12 m.a successive (= 1-1-1-2-2-2 volte), A.3 sulle 12 m.a successive (= 2 volte), A.2 sulle ultime 12-18-18-18-24-30 m.a (= 2-3-3-3-4-5 volte). NOTA: Nelle taglie S+XL+XXL iniziare il giro un pò verso un lato in modo che combaci il motivo. Continuare il motivo in questo modo. FARE ATTENZIONE ALLA TENSIONE DEL LAVORO! Quando A.1/A.2 sono stati lavorati una volta in verticale, ripeterli verso l’alto. Quando A.3 è stato lavorato 1 volta in verticale, ci sono 240-252-292-316-340-352 m.a sul giro. Il lavoro misura circa 18-18-20-20-22-22 cm (misurati dal bordo del collo). Ora lavorare come segue (= 6° giro in A.1/A.2): lavorare 1 m.a in ognuna delle prime 39-39-44-50-56-56 m.a (= metà dietro), lavorare 6-6-8-8-8-8 cat, saltare 48-48-58-64-64-64 m.a (= scalfo), lavorare 1 m.a in ognuna delle 72-78-88-94-106-112 m.a successive (= davanti), work 6-6-8-8-8-8 cat, saltare 48-48-58-64-64-64 m.a (= scalfo), lavorare 1 m.a in ognuna delle ultime 33-39-44-44-50-56 m.a = 144-156-176-188-212-224 m.a e 6-6-8-8-8-8 cat a ogni lato del lavoro (= 156-168-192-204-228-240 m in totale). Inserire un segnapunti nel lavoro, ORA MISURARE IL LAVORO DA QUI. CORPO: Lavorare il giro successivo come segue (= 7° giro di A.1/A.2): lavorare A.1 1 volta, poi lavorare A.2 sulle 150-162-186-198-222-234 m.a/cat rimaste (= 25-27-31-33-37-39 volte in totale in larghezza). Continuare a lavorare il motivo in verticale. ALLO STESSO TEMPO sul giro con la freccia nel diagramma aumentare 12 m.a in modo uniforme (cioè lavorare 2 m.a in ogni 13°-14°-16°-17°-19°-20° m.a) = 168-180-204-216-240-252 m.a. Ripetere A.2 altre 2 volte in larghezza. Ripetere gli aumenti ogni 10 cm, aggiustarlo ad aumentare su un giro a m.a, altre 3 volte = 204-216-240-252-276-288 m.a. Per ogni aumento, ripetere A.2 altre 2 volte in larghezza. Dopo l’ultimo, ripetere A.2 33-35-39-41-45-47 volte in totale in larghezza. Quando il lavoro misura circa 44-46-46-48-48-50 cm (dal segnapunti) – aggiustarlo in modo che l’ultimo giro sia un giro a m.a, lavorare A.y 3 volte in totale in verticale. Poi lavorare A.z 1 volta in verticale. Il lavoro misura circa 78-80-82-84-86-88 cm in totale dal bordo del collo. Chiudere e affrancare. BORDO DELLA MANICA: Lavorato in tondo. Iniziare al centro sotto la manica. Lavorare 1 m.bss nella 4° cat al centro sotto la manica, 3 cat, 1 m.a in ognuna delle 2-2-4-4-4-4 cat successive, 1 m.a in ognuna delle 48-48-58-64-64-64 m.a per la manica, ALLO STESSO TEMPO diminuire 6-6-4-4-0-0 m.a in modo uniforme e 1 m.a in ognuna delle ultime 3 cat avviate sotto la manica = 48-48-62-68-72-72 m.a. Lavorare 2 giri con 1 m.a in ogni m.a. Chiudere e affrancare. Lavorare un bordo della manica sull’altra manica. |
|||||||||||||||||||||||||||||||
Spiegazioni del diagramma |
|||||||||||||||||||||||||||||||
|
|||||||||||||||||||||||||||||||
 |
|||||||||||||||||||||||||||||||
 |
|||||||||||||||||||||||||||||||
 |
|||||||||||||||||||||||||||||||
 |
|||||||||||||||||||||||||||||||
Avete terminato questo modello?Allora taggate le vostre foto con #dropspattern #toulousedress o inviatele alla #dropsfan gallery. Avete bisogno di aiuto con questo modello?Troverete 10 video tutorial, una sezione per i commenti/domande e molto altro guardando il modello su www.garnstudio.com © 1982-2026 DROPS Design A/S. Ci riserviamo tutti i diritti. Questo documento, compreso tutte le sue sotto-sezioni, è protetto dalle leggi sul copyright. Potete leggere quello che potete fare con i nostri modelli alla fine di ogni modello sul nostro sito. |
|||||||||||||||||||||||||||||||


Con oltre 40 anni di esperienza nel design di modelli di maglia e uncinetto, DROPS Design offre la più estesa collezione di modelli gratuiti su internet - tradotti in 17 lingue. Ad oggi vi possiamo fornire 324 cataloghi e 12290 modelli - 9561 dei quali sono tradotti in Italiano.
Ci stiamo impegnando molto per darvi il meglio che vi possiamo offrire in termini di maglia e uncinetto, ispirazioni e consigli così come filati di grande qualità ad un prezzo incredibile! Volete utilizzare i nostri modelli per qualcosa d'altro oltre al vostro uso personale? Potete leggere tutto ciò che è consentito nel testo sul Copyright in basso su tutte le pagine dei nostri modelli. Buon lavoro!
Lasciare un commento sul modello DROPS 165-36
Noi saremmo felici di ricevere i tuoi commenti e opinioni su questo modello!
Se vuoi fare una domanda, fai per favore attenzione a selezionare la categoria corretta nella casella qui sotto per velocizzare il processo di risposta. I campi richiesti sono indicati da *.