
Categorie popolari
State cercando un filato?


Commenti / Domande (36)
![]() Mira Vereecken ha scritto:
Mira Vereecken ha scritto:
LIJF :Herhaal A.2 nog twee keer in de rondte. Herhaal dit meerderen elke 10 cm, pas zo aan dat u meerdert op een toer met stk, nog 3 keer = 204-216-240-252-276-288 stk. Herhaal voor elke meerdering A.2 nog twee keer in de rondte. Herhaal na de laatste meerdering A.2 33-35-39-41-45-47 keer in totaal in de rondte. -A2 steeds volledig in de hoogte? -Hoeveel keer heb je dan A2 gedaan voor maar L? -Steeds meerderen op toer met pijl? Mvg, Mira
09.10.2025 - 13:22DROPS Design ha risposto:
Dag Mira,
Nadat je steken gemeerderd hebt (bij de pijl) heb je meer steken in totaal in de rondte, waardoor je meer herhalingen van A.2 maakt over een hele toer. 10 cm verder meerder je weer, waardoor je opnieuw meer herhalingen in de breedte maakt.
11.10.2025 - 18:01
![]() Julika ha scritto:
Julika ha scritto:
Hi, Grösse L Muster A1 bzw. A2., Runde 3: Begonnen wird mit 3 Hebeluftmaschen, dann noch 3 Lm. Dann 2 Festemaschen. Bis hierhin ist es klar. Über den 2 Fm sind 2 kleine Schraegstriche aufgeführt. Meine Frage: sind das Lm? Muss ich zwischen die 2 Fm 2 Lm haekeln? Danke im voraus. LG Julika
30.09.2025 - 12:05
![]() Mira Vereecken ha scritto:
Mira Vereecken ha scritto:
De beschreven stukken, staan die ook op het getekend patroon? En bij het stuk 'Let op' moet je dan A1en A2 helemaal tot boven afhaken en nog een keer of alleen het daarvoor beschreven stukje? en verder ook met A3 tot helemaal boven? En daarna terug beginnen bij toer 6? Mvg, Mira
27.09.2025 - 17:16DROPS Design ha risposto:
Dag Mira,
In de beschrijving wordt verwezen naar de telpatronen, op dat moment pak je de telpatronen erbij om te lezen. Wat beschreven staat is verder niet in de vorm van een tekening oid opgenomen. Je breit A.3 in de hoogte en A.1 en A.2 lopen mee met A.3 Het gaat erom dat A.3 klaar is in de hoogte (dat staat in de zin na die paragraaf).
27.09.2025 - 20:00
![]() Anette Schwarz ha scritto:
Anette Schwarz ha scritto:
Hallo liebes Drops- Team, Wie kommt es, dass ich für die Anleitung für dieses Kleid auf einer anderen Webseite 3€ bezahlen muss? Lg
11.07.2023 - 11:08DROPS Design ha risposto:
Liebe Anette, Alle unsere Modelle sind kostenlos auf unserer Website verfügbar. Sie können sie hier einsehen und als PDF herunterladen. Viele Spass beim häkeln!
27.07.2023 - 10:06
![]() Ute Wilson-Oertel ha scritto:
Ute Wilson-Oertel ha scritto:
Hi, the size is XL . The pattern A3 confuses me, I do not know how to proceed or how it repeats itself . It would help me, if I knew how the pattern is continuing. Thanks a lot
27.02.2023 - 10:43DROPS Design ha risposto:
Dear Mrs Wilson-Oertel, you just have to work all diagrams at the same time in this order: A.1 over the first 6 tr, A.2 over the next 18 tr (= 3 times in total), A.3 over the next 12 tr (= 2 times in total), A.2 over the next 12 tr (= 2 times), A.3 over the next 12 tr (= 2 times), A.2 over the next 42 tr (= 7 times), A.3 over the next 12 tr (= 2 times), A.2 over the next 12 tr (= 2 times), A.3 over the next 12 tr (= 2 times), A.2 over the last 18 tr (= 3 times) = 156 trebles. Then work 2nd row all diagrams, 3rd row all diagrams etc... You should increase only in A.3 - insert markers between diagrams/repeats can help you tracking the number of sts. Can this help?
27.02.2023 - 11:25
![]() Ute Wilson-Oertel ha scritto:
Ute Wilson-Oertel ha scritto:
Hallo, A3 habe ich Probleme. Bei den Reihen mit den Stäbchen, weiß ich nicht wie es danach weiter geht, da es abgehackt ist und ich nicht weiß, ob der Anfang mitgezählt wird. Eine Reihe beginnt mit 5 Stäbchen ,dann werden am Ende 8 Stäbchen angezeigt und dann? Wie fahre ich weiter? Danke
26.02.2023 - 13:19
![]() Ute Wilson-Oertel ha scritto:
Ute Wilson-Oertel ha scritto:
Hallo, A3 habe ich Probleme. Bei den Reihen mit den Stäbchen, weiß ich nicht wie es danach weiter geht, da es abgehackt ist und ich nicht weiß, ob der Anfang mitgezählt wird. Z.B. Reihe 13 beginnt mit 5 Stäbchen ,dann werden am Ende 8 Stäbchen angezeigt und dann? Wie fahre ich weiter? Danke
26.02.2023 - 13:18DROPS Design ha risposto:
Liebe Frau Wilson-Oertel, können Sie uns bitte mitteilen, welche Größe Sie häkeln? Da es sind 3 verschieden A.3, würde es uns helfen, Ihnen dann weiterzuhelfen. Danke im voraus für Ihr Verständnis.
27.02.2023 - 10:28
![]() Tracey ha scritto:
Tracey ha scritto:
I completed 3 rd row now. So now it asking when a1 a2 have been worked 1 time vertically repeat them upwards. So do I do a1 row then a2. Then a1 then a2. Or just go up on a2 chart thanks.
29.11.2019 - 14:40DROPS Design ha risposto:
Dear Tracey, you continue working the same diagrams as for previous round, ie A.1, A.2, A.3 , etc... in the same order as before, working each row in each diagram. You are increasing stitches in A.3, while the number of stitches in A.1 and A.2 will remain the same. Happy crocheting!
29.11.2019 - 15:48
![]() Tracey ha scritto:
Tracey ha scritto:
Hi I have done 1 row as 4 tr and skip stitch. 4 tr. to end. Then second row I increased so I have 120 now. Instead of 104. So I know that right. But now it says continue to work as follows. Work a1 over the first 6 tr. is that 1 row Cause if I do 30 times tr 5 times. And the other stitches aswell. It not going to fit on the same row. As I only got 120 sts. As I’m doing the small size. Plz help with diagram. I’m still learning to do crochet.
29.11.2019 - 12:25DROPS Design ha risposto:
Dear Tracey, work first row each diagram at a time, ie row 1 in A.1 over the first 6 sts, then repeat row 1 in A.2 a total of 2 times (= over the next 12 sts), row 1 in A.3 over the next 12 sts (= 2 times in width), and so on. On next round, work row 2 each diagram, then row 3 and so on. read more here. Happy crocheting!
29.11.2019 - 13:00Irma ha scritto:
: Work A.1 over the first 6 dc, A.2 over the next 12-12-12-18-24-24 dc (= 2-2-2-3-4-4 times in total), A.3 over the next 12 dc (= 2 times in total), A.2 over the next 6-6-6-12-12-12 dc (= 1-1-1-2-2-2 times), A.3 over the next 12 dc (= 2 times), ............... A.3 over the next 12 dc (= 2 times), A.2 over the last 12-18-18-18-24-30 dc (= 2-3-3-3-4-5 times) After above round how many stitches should i have for xl.
28.09.2017 - 15:45DROPS Design ha risposto:
Dear Irma, after this round, you will still have 156 sts in XL,ie as before since you work 1 st in the st from previous row, see diagram. Happy crocheting!
28.09.2017 - 17:22
|
|||||||||||||||||||||||||||||||
Toulouse#toulousedress |
|||||||||||||||||||||||||||||||
|
|
|||||||||||||||||||||||||||||||
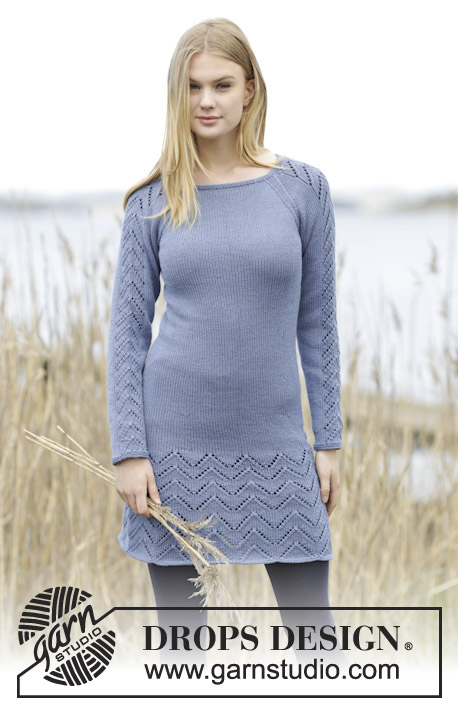
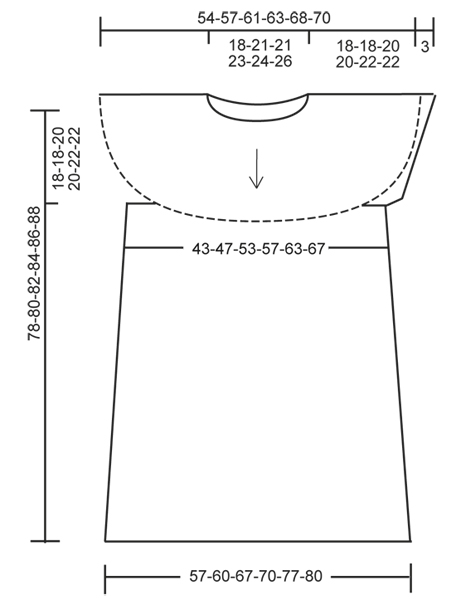
Vestito DROPS lavorato all’uncinetto con motivo traforato e sprone rotondo, lavorato dall’alto in basso (top down) in ”Cotton Merino”. Taglie: S - XXXL.
DROPS 165-36 |
|||||||||||||||||||||||||||||||
|
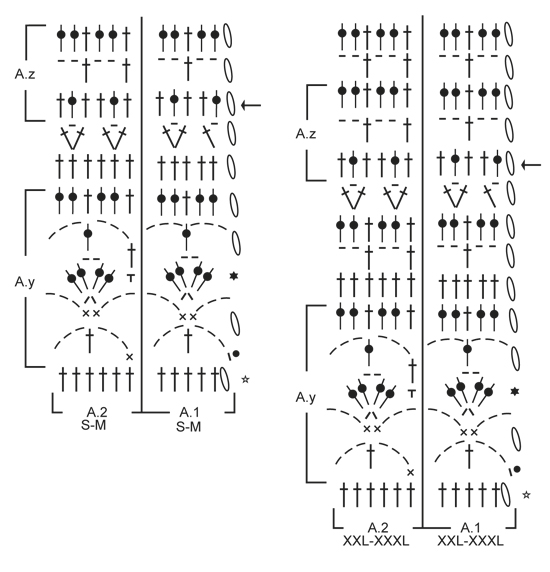
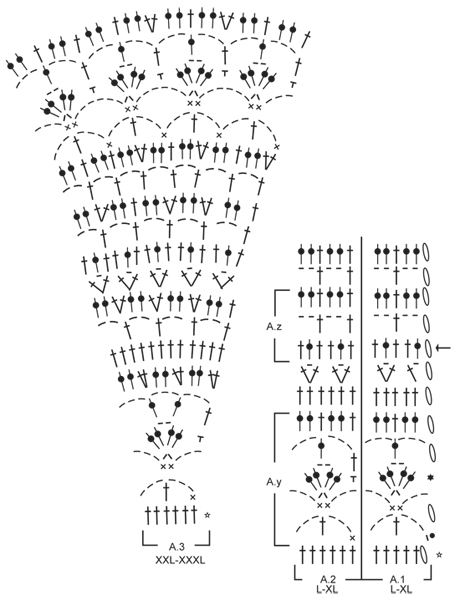
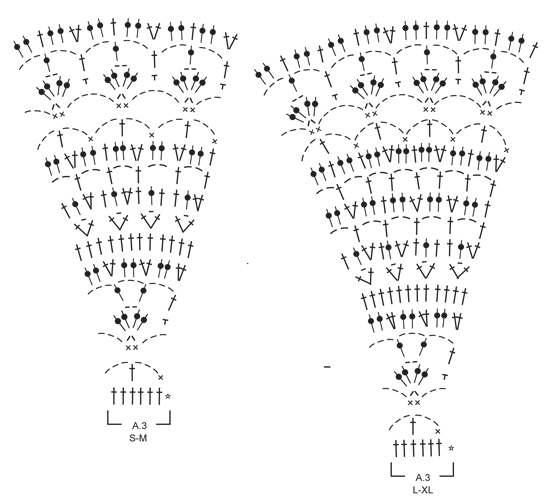
INFORMAZIONI PER IL LAVORO: Su ogni giro a m.a, sostituire la 1° m.a con 3 cat e finire il giro con 1 m.bss nella 3° cat dall’inizio del giro. SUGGERIMENTO PER GLI AUMENTI: Aumentare 1 m.a lavorando 2 m.a in 1 m.a. MOTIVO: Vedere i diagrammi A.1-A.3. Scegliere il diagramma per la taglia corretta. A.1 mostra come inizia e finisce il motivo. ---------------------------------------------------------- SPRONE: Lavorato in tondo, dall’alto in basso (top down), iniziando dal centro dietro. Avviare 128-138-138-163-168-173 cat con l’uncinetto n° 4 mm con Cotton Merino e formare un anello con 1 m.bss nella 1° cat. Lavorare il giro successivo come segue: lavorare 3 cat (= 1 m.a) – LEGGERE LE INFORMAZIONI PER IL LAVORO, 1 m.a nella 1° cat dall’anello di cat, 1 m.a in ognuna delle 2 cat successive, * saltare 1 cat, 1 m.a in ognuna delle 4 cat successive *, ripetere *-* per tutto il giro, finire con 1 m.bss nella 3° cat all’inizio del giro = 104-112-112-132-136-140 m.a. Sul giro successivo distribuire 16-20-20-24-44-52 aumenti in modo uniforme – LEGGERE IL SUGGERIMENTO PER GLI AUMENTI = 120-132-132-156-180-192 m.a. Continuare a lavorare come segue: lavorare A.1 sulle prime 6 m.a, A.2 sulle 12-12-12-18-24-24 m.a successive (= 2-2-2-3-4-4 volte in totale), A.3 sulle 12 m.a successive (= 2 volte in totale), A.2 sulle 6-6-6-12-12-12 m.a successive (= 1-1-1-2-2-2 volte), A.3 sulle 12 m.a successive (= 2 volte), A.2 sulle 30-36-36-42-54-60 m.a successive (= 5-6-6-7-9-10 volte), A.3 sulle 12 m.a successive (= 2 volte), A.2 sulle 6-6-6-12-12-12 m.a successive (= 1-1-1-2-2-2 volte), A.3 sulle 12 m.a successive (= 2 volte), A.2 sulle ultime 12-18-18-18-24-30 m.a (= 2-3-3-3-4-5 volte). NOTA: Nelle taglie S+XL+XXL iniziare il giro un pò verso un lato in modo che combaci il motivo. Continuare il motivo in questo modo. FARE ATTENZIONE ALLA TENSIONE DEL LAVORO! Quando A.1/A.2 sono stati lavorati una volta in verticale, ripeterli verso l’alto. Quando A.3 è stato lavorato 1 volta in verticale, ci sono 240-252-292-316-340-352 m.a sul giro. Il lavoro misura circa 18-18-20-20-22-22 cm (misurati dal bordo del collo). Ora lavorare come segue (= 6° giro in A.1/A.2): lavorare 1 m.a in ognuna delle prime 39-39-44-50-56-56 m.a (= metà dietro), lavorare 6-6-8-8-8-8 cat, saltare 48-48-58-64-64-64 m.a (= scalfo), lavorare 1 m.a in ognuna delle 72-78-88-94-106-112 m.a successive (= davanti), work 6-6-8-8-8-8 cat, saltare 48-48-58-64-64-64 m.a (= scalfo), lavorare 1 m.a in ognuna delle ultime 33-39-44-44-50-56 m.a = 144-156-176-188-212-224 m.a e 6-6-8-8-8-8 cat a ogni lato del lavoro (= 156-168-192-204-228-240 m in totale). Inserire un segnapunti nel lavoro, ORA MISURARE IL LAVORO DA QUI. CORPO: Lavorare il giro successivo come segue (= 7° giro di A.1/A.2): lavorare A.1 1 volta, poi lavorare A.2 sulle 150-162-186-198-222-234 m.a/cat rimaste (= 25-27-31-33-37-39 volte in totale in larghezza). Continuare a lavorare il motivo in verticale. ALLO STESSO TEMPO sul giro con la freccia nel diagramma aumentare 12 m.a in modo uniforme (cioè lavorare 2 m.a in ogni 13°-14°-16°-17°-19°-20° m.a) = 168-180-204-216-240-252 m.a. Ripetere A.2 altre 2 volte in larghezza. Ripetere gli aumenti ogni 10 cm, aggiustarlo ad aumentare su un giro a m.a, altre 3 volte = 204-216-240-252-276-288 m.a. Per ogni aumento, ripetere A.2 altre 2 volte in larghezza. Dopo l’ultimo, ripetere A.2 33-35-39-41-45-47 volte in totale in larghezza. Quando il lavoro misura circa 44-46-46-48-48-50 cm (dal segnapunti) – aggiustarlo in modo che l’ultimo giro sia un giro a m.a, lavorare A.y 3 volte in totale in verticale. Poi lavorare A.z 1 volta in verticale. Il lavoro misura circa 78-80-82-84-86-88 cm in totale dal bordo del collo. Chiudere e affrancare. BORDO DELLA MANICA: Lavorato in tondo. Iniziare al centro sotto la manica. Lavorare 1 m.bss nella 4° cat al centro sotto la manica, 3 cat, 1 m.a in ognuna delle 2-2-4-4-4-4 cat successive, 1 m.a in ognuna delle 48-48-58-64-64-64 m.a per la manica, ALLO STESSO TEMPO diminuire 6-6-4-4-0-0 m.a in modo uniforme e 1 m.a in ognuna delle ultime 3 cat avviate sotto la manica = 48-48-62-68-72-72 m.a. Lavorare 2 giri con 1 m.a in ogni m.a. Chiudere e affrancare. Lavorare un bordo della manica sull’altra manica. |
|||||||||||||||||||||||||||||||
Spiegazioni del diagramma |
|||||||||||||||||||||||||||||||
|
|||||||||||||||||||||||||||||||
 |
|||||||||||||||||||||||||||||||
 |
|||||||||||||||||||||||||||||||
 |
|||||||||||||||||||||||||||||||
 |
|||||||||||||||||||||||||||||||
Avete terminato questo modello?Allora taggate le vostre foto con #dropspattern #toulousedress o inviatele alla #dropsfan gallery. Avete bisogno di aiuto con questo modello?Troverete 10 video tutorial, una sezione per i commenti/domande e molto altro guardando il modello su www.garnstudio.com © 1982-2026 DROPS Design A/S. Ci riserviamo tutti i diritti. Questo documento, compreso tutte le sue sotto-sezioni, è protetto dalle leggi sul copyright. Potete leggere quello che potete fare con i nostri modelli alla fine di ogni modello sul nostro sito. |
|||||||||||||||||||||||||||||||


Con oltre 40 anni di esperienza nel design di modelli di maglia e uncinetto, DROPS Design offre la più estesa collezione di modelli gratuiti su internet - tradotti in 17 lingue. Ad oggi vi possiamo fornire 324 cataloghi e 12290 modelli - 9561 dei quali sono tradotti in Italiano.
Ci stiamo impegnando molto per darvi il meglio che vi possiamo offrire in termini di maglia e uncinetto, ispirazioni e consigli così come filati di grande qualità ad un prezzo incredibile! Volete utilizzare i nostri modelli per qualcosa d'altro oltre al vostro uso personale? Potete leggere tutto ciò che è consentito nel testo sul Copyright in basso su tutte le pagine dei nostri modelli. Buon lavoro!
Lasciare un commento sul modello DROPS 165-36
Noi saremmo felici di ricevere i tuoi commenti e opinioni su questo modello!
Se vuoi fare una domanda, fai per favore attenzione a selezionare la categoria corretta nella casella qui sotto per velocizzare il processo di risposta. I campi richiesti sono indicati da *.