
Categorie popolari
State cercando un filato?


Commenti / Domande (45)
![]() Sandra ha scritto:
Sandra ha scritto:
Wie kommt man beim Rumpfteil in der Größe XXL auf 136 Maschen? Ich habe 2x30 für das Rückenteil und 60 für das Vorderteil. Das sind 120 Maschen. 55 Maschen für jeden Ärmel. Insgesamt 230 Maschen.
20.08.2025 - 17:42DROPS Design ha risposto:
Liebe Sandra, vor der Aufteilung sind es 214 Maschen (XXL = 5. Größe) und so wird die Arbeit aufgeteilt: 30 M (halbes Rückenteil) + 8 Luftmaschen (47 M überspringen) + 60 M (Vorderteil) + 8 Luftmaschen (47 M überspringen) + 30 M (halbes-Rückenteil) = 30+47+60+47+30=214 vor Aufteilung und 30+8+60+8+30=136 Maschen nach der Aufteilung. Viel Spaß beim Häkeln!
22.08.2025 - 15:20
![]() Sandra ha scritto:
Sandra ha scritto:
Was ist mit hiermit gemeint? dann in jeder 2. Rd 2-3-2-2-2-0 x arb = 160-173-186-201-214 Was soll 2 mal gearbeitet werden?
13.08.2025 - 16:58DROPS Design ha risposto:
Liebe Sandra, nach den Zunahmen in jeder Runde, nehmen Sie jetzt in jeder 2. Runde insgesamt 2 Mal, dh (1 Runde ohne Zunahme, 1 Runde mit Zunahmen) x 2. Viel Spaß beim Häkeln!
14.08.2025 - 08:46
![]() Hannah ha scritto:
Hannah ha scritto:
I think I may be reading this wrong. I did a test swatch and got the right gauge with a 6mm hook but when I made my first rows, it was big enough for me to put around my waist with room to spare, and that was only 90 stitches. Is that right that 90 stitches is the neck hole and its 238 at its widest? With my gauge, that's big enough for a family of four. Please can someone help me here?
15.11.2024 - 22:40DROPS Design ha risposto:
Dear Hannah, the 90 loose stitches (for the largest size) should be 79 dc, which should be the width of your neck. These 79 dc should measure approx. 65cm for the neck. You can see in the jacket version of this pattern here: https://www.garnstudio.com/pattern.php?id=7094&cid=19, that the neck is very wide. 238 is the yoke, which includes the sleeves; the body should have 154 stitches, which are approx. 128 cm. Happy crochetting!
17.11.2024 - 23:27
![]() Amanda ha scritto:
Amanda ha scritto:
Hello 👋 I'm struggling with A.1 and A.2 How many stitches do you skip? 2 or 3? And then the next row you work dc into the ch3 space, correct? What is the correct stitch count after round 2 of the body in size XXL?
10.08.2024 - 22:19DROPS Design ha risposto:
Dear Amanda, in this case, you can follow the pattern instructions; you don't need to interpret the charts if you find it difficult. You can find rounds 1 and 2 explained in the body section. Happy crochetting!
12.08.2024 - 00:27
![]() Pia Svane Christensen ha scritto:
Pia Svane Christensen ha scritto:
Hej Jeg forstår ikke hvad det er jeg skal gøre i bærestykket, skal jeg tage dobbelt ud i hveranden omgang. ? Med venlig hilsen Pia Nu tages der ud på skiftevis højre og venstre side af hver mærke. Gentag udtagningen på hver omg 9-9-11-12-13-16 gange til, og på hver 2.omg 2-3-2-2-2-0 gange = 160-173-186-201-214-238 st på omg.
29.08.2022 - 21:07DROPS Design ha risposto:
Hej Pia, først tager du ud på hver omgang 9 gange og efter det tager du ud på hver 2.omgang 2 gange (i den mindste størrelse) :)
31.08.2022 - 13:45
![]() Melanie ha scritto:
Melanie ha scritto:
Hallo, Größe XXXL, 16 mal in Jeder Runde 8 Zun. erste Runde rechts, nächste Runde links, verstanden. Hier habe ich dann nach 16 Runden 230 Maschen. "dann in jeder 2. Rd 0 x arb = 238" Aber 0 Zunamen heißt ich habe nur 230 Maschen oder Runde 17. 8Znm und danach ohne Zunahmen weiter? Und nein mir helfen weder alle anderen Kommentare noch ein Video.
13.05.2022 - 09:06DROPS Design ha risposto:
Liebe Melanie, die Zunahmen wiederholen Sie noch weitere 16 x, dh insgesamt 17 Mal (die 1. Zunahmen + noch 16 Mal), so haben Sie die 238 Maschen. Viel Spaß beim häkeln!
13.05.2022 - 09:14
![]() Marianne ha scritto:
Marianne ha scritto:
Klopt het dat er na het plaatsen van de 8 markeerders bij maat xl,tussen de middelste twee markeerders 23 st zijn aan de voorkant en tussen de middelste twee markeerders aan de achterkant 20 st zijn
11.01.2022 - 15:34DROPS Design ha risposto:
Dag Marianne,
Op het achterpand zijn er 22 steken en op het voorpand zijn er 23 steken.
12.01.2022 - 09:42
![]() Marianne ha scritto:
Marianne ha scritto:
Klopt het dat er na het plaatsen van de 8 markeerders bij maat xl,tussen de middelste twee markeerders 23 st zijn aan de voorkant en tussen de middelste twee markeerders aan de achterkant 20 st zijn
11.01.2022 - 15:32
![]() Flamarion ha scritto:
Flamarion ha scritto:
Antwort ist falsch, Video passt nicht z. Anleitung. Auf dem Foto ist zu erkennen, daß i. d. Mitte des Pullis KEINE Maschen zugenommen sind, darum heißt es lt. Anleitung RAGLAN.Markierer habe ich lt. Anleitung korrekt gesetzt, 4 x 2 (mit je 2 Stäb. Abstand). Nächste Reihe = 4 x 2 Stäb. rechts der Marker zunehmen, in der nächsten Reihe links davon.Vergrößert sich d. Abstand innerhalb der Zunahmen oder bleiben immer die 2 Stäbchen Abstand (Raglanlinie)?Bitte Häkelschrift anfertigen.
08.02.2021 - 18:03DROPS Design ha risposto:
Es werden nicht 2 Stb pro Markierer zugenommen, sondern stets nur 1 Stb. Die Anleitung wurde inzwischen umformuliert, da sie an dieser Stelle doppeldeutig war - das Video passt zur Anleitung, da hier auch nur jeweils 1 Stb zugenommen wird. Sie häkeln die Zunahmen jedes Mal in das Stb neben dem Markierer. Eine Raglanlinie gibt es streng genommen nicht, da die Maschenzahl nicht bei 2 Stb bleibt - die Passe wird dadurch nach und nach zur Rundpasse. Zur Kontrolle Ihrer Markierer: Sie müssten anfangs je 20-21-22-23-26-30 Stb für das Vorderteil und das Rückenteil haben und je 8-10-12-14-14-17 Stb für die Ärmel, dazwischen je 2 Stb. Gutes Gelingen!
09.02.2021 - 10:47
![]() Flamarion ha scritto:
Flamarion ha scritto:
Keine Anfängerin, komme ebenfalls mit den Zunahmen nicht klar, Antworten und Video hilft nicht weiter. Im Video wird nur jeweils 1 Zunahme links od. rechts erklärt, wie aber mit 2 Zunahmen? Wieviel einzelne Stäbchen müssen zwischen den beiden Zunahmen pro Zunahmestelle generell sein? ?? Hinweis -> Ein Häkeldiagramm wäre wesentlich hilfreicher, in dem mehrere Reihen Zunahmen dargestellt sind, statt mit Worten oder nicht wirklich passendem Video zu erklären.
08.02.2021 - 14:21DROPS Design ha risposto:
Liebe Frau Flamarion, es wird bei der Passe nur 1 Masche bei jeder Markierung zugenommen, beim 1. Mal nehmen Sie an der rechten Seite jeder Markierer (= 8 Zunahmen), das nächste Mal, an der linken Seite jeder Markierer (=8 Zunahmen) - Deutsche Anleitung muss hier korrigiert werden, danke für den Hinweis, dh es wird genau wie im Video zugenommen. Viel Spaß beim häkeln!
08.02.2021 - 15:30
|
||||||||||||||||||||||||||||
Lakeside#lakesidesweater |
||||||||||||||||||||||||||||
|
|
||||||||||||||||||||||||||||
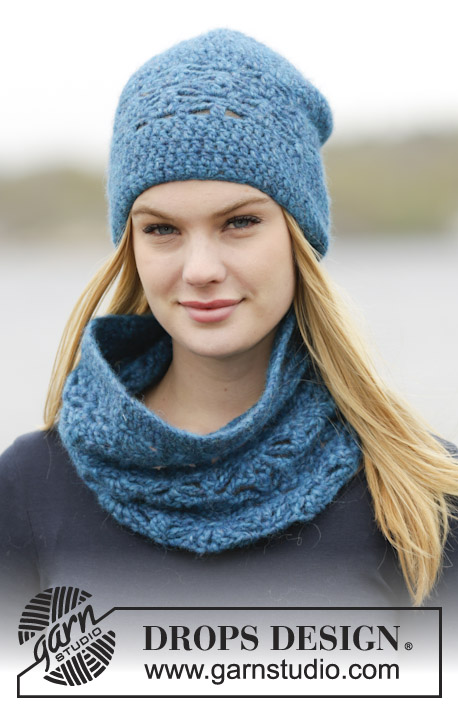
Maglione DROPS lavorato all’uncinetto a maglie alte, motivo traforato e sprone rotondo, lavorato dall'alto in basso (top down) in "Air".
DROPS 164-31 |
||||||||||||||||||||||||||||
|
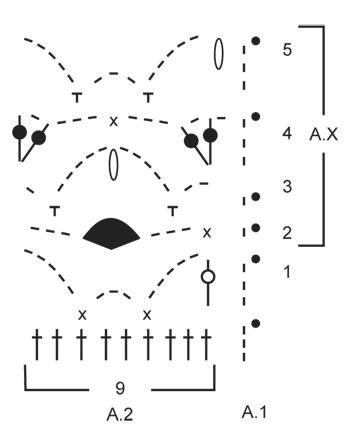
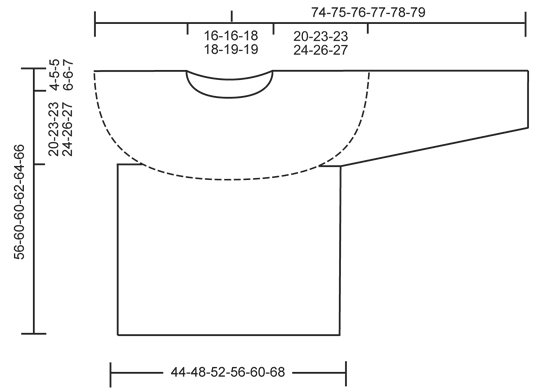
INFORMAZIONI PER IL LAVORO: Sostituire la 1° m.b all'inizio di ogni giro a m.b con 1cat. Finire ogni giro con 1 m.bss nella cat all'inizio del giro. Sostituire la 1° m.a all'inizio di ogni giro a m.a con 3 cat. Finire ogni giro con 1 m.bss nella 3° cat dall'inizio del giro. MOTIVO: Vedere i diagrammi A.1 e A.2. LAVORARE 2 M.A INSIEME (nella m.a): Lavorare 1 m.a nella m.a successiva ma aspettare con l'ultimo passaggio, lavorare un'altra m.a nella stessa m.a, ma sull'ultimo passaggio, far passare il filo attraverso tutte le m sull'uncinetto. LAVORARE 2 M.A INSIEME (attorno alla cat): lavorare 1 m.a attorno alla cat centrale del gruppo di m.a ma aspettare con l'ultimo passaggio, lavorare un'altra m.a attorno alla stessa cat, ma sull'ultimo passaggio, far passare il filo attraverso tutte le m sull'uncinetto. GRUPPO DI M.A: Lavorare un gruppo di m.a attorno all'arco di cat come segue: lavorare * 1 m.a, 1 cat *, ripetere *-* altre 2 volte attorno allo stesso arco di cat, 1 m.a attorno allo stesso arco di cat. SUGGERIMENTO PER GLI AUMENTI: Aumentare 1 m.a lavorando 2 m.a in 1 m.b/m.a. SUGGERIMENTO PER LE DIMINUZIONI: Diminuire 1 m.a all'inizio e alla fine del giro come segue: lavorare 1 m.a (= 3 cat), * lavorare 1 m,a ma aspettare con l'ultimo passaggio (= 2 m sull'uncinetto), poi lavorare la m.a successiva ma sull'ultimo passaggio, far passare il filo attraverso tutte le m sull'uncinetto *, ripetere *-* quando rimangono 3 m.a sul giro = 1 m diminuita a pgni lato del segnapunti. ---------------------------------------------------------- MAGLIONE: Lavorato dall'alto in basso (top down). Lavorato in tondo, il giro inizia al centro dietro. SPRONE: Avviare 66-69-75-82-84-90 cat lasse con l'uncinetto n° 6 mm con Air e formare un anello con 1 m.bss. Lavorare il 1° giro come segue: GIRO 1: lavorare 1 cat - LEGGERE LE INFORMAZIONI PER IL LAVORO, lavorare 1 m.b in ognuna delle prime 1-4-2-1-3-1 cat, * saltare 1 cat, lavorare 1 m.b in ognuna delle 7 cat successive *, ripetere *-* altre 7-7-8-9-9-10 volte = 58-61-66-72-74-79 m.b. GIRO 2: lavorare 1 m.a in ogni m.b e ALLO STESSO TEMPO aumentare 6-8-8-9-12-23 m.a in modo uniforme - LEGGERE IL SUGGERIMENTO PER GLI AUMENTI = 64-69-74-81-86-102 m.a. Ora inserire 8 segnapunti nel lavoro per gli aumenti del raglan senza lavorare le m. Inserire 4 segnapunti a ogni lato dall'inizio del giro in modo che siano a specchio dal centro davanti: Inserire un segnapunti dopo 10-10-10-11-12-15 m.a, inserire il segnapunti successivo dopo 2 m.a, poi inserire il segnapunti successivo dopo 8-10-12-14-14-17 m.a, e finire con l'ultimo segnapunti dopo 2 m.a. Ora ci sono 20-21-22-23-26-30 m.a tra i due segnapunti centrali verso il centro davanti sul maglione. Ora continuare con 1 m.a in ogni m.a, ALLO STESSO TEMPO aumentare 1 m.a sul lato destro degli 8 segnapunti. Poi aumentare in modo alternato sul lato destro e sinistro di tutti i segnapunti. Ripetere gli aumenti a ogni giro altre 9-9-11-12-13-16 volte, e poi a giri alterni 2-3-2-2-2-0 volte = 160-173-186-201-214-238 m.a sul giro. Il lavoro misura circa 20-23-23-24-26-27 cm. FARE ATTENZIONE ALLA TENSIONE DEL LAVORO! Sul giro successivo lavorare come segue: lavorare 21-23-25-28-30-34 m.a (= metà dietro), 8 cat (sotto manica), saltare 38-40-42-45-47-50 m.a dalla riga precedente (= manica), 42-47-52-55-60-70 m.a (= davanti), 8 cat (sotto manica), saltare 38-40-42-45-47-50 m.a dalla riga precedente (= manica) e 21-23-25-27-30-34 m.a (= metà dietro). Inserire un segnapunti, ora misurare il lavoro da qui! CORPO: Ora ci sono 100-109-118-127-136-154 m per il corpo. ORA MISURARE IL LAVORO DA QUI. Lavorare 1 giro con 1 m.a in ogni m.a/cat, poi lavorare il MOTIVO – leggere la spiegazione sopra, come segue: NOTA: lavorare dal 1° giro di A.1-A.2. GIRO 1: lavorare 3 cat (= A.1) – ricordarsi delle informazioni per il lavoro. Poi lavorare A.2 come segue: * lavorare 2 M.A INSIEME (nella m.a) – leggere la spiegazione sopra, 5 cat, saltare 2 m.a, 1 m.b nella m.a successiva, 3 cat, saltare 2 m.a, 1 m.b nella m.a successiva, 5 cat, saltare 2 m.a *, ripetere *-* altre 10-11-12-13-14-16 volte. Finire con 1 m.bss nella 3° cat sul giro (= A.1). GIRO 2: lavorare 1 cat, * lavorare 1 m.b nella 2° m.a lavorata insieme, 3 cat, saltare 1 arco di cat, lavorare 1 GRUPPO DI M.A – leggere la spiegazione sopra, attorno al successivo arco di cat, 3 cat, saltare 1 arco di cat *, ripetere *-* altre 10-11-12-13-14-16 volte. Finire con 1 m.bss nella 1° cat sul giro. GIRO 3: lavorare 1 cat, * 2 cat, 1 m.b attorno all’arco di cat successivo, 5 cat, lavorare 2 M.A INSIEME (attorno alla cat) – leggere la spiegazione sopra, 5 cat, 1 m.b attorno all’arco di cat successivo dopo il gruppo di m.a, 1 cat *, ripetere *-* altre 10-11-12-13-14-16 volte. Finire con 1 m.bss nella 1° cat sul giro. GIRO 4: lavorare 3 cat, lavorare (1 cat, 1 m.a, 1 cat, 1 m.a) attorno al 1° arco di cat, 3 cat, saltare 1 arco di cat, 1 m.b nelle 2 m.a lavorate insieme, 3 cat, saltare un arco di cat, * (1 m.a, 1 cat, 1 m.a, 1 cat, 1 m.a, 1 cat, 1 m.a) attorno all’arco di cat successivo, 3 cat, saltare 1 arco di cat, 1 m.b nelle 2 m.a lavorate insieme, 3 cat, saltare 1 arco di cat *, ripetere *-* altre 9-10-11-12-13-15 volte, (1 m.a, 1 cat, 1 m.a) attorno all’ultimo arco di cat. Finire con 1 m.bss nella 3° cat sul giro. GIRO 5: lavorare 3 cat, * lavorare 2 M.A INSIEME (attorno alla cat), 5 cat, 1 m.b attorno all’arco di cat dopo il gruppo di m.a, 3 cat, 1 m.b attorno all’arco di cat successivo, 5 cat *, ripetere *-* altre 10-11-12-13-14-16 volte, Finire con 1 m.bss nella 3° cat sul giro. Continuare in questo modo e ripetere A.X (= 2°-5° giro) fino a quando il lavoro misura circa 32 cm in tutte le taglie – aggiustare per finire dopo il 2° o 4° giro in A.1-A.2. Il lavoro misura 56-60-60-62-64-66 cm in totale. MANICA: La manica è lavorata in tondo, dall’alto in basso (top down). ORA MISURARE IL LAVORO DA QUI. Inserire un segnapunti al centro delle 8 cat lavorate sotto la manica. Ora misurare il lavoro da qui. Lasciare che il segnapunti segua il lavoro fino alla fine del lavoro. Affrancare il filo con 1 m.bss nella 5° cat delle 8 cat lavorate sullo scalfo sul corpo. Lavorare 3 cat (= 1 m.a), continuare con 1 m.a in ognuna delle 3 cat successive, 1 m.a in ognuna delle m.a per la manica e poi 1 m.a nelle 4 cat rimaste sotto la manica = 46-48-50-53-55-58 m.a – ricordarsi delle INFORMAZIONI PER IL LAVORO! Continuare con 1 m.a in ogni m.a e ALLO STESSO TEMPO quando il lavoro misura circa 4 cm iniziare a diminuire – LEGGERE IL SUGGERIMENTO PER LE DIMINUZIONI. Ripetere le diminuzioni ogni 3-2-2-2-2-1 giri altre 8-9-10-10-11-12 volte = 28-28-28-31-31-32 m.a rimaste. Quando la manica misura 46-44-44-43-42-40 cm, la manica è finita. Lavorare l’altra manica nello stesso modo. ---------------------------------------------------------- Cappello e scaldacollo: Vedere DROPS 164-32 o "Motivi relativi" nel motivo o sul sito. ---------------------------------------------------------- |
||||||||||||||||||||||||||||
Spiegazioni del diagramma |
||||||||||||||||||||||||||||
|
||||||||||||||||||||||||||||
 |
||||||||||||||||||||||||||||
 |
||||||||||||||||||||||||||||
Avete terminato questo modello?Allora taggate le vostre foto con #dropspattern #lakesidesweater o inviatele alla #dropsfan gallery. Avete bisogno di aiuto con questo modello?Troverete 14 video tutorial, una sezione per i commenti/domande e molto altro guardando il modello su www.garnstudio.com © 1982-2026 DROPS Design A/S. Ci riserviamo tutti i diritti. Questo documento, compreso tutte le sue sotto-sezioni, è protetto dalle leggi sul copyright. Potete leggere quello che potete fare con i nostri modelli alla fine di ogni modello sul nostro sito. |
||||||||||||||||||||||||||||


Con oltre 40 anni di esperienza nel design di modelli di maglia e uncinetto, DROPS Design offre la più estesa collezione di modelli gratuiti su internet - tradotti in 17 lingue. Ad oggi vi possiamo fornire 325 cataloghi e 12298 modelli - 9569 dei quali sono tradotti in Italiano.
Ci stiamo impegnando molto per darvi il meglio che vi possiamo offrire in termini di maglia e uncinetto, ispirazioni e consigli così come filati di grande qualità ad un prezzo incredibile! Volete utilizzare i nostri modelli per qualcosa d'altro oltre al vostro uso personale? Potete leggere tutto ciò che è consentito nel testo sul Copyright in basso su tutte le pagine dei nostri modelli. Buon lavoro!
Lasciare un commento sul modello DROPS 164-31
Noi saremmo felici di ricevere i tuoi commenti e opinioni su questo modello!
Se vuoi fare una domanda, fai per favore attenzione a selezionare la categoria corretta nella casella qui sotto per velocizzare il processo di risposta. I campi richiesti sono indicati da *.