
Categorie popolari
State cercando un filato?


Commenti / Domande (21)
![]() Andrea ha scritto:
Andrea ha scritto:
Can this pattern be easily adapted to straight needle knitting
11.12.2024 - 13:46DROPS Design ha risposto:
Dear Andrea, you can check the following lesson to adjust this pattern to straight needles: https://www.garnstudio.com/lesson.php?id=13&cid=19. However, the shaping of the hat and neck warmer and the high amount of stitches for the neck warmer may make the pieces more difficult to work with straight needles. But you can try it, adjusting the pattern as in the lesson. Happy knitting!
15.12.2024 - 19:22
![]() Charlotte Kristensen ha scritto:
Charlotte Kristensen ha scritto:
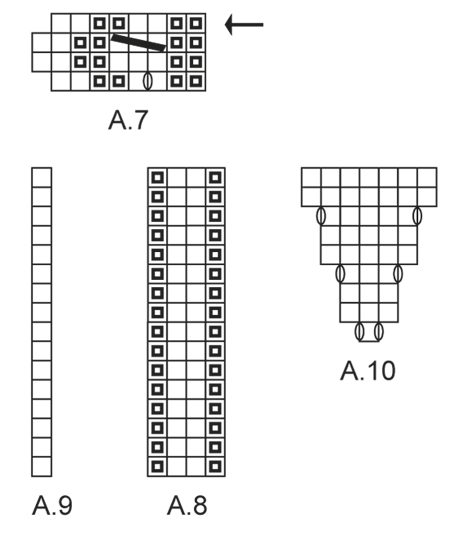
Jeg strikker hals delen. Jeg skal til udtagninger, men jeg forstår ikke hvordan. Skal jeg strikke efter Diagrram A8, efterfulgt A3, og så A10,A9 og så gentage disse runden rundt? Jeg syntes ikke mønsteret kommer til at passe? Jeg undrer mig nok bare over hvor udtagningerne skal laves/sættes😅
21.10.2022 - 03:17DROPS Design ha risposto:
Hej, Slå 102-119 m op med Cotton Merino på rundp 4. Strik således: * Diag A.8 over 4 m, diag A.3 over 6 m, diag A.9 over 1 m og diag A.3 over 6 m *, gentag disse 17 masker fra *-* omg rundt (6-7 gange) til arb måler ca 10 cm. Du erstatter nu A.9 med A.10 hvor du tager ud i hver side af A.10 med omslag på hver 4.omgang til arbejdet måler 22 cm. Omslagen strikkes ret så der bliver hul...
25.10.2022 - 12:18
![]() Emma ha scritto:
Emma ha scritto:
Hei! Ranteenlämmittimien peukaloaukosta: olisiko se syytä aloittaa yhtä riviä aikaisemmin siten, että nurjalla puolella neulottaisiin mallineuleen rivejä 2 ja 4 (pelkkää oikeaa ja nurjaa), oikealla puolella rivejä 1 ja 3?
02.08.2022 - 10:43
![]() GERTRUD ha scritto:
GERTRUD ha scritto:
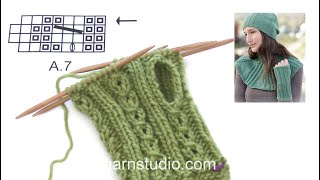
Ich verstehe nicht, wie ich bei den Pulswärmern in hin und Rückreihen strecken soll, ( kraus rechts ?!) wenn ich auf einem Nadelspiel stricke. gleiches gilt für A7. ist es dann nur immer in " Hinreihen" also immer nur so, wie es erscheint?
20.10.2021 - 19:13DROPS Design ha risposto:
Liebe Gertrud, Pulswärmer werden in Runden gestrickt - A.7 zeigt alle Reihen, die stricken Sie alle rechts nach links (keine "Rückreihe" von links/innenseite/Rückseite gestrickt). Dies wird korrigiert, danke für den Hinweis. Viel Spaß beim stricken!
21.10.2021 - 07:02
![]() Maria ha scritto:
Maria ha scritto:
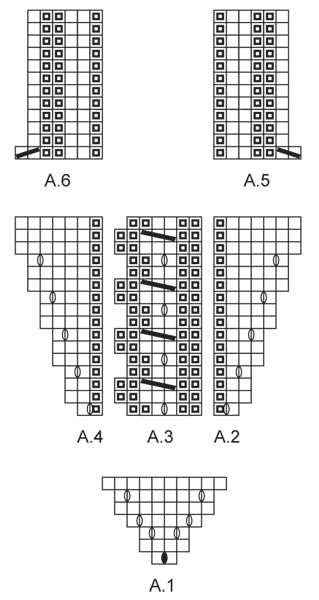
I am having the same problem as Pam; when I work A.1 as charted I end up with 45 stitches, and further, the pattern goes off on row 4 of the chart. I worked A.1 as 7 rounds: 1: (k1, yo, k1) 2: (k18) 3:(k1, yo, k2, yo,k1)- 2 sets remain so I k them 4: (k1, yo, k4, yo, k1) 5: k around 6: (k, yo, k6, yo, k1) 7: k around Your answer to Pam suggests to work ONLY the first row of the chart 6 times (that is, for 6 rounds); is that how it should be done?
13.01.2021 - 23:53DROPS Design ha risposto:
Dear Maria, A.1 should be worked a total of 6 times on the round, starting with 6 times 2 sts, then increase on ever other round as shown in diagram - there are 10 sts after last increase round x 6 repeats = 60 sts on needle. After last row in diagram, you then don't work A.1 anymore but work now as ewplained with (A.2, A.3, A.4), repeat from (to) all the round. Happy knitting!
14.01.2021 - 07:48
![]() Chaja ha scritto:
Chaja ha scritto:
Bonjour ! Pour les mitaines, dans le tricot en rond sur les aiguilles double pointe, il faut tricoter à l’inverse de ce qui est proposé : les mailles endroit à l’envers et inversement. Mon travail est joli mais ne ressort pas sur un fond de jersey.
07.12.2020 - 15:27DROPS Design ha risposto:
Bonjour Chaja, pour les mitaines, on tricote le diagramme A.7, non pas sur fond de jersey mais ainsi: *2 m env, torsade sur 2/3 mailles, 2 m env, 2 m end*, répétez de *-* tout le tour, ainsi la torsade se trouve placée avec 2 m env de chaque côté et peut bien ressortir. Bon tricot!
07.12.2020 - 16:07
![]() Kristine Asmussen ha scritto:
Kristine Asmussen ha scritto:
Hej. Jeg strikker halsdelen. Jeg er nået til udtagningerne. Er det korrekt de ligsom gentages over 3 omgang - mens hulmønsteret gentages over 4 omgange?
21.03.2019 - 06:58DROPS Design ha risposto:
Hei Kristine. Hullmønsteret du ser langs flettene og økningene er det samme diagrammet (diagram A.10). Det økes på hver 3 omgang, altså er hullmønsteret hver 3 omgang. I tillegg er det et flettemønster, med 1 hull mellom hver flette (A.3), og her er hullene på hver 4 omgang. Dette stemmer. God fornøyelse.
26.03.2019 - 13:52
![]() Pam ha scritto:
Pam ha scritto:
When working the hat I end up with 45 stitches, not 60. I have tried this twice and still end up with 45. Is this an error in the instructions? If not I don't know what I am doing incorrectly. Any suggestions?
07.07.2017 - 00:50DROPS Design ha risposto:
Dear Pam, you are working A.1 (= 2sts on 1st round) a total of 6 times in the round, and you will inc every other round, when A.1 has been worked, there are 10 sts in each A.1 = 10sts x 6 = 60 sts. Happy knitting!
07.07.2017 - 09:27Emily ha scritto:
Thank you for the answer. I still don't understand how I should turn the piece and work still the same pattern. It will then be messed up won't it? Sorry I am new to knitting
22.08.2016 - 11:07DROPS Design ha risposto:
Dear Emily, after you have worked the round before the one with the arrow, work the first 3 sts in diagram (= P2, K1), then turn to work from WS (ie you won't work in the round anymore for some rows) and continue as before but now read diagram from the left towards the right on rows from WS starting with P1, K2, then work last row in diagram from the left towards the right and work now alternately from RS (rows with YO and dec) and from WS. Happy knitting!
22.08.2016 - 13:13Emily ha scritto:
Thank you for the answer. I still don't understand how I should turn the piece and work still the same pattern. It will then be messed up won't it? Sorry I am new to knitting
22.08.2016 - 11:02
|
||||||||||||||||||||||
Tourmaline#tourmalineset |
||||||||||||||||||||||
|
|
||||||||||||||||||||||
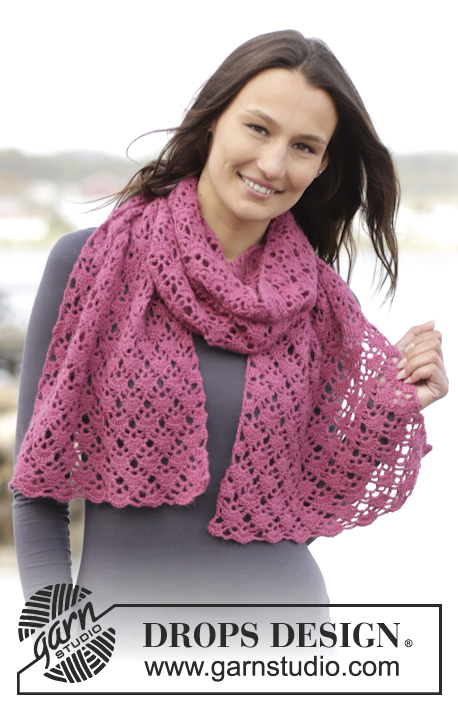
Completo DROPS formato da: Berretto, scalda polsi e scalda collo, con piccole trecce e coste, in "Cotton Merino".
DROPS 164-39 |
||||||||||||||||||||||
|
PUNTO LEGACCIO (in tondo): Lavorare * 1 giro a dir, 1 giro a rov *, ripetere da *-*. 1 “costa” a legaccio = 2 giri MOTIVO PER IL BERRETTO: Vedere i diagrammi da A.1 a A.6. MOTIVO PER GLI SCALDA POLSI: Vedere il diagramma A.7. Il diagramma mostra tutti i ferri del motivo, visti sul diritto del lavoro. INTRECCIARE CON MAGLIE GETTATE (per gli scalda polsi) Per avere un bel bordo di chiusura sugli scalda polsi, intrecciare le m a dir aggiungendo delle m gettate, come segue: * Intrecciare 2 m, 1 m gettata, intrecciare la m gettata, 1 m gettata, intrecciare la m gettata, 1 m gettata, intrecciare la m gettata, ripetere da *-*. MOTIVO PER LO SCALDA COLLO: Vedere i diagrammi A.3, A.8, A.9 e A.10. ---------------------------------------------------------- BERRETTO: Si lavora dall’alto verso il basso in tondo sui ferri a doppia punta e poi sui ferri circolari. Avviare 6 m e suddividerle su 3 ferri a doppia punta n° 4 con il filato Cotton Merino. Lavorare 2 m in ogni m su tutto il giro (lavorare alternativamente nel filo anteriore e in quello posteriore della m) = 12 m. Lavorare 1 giro a dir. Inserire un segno all’inizio del giro. Proseguire seguendo il diagramma A.1 (= 6 ripetizioni sul giro). Passare ai 4 ferri a doppia punta o ai ferri circolari quando necessario. Dopo aver lavorato il diagramma 1 volta in verticale, sui ferri ci sono 60 m. RICORDARSI LA TENSIONE DEL LAVORO ! Lavorare ora come segue sulle m del diagramma A.1: * Lavorare il diagramma A.2 sulle 2 m successive, diagramma A.3 sulle 6 m successive, diagramma A.4 sulle 2 m successive *, ripetere da *-* su tutto il giro = 6 ripetizioni sul giro. Dopo aver lavorato i diagrammi 1 volta in verticale, sui ferri ci sono 120 m. Continuare come indicato per l’ultimo giro del diagramma A.2 sul diagramma A.2, lavorare il diagramma A.3 come prima e lavorare come indicato per l’ultimo giro del diagramma A.4 sul diagramma A.4 finché il lavoro non misura 19 cm in tutto; assicurarsi che l’ultimo giro sia un giro senza m gettate. Passare ai ferri circolari n° 3,5 e lavorare il diagramma A.5 sul diagramma A.2, il diagramma A.3 come prima e lavorare il diagramma A.6 sul diagramma A.4 = 108 m. Dopo aver lavorato i diagrammi 1 volta in verticale, usare due capi del filato e intrecciare le m lavorando a dir le m dir e a rov le m rov. ---------------------------------------------------------- SCALDA POLSI: Si lavorano in tondo sui ferri a doppia punta. Avviare 40 m sui ferri a doppia punta n° 3,5 con il filato Cotton Merino. Lavorare 2 coste a PUNTO LEGACCIO - vedere le spiegazioni sopra. Proseguire seguendo il diagramma A.7 (= 5 ripetizioni sul giro). Inserire un segno all’inizio del giro. RICORDARSI LA TENSIONE DEL LAVORO! Quando il lavoro misura ca.14 cm, assicurarsi che l’ultimo giro sia il giro con la freccia nel diagramma, lavorare le prime 3 m del diagramma (= 2 m rov, 1 m dir; centro della treccia). Girare il lavoro e lavorare avanti e indietro seguendo il diagramma su tutte le m. Dove il lavoro è stato diviso, le m del diagramma vengono lavorate senza gettate e senza trecce: questa è l’apertura per il pollice. Proseguire avanti e indietro in questo modo finché il diagramma non è stato lavorato 3 volte in verticale. Proseguire di nuovo in tondo come prima dell’apertura per il pollice. Lavorare in questo modo finché il lavoro non misura ca.20 cm. Lavorare 2 coste a legaccio e INTRECCIARE CON MAGLIE GETTATE - vedere le spiegazioni sopra. Lavorare il secondo scalda polsi in modo uguale. ---------------------------------------------------------- SCALDA COLLO: Si lavora in tondo sui ferri circolari, dall’alto verso il basso. Avviare 102-119 m sui ferri circolari n° 4 con il filato Cotton Merino. Lavorare come segue: * diagramma A.8 sulle 4 m successive, diagramma A.3 sulle 6 m successive, diagramma A.9 sulla m successiva e diagramma A.3 sulle 6 m successive *, ripetere da *-* su tutto il giro finché il lavoro non misura ca.10 cm. RICORDARSI LA TENSIONE DEL LAVORO! Proseguire con il motivo come prima sopra i diagrammi A.8 e A.3 ma lavorare seguendo il diagramma A.10 sopra il diagramma A.9. Al giro successivo lavorare le m gettate a dir per formare i buchi. Proseguire a lavorare il motivo come prima e aumentare come indicato nel diagramma A.10 finché il lavoro non misura 22 cm in tutto. Lavorare 2 giri a dir, 1 giro a rov e 1 giro a dir. Al giro successivo, intrecciare le m senza stringere troppo il filo lavorandole a rov. |
||||||||||||||||||||||
Spiegazioni del diagramma |
||||||||||||||||||||||
|
||||||||||||||||||||||
 |
||||||||||||||||||||||
 |
||||||||||||||||||||||
Avete terminato questo modello?Allora taggate le vostre foto con #dropspattern #tourmalineset o inviatele alla #dropsfan gallery. Avete bisogno di aiuto con questo modello?Troverete 26 video tutorial, una sezione per i commenti/domande e molto altro guardando il modello su www.garnstudio.com © 1982-2026 DROPS Design A/S. Ci riserviamo tutti i diritti. Questo documento, compreso tutte le sue sotto-sezioni, è protetto dalle leggi sul copyright. Potete leggere quello che potete fare con i nostri modelli alla fine di ogni modello sul nostro sito. |
||||||||||||||||||||||


Con oltre 40 anni di esperienza nel design di modelli di maglia e uncinetto, DROPS Design offre la più estesa collezione di modelli gratuiti su internet - tradotti in 17 lingue. Ad oggi vi possiamo fornire 324 cataloghi e 12290 modelli - 9561 dei quali sono tradotti in Italiano.
Ci stiamo impegnando molto per darvi il meglio che vi possiamo offrire in termini di maglia e uncinetto, ispirazioni e consigli così come filati di grande qualità ad un prezzo incredibile! Volete utilizzare i nostri modelli per qualcosa d'altro oltre al vostro uso personale? Potete leggere tutto ciò che è consentito nel testo sul Copyright in basso su tutte le pagine dei nostri modelli. Buon lavoro!
Lasciare un commento sul modello DROPS 164-39
Noi saremmo felici di ricevere i tuoi commenti e opinioni su questo modello!
Se vuoi fare una domanda, fai per favore attenzione a selezionare la categoria corretta nella casella qui sotto per velocizzare il processo di risposta. I campi richiesti sono indicati da *.