
Categorie popolari
State cercando un filato?


Commenti / Domande (57)
![]() Michelle ha scritto:
Michelle ha scritto:
Hello! I'm loving this pattern so far, but I'm a bit stuck. I had 213 sts when I found your pattern. I can fit 9 complete pattern sections. I'm on row 13 of the pattern (the 1st decrease row), but I am left with 207 sts. I'm missing something - how do I get to 117 sts? What do you mean Work 1 round while AT THE SAME TIME dec. 27 sts evenly. Do I figure this out for myself AND is this done on every decrease row? Thank you for your help!
12.01.2026 - 20:16DROPS Design ha risposto:
Dear Michelle, the decreasing in yoke are done in the diagram, this means when you work the diagrams (A.1, A.2) you will first increase in 3rd row in each A.1, then decrease in each A.2 (by working the double decrease, 5th symbol without yarn overs to compensate the decrease) On the next to last row in diagrams you will have (A.1 = 6 sts, A.2 = 7 sts) x number of times for your size, ex in S x 9 = 13x9=117 sts left. Happy knitting!
14.01.2026 - 09:41
![]() Samira BRIKI ha scritto:
Samira BRIKI ha scritto:
Bonjour J ai terminé l empiècement et je dois tricoter la réhausse et suis perdue pour trouver le milieu du dos . Comment compter les mailles pour mettre le marqueur de départ Merci d avance Cordialement
04.06.2024 - 13:11DROPS Design ha risposto:
Bonjour Mme Briki, posez simplement votre ouvrage à plat, vous pourrez ainsi trouver le milieu dos plus facilement à l'aide des motifs et de votre nombre de mailles. Bon tricot!
04.06.2024 - 15:51
![]() Martina Giers ha scritto:
Martina Giers ha scritto:
Hallo, wenn die Ärmel wieder auf der Nadel sind und die Passe begonnen wird, wo soll dann der Rundenbeginn sein, damit das Muster korrekt aufgeht? Viele Grüße
12.12.2023 - 07:14DROPS Design ha risposto:
Liebe Frau Giers, die Runden beginnen zwischen Rückenteil und Ärmel, wenn Sie das Muster A.1 oder A.2) in der Mitte wollen, dann sollen Sie vielleicht kalkulieren, wie Sie am besten beginnen sollen. Viel Spaß beim stricken!
12.12.2023 - 09:39
![]() Ann ha scritto:
Ann ha scritto:
I dont understand where are decreases in a yoke? in a diagram is not visible...
27.04.2023 - 03:36DROPS Design ha risposto:
Hi Ann, The decreases are in A.2 on the yoke. The filled in triangles decrease 2 stitches on each repeat of the diagram in width and you decrease 4-5 times in height in each repeat, depending on which size you are working. Happy knitting!
27.04.2023 - 06:46
![]() Rachel Forder ha scritto:
Rachel Forder ha scritto:
When the sleeves have been slipped back on to the needle where does the row commence to start the yolk? I assume that is important to get the pattern in the correct position?
09.04.2023 - 23:02DROPS Design ha risposto:
Dear Rachel, the round begins in the transition between the sleeve and the back, continuing over the sleeve, the front, e.t.c. Happy knitting!
10.04.2023 - 16:54
![]() Judit Rubio Mulet ha scritto:
Judit Rubio Mulet ha scritto:
Buenos días, me encantan todos vuestros patrones. Pero tengo el problema de que mi talla es muy pequeña, y la S me queda grande. Me gustaría saber si es posible adaptar este patrón para una talla XS. Muchas gracias por vuestro tiempo, un saludo. Good morning, I love all your patterns. But I have the problem that my size is too small, and the S is too big for me. I would like to know if it is possible to adapt this pattern for a size XS. Thank you very much for your time, regards.
11.01.2023 - 10:39DROPS Design ha risposto:
Hola Judit, no hacemos patrones personalizados, pero puedes adaptar el patrón para la talla XS tú misma. Puedes probar a trabajar con agujas más pequeñas la talla S, pero tienes que calcular la tensión del tejido necesaria en ese caso. También puedes hacer una regla de tres para calcular los puntos necesarios para tus medidas. Puedes obtener más información en la siguiente lección: https://www.garnstudio.com/lesson.php?id=25&cid=23
15.01.2023 - 11:26
![]() Dede ha scritto:
Dede ha scritto:
Regarding the "elevation" -- do you know the name of this short row method? I need to study some tutorials. Thank you!
14.07.2021 - 14:53DROPS Design ha risposto:
Dear Dede, it is a simple short ro method, the pattern does not even ask you to wrap and turn, only to thighten the yarn when you turn (which does not mean you cannot use wrap and turn if that makes you more comfortable.) Happy Knitting!
14.07.2021 - 15:10
![]() Marcia Brown ha scritto:
Marcia Brown ha scritto:
Hi I'm struggling with the instructions on the final section of the yoke "work elevation at the back". What happens to the rest of the stitches on the circular needles whilst the elevation is being worked? Advice would be much appreciated. Thanks
18.06.2021 - 08:54DROPS Design ha risposto:
Dear marcia, when you do the elevation on the back of the sweater, you only working on part of the stitches, back and forth, the rest of the stitches are left on the needle until you finish these short rows, and then countinue with all the stitches again. Happy Stitching!
18.06.2021 - 12:45
![]() Magda Elhamamy ha scritto:
Magda Elhamamy ha scritto:
Are ther short row in the end
27.03.2021 - 22:48DROPS Design ha risposto:
Dear Magda, the very last part of the description for youke tells you how to knit a few short rows, to raise the neckline on the back. Happy Knitting!
28.03.2021 - 12:01
![]() Karin Bjelkenäs ha scritto:
Karin Bjelkenäs ha scritto:
Enligt beskrivningen ska man i storlek M sticka A1-A2 en gång på höjden, vilket innebär att det blir 4 triangulära toppar och 6 vridningar på flötan i A2. Om man tittar på fotona så är det 6 st triangulära toppar och 7 vridningar på flätan. Om man följer mönstret och enbart gör A1 och A2 enligt diagrammet blir väl tröjan jättestor i halsringningen. Bilderna stämmer inte med någon storlek!! Ska man improvisera när man närmar sig halsringningen??
23.03.2021 - 19:10DROPS Design ha risposto:
Hej Karin, ifølge opskriften har du 96 masker tilbage til hals så halsen bliver ca 57 cm i omkreds :)
24.03.2021 - 16:01
|
||||||||||||||||||||||||||||
Early Autumn#earlyautumnsweater |
||||||||||||||||||||||||||||
 |
 |
|||||||||||||||||||||||||||
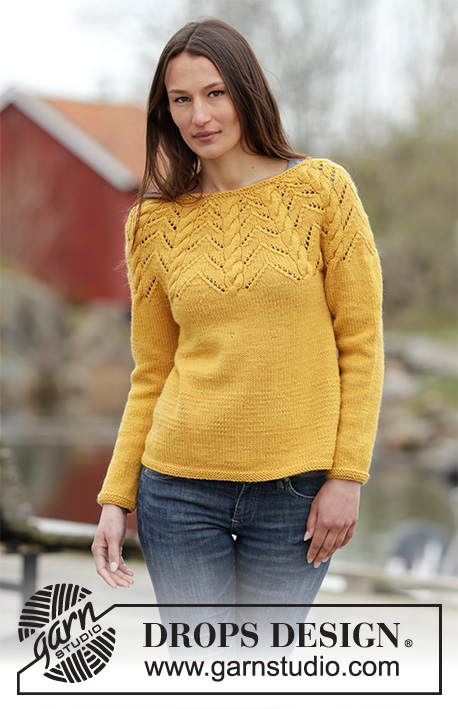
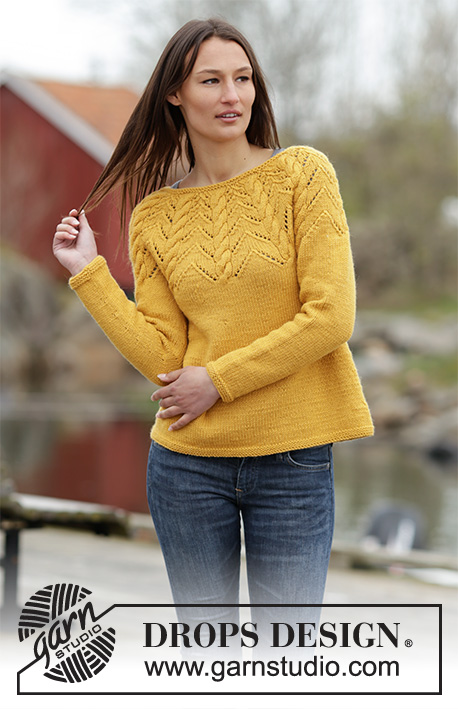
Maglione DROPS ai ferri, a forma di A, con sprone rotondo, trecce e motivo traforato, in "Nepal". Taglie: Dalla S alla XXXL.
DROPS 166-9 |
||||||||||||||||||||||||||||
|
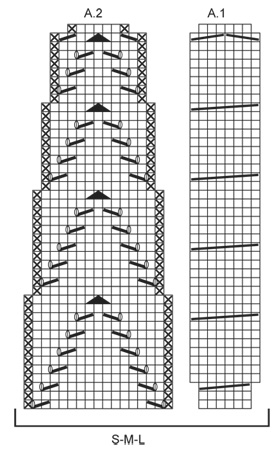
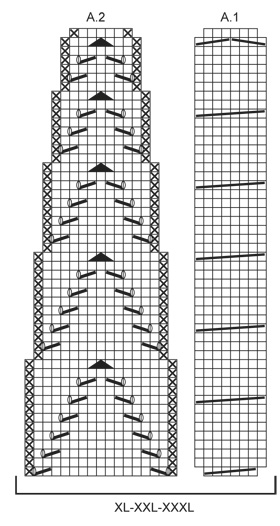
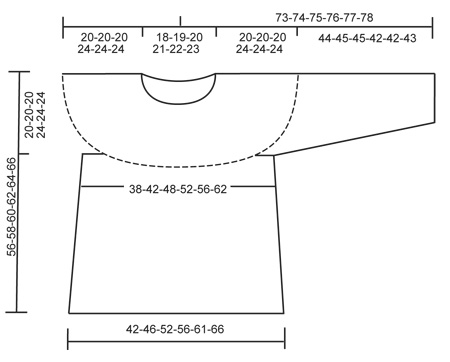
PUNTO LEGACCIO (in tondo sui ferri a doppia punta/ferri circolari): * 1 giro a dir, 1 giro a rov *, ripetere da *-*. 1 “costa” a legaccio = 2 giri SUGGERIMENTO PER LE DIMINUZIONI (per il davanti / dietro): Diminuire come segue, prima del segno (iniziare 4 m prima del segno): 2 m insieme a dir, 2 m a maglia rasata. Diminuire come segue, dopo il segno: 2 m a maglia rasata, passare 1 m a dir senza lavorarla, 1 m dir, accavallare la m passata sulla m lavorata. MOTIVO: Vedere i diagrammi A.1 e A.2. Seguire il diagramma corrispondente alla propria taglia. --------------------------------------------------------- DAVANTI E DIETRO: Si lavorano in tondo sui ferri circolari. Avviare 144-158-178-192-208-226 m sui ferri circolari n° 4 con il filato Nepal. Inserire 1 segno all’inizio del giro e un segno dopo 72-79-89-96-104-113 m (= lati). Lavorare 3 coste a PUNTO LEGACCIO - vedere le spiegazioni sopra. Passare ai ferri circolari n° 5 e proseguire a maglia rasata. RICORDARSI LA TENSIONE DEL LAVORO! Quando il lavoro misura 8 cm, diminuire 1 m da ciascun lato di ognuno dei due segni (= 4 m diminuite) - VEDERE IL SUGGERIMENTO PER LE DIMINUZIONI! Ripetere queste diminuzioni ogni 8-9-10-9-10-10 cm altre 3 volte (= 4 volte in tutto) = 128-142-162-176-192-210 m. Quando il lavoro misura 36-38-40-38-40-42 cm, intrecciare le m per gli scalfi da ciascun lato, come segue: Intrecciare le prime 4 m del giro, lavorare finché non rimangono 4 m prima dell’altro segno, intrecciare le 8 m successive, lavorare finché non rimangono 4 m, intrecciare queste 4 m = per il davanti e il dietro rimangono 56-63-73-80-88-97 m. Lasciare il lavoro in sospeso e proseguire con le maniche. MANICHE: Si lavorano in tondo sui ferri a doppia punta. Avviare 36-38-40-42-44-46 m sui ferri a doppia punta n° 4 con il filato Nepal. Lavorare 3 coste a PUNTO LEGACCIO - vedere le spiegazioni sopra. Passare ai ferri a doppia punta n° 5. Inserire 1 segno all’inizio del giro (= centro, sotto la manica). Proseguire a maglia rasata. ALLO STESSO TEMPO, quando il lavoro misura 8 cm, aumentare 1 m da ciascun lato del segno: per aumentare, lavorare 2 m dir nella m prima e nella m dopo il segno. Ripetere questi aumenti ogni 3½-3-3-2½-2½-2½ cm altre 9-10-10-11-12-12 volte (= 10-11-11-12-13-13 volte in tutto) = 56-60-62-66-70-72 m. Quando il lavoro misura 44-45-45-42-42-43 cm, intrecciare 8 m al centro, sotto la manica (intrecciare quindi le 4 m che precedono e le 4 m che seguono il segno) = sui ferri rimangono 48-52-54-58-62-64 m. Lasciare il lavoro in sospeso e proseguire con la seconda manica. SPRONE: Trasferire le m delle maniche sugli stessi ferri circolari n° 5 usati per lavorare il dietro e il davanti, nel punto in cui sono state intrecciate le m per gli scalfi. Allo stesso tempo, diminuire 1-0-1-0-1-0 m = 207-230-253-276-299-322 m. Proseguire come segue: * diagramma A.1, diagramma A.2 *, ripetere da *-* 9-10-11-12-13-14 volte. Seguire il diagramma corrispondente alla propria taglia ! Dopo aver lavorato la prima treccia del diagramma A.1, sui ferri ci sono 225-250-275-300-325-350 m. Proseguire con il motivo e diminuire come indicato nel diagramma A.2. Dopo aver lavorato il diagramma A.1/A.2 1 volta in verticale, sui ferri ci sono 117-130-143-156-169-182 m. Lavorare 1 giro e, allo stesso tempo, diminuire 27-34-41-48-55-62 m in modo uniforme = 90-96-102-108-114-120 m. Lavorare ora un’alzata per lo scollo sul dietro, a maglia rasata, come segue: inserire 1 segno al centro sul dietro, tagliare il filo e iniziare da questo punto. Lavorare 7 m dir dopo il segno al centro sul dietro, girare, stringere il filo e lavorare 14 m rov sul ferro di ritorno, girare, stringere il filo e lavorare 21 m dir, girare, stringere il filo e lavorare 28 m rov sul ferro di ritorno. Proseguire in questo modo lavorando 7 m in più ogni volta prima di girare il lavoro, finché non sono state lavorate in tutto 56-56-56-70-70-70 m; girare e lavorare 1 giro a dir fino al centro sul dietro. Passare ai ferri circolari n° 4. Lavorare 2 coste a legaccio. Intrecciare lavorando le m a dir. CONFEZIONE: Cucire le aperture sotto le maniche. |
||||||||||||||||||||||||||||
Spiegazioni del diagramma |
||||||||||||||||||||||||||||
|
||||||||||||||||||||||||||||
 |
||||||||||||||||||||||||||||
 |
||||||||||||||||||||||||||||
 |
||||||||||||||||||||||||||||
Avete terminato questo modello?Allora taggate le vostre foto con #dropspattern #earlyautumnsweater o inviatele alla #dropsfan gallery. Avete bisogno di aiuto con questo modello?Troverete 30 video tutorial, una sezione per i commenti/domande e molto altro guardando il modello su www.garnstudio.com © 1982-2026 DROPS Design A/S. Ci riserviamo tutti i diritti. Questo documento, compreso tutte le sue sotto-sezioni, è protetto dalle leggi sul copyright. Potete leggere quello che potete fare con i nostri modelli alla fine di ogni modello sul nostro sito. |
||||||||||||||||||||||||||||


Con oltre 40 anni di esperienza nel design di modelli di maglia e uncinetto, DROPS Design offre la più estesa collezione di modelli gratuiti su internet - tradotti in 17 lingue. Ad oggi vi possiamo fornire 324 cataloghi e 12290 modelli - 9561 dei quali sono tradotti in Italiano.
Ci stiamo impegnando molto per darvi il meglio che vi possiamo offrire in termini di maglia e uncinetto, ispirazioni e consigli così come filati di grande qualità ad un prezzo incredibile! Volete utilizzare i nostri modelli per qualcosa d'altro oltre al vostro uso personale? Potete leggere tutto ciò che è consentito nel testo sul Copyright in basso su tutte le pagine dei nostri modelli. Buon lavoro!
Lasciare un commento sul modello DROPS 166-9
Noi saremmo felici di ricevere i tuoi commenti e opinioni su questo modello!
Se vuoi fare una domanda, fai per favore attenzione a selezionare la categoria corretta nella casella qui sotto per velocizzare il processo di risposta. I campi richiesti sono indicati da *.