
Categorie popolari
State cercando un filato?


Commenti / Domande (53)
![]() Linda Pryce ha scritto:
Linda Pryce ha scritto:
On row 3 of A 2 there is a yarn over before the slip1 K1 psso. If I do this after the yarn over I only have 7 stitches before the K2tog followed by a yarn over. The pattern shows 9 stitches between. What am I doing wrong or is the yarn over part of the s1k1 pssoand the k 2 together?
17.02.2025 - 16:10DROPS Design ha risposto:
Dear Mrs Pryce, you should keep the same number of rows on row 3 as on row 1, as the yarn overs will compensate the decreases worked until you work the double decrease on top of the lace triangle (where you decrease 2 stitches but make no yarn overs). Happy knitting!
20.02.2025 - 12:26
![]() Anne Young ha scritto:
Anne Young ha scritto:
Is it possible to purchase a paper pattern of pattern no. ne-179. The early autumn cardigan knitted wit Drops Nepal
22.01.2025 - 15:10
![]() Vlasta Saková ha scritto:
Vlasta Saková ha scritto:
Dobrý den, prosím poradíte, jak zmenšit návod DROPS 166-8 na dívčí velikost 152??? moc se mi líbí, jen si nevím rady...díky předem. Vlasta
18.11.2021 - 15:51
![]() Nel ha scritto:
Nel ha scritto:
Bij het lijf staat er niets aan gegeven wanneer er met het patroon gestart wordt. Dit is wel bij andere patronen van drops. Nu kan ik mijn werk gaan uit halen. Is niet fijn.
13.04.2021 - 14:03
![]() Madeleine Bergh ha scritto:
Madeleine Bergh ha scritto:
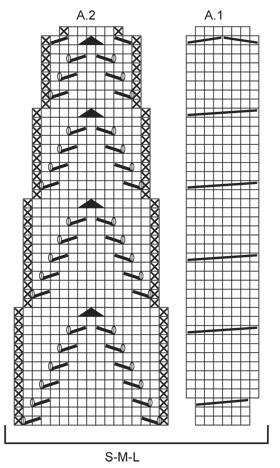
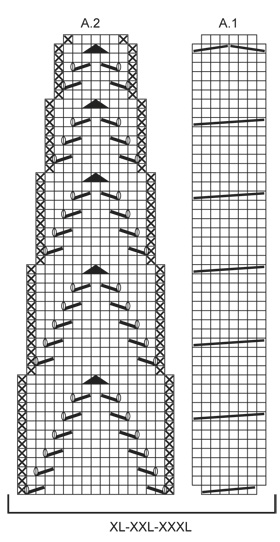
Hej, (fråga 1) Om jag har 246m i storlek M när jag påbörjar oket, hur kan det bli 268 efter första flätan i A1, och (fråga2) jag får det till 166m (storlek M, efter att ha minskat 80m) i stället för 146m efter rapporten stickats 1 gång på höjden, är det fel i mönstret? "Efter första flätan i A.1 är det 243-268-293-318-343-368 m på st. Fortsätt med mönstret och minskn i A.2, när A.1/ A.2 har stickats 1 gång på höjden är det 133-146-159-172-185-198 m på st. "
22.10.2020 - 15:29DROPS Design ha risposto:
Hej Madeleine. När vi skriver att det ska vara 268 m efter första flätan menar vi efter första vridningen på flätan, dvs efter varv 3 i diagrammen är stickade. Du stickar A.1 totalt 11 gånger på 1 varv (först 10 gånger tillsammans med A.2 och sedan 1 gång innan de 5 sista rätstickade m). Det ökas 2 m i varje A.2. 246+ (2x11)=268 m. Sedan minskar du 100 m i A.2 och 22 m i A.1. 268-100-22= 146 m. Observera att sista minskningen i A.2 är på 4 maskor, inte 2 som de tidigare. Mvh DROPS Design
23.10.2020 - 09:02
![]() Sarah Paule Dalle ha scritto:
Sarah Paule Dalle ha scritto:
In the photo it looks like the cables are knit right up to the two ridges at the neckline, but in following the instructions I end up with several cm of stockinette between the end of the cable pattern and the neckline. Have I misunderstood something?
13.10.2020 - 22:14DROPS Design ha risposto:
Dear Mrs Dalle, if you work the elevation on back piece, there might be some more stocking stitch after pattern and before neck edge. You might like to work these short rows in garter stitch or just leave them (neck on front piece and back piece will be the same). Happy knitting!
14.10.2020 - 07:57
![]() Siobhan Sargent ha scritto:
Siobhan Sargent ha scritto:
I have completed the chart and followed the instructions and my stitch count is not correct it's less for the size l, THe neck is very wide unlike the photo do you suggest ripping and redoing the yoke
20.05.2020 - 13:19DROPS Design ha risposto:
Dear Mrs Sargent, do you have the correct number of sts in each diagram as described in previous answer? When 159 sts remain, knit 1 row while dec 47 sts evenly = 112 sts remain, purl 1 row and work now elevation. You are welcome to bring your work to your store to show them what you did till now (or send them a picture), it would be much easier for them to check. Happy knitting!
20.05.2020 - 13:36
![]() Siobhan Sargent ha scritto:
Siobhan Sargent ha scritto:
Dear drops, I am knitting this cardigan in the size l, I have worked my way through the chart and have not got the correct amount of stitches after I have done the decreases, can you please Advise? Also in the back it says to do the short rows, is this continues in the pattern or stocking stitch ? Thank you
20.05.2020 - 00:37DROPS Design ha risposto:
Dear Mrs Sargent, in size L you start yoke with 269 sts and work: 5 front band sts, 11 x (A.1, A.2), A.1, 5 front band sts. When diagrams are finished, there are 6 sts in each A1 and 7 sts in each A.2, this means: 5 + 11x (6+7) + 6 + 5 = 159 sts. Short rows for the elevation on back piece are worked in stocking stitch. Happy knitting!
20.05.2020 - 07:17
![]() SPD ha scritto:
SPD ha scritto:
There is a mistake in the instructions for the buttonhole: the k2tog should be on the 2nd and 3rd stitches from the edge (not 3rd &4th)
03.05.2020 - 01:07
![]() Cath ha scritto:
Cath ha scritto:
Je viens de tricoter ce modèle (en taille S) et je ne comprends pas le nombre de mailles indiqué une fois que les diagrammes A1 et A2 ont été tricotés. Si j'ai 243 m après la première torsade et que je diminue de 2 m à chaque surjet double donc 9 fois dans la largeur (répétition du motif) et 4 fois dans la hauteur, je diminue au total de 72 m. 243 mailles - 72 = 171 mailles (et pas 133)
01.05.2020 - 08:49DROPS Design ha risposto:
Bonjour Cath, vous diminuez non pas 8 mailles mais 10 mailles dans chaque A.2 + 2 mailles dans la dernière torsade de chaque A.1 soit: 10 diminutions x 9 A.2 = 90 diminutions et 2 diminutions x 10 A.1 = 20 diminutions. Vous aviez 243 m - 90 m - 20= 133 m. Bon tricot!
04.05.2020 - 10:05
|
||||||||||||||||||||||||||||
Early Autumn Cardigan#earlyautumncardigan |
||||||||||||||||||||||||||||
 |
 |
|||||||||||||||||||||||||||
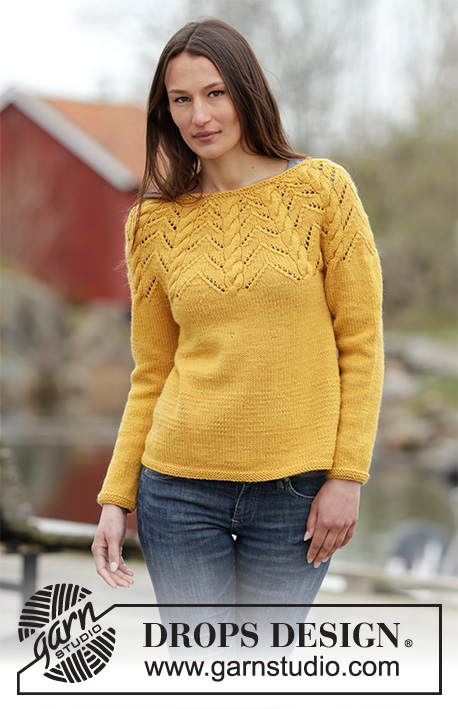
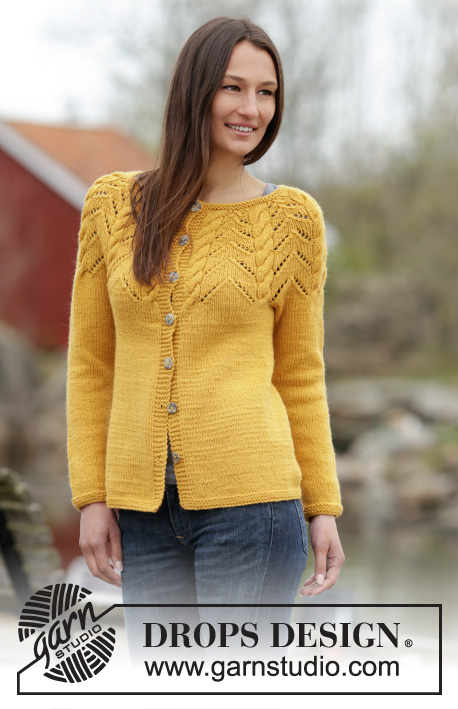
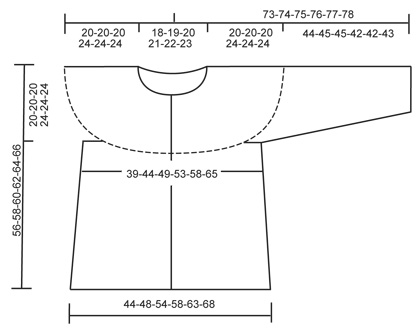
Cardigan DROPS ai ferri, a forma di A, con sprone rotondo, trecce e motivo traforato, in "Nepal". Taglie: Dalla S alla XXXL.
DROPS 166-8 |
||||||||||||||||||||||||||||
|
PUNTO LEGACCIO (avanti e indietro sui ferri): Lavorare tutti i ferri a dir. 1 “costa” a legaccio = 2 ferri a dir. PUNTO LEGACCIO (in tondo sui ferri a doppia punta): * 1 giro a dir, 1 giro a rov *, ripetere da *-*. 1 “costa” a legaccio = 2 giri SUGGERIMENTO PER LE DIMINUZIONI (per il davanti / dietro): Diminuire come segue, prima del segno (iniziare 4 m prima del segno): 2 m insieme a dir, 2 m a maglia rasata. Diminuire come segue, dopo il segno: 2 m a maglia rasata, passare 1 m a dir senza lavorarla, 1 m dir, accavallare la m passata sulla m lavorata. MOTIVO: Vedere i diagrammi A.1 e A.2. Seguire il diagramma corrispondente alla propria taglia. ASOLE: Intrecciare le m per le asole sul bordo davanti destro. 1 asola = lavorare insieme a dir la 3a e la 4a m dal bordo e fare 1 m gettata. Intrecciare le m per le asole quando il lavoro misura: TAGLIA S: 11, 17, 23, 30, 37, 44 e 51 cm TAGLIA M: 11, 18, 25, 32, 39, 46 e 53 cm TAGLIA L: 11, 18, 25, 32, 39, 47 e 55 cm TAGLIA XL: 11, 18, 26, 34, 42, 50 e 57 cm TAGLIA XXL: 11, 19, 27, 35, 43, 51 e 59 cm TAGLIA XXXL: 11, 20, 29, 37, 45, 53 e 61 cm --------------------------------------------------------- DAVANTI e DIETRO: Si lavorano avanti e indietro sui ferri circolari. Avviare 159-174-193-208-223-242 m sui ferri circolari n° 4 con il filato Nepal. Inserire 2 segni nel lavoro: il primo segno dopo le prime 42-46-51-55-58-63 m ed il secondo segno prima delle ultime 42-46-51-55-58-63 m (dietro = 75-82-91-98-107-116 m). Lavorare 3 coste a PUNTO LEGACCIO - vedere le spiegazioni sopra. Passare ai ferri circolari n° 5 e proseguire a maglia rasata con 5 m a punto legaccio da ciascun lato (= bordi davanti). RICORDARSI LA TENSIONE DEL LAVORO! Quando il lavoro misura 8 cm, diminuire 1 m da ciascun lato di ognuno dei due segni - VEDERE IL SUGGERIMENTO PER LE DIMINUZIONI! Ripetere queste diminuzioni ogni 8-9-10-9-10-10 cm altre 3 volte (= 4 volte in tutto) = 143-158-177-192-207-226 m. Quando il lavoro misura 36-38-40-38-40-42 cm, intrecciare 8 m da ciascun lato, per gli scalfi (intrecciare quindi le 4 m che precedono e le 4 m che seguono ognuno dei due segni) = rimangono 59-66-75-82-91-100 m per il dietro e 34-38-43-47-50-55 m per ognuno dei due davanti. Lasciare il lavoro in sospeso e proseguire con le maniche. MANICHE: Si lavorano in tondo sui ferri a doppia punta. Avviare 36-38-40-42-44-46 m sui ferri a doppia punta n° 4 con il filato Nepal. Lavorare 3 coste a PUNTO LEGACCIO - vedere le spiegazioni sopra. Passare ai ferri a doppia punta n° 5. Inserire 1 segno all’inizio del giro (= centro, sotto la manica). Proseguire a maglia rasata. ALLO STESSO TEMPO, quando il lavoro misura 8 cm, aumentare 1 m da ciascun lato del segno: per aumentare lavorare 2 m dir nella m prima e nella m dopo il segno. Ripetere questi aumenti ogni 3½-3-3-2½-2½-2½ cm altre 9-10-10-11-12-12 volte (= 10-11-11-12-13-13 volte in tutto) = 56-60-62-66-70-72 m. Quando il lavoro misura 44-45-45-42-42-43 cm, intrecciare 8 m al centro, sotto la manica (intrecciare quindi le 4 m che precedono e le 4 m che seguono il segno) = sui ferri rimangono 48-52-54-58-62-64 m. Lasciare il lavoro in sospeso e proseguire con la seconda manica. SPRONE: Trasferire le m delle maniche sugli stessi ferri circolari n° 5 usati per lavorare il dietro e il davanti, nel punto in cui sono state intrecciate le m per gli scalfi = 223-246-269-292-315-338 m. Proseguire come segue, sul diritto del lavoro: 5 m a punto legaccio, * diagramma A.1, diagramma A.2 *, ripetere da *-* 9-10-11-12-13-14 volte, finire con il diagramma A.1 e 5 m a punto legaccio. Seguire il diagramma corrispondente alla propria taglia! Dopo aver lavorato la prima treccia del diagramma A.1, sui ferri ci sono 243-268-293-318-343-368 m. Proseguire con il motivo e diminuire come indicato nel diagramma A.2. Dopo aver lavorato il diagramma A.1/A.2 1 volta in verticale, sui ferri ci sono 133-146-159-172-185-198 m. Lavorare 1 ferro a dir e, allo stesso tempo, diminuire 33-40-47-54-61-68 m in modo uniforme = 100-106-112-118-124-130 m. Lavorare 1 ferro a rovescio. Lavorare ora un’alzata per lo scollo sul dietro, come segue, a maglia rasata: inserire 1 segno al centro sul dietro. Lavorare 7 m dir dopo il segno al centro sul dietro, girare, stringere il filo e sul ferro di ritorno lavorare 14 m rov, girare, stringere il filo e lavorare 21 m dir, girare; proseguire in questo modo lavorando 7 m in più ogni volta prima di girare il lavoro, finché non sono state lavorate in tutto 56-56-56-70-70-70 m; girare e lavorare 1 ferro a dir fino al centro sul davanti. Lavorare 1 ferro a rov sul rovescio del lavoro. Passare ai ferri circolari n° 4. Lavorare 2 coste a legaccio. Intrecciare lavorando le m a dir sul diritto del lavoro. CONFEZIONE: Cucire le aperture sotto le maniche. Attaccare i bottoni sul bordo davanti sinistro. |
||||||||||||||||||||||||||||
Spiegazioni del diagramma |
||||||||||||||||||||||||||||
|
||||||||||||||||||||||||||||
 |
||||||||||||||||||||||||||||
 |
||||||||||||||||||||||||||||
 |
||||||||||||||||||||||||||||
Avete terminato questo modello?Allora taggate le vostre foto con #dropspattern #earlyautumncardigan o inviatele alla #dropsfan gallery. Avete bisogno di aiuto con questo modello?Troverete 29 video tutorial, una sezione per i commenti/domande e molto altro guardando il modello su www.garnstudio.com © 1982-2026 DROPS Design A/S. Ci riserviamo tutti i diritti. Questo documento, compreso tutte le sue sotto-sezioni, è protetto dalle leggi sul copyright. Potete leggere quello che potete fare con i nostri modelli alla fine di ogni modello sul nostro sito. |
||||||||||||||||||||||||||||


Con oltre 40 anni di esperienza nel design di modelli di maglia e uncinetto, DROPS Design offre la più estesa collezione di modelli gratuiti su internet - tradotti in 17 lingue. Ad oggi vi possiamo fornire 324 cataloghi e 12290 modelli - 9561 dei quali sono tradotti in Italiano.
Ci stiamo impegnando molto per darvi il meglio che vi possiamo offrire in termini di maglia e uncinetto, ispirazioni e consigli così come filati di grande qualità ad un prezzo incredibile! Volete utilizzare i nostri modelli per qualcosa d'altro oltre al vostro uso personale? Potete leggere tutto ciò che è consentito nel testo sul Copyright in basso su tutte le pagine dei nostri modelli. Buon lavoro!
Lasciare un commento sul modello DROPS 166-8
Noi saremmo felici di ricevere i tuoi commenti e opinioni su questo modello!
Se vuoi fare una domanda, fai per favore attenzione a selezionare la categoria corretta nella casella qui sotto per velocizzare il processo di risposta. I campi richiesti sono indicati da *.