
Categorie popolari
State cercando un filato?


Commenti / Domande (46)
![]() Agnès Savigny ha scritto:
Agnès Savigny ha scritto:
Bonjour! pour le devant gauche: glisser en attente pour l'encolure les 14 premières mailles à partir du milieu devant. je ne comprends pas de quelles mailles on parle, d'où on commence à compter? merci pour votre aide
07.12.2018 - 14:35DROPS Design ha risposto:
Bonjour Mme Savigny, en début de rang sur l'envers (devant gauche), tricotez les 14 premières mailles du rang et glissez-les en attente sur un fil, continuez le rang jusqu'à la fin. Vous avez maintenant mis 14 m en attente côté encolure (vous reprendrez ces mailles plus tard pour la capuche), au début du rang suivant sur l'envers, rabattez les mailles pour l'encolure comme indiqué (= 1 x 2 m et 2 x 1 m). Bon tricot!
07.12.2018 - 14:43
![]() M. Paulis ha scritto:
M. Paulis ha scritto:
Kan dit patroon ook zonder capuchon en zo ja, hoe pas ik dat aan? Als het niet kan heeft u dan een soortgelijk patroon voor een lang kindervest met meerder knopen voor de sluiting? Leeftijd 2-3.
22.08.2018 - 15:08DROPS Design ha risposto:
Dag M. Paulis, In plaats van een capuchon te breien na het opnemen van steken rondom de hals, zou je een boord kunnen breien. Het is dan wel mooi om een extra knoopsgat te maken zodat het vest tot bovenaan dicht kan.
23.08.2018 - 17:52
![]() Gerlinda Hoogeboom ha scritto:
Gerlinda Hoogeboom ha scritto:
Ik merk dat jullie eigenlijk, zover ik zie, alleen maar rondbreinaalden gebruiken. Hebben jullie nou helemaal geen patronen voor gewoon 2 naalden, ik ( en ik ben niet de enige) vind het breien op een rondbreinaald verschrikkelijk, net als met 4 breinaalden breien.
11.03.2018 - 18:58DROPS Design ha risposto:
Hallo Gerlinda, Onze ontwerpen komen uit Noorwegen en daar is het heel gebruikelijk om alles met rondbreinaalden te breien. Veel patronen kunnen echter ook aangepast worden zodat je ze met rechte naalden kunt breien. Klik hier voor meer informatie daarover. In het geval van dit patroon moet je even kijken hoe je uitkomt met de kantrand onderaan. Misschien is het mogelijk (bij een kleine maat) om voor- en achterpand beide op een rechte naald te zetten.
12.03.2018 - 09:15
![]() Claessens Danièle ha scritto:
Claessens Danièle ha scritto:
Bonjour, je fais le modèle children 26-13 et j'ai un doute au niveau de l'arrondi de la manche à la fin je trouve 26 mailles restantes et celui ci ci me parait petit par rapport à l'emmanchure. Vous serait il possible de me confirmer que mes calculs sont bons et que la longueur totale de la manche est bien 47 cm Je vous remercie
15.02.2018 - 22:42DROPS Design ha risposto:
Bonjour Mme Claessens, en fonction de la taille et du nombre de rangs en hauteur, le nombre de mailles restant à la fin de l'arrondi de la manche peut varier, mais si votre manche mesure bien la bonne longueur, alors tout est juste, l'arrondi (en commençant par les 6 m rabattues sous la manche d'un côté jusqu'à l'autre côté) sera ensuite assemblé le long de l'emmanchure dos/devant. Bon tricot!
16.02.2018 - 09:48
![]() Sarah ha scritto:
Sarah ha scritto:
Hi, i do not quite understand how to do the pattern on the second row. Do i follow the same order as on the 1 st row: A1, A2, A3, A4, A1 or do I reverse: A1, A4, A3, A2, A1? Thank you
04.03.2017 - 22:07DROPS Design ha risposto:
Dear Sarah, you have to work the diagrams reversed from WS so that each diagram will follow, read diagram from the left towards the right from WS. Happy knitting!
06.03.2017 - 09:25
![]() Mirjam ha scritto:
Mirjam ha scritto:
Ik kom niet uit met de steken op het achterpand. 32 voor links, 32 voor rechts, 51 voor het achterpand = 115 st. 51-/- 3 st aan weerskanten voor de armsgaten = 45 (geen 49 st) 45-/- 1x2 1x1 aan weerskanten =39 (geen 43 st) 39-/- 17 voor de hals = 22 22-/-1 st voor de hals =20 blijven er dus 10st over voor elke schouder ipv 12 Zie ik nu iets over het hoofd? Met vriendelijke groet, Mirjam Goudswaard
27.01.2017 - 16:30DROPS Design ha risposto:
Hoi Mirjam. Je hebt 125 st en kant 6 st af aan beide zijkanten. Na de minderingen (4 keer totaal) heb je 34 st op elk voorpand en 57 voor het achterpand. 6 st afkanten voor elk armsgat: 31 voor elk voorpand en 51 (3 aan beide zijkanten) voor het achterpand. Dan kant je 6 st verder af aan beide zijkanten van het achterpand = 45 st over. 19 middelste af = 13 st op elke schouder + nog 1 st afkanten = 12 over. Hetzelfde voor het voorpand: 31 st - 3 = 28 st over - 12 st middenvoor = 16 en dan nog 4 st afkanten = 12 st over
02.02.2017 - 14:54Israa Ezzat ha scritto:
Why 2 button holes in each band? I think a band shouls have a one button hole and the other band should have no holes to fasten the button. Can you please explain.
01.11.2016 - 08:57DROPS Design ha risposto:
Dear Mrs Ezzat, front bands do have holes all the way (= lace pattern), but not all holes from front bands will be used to button. Happy knitting!
01.11.2016 - 12:34Johanna VanSpronsen ha scritto:
Row 7 of A.1 makes two holes (for button holes?); should the holes be made just on the right side of work?
21.06.2016 - 19:35DROPS Design ha risposto:
Dear Mrs VanSpronsen, A.1 is worked on both front band sts, ie on right and left band. The holes in A.1 are used then to button at the end. Sew the buttons on the opposite band. Happy knitting!
22.06.2016 - 09:35
![]() Sabine Simma ha scritto:
Sabine Simma ha scritto:
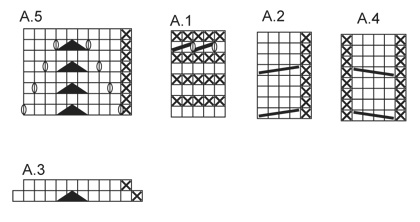
Ich habe eine Frage zu den Diagrammen, sind nur die Hinreihen eingezeichnet und es werden dann die Rückreihen gestrickt wie sie erscheinen oder ist der gesamte Rapport 8 Reihen lang? Praktisch wäre es wenn die Reihen nummeriert wären, dann würde sich meine Frage erübrigen. Liebe Grüße Sabine
15.03.2016 - 10:19DROPS Design ha risposto:
Liebe Sabine, die Information hierzu finden Sie unter "MUSTER": Die Diagramme zeigen alle Hin- und Rück-R, wie sie auf der Vorderseite erscheinen. Es sind also sowohl Hin- als auch Rückreihen abgebildet.
15.03.2016 - 18:27
![]() Britt Axelsson ha scritto:
Britt Axelsson ha scritto:
Jag kan ej förstå hur jag ska göra för att få en söm på huvan. Stickar jag inte bara fram och tillbaka på de maskor jag plockat upp? Var och hur ökar jag för att det ska bli en " snibb " baktill.
17.01.2016 - 15:30DROPS Design ha risposto:
Hej, Jo men det får du automatisk når du har strikket de 25-26-27-28-29-30 cm frem og tilbage. Da lægger du stykkerne sammen og syr til kanten. Det er tydeligt at se. God fornøjelse!
11.03.2016 - 11:13
|
||||||||||||||||||||||
Bright Sally#brightsallycardigan |
||||||||||||||||||||||
 |
 |
|||||||||||||||||||||
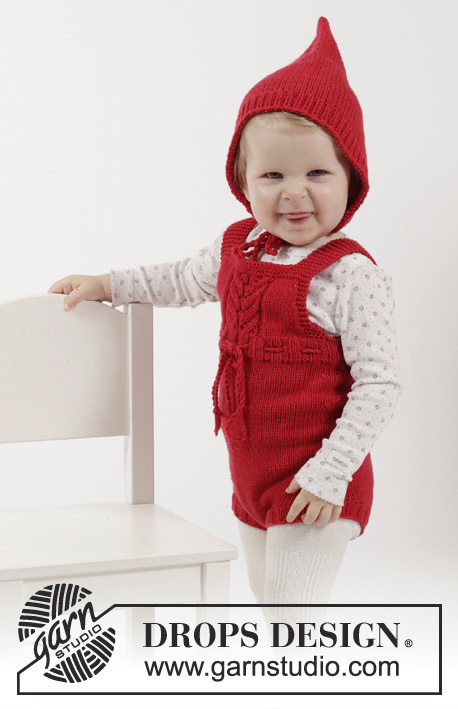
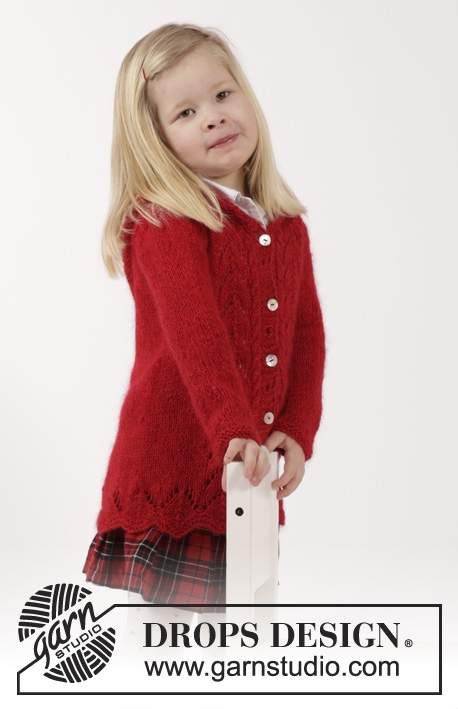
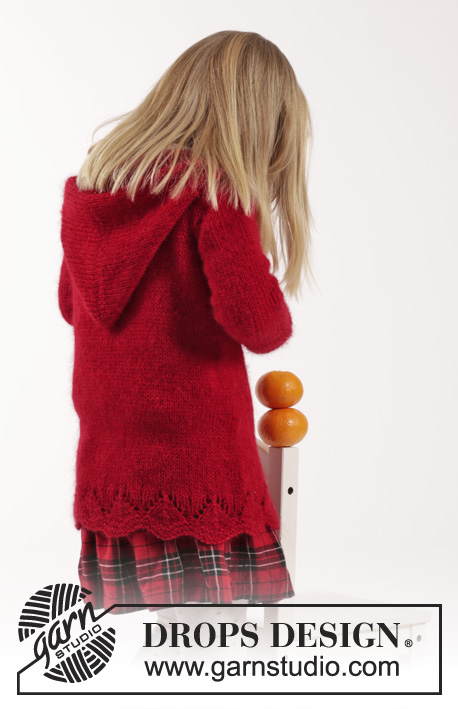
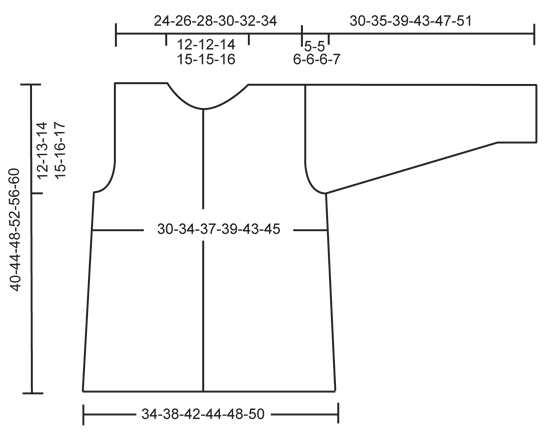
Cardigan lavorato ai ferri, con trecce, motivo traforato e cappuccio, in DROPS Alpaca e DROPS Kid-Silk. Taglie: Da 2 a 12 anni.
DROPS Children 26-13 |
||||||||||||||||||||||
|
PUNTO LEGACCIO (avanti e indietro sui ferri): Lavorare tutti i ferri a dir. 1 "costa" a legaccio = 2 ferri a dir. PUNTO LEGACCIO (in tondo): Lavorare * 1 giro a dir, 1 giro a rov *, ripetere da *-*. 1 "costa" a legaccio = 2 giri MOTIVO: Vedere i diagrammi da A.1 a A.5. I diagrammi mostrano tutti i ferri del motivo visti sul diritto del lavoro. ---------------------------------------------------------- CARDIGAN: Si lavora avanti e indietro sui ferri circolari con inizio al centro, sul davanti. Avviare 153-165-177-189-201-213 m (comprese 5 m per il bordo davanti da ciascun lato) sui ferri circolari n° 5 con 1 capo del filato Alpaca + 1 capo del filato Kid-Silk. Lavorare 2 coste a PUNTO LEGACCIO - vedere le spiegazioni sopra. Proseguire come segue: diagramma A.1 (= bordo davanti), diagramma A.2 (= 5 m), diagramma A.3 (= 12 m) sulle 132-144-156-168-180-192 m successive, diagramma A.4 (= 6 m), finire con il diagramma A.1 (= bordo davanti). Dopo aver lavorato il diagramma A.3 una volta in verticale, sui ferri ci sono 131-141-151-161-171-181 m. Proseguire seguendo il motivo come impostato, ma lavorare il diagramma A.5 sopra ogni ripetizione del diagramma A.3. Dopo aver lavorato il diagramma A.5 1 volta in verticale, proseguire come segue: diagramma A.1, diagramma A.2, diagramma A.5, 1 m rov, 89-99-109-119-129-139 m a maglia rasata, diagramma A.5, diagramma A.4, diagramma A.1. Proseguire con il motivo come impostato. Inserire ora 2 segni nel lavoro; il primo dopo le prime 36-38-40-43-45-48 m ed il secondo prima delle ultime 36-38-40-43-45-48 m (dietro = 59-65-71-75-81-85 m). RICORDARSI LA TENSIONE DEL LAVORO. ALLO STESSO TEMPO, quando il lavoro misura 6 cm, diminuire 1 m da ciascun lato di ogni segno (= 4 m diminuite). Ripetere queste diminuzioni ogni 6½-7½-8½-9½-10½-11½ cm altre 3 volte = 115-125-135-145-155-165 m. Quando il lavoro misura 28-31-34-37-40-43 cm, intrecciare 6 m da ciascun lato per gli scalfi (intrecciare quindi le 3 m che precedono e le 3 m che seguono ognuno dei due segni). Finire ogni parte separatamente. DIETRO: = 47-51-57-61-67-71 m. Proseguire ad intrecciare per gli scalfi da ciascun lato all’inizio di ogni ferro, come segue: 2 m 1-1-2-2-2-2 volte e 1 m 1-1-1-1-2-3 volte = 41-45-47-51-55-57 m. Quando il lavoro misura 38-42-46-50-54-58 cm, intrecciare le 17-19-21-23-23-25 m centrali per lo scollo. Al ferro successivo, intrecciare 1 m per lo scollo = per la spalla rimangono 11-12-12-13-15-15 m. Intrecciare le m quando il lavoro misura 40-44-48-52-56-60 cm. DAVANTI SINISTRO: = 28-31-33-36-38-41 m. Intrecciare per lo scalfo sul lato come indicato per il dietro = 25-28-28-31-32-34 m. Quando il lavoro misura 35-39-43-47-51-55 cm, mettere in attesa su un ferma maglie le prime 10-12-12-14-13-15 m dal centro davanti, per lo scollo. Intrecciare ora, all’inizio di ogni ferro sul diritto del lavoro, come segue: 2 m 1 volta e 1 m 2 volte = per la spalla rimangono 11-12-12-13-15-15 m – lavorare a maglia rasata le m che non possono essere lavorate in base al motivo. Intrecciare le m quando il lavoro misura 40-44-48-52-56-60 cm. DAVANTI DESTRO: = 28-31-33-36-38-41 m. Lavorare come indicato per il davanti sinistro ma a specchio. MANICHE: Si lavorano in tondo sui ferri a doppia punta. Avviare 30-33-33-34-36-36 m sui ferri a doppia punta n° 5 con 1 capo del filato Alpaca + 1 capo del filato Kid-Silk. Lavorare 2 coste a legaccio. Proseguire a maglia rasata. Inserire 1 segno all’inizio del giro = centro, sotto la manica. Quando il lavoro misura 6 cm, aumentare 1 m da ciascun lato del segno. Ripetere questi aumenti ogni 4-4½-5-4-4-4 cm altre 4-4-5-7-8-9 volte = 40-43-45-50-54-56 m. Quando il lavoro misura 25-30-33-37-41-44 cm, intrecciare 6 m al centro, sotto la manica per lo scalfo. Proseguire avanti e indietro e, ALLO STESSO TEMPO, intrecciare per l’arrotondamento della manica da ciascun lato, come segue: 2 m 2 volte, 1 m 0-0-1-1-1-2 volte; intrecciare poi 2 m da ciascun lato finché il lavoro non misura 29-34-38-42-46-50 cm. Intrecciare ora 3 m da ciascun lato; intrecciare poi le rimanenti m. Il lavoro misura ca.30-35-39-43-47-51 cm. Lavorare la seconda manica in modo uguale. CONFEZIONE: Cucire le spalle. Montare le maniche. CAPPUCCIO: Riprendere ca.62-78 m intorno allo scollo (comprese le maglie dei davanti messe in attesa sul ferma maglie) sui ferri circolari n° 5 con 1 capo di ognuna delle qualità di filato. Lavorare 1 ferro a dir sul rovescio del lavoro, poi 1 ferro a dir sul diritto del lavoro e, ALLO STESSO TEMPO, aumentare in modo uniforme così da portare il numero delle m a 76-78-80-82-84-86. Proseguire a maglia rasata e lavorando il diagramma A.1 ai lati. Quando il lavoro misura 25-26-27-28-29-30 cm, intrecciare tutte le m. Cucire la parte superiore del berretto, a punto maglia. Attaccare 5-6-6-7-7-8 bottoni a intervalli regolari sul bordo davanti sinistro - abbottonare attraverso i fori sul bordo davanti destro: posizionare i bottoni in base a questi fori. |
||||||||||||||||||||||
Spiegazioni del diagramma |
||||||||||||||||||||||
|
||||||||||||||||||||||
 |
||||||||||||||||||||||
 |
||||||||||||||||||||||
Avete terminato questo modello?Allora taggate le vostre foto con #dropspattern #brightsallycardigan o inviatele alla #dropsfan gallery. Avete bisogno di aiuto con questo modello?Troverete 29 video tutorial, una sezione per i commenti/domande e molto altro guardando il modello su www.garnstudio.com © 1982-2026 DROPS Design A/S. Ci riserviamo tutti i diritti. Questo documento, compreso tutte le sue sotto-sezioni, è protetto dalle leggi sul copyright. Potete leggere quello che potete fare con i nostri modelli alla fine di ogni modello sul nostro sito. |
||||||||||||||||||||||


Con oltre 40 anni di esperienza nel design di modelli di maglia e uncinetto, DROPS Design offre la più estesa collezione di modelli gratuiti su internet - tradotti in 17 lingue. Ad oggi vi possiamo fornire 324 cataloghi e 12290 modelli - 9561 dei quali sono tradotti in Italiano.
Ci stiamo impegnando molto per darvi il meglio che vi possiamo offrire in termini di maglia e uncinetto, ispirazioni e consigli così come filati di grande qualità ad un prezzo incredibile! Volete utilizzare i nostri modelli per qualcosa d'altro oltre al vostro uso personale? Potete leggere tutto ciò che è consentito nel testo sul Copyright in basso su tutte le pagine dei nostri modelli. Buon lavoro!
Lasciare un commento sul modello DROPS Children 26-13
Noi saremmo felici di ricevere i tuoi commenti e opinioni su questo modello!
Se vuoi fare una domanda, fai per favore attenzione a selezionare la categoria corretta nella casella qui sotto per velocizzare il processo di risposta. I campi richiesti sono indicati da *.