
Categorie popolari
State cercando un filato?


Commenti / Domande (46)
![]() Ninni ha scritto:
Ninni ha scritto:
Diag.3 2:a varvet. efter A1 o A2 följer 9a m och 1 r m . I diag. ligger denna r m före förra varvets r m. Jag får den efter... I er video ser det ut som att de räta m ligger på varandra! Jag har 181m enl beskrivning. Hur ska det vara? Följt beskrivningen. rivit upp o räknat x flera. tacksam för förklaring
22.01.2021 - 06:35DROPS Design ha risposto:
Hej Ninni, videon följer beskrivningen, stoppa videoen när du blir osäker, ja rm och am skall ligga på varandra. Lycka till :)
27.01.2021 - 15:27
![]() Gertrud Pettersson ha scritto:
Gertrud Pettersson ha scritto:
Har fått ett garn Plassard i gåva. Vill sticka Bright Sally 11/12 år . Undrar om garnet räcker? Stickfashet nr 5½ 17m=10cm ,22v=9cm . 50g Plassard =225m. Har 400g Plassard Mycket tacksam för råd o svar!
05.01.2021 - 16:32DROPS Design ha risposto:
Hei Gertrud. Har ikke kjennskap til det garnet, anbefaler deg å strikke en strikkeprøve for å se om strikkefastheten passer oppskriften. mvh DROPS design
13.01.2021 - 14:45
![]() Gertrud Pettersson ha scritto:
Gertrud Pettersson ha scritto:
Kollar på st.9/10 år. Nederkantens omkrets 48 cm x 2 enl.diagram, totalt 96cm. Räknar själv; 201m : 17m= 11,8 x10cm = 118 cm. Tänker jag fel när jag gör denna uträkning?? Jag får en skillnad på 22cm i omkretsen av tröjan nedtill.... Tacksam för ett klargörande
06.07.2020 - 19:40DROPS Design ha risposto:
Hej Gertrud, redan på varv 2 i diagram A.3 minskar du 2 m för varje gång du stickar A.3 = 180 m. Lycka till!
07.07.2020 - 15:48
![]() Gisele ha scritto:
Gisele ha scritto:
I am wondering if you have an access to a website that has all your knitted patterns especially for children. Sweaters, dresses, etc.
14.03.2020 - 13:58DROPS Design ha risposto:
Dear Gisele, you will find all our knitted patterns for children here. Happy knitting!
16.03.2020 - 09:37
![]() Kerrk ha scritto:
Kerrk ha scritto:
Knitting smallest size. Numbers don't add up after casting off 6 stitches for each armhole. That is 115 - 6 - 6 = 103. Not the 107 stitches that your pattern requires. Is there an amendment available for this pattern?
20.10.2019 - 14:08DROPS Design ha risposto:
Dear Mrs Kerrk, thanks for your feedback, the size 2 years have been edited - see "corrections" at the end of the pattern, online patterns includes now corrections. Happy knitting!
21.10.2019 - 15:34
![]() Silvia ha scritto:
Silvia ha scritto:
There is no store here that I could go to and ask the questions. Is it possible for me to send you by email my question with photos that will show the measurements I am talking about?
19.07.2019 - 20:38DROPS Design ha risposto:
Dear Silvia, you will find the list of all DROPS stores shipping to your country here. Happy knitting!
05.08.2019 - 16:24
![]() Silvia ha scritto:
Silvia ha scritto:
I am sorry, I still don’t get it. I am talking measures only: the sleeve leaves only 5 cm for the armhole (35-30=5cm) while the back/front leaves 13 cm for the armhole (44-31=13 cm). Where am I wrong?
19.07.2019 - 01:27DROPS Design ha risposto:
Dear Silvia, sorry I don't get the measurements for armholes you are writing here. The sleeves should be sewn starting from middle of armhole (= in the middle of 6 sts cast off for armhole on body), then along sts cast off for armhole, up to the shoulder and down to the stiitches cast off for armhole. It would be a good idea to bring your work to your store (or send them a photo) so that they can provide you any further individual assistance there. Happy knitting!
19.07.2019 - 08:15
![]() Silvia ha scritto:
Silvia ha scritto:
Re 26-13 Bright Sally 3-4 yrs.Back piece: When piece measures 31cm, cast off 6 sts for armholes and cast off the 12 sets shoulder when the piece measures 44 cm. That is 13 cm for the armholes.Sleeve: When piece measures 30cm, cast off 6 sts for armhole and cast off all remaining sts when the sleeve measures 35 cm. That means only 5 cm for the armholes. If I try to sew the sleeve to the back-front I cannot fit the 5 cm length of the sleeve armhole with the 13 cm length of the back-front piece.
18.07.2019 - 03:12DROPS Design ha risposto:
Dear Silvia, if your tension is right you should have correct measurement = 5 cm armhole as in chart and 5 cm for sleeve cap, you then sew the cast off stitches on sleeve along the armholes from body, pin the sleeve before sewing can help. Happy assembly!
18.07.2019 - 10:38
![]() Annika Hallberg ha scritto:
Annika Hallberg ha scritto:
Hej! Kan man göra den här tröjan med bara "vanlig" halskant?
18.05.2019 - 16:47DROPS Design ha risposto:
Hej. Ja det bör inte vara några problem att göra en vanlig halskant på den istället för en luva. Se ev. på ett mönster i samma stickfasthet med en vanlig halskant för att se hur många maskor osv du bör ha längst upp. Lycka till!
22.05.2019 - 07:58
![]() Paula Parracho ha scritto:
Paula Parracho ha scritto:
Boa noite, FRENTE ESQUERDA: A 39-43-47-51-55 cm de altura total, colocar em espera para o decote as 10-12-12-14-13-15 primeiras ms/pts a partir do meio da frente num alfinete de ms/pts. Arrematar então no princípio de cada carreira pelo direito: 1 vez 2 ms/pts e 2 vezes 1 m/p - Estes remates são no decote ou do lado da cava? Não entendo, Obrigada
13.03.2019 - 22:16DROPS Design ha risposto:
Boa tarde, Estes remates são no lado do decote. Bom tricô!
08.04.2019 - 17:13
|
||||||||||||||||||||||
Bright Sally#brightsallycardigan |
||||||||||||||||||||||
 |
 |
|||||||||||||||||||||
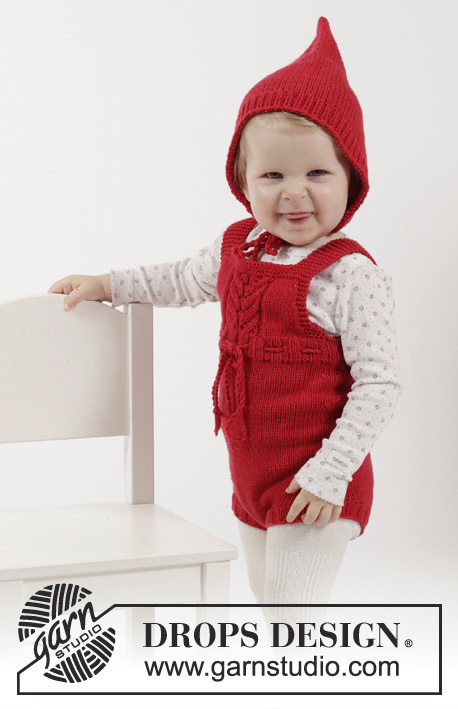
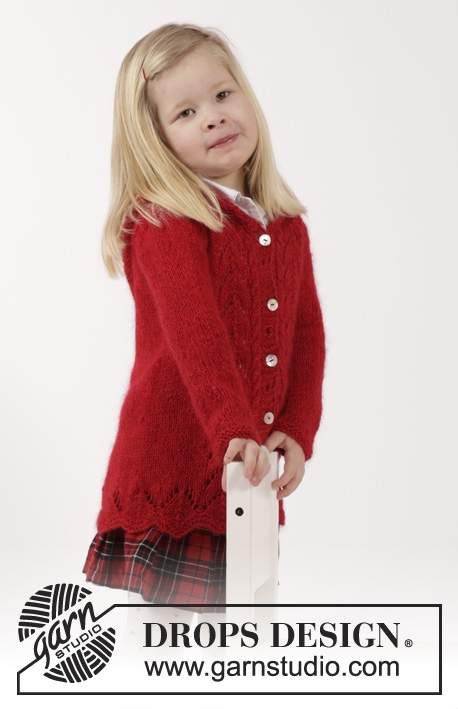
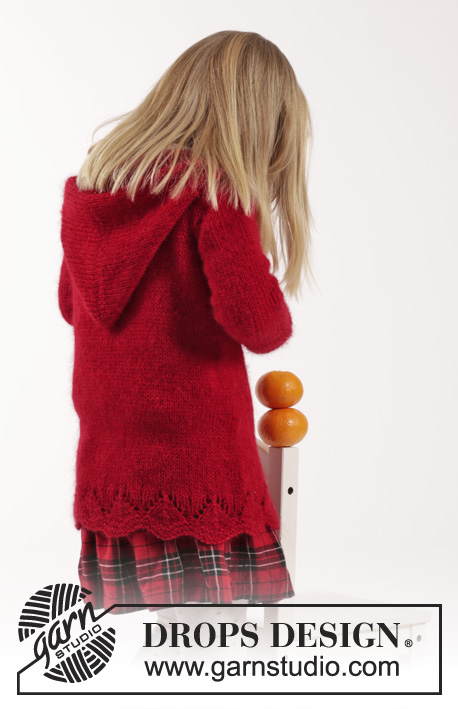
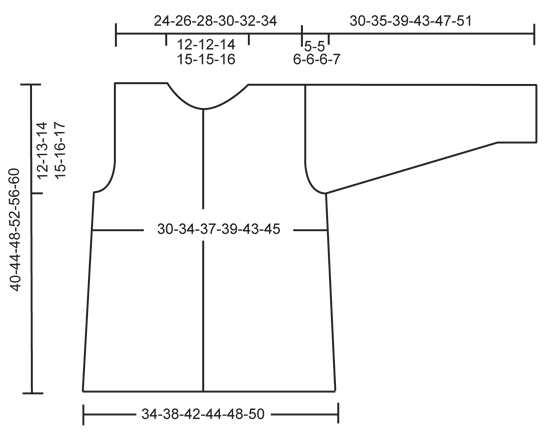
Cardigan lavorato ai ferri, con trecce, motivo traforato e cappuccio, in DROPS Alpaca e DROPS Kid-Silk. Taglie: Da 2 a 12 anni.
DROPS Children 26-13 |
||||||||||||||||||||||
|
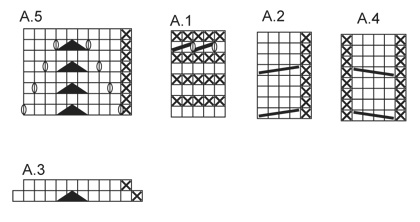
PUNTO LEGACCIO (avanti e indietro sui ferri): Lavorare tutti i ferri a dir. 1 "costa" a legaccio = 2 ferri a dir. PUNTO LEGACCIO (in tondo): Lavorare * 1 giro a dir, 1 giro a rov *, ripetere da *-*. 1 "costa" a legaccio = 2 giri MOTIVO: Vedere i diagrammi da A.1 a A.5. I diagrammi mostrano tutti i ferri del motivo visti sul diritto del lavoro. ---------------------------------------------------------- CARDIGAN: Si lavora avanti e indietro sui ferri circolari con inizio al centro, sul davanti. Avviare 153-165-177-189-201-213 m (comprese 5 m per il bordo davanti da ciascun lato) sui ferri circolari n° 5 con 1 capo del filato Alpaca + 1 capo del filato Kid-Silk. Lavorare 2 coste a PUNTO LEGACCIO - vedere le spiegazioni sopra. Proseguire come segue: diagramma A.1 (= bordo davanti), diagramma A.2 (= 5 m), diagramma A.3 (= 12 m) sulle 132-144-156-168-180-192 m successive, diagramma A.4 (= 6 m), finire con il diagramma A.1 (= bordo davanti). Dopo aver lavorato il diagramma A.3 una volta in verticale, sui ferri ci sono 131-141-151-161-171-181 m. Proseguire seguendo il motivo come impostato, ma lavorare il diagramma A.5 sopra ogni ripetizione del diagramma A.3. Dopo aver lavorato il diagramma A.5 1 volta in verticale, proseguire come segue: diagramma A.1, diagramma A.2, diagramma A.5, 1 m rov, 89-99-109-119-129-139 m a maglia rasata, diagramma A.5, diagramma A.4, diagramma A.1. Proseguire con il motivo come impostato. Inserire ora 2 segni nel lavoro; il primo dopo le prime 36-38-40-43-45-48 m ed il secondo prima delle ultime 36-38-40-43-45-48 m (dietro = 59-65-71-75-81-85 m). RICORDARSI LA TENSIONE DEL LAVORO. ALLO STESSO TEMPO, quando il lavoro misura 6 cm, diminuire 1 m da ciascun lato di ogni segno (= 4 m diminuite). Ripetere queste diminuzioni ogni 6½-7½-8½-9½-10½-11½ cm altre 3 volte = 115-125-135-145-155-165 m. Quando il lavoro misura 28-31-34-37-40-43 cm, intrecciare 6 m da ciascun lato per gli scalfi (intrecciare quindi le 3 m che precedono e le 3 m che seguono ognuno dei due segni). Finire ogni parte separatamente. DIETRO: = 47-51-57-61-67-71 m. Proseguire ad intrecciare per gli scalfi da ciascun lato all’inizio di ogni ferro, come segue: 2 m 1-1-2-2-2-2 volte e 1 m 1-1-1-1-2-3 volte = 41-45-47-51-55-57 m. Quando il lavoro misura 38-42-46-50-54-58 cm, intrecciare le 17-19-21-23-23-25 m centrali per lo scollo. Al ferro successivo, intrecciare 1 m per lo scollo = per la spalla rimangono 11-12-12-13-15-15 m. Intrecciare le m quando il lavoro misura 40-44-48-52-56-60 cm. DAVANTI SINISTRO: = 28-31-33-36-38-41 m. Intrecciare per lo scalfo sul lato come indicato per il dietro = 25-28-28-31-32-34 m. Quando il lavoro misura 35-39-43-47-51-55 cm, mettere in attesa su un ferma maglie le prime 10-12-12-14-13-15 m dal centro davanti, per lo scollo. Intrecciare ora, all’inizio di ogni ferro sul diritto del lavoro, come segue: 2 m 1 volta e 1 m 2 volte = per la spalla rimangono 11-12-12-13-15-15 m – lavorare a maglia rasata le m che non possono essere lavorate in base al motivo. Intrecciare le m quando il lavoro misura 40-44-48-52-56-60 cm. DAVANTI DESTRO: = 28-31-33-36-38-41 m. Lavorare come indicato per il davanti sinistro ma a specchio. MANICHE: Si lavorano in tondo sui ferri a doppia punta. Avviare 30-33-33-34-36-36 m sui ferri a doppia punta n° 5 con 1 capo del filato Alpaca + 1 capo del filato Kid-Silk. Lavorare 2 coste a legaccio. Proseguire a maglia rasata. Inserire 1 segno all’inizio del giro = centro, sotto la manica. Quando il lavoro misura 6 cm, aumentare 1 m da ciascun lato del segno. Ripetere questi aumenti ogni 4-4½-5-4-4-4 cm altre 4-4-5-7-8-9 volte = 40-43-45-50-54-56 m. Quando il lavoro misura 25-30-33-37-41-44 cm, intrecciare 6 m al centro, sotto la manica per lo scalfo. Proseguire avanti e indietro e, ALLO STESSO TEMPO, intrecciare per l’arrotondamento della manica da ciascun lato, come segue: 2 m 2 volte, 1 m 0-0-1-1-1-2 volte; intrecciare poi 2 m da ciascun lato finché il lavoro non misura 29-34-38-42-46-50 cm. Intrecciare ora 3 m da ciascun lato; intrecciare poi le rimanenti m. Il lavoro misura ca.30-35-39-43-47-51 cm. Lavorare la seconda manica in modo uguale. CONFEZIONE: Cucire le spalle. Montare le maniche. CAPPUCCIO: Riprendere ca.62-78 m intorno allo scollo (comprese le maglie dei davanti messe in attesa sul ferma maglie) sui ferri circolari n° 5 con 1 capo di ognuna delle qualità di filato. Lavorare 1 ferro a dir sul rovescio del lavoro, poi 1 ferro a dir sul diritto del lavoro e, ALLO STESSO TEMPO, aumentare in modo uniforme così da portare il numero delle m a 76-78-80-82-84-86. Proseguire a maglia rasata e lavorando il diagramma A.1 ai lati. Quando il lavoro misura 25-26-27-28-29-30 cm, intrecciare tutte le m. Cucire la parte superiore del berretto, a punto maglia. Attaccare 5-6-6-7-7-8 bottoni a intervalli regolari sul bordo davanti sinistro - abbottonare attraverso i fori sul bordo davanti destro: posizionare i bottoni in base a questi fori. |
||||||||||||||||||||||
Spiegazioni del diagramma |
||||||||||||||||||||||
|
||||||||||||||||||||||
 |
||||||||||||||||||||||
 |
||||||||||||||||||||||
Avete terminato questo modello?Allora taggate le vostre foto con #dropspattern #brightsallycardigan o inviatele alla #dropsfan gallery. Avete bisogno di aiuto con questo modello?Troverete 29 video tutorial, una sezione per i commenti/domande e molto altro guardando il modello su www.garnstudio.com © 1982-2026 DROPS Design A/S. Ci riserviamo tutti i diritti. Questo documento, compreso tutte le sue sotto-sezioni, è protetto dalle leggi sul copyright. Potete leggere quello che potete fare con i nostri modelli alla fine di ogni modello sul nostro sito. |
||||||||||||||||||||||


Con oltre 40 anni di esperienza nel design di modelli di maglia e uncinetto, DROPS Design offre la più estesa collezione di modelli gratuiti su internet - tradotti in 17 lingue. Ad oggi vi possiamo fornire 324 cataloghi e 12290 modelli - 9561 dei quali sono tradotti in Italiano.
Ci stiamo impegnando molto per darvi il meglio che vi possiamo offrire in termini di maglia e uncinetto, ispirazioni e consigli così come filati di grande qualità ad un prezzo incredibile! Volete utilizzare i nostri modelli per qualcosa d'altro oltre al vostro uso personale? Potete leggere tutto ciò che è consentito nel testo sul Copyright in basso su tutte le pagine dei nostri modelli. Buon lavoro!
Lasciare un commento sul modello DROPS Children 26-13
Noi saremmo felici di ricevere i tuoi commenti e opinioni su questo modello!
Se vuoi fare una domanda, fai per favore attenzione a selezionare la categoria corretta nella casella qui sotto per velocizzare il processo di risposta. I campi richiesti sono indicati da *.