
Categorie popolari
State cercando un filato?


Commenti / Domande (69)
![]() KTY ha scritto:
KTY ha scritto:
Bonsoir, très joli modèle. Est-il possible de rallonger les manches de quelques centimètres sans avoir à recalculer? Merci pour votre réponse
23.03.2021 - 21:29DROPS Design ha risposto:
Bonjour Kty, probablement, vous trouverez ici d'autres hauts tricotés en fils du groupe B, avec des longueurs de manches différentes; vous pourrez vous en inspirer pour trouver la longueur/la méthode qui vous convient. Bon tricot!
24.03.2021 - 07:52
![]() Louise Ojén ha scritto:
Louise Ojén ha scritto:
Jeg er lidt over halvvejs i bærestykket med A2. Og det går nu op for mig at mønsteret er skævt. I opskriften står der at jeg skal strikke 14 m ret, A2 osv. Men hvornår starter de 14 masker ret? For starter de altid lige efter raglan mærket så vil mønstret jo ikke ende midt på...? Hvordan sikrer jeg mig at mønstret bliver på midten af forstykket, når der i opskriften står jeg skal strikke 14 masker derefter A2 osv? Vh. Louise.
05.01.2020 - 21:54
![]() Eva ha scritto:
Eva ha scritto:
Dobrý den, prosím jak na to raglánové skosení při Velikosti XL. NEMOHU SE V TOM VYZNAT. Děkuji
30.06.2019 - 13:05DROPS Design ha risposto:
Dobrý den, Evo, text návodu je upravený a přeformulovaný, podívejte se, prosím, na odstavec RAGLÁNOVÉ ZKOSENÍ a pak rozpis pro SEDLO - věřím, že teď bude postup srozumitelnější a jasnější. Příjemné letní pletení! Hana
01.07.2019 - 08:43
![]() Deb From Nova Scotia ha scritto:
Deb From Nova Scotia ha scritto:
I mad this sweater in Belle navy blue, hand washed with Eucalan delicate soap, blocked and let it dry. Love the yarn; drapes nicely & has a nice weight and shine to it. I like the fit of the sweater, but, like a few others, I find the neck too wide. I’m a fairly new knitter and don’t know what to do to make the neck opening smaller. What do you suggest? I’d like to make another sweater from this pattern. I’m guessing that I should cast on fewer stitches, and knit extra rows. Correct?
20.02.2019 - 02:58DROPS Design ha risposto:
Dear Deb From Nova Scotia, this pattern has a quite large neck as shown in the picture. We are unfortunately not able to adapt every pattern to every single request but please contact your DROPS store - even per mail or telephone - for any individual assistance. Happy knitting!
20.02.2019 - 09:36
![]() Dk ha scritto:
Dk ha scritto:
Hello, I finished the a2 and done all the 17 raglan repetitions for size small. However, instead of finding 294 stitches I only have 286. Which actually makes sense since 17 repetitions times 8 stitches is actually 136, plus the previous 150 totals 286. Is this a mistake on the pattern? Thank you !
04.11.2018 - 17:19DROPS Design ha risposto:
Dear Dk, you increase for the raglan a total of 18 times (= 17 more times = 18 times), so that you will have 150 sts + (8 sts inc x 18 times = 144)= 294 sts. Happy knitting!
05.11.2018 - 09:44
![]() Kathy Fae ha scritto:
Kathy Fae ha scritto:
Thank you for the help. Another question regarding A2 section. I’m making a large. I have 50 sts on that section. (Instructions were knit 49, knit 1, then place a marker) So I have 50. I’ll work raglan increase, 4 sts, knit 16, work chart, (17 sts), that’s a total of 37 sts that only leaves 13 sts until marker. The A2 design will not be centered on the chest. What am I doing wrong?
21.06.2018 - 18:19DROPS Design ha risposto:
Dear Mrs Fae, A.2 should be centered over the 49 sts on front piece = K16, work A.2, K14, inc for raglan = YO, K1, YO, K1fb, K1 (= st with marker), K1fb, YO, K1, YO and continue working inc at each raglan, at the end of round you will work the increase on each side of first marker (= at the end of round + at the beg of next round). Happy knitting!
22.06.2018 - 07:54
![]() Kathy Fae ha scritto:
Kathy Fae ha scritto:
I’m unsure about A2 section. I’ve placed all my raglan markers. I’m making a Large. Is this correct: Row 1, work raglan increases (4 sts), knit 16, work row 1 of chart, then continue on with knit and regular increases to end. Row 2, knit all, twisted knit ay certain YOs. Row 3, work raglan increases, then knit 16 again, then row 3 of chart. I’m uncertain because the charted area moves over two stitches due to the two raglan increases. Am I doing this right?
21.06.2018 - 09:18DROPS Design ha risposto:
Dear Mrs Fae, when you will work row 3 in A.2 you should line it up over the row 1 in A.2, ie over the same 17 sts as on row 1 (you can insert a marker before and after these 17 sts to mark where A.2 should be worked). The number of sts on each side of A.2 will increase due to the raglan increases. Happy knitting!
21.06.2018 - 15:24
![]() Julie ha scritto:
Julie ha scritto:
Right now i have 294 stitches when i separate the stitches for the sleeves and the front and back on my needles i will only have 162 stitches when it written that i should have 174 the extra 12 stitches is that what i'm adding to the sleeves and counts for the 174? where does a person put the stitch markers?
28.05.2018 - 02:53DROPS Design ha risposto:
Dear Julie, the new markers will be inserted in the middle of the new 6 sts cast on under sleeve: 81 sts (= front piece), 6 sts (= 3 sts, 1 marker, 3 sts), 81 sts (= back piece), 6 sts (= 3 sts, 1 marker, 3 sts) = 174 sts (there are now 66 sts on each side on thread/st holders). Happy knitting!
28.05.2018 - 09:48
![]() Julie ha scritto:
Julie ha scritto:
Hi I have another question the A 2 design how many stitches are between the holes? I really don’t understand the directions so any kind of help you could give would be much appreciated
18.05.2018 - 05:39DROPS Design ha risposto:
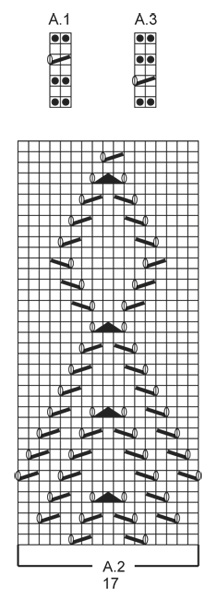
Dear Julie, diagram A.2 is showing the 17 sts you have to work on mid front. Start reading diagram from the bottom corner on the right side towards the left on every round. Inserting a marker at the beg and another marker at the end of A.2 to mark these 17 sts can help. Happy knitting!
18.05.2018 - 09:05
![]() Julie ha scritto:
Julie ha scritto:
Could you please explain to me on the yoke part of the pattern when i switch the needles to size 4 i increased the 16 stitches on the next round it says it wants to set 4 markers than i knitted the 45 stitches and knitted one more stitch and put the 2nd marker on this stitch is this stitch is to be the dividing stitch between front and the sleeve?jploog
17.05.2018 - 03:30DROPS Design ha risposto:
Dear Julie, that's right the stitch with the 2nd marker is the st on raglan line between front and sleeve, the st with 3rd marker is between sleeve and back piece, the st with 4th marker is between back piece and sleeve (first st on round is the one between sleeve and front piece). Happy knitting!
17.05.2018 - 09:02
|
|||||||||||||||||||
Serene Spring |
|||||||||||||||||||
 |
 |
||||||||||||||||||
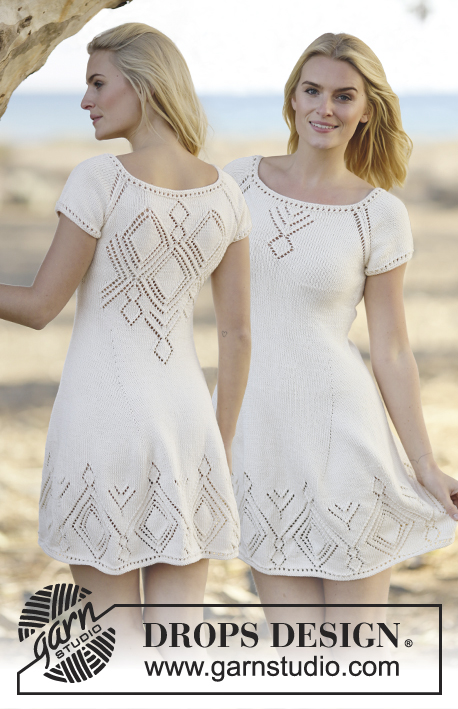
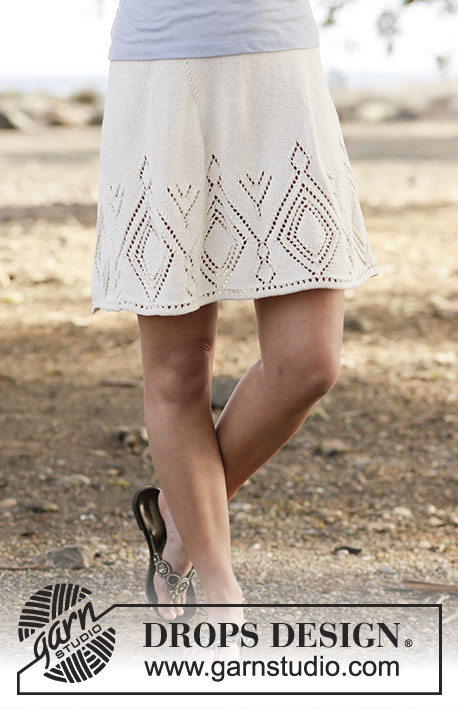
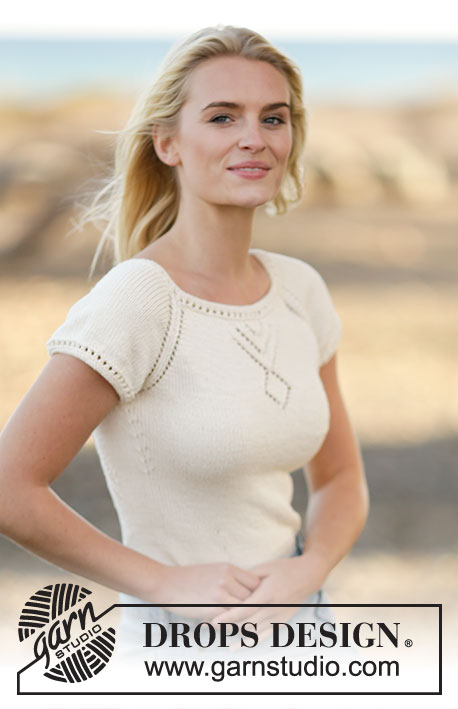
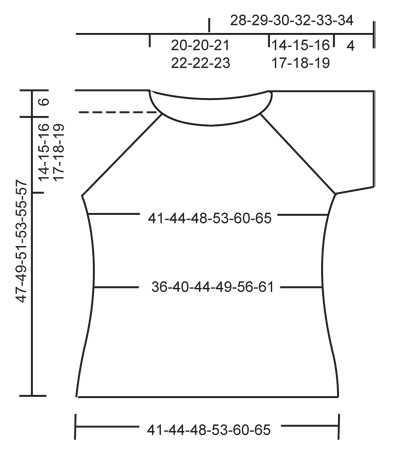
Top DROPS lavorato ai ferri con motivo traforato e raglan in ”Belle”. Lavorato dall’alto in basso (top down). Taglie: S - XXXL.
DROPS Extra 0-1104 |
|||||||||||||||||||
|
MOTIVO: Vedere i diagrammi A.1-A.3. SUGGERIMENTO PER LE DIMINUZIONI: Diminuire 1 m prima del segnapunti come segue: lavorare fino a quando rimangono 2 m prima del segnapunti, passare 1 m a dir senza lavorarla, 1 m dir, accavallare la m passata sopra quella appena lavorata. Diminuire 1 m dopo il segnapunti come segue: lavorare 2 m insieme a dir. RAGLAN: Aumentare in modo diverso per il raglan per le diverse taglie: TAGLIE S-M: Aumentare 1 m a ogni lato di ogni segnapunti (= 8 aumenti in totale) come segue: 1 gettato, 1 m a dir ritorto, 1 m dir (= m con il segno), 1 m dir ritorto, 1 gettato. Non lavorare i gettati a ritorto sul giro successivo, devono fare i buchi, ripetere gli aumenti a giri alterni altre 17-19 volte. NOTA: L'aumento a ogni lato del 1° segnapunti (= nell'ultima maglia sul giro) è lavorato come segue: all'inizio del giro, 1 maglia diritto ritorto, 1 gettato. Alla fine del giro: 1 gettato, 1 maglia diritto ritorto, 1 maglia diritto (= maglia con il segnapunti). TAGLIE L-XL-XXL-XXXL: Aumentati a giri alterni come segue: Aumentare 2 m a ogni lato di ogni segnapunti (= 16 aumenti in totale) come segue: 1 gettato, 1 m dir, 1 gettato, 1 m dir ritorto, 1 m dir (= m con il segnapunti), 1 m dir ritorto, 1 gettato, 1 m dir, 1 gettato (lavorare il 1° e ultimo gettato a dir ritorto sul giro successivo, non deve fare un buco, le 2 m centrali devono fare buchi). Ripetere gli aumenti a giri alterni altre 1-1-1-3 volte. NOTA: L'aumento a ogni lato del 1° segnapunti (= nell'ultima maglia sul giro) è lavorato come segue: all'inizio del giro, 1 maglia diritto ritorto, 1 gettato. Alla fine del giro: 1 gettato, 1 maglia diritto ritorto, 1 maglia diritto (= maglia con il segnapunti). Poi aumentare in questo modo: Aumentare 1 m a ogni lato di tutti i segnapunti (= 8 aumenti in totale) come segue: 1 gettato, 1 m dir ritorto, 1 m dir (= m con il segnapunti), 1 m dir ritorto, 1 gettato. Non lavorare i gettati a dir ritorto sul giro successivo, devono fare i buchi. Ripetere gli aumenti a giri alterni altre 19-20-22-21 volte in totale. SUGGERIMENTO PER GLI AUMENTI: Iniziare 1 m prima del segnapunti e aumentare come segue: 1 gettato, 2 m dir (il segnapunti è tra queste 2 m), 1 gettato. Sul giro successivo lavorare i gettati a dir ritorto per evitare buchi. ---------------------------------------------------------- TOP: Lavorato in tondo con i f circolari, dall’alto in basso (top down). SPRONE: Avviare 134-134-140-144-144-148 m con i f circolari n° 3,5 mm con Belle. Lavorare A.1 (= 2 m) su tutte le m. Quando A.1 è stato lavorato 1 volta in verticale, passare ai f circolari n° 4 mm. Sul giro successivo lavorare tutte le m a dir e distribuire 16-20-14-22-42-46 aumenti in modo uniforme = 150-154-154-166-186-194 m. Sul giro successivo inserire 4 segnapunti come segue: Inserire il 1° segnapunti nell'ultima m sul giro, 45-47-49-55-65-71 m dir (= davanti), 1 m dir e inserire il 2° segnapunti in questa m, 28-28-26-26-26-24 m dir (= manica), 1 m dir e inserire il 3° segnapunti in questa m, 45-47-49-55-65-71 m dir (= dietro), 1 m dir e inserire il 4° segnapunti in questa m, lavorare il resto del giro a dir (= 28-28-26-26-26-24 m = manica). FARE ATTENZIONE ALLA TENSIONE DEL LAVORO! Poi lavorare come segue – ALLO STESSO TEMPO aumentare per il RAGLAN – leggere la spiegazione sopra. Lavorare metà dell'aumento per il raglan per il 1° segnapunti (leggere la spiegazione sopra). Lavorare 14-15-16-19-24-27 m dir, A.2 (= 17 m), lavorare a dir fino a quando rimangono 1-1-2-2-2-2 m prima del 2° segnapunti, lavorare il RAGLAN – leggere la spiegazione sopra, lavorare a dir fino a quando rimangono 1-1-2-2-2-2 m prima del 3° segnapunti, lavorare il raglan, lavorare a dir fino a quando rimangono 1-1-2-2-2-2 m prima del 4° segnapunti, lavorare il raglan, lavorare a dir fino a quando rimangono 1-1-2-2-2-2 m prima del 1° segnapunti, lavorare il raglan. Lavorare gli aumenti a m rasata. Quando A.2 è stato lavorato 1 volta in verticale, lavorare a m rasata su tutte le m. Alla fine di tutti gli aumenti ci sono 294-314-338-358-394-426 m sul f. Il lavoro misura circa 14-15-16-17-18-19 cm. Continuare a m rasata e lavorare come segue: lavorare le prime 81-87-95-103-117-129 m (= davanti), trasferire le 66-70-74-76-80-84 m successive su un fermamaglie per la manica, avviare 6-6-6-8-8-8 m sotto la manica (inserire un segnapunti al centro delle nuove m), lavorare le 81-87-95-103-117-129 m successive (= dietro), trasferire le 66-70-74-76-80-84 m successive su un fermamaglie per la manica, avviare 6-6-6-8-8-8 m sotto la manica (inserire un segnapunti al centro delle nuove m) = 174-186-202-222-250-274 m rimaste sul f. Inserire 1 segnapunti nel lavoro, ORA MISURARE IL LAVORO DA QUI. CORPO: Continuare a m rasata. Quando il lavoro misura 3 cm, diminuire 1 m a ogni lato di tutti i segnapunti ai lati (= 4 diminuzioni) – LEGGERE IL SUGGERIMENTO PER LE DIMINUZIONI! Ripetere le diminuzioni ogni 2½-4-4-4-4-4 cm altre 5-3-3-3-3-3 volte = 150-170-186-206-234-258 m. Quando il lavoro misura 20 cm per tutte le taglie, aumentare 1 m a ogni lato di tutti i segnapunti ai lati (= 4 aumenti) – LEGGERE IL SUGGERIMENTO PER GLI AUMENTI. Ripetere gli aumenti ogni 2-4-4-4-4-4 cm altre 5-3-3-3-3-3 volte = 174-186-202-222-250-274 m. Quando il lavoro misura 31-32-33-34-35-36 cm, passare ai f circolari n° 3,5 mm. Lavorare A.3 (= 2 m) su tutte le m. Intrecciare. MANICHE: Lavorate in tondo con i f a doppia punta. Riportare le m dal fermamaglie sui f a doppia punta n° 4 mm e avviare 6-6-6-8-8-8 m sotto la manica = 72-76-80-84-88-92 m. Lavorare a m rasata per 2 cm, sul giro successivo distribuire 8 diminuzioni in modo uniforme = 64-68-72-76-80-84 m. Passare ai f a doppia punta n° 3,5 mm. Lavorare A.3 su tutte le m. Intrecciare. Lavorare l’altra manica nello stesso modo. CONFEZIONE: Cucire le aperture sotto le maniche. |
|||||||||||||||||||
Spiegazioni del diagramma |
|||||||||||||||||||
|
|||||||||||||||||||
 |
|||||||||||||||||||
 |
|||||||||||||||||||
Avete terminato questo modello?Allora taggate le vostre foto con #dropspattern o inviatele alla #dropsfan gallery. Avete bisogno di aiuto con questo modello?Troverete 21 video tutorial, una sezione per i commenti/domande e molto altro guardando il modello su www.garnstudio.com © 1982-2026 DROPS Design A/S. Ci riserviamo tutti i diritti. Questo documento, compreso tutte le sue sotto-sezioni, è protetto dalle leggi sul copyright. Potete leggere quello che potete fare con i nostri modelli alla fine di ogni modello sul nostro sito. |
|||||||||||||||||||


Con oltre 40 anni di esperienza nel design di modelli di maglia e uncinetto, DROPS Design offre la più estesa collezione di modelli gratuiti su internet - tradotti in 17 lingue. Ad oggi vi possiamo fornire 324 cataloghi e 12290 modelli - 9561 dei quali sono tradotti in Italiano.
Ci stiamo impegnando molto per darvi il meglio che vi possiamo offrire in termini di maglia e uncinetto, ispirazioni e consigli così come filati di grande qualità ad un prezzo incredibile! Volete utilizzare i nostri modelli per qualcosa d'altro oltre al vostro uso personale? Potete leggere tutto ciò che è consentito nel testo sul Copyright in basso su tutte le pagine dei nostri modelli. Buon lavoro!
Lasciare un commento sul modello DROPS Extra 0-1104
Noi saremmo felici di ricevere i tuoi commenti e opinioni su questo modello!
Se vuoi fare una domanda, fai per favore attenzione a selezionare la categoria corretta nella casella qui sotto per velocizzare il processo di risposta. I campi richiesti sono indicati da *.