
Categorie popolari
State cercando un filato?




























Commenti / Domande (74)
 Maggie ha scritto:
Questions not comments
06.10.2026 - 21:14
Maggie ha scritto:
After the yoke,what's the next step? Raglan? And at the same time, work A2? In the increases for Raglan small,when do you slip the marker? Im not sure what order to proceed with. It's a bit confusing. Is every other round just knit? How do you incorporate A2 in the Raglan section?
06.10.2026 - 21:13DROPS Design ha risposto:
Dear Maggie, after you have inserted the markers you will work the increases for the raglan as explained for your size and at the same time begin working A.2 after the first 14-27 sts of the round, all other stitches will be worked in stocking stitch. When A.2 is finished just work all stitches in stocking stitch as the other. Increase for raglan as explained under RAGLAN for your size and how described for the first round on yoke when starting A.2. Happy knitting!
07.10.2026 - 07:39
Kaye ha scritto:
Continuing clarification, K26 brings me up to the 1st marker. I start raglan increase - half of the increase for marker 1: K1 twisted, 1 YO, K1, 1YO. How do I increase BEFORE the marker if the first stitch of K1 twisted is knitting the marker stitch? I've read through these questions and from pattern Drops 160-1 and still cannot figure out how to make the increase. Thank you!
02.06.2026 - 14:20DROPS Design ha risposto:
Dear Kaye, in L you increase 2 sts in each side of each marker just as explained at the beg of the pattern, so at the end of the round you work until 2 st before the last marker, then YO, K1, YO, K1 twisted, and K1 with the marker. Happy knitting!
03.06.2026 - 08:21
Kaye ha scritto:
Yoke instructions adding the markers, for Large size. I put a marker on the last stitch of the last round. I knit 49 + 1 knit (50 stitches) and place a marker on this stitch (50th stitch). I knit 26 + 1 knit (27 stitches) and place a marker on this stitch (77th stitch). I knit 49 + 1 knit (50 stitches) and place a marker on this stitch (127th stitch). End the round with 26 stitches. This adds up to 153 not 154. Should I be knitting 27 at the end of this row? Thank you!
01.06.2026 - 02:18DROPS Design ha risposto:
Hi Kaye, You have 154 stitches: The 4th marker is in the 127th stitch as you say. You then knit 26 stitches and start the next round before the first marker-stitch (the last stitch on the previous round), beginning the increases for raglan as described in the text. Regards, Drops Team.
01.06.2026 - 06:11
Lori ha scritto:
I am stuck at the very beginning! I see that I need both a 60 cm and 80 cm circular needle for 4 mm and 6 mm. The pattern indicates that I start with the 4 mm and then change to 6 mm. But, I do not see when I use the 60 cm or 80 cm for either 4 mm or 6 mm. What am I missing? Thanks much.
27.05.2026 - 18:21DROPS Design ha risposto:
Hi Lori, The longer circular needles are used when you have a lot of stitches, then the shorter needles when you have decreased and the longer needles are too long. Regards, Drops Team.
28.05.2026 - 06:30
Audrey Coggeshall ha scritto:
I am starting the round where I have to insert the markers. I come up with 149 stitches not 150. Place first marker on last stitch of last round..knit 45..K 1 insert marker,K 28,K 1 place marker, knit 45, Knit 1 place marker K 28..I calculate 149 st.NOT 150..please explain. Thank you
16.08.2025 - 06:37DROPS Design ha risposto:
Hi Audrey, The markers are inserted into stitches (not between stitches): Marker stitch + 45 + marker-stitch + 28 + marker-stitch + 45 + marker-stitch + 28 = 150 stitches. Regards, Drops team.
18.08.2025 - 06:46
Audrey Coggeshall ha scritto:
I don't understand the A-1 diagram. The pattern states " when A-1 has worked one time vertically? Do you mean P-1 ,K-1,P-1,K -1 P 2 together, P 1, P-1 etc. This is not clear. Thank you for an explanation Thank you
15.08.2025 - 05:42DROPS Design ha risposto:
Hi Audrey, The pattern diagrams are at the bottom of the page, above the size chart. The diagrams are read from right to left and bottom up. A.1 consists of 2 stitches which are repeated on the round, so the first round is purl, the second round knit, then purl, then knit. Round 5 is knit 2 together, make 1 yarn over repeated to end of round, then you knit 1 round and purl 1 round. A.1 is now finished in height. Regards, Drops team.
15.08.2025 - 06:36
 Solveig ha scritto:
Str small.Ved å strikke diagram A1 halveres antall masker og da kommer jeg ikke opp 150 masker etter å ha strikket diagram 1?
22.07.2025 - 12:00DROPS Design ha risposto:
Hei Solveig. Har du glemt kastene i 5. omgang i diagram A.1 (der du strikker 2 masker rett sammen + 1 kast). Du starter med 134 masker og strikker A.1, og du skal ha samme maskeantall når du er ferdig å strikke A.1 (134 masker). Så skal du øke 16 masker jevnt fordelt = 134+16 = 150 masker. mvh DROPS Design
04.08.2025 - 11:08
 Fia ha scritto:
Jag har satt mina 4 markörer som jag ska. Men nu när jag ska börja med ökningarna till raglan samtidigt med A2, så får jag det inte till att stämma. Jag får inte A2 på mitten. Jag stickar en L. Kan ni vara snäll att hjälpa mig att förstå vad som blir fel?
20.07.2025 - 19:54DROPS Design ha risposto:
Hei Fia. Oppskriften er blitt oversent til Design avd. slik at de kan ta en dobbeltsjekk, men det er mulig det mangler en korrigering når man starter med raglanøkningen. At man skal starte med halve raglanøkningen til 1. merke og så strikk 14 masker. Se evnt på kjolen i DROPS 160-1, den har samme begynnelsen som DROPS Extra 0-1104 og fått en korrigering. mvh DROPS Design
31.07.2025 - 13:33
Sofia ha scritto:
Str small: «SAMTIDIG som øker til raglan strikk 14 masker rett» Er de 14 masker innbefattet økningene? ( inkl kastene?)
06.07.2025 - 17:37DROPS Design ha risposto:
Hei Sofia. Økningene til raglan kommer utenom de 14 maskene. Altså, øk, strikk 14 masker, A.2 osv. mvh DROPS Design
31.07.2025 - 08:03
|
|||||||||||||||||||
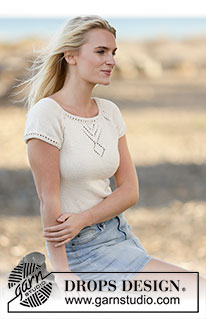
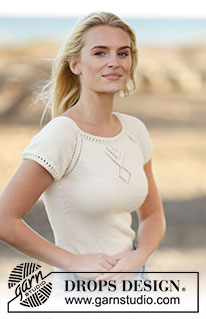
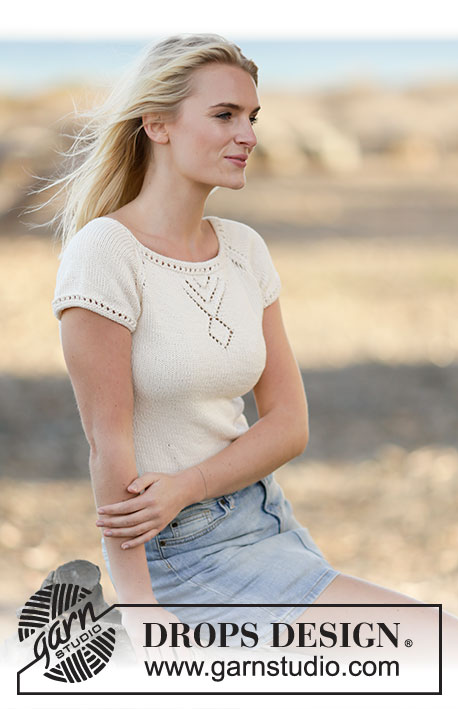
Serene Spring |
|||||||||||||||||||
 |
 |
||||||||||||||||||
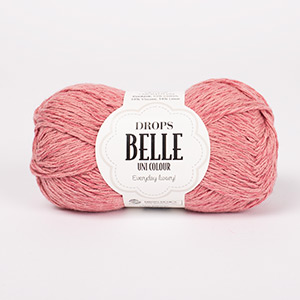
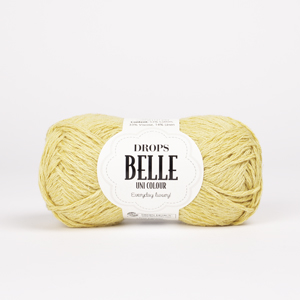
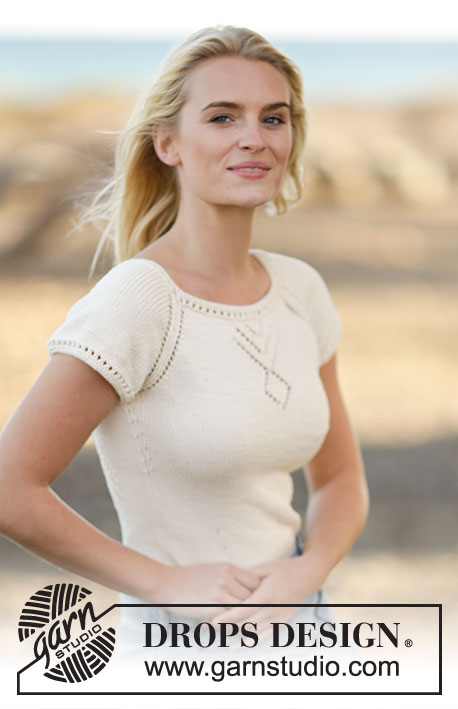
Top DROPS lavorato ai ferri con motivo traforato e raglan in ”Belle”. Lavorato dall’alto in basso (top down). Taglie: S - XXXL.
DROPS Extra 0-1104 |
|||||||||||||||||||
|
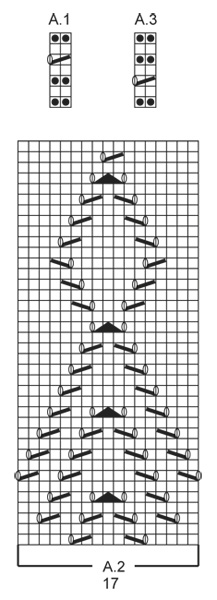
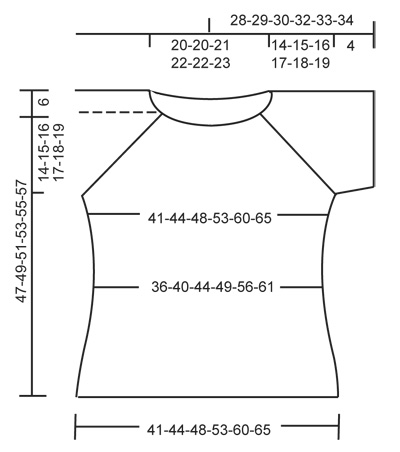
MOTIVO: Vedere i diagrammi A.1-A.3. SUGGERIMENTO PER LE DIMINUZIONI: Diminuire 1 m prima del segnapunti come segue: lavorare fino a quando rimangono 2 m prima del segnapunti, passare 1 m a dir senza lavorarla, 1 m dir, accavallare la m passata sopra quella appena lavorata. Diminuire 1 m dopo il segnapunti come segue: lavorare 2 m insieme a dir. RAGLAN: Aumentare in modo diverso per il raglan per le diverse taglie: TAGLIE S-M: Aumentare 1 m a ogni lato di ogni segnapunti (= 8 aumenti in totale) come segue: 1 gettato, 1 m a dir ritorto, 1 m dir (= m con il segno), 1 m dir ritorto, 1 gettato. Non lavorare i gettati a ritorto sul giro successivo, devono fare i buchi, ripetere gli aumenti a giri alterni altre 17-19 volte. NOTA: L'aumento a ogni lato del 1° segnapunti (= nell'ultima maglia sul giro) è lavorato come segue: all'inizio del giro, 1 maglia diritto ritorto, 1 gettato. Alla fine del giro: 1 gettato, 1 maglia diritto ritorto, 1 maglia diritto (= maglia con il segnapunti). TAGLIE L-XL-XXL-XXXL: Aumentati a giri alterni come segue: Aumentare 2 m a ogni lato di ogni segnapunti (= 16 aumenti in totale) come segue: 1 gettato, 1 m dir, 1 gettato, 1 m dir ritorto, 1 m dir (= m con il segnapunti), 1 m dir ritorto, 1 gettato, 1 m dir, 1 gettato (lavorare il 1° e ultimo gettato a dir ritorto sul giro successivo, non deve fare un buco, le 2 m centrali devono fare buchi). Ripetere gli aumenti a giri alterni altre 1-1-1-3 volte. NOTA: L'aumento a ogni lato del 1° segnapunti (= nell'ultima maglia sul giro) è lavorato come segue: all'inizio del giro, 1 maglia diritto ritorto, 1 gettato. Alla fine del giro: 1 gettato, 1 maglia diritto ritorto, 1 maglia diritto (= maglia con il segnapunti). Poi aumentare in questo modo: Aumentare 1 m a ogni lato di tutti i segnapunti (= 8 aumenti in totale) come segue: 1 gettato, 1 m dir ritorto, 1 m dir (= m con il segnapunti), 1 m dir ritorto, 1 gettato. Non lavorare i gettati a dir ritorto sul giro successivo, devono fare i buchi. Ripetere gli aumenti a giri alterni altre 19-20-22-21 volte in totale. SUGGERIMENTO PER GLI AUMENTI: Iniziare 1 m prima del segnapunti e aumentare come segue: 1 gettato, 2 m dir (il segnapunti è tra queste 2 m), 1 gettato. Sul giro successivo lavorare i gettati a dir ritorto per evitare buchi. ---------------------------------------------------------- TOP: Lavorato in tondo con i f circolari, dall’alto in basso (top down). SPRONE: Avviare 134-134-140-144-144-148 m con i f circolari n° 3,5 mm con Belle. Lavorare A.1 (= 2 m) su tutte le m. Quando A.1 è stato lavorato 1 volta in verticale, passare ai f circolari n° 4 mm. Sul giro successivo lavorare tutte le m a dir e distribuire 16-20-14-22-42-46 aumenti in modo uniforme = 150-154-154-166-186-194 m. Sul giro successivo inserire 4 segnapunti come segue: Inserire il 1° segnapunti nell'ultima m sul giro, 45-47-49-55-65-71 m dir (= davanti), 1 m dir e inserire il 2° segnapunti in questa m, 28-28-26-26-26-24 m dir (= manica), 1 m dir e inserire il 3° segnapunti in questa m, 45-47-49-55-65-71 m dir (= dietro), 1 m dir e inserire il 4° segnapunti in questa m, lavorare il resto del giro a dir (= 28-28-26-26-26-24 m = manica). FARE ATTENZIONE ALLA TENSIONE DEL LAVORO! Poi lavorare come segue – ALLO STESSO TEMPO aumentare per il RAGLAN – leggere la spiegazione sopra. Lavorare metà dell'aumento per il raglan per il 1° segnapunti (leggere la spiegazione sopra). Lavorare 14-15-16-19-24-27 m dir, A.2 (= 17 m), lavorare a dir fino a quando rimangono 1-1-2-2-2-2 m prima del 2° segnapunti, lavorare il RAGLAN – leggere la spiegazione sopra, lavorare a dir fino a quando rimangono 1-1-2-2-2-2 m prima del 3° segnapunti, lavorare il raglan, lavorare a dir fino a quando rimangono 1-1-2-2-2-2 m prima del 4° segnapunti, lavorare il raglan, lavorare a dir fino a quando rimangono 1-1-2-2-2-2 m prima del 1° segnapunti, lavorare il raglan. Lavorare gli aumenti a m rasata. Quando A.2 è stato lavorato 1 volta in verticale, lavorare a m rasata su tutte le m. Alla fine di tutti gli aumenti ci sono 294-314-338-358-394-426 m sul f. Il lavoro misura circa 14-15-16-17-18-19 cm. Continuare a m rasata e lavorare come segue: lavorare le prime 81-87-95-103-117-129 m (= davanti), trasferire le 66-70-74-76-80-84 m successive su un fermamaglie per la manica, avviare 6-6-6-8-8-8 m sotto la manica (inserire un segnapunti al centro delle nuove m), lavorare le 81-87-95-103-117-129 m successive (= dietro), trasferire le 66-70-74-76-80-84 m successive su un fermamaglie per la manica, avviare 6-6-6-8-8-8 m sotto la manica (inserire un segnapunti al centro delle nuove m) = 174-186-202-222-250-274 m rimaste sul f. Inserire 1 segnapunti nel lavoro, ORA MISURARE IL LAVORO DA QUI. CORPO: Continuare a m rasata. Quando il lavoro misura 3 cm, diminuire 1 m a ogni lato di tutti i segnapunti ai lati (= 4 diminuzioni) – LEGGERE IL SUGGERIMENTO PER LE DIMINUZIONI! Ripetere le diminuzioni ogni 2½-4-4-4-4-4 cm altre 5-3-3-3-3-3 volte = 150-170-186-206-234-258 m. Quando il lavoro misura 20 cm per tutte le taglie, aumentare 1 m a ogni lato di tutti i segnapunti ai lati (= 4 aumenti) – LEGGERE IL SUGGERIMENTO PER GLI AUMENTI. Ripetere gli aumenti ogni 2-4-4-4-4-4 cm altre 5-3-3-3-3-3 volte = 174-186-202-222-250-274 m. Quando il lavoro misura 31-32-33-34-35-36 cm, passare ai f circolari n° 3,5 mm. Lavorare A.3 (= 2 m) su tutte le m. Intrecciare. MANICHE: Lavorate in tondo con i f a doppia punta. Riportare le m dal fermamaglie sui f a doppia punta n° 4 mm e avviare 6-6-6-8-8-8 m sotto la manica = 72-76-80-84-88-92 m. Lavorare a m rasata per 2 cm, sul giro successivo distribuire 8 diminuzioni in modo uniforme = 64-68-72-76-80-84 m. Passare ai f a doppia punta n° 3,5 mm. Lavorare A.3 su tutte le m. Intrecciare. Lavorare l’altra manica nello stesso modo. CONFEZIONE: Cucire le aperture sotto le maniche. |
|||||||||||||||||||
Spiegazioni del diagramma |
|||||||||||||||||||
|
|||||||||||||||||||
 |
|||||||||||||||||||
 |
|||||||||||||||||||
Avete terminato questo modello?Allora taggate le vostre foto con #dropspattern o inviatele alla #dropsfan gallery. Avete bisogno di aiuto con questo modello?Troverete 13 video tutorial, una sezione per i commenti/domande e molto altro guardando il modello su www.garnstudio.com © 1982-2026 DROPS Design A/S. Ci riserviamo tutti i diritti. Questo documento, compreso tutte le sue sotto-sezioni, è protetto dalle leggi sul copyright. Potete leggere quello che potete fare con i nostri modelli alla fine di ogni modello sul nostro sito. |
|||||||||||||||||||



Con oltre 40 anni di esperienza nel design di modelli di maglia e uncinetto, DROPS Design offre la più estesa collezione di modelli gratuiti su internet - tradotti in 17 lingue. Ad oggi vi possiamo fornire 333 cataloghi e 12536 modelli - 9810 dei quali sono tradotti in Italiano.
Ci stiamo impegnando molto per darvi il meglio che vi possiamo offrire in termini di maglia e uncinetto, ispirazioni e consigli così come filati di grande qualità ad un prezzo incredibile! Volete utilizzare i nostri modelli per qualcosa d'altro oltre al vostro uso personale? Potete leggere tutto ciò che è consentito nel testo sul Copyright in basso su tutte le pagine dei nostri modelli. Buon lavoro!
Lasciare un commento sul modello DROPS Extra 0-1104
Noi saremmo felici di ricevere i tuoi commenti e opinioni su questo modello!
Se vuoi fare una domanda, fai per favore attenzione a selezionare la categoria corretta nella casella qui sotto per velocizzare il processo di risposta. I campi richiesti sono indicati da *.