
Categorie popolari
State cercando un filato?


Commenti / Domande (97)
Danesh ha scritto:
Should I repeat A2 until the piece measure is ok?
18.08.2015 - 18:30DROPS Design ha risposto:
Dear Mrs Danesh, A.2 is worked while increasing for raglan, when all inc for raglan are done, you should get the stated measurements (remember to check and keep correct tension), then divide piece for body. Happy knitting!
18.08.2015 - 19:02
![]() Frieda G ha scritto:
Frieda G ha scritto:
Wellicht duidelijker vermelden om voor en na A2 een rechte steek te breien al vorens de meerderingen te maken. Ik heb flink stuk uit moeten halen omdat ik lelijke ladder kreeg.
31.07.2015 - 15:49
![]() Anne Næss ha scritto:
Anne Næss ha scritto:
Hei. Jeg er kommet dit at jeg skal øke på ermene. Skal økningen starte masken før og etter A2? Altså 4 masker pr gang det økes? Når jeg er ferdig med økningen til ermene, er jeg da ferdig med å strikke mønsteret?
11.07.2015 - 10:26DROPS Design ha risposto:
Hej Anne, Ja det stemmer, læs også øketips øverst i opskriften. God fornøjelse!
30.07.2015 - 15:39Sonia Strauss ha scritto:
Thank you for pattern count! I am now 8 rds into main pattern & my raglan increases do not look right. It says to inc ea side of A.2 but how? i.e. On the 2nd rd after first rd inc, I work YO twisted but do I now make the next inc before twisted YO or after? K18, YO twist, inc, A2, K1, A2, YO twist, inc, K36, etc? 3rd rd: K18, k1, YO twist, inc, A2, etc?
05.07.2015 - 19:51DROPS Design ha risposto:
Dear Mrs Strauss, inc for raglan are made on each side of A.2, ie if you have made a YO after A.2, and need to inc on next round after A.2 again, work A.2, then YO (=inc for raglan), then work YO twisted, to get always the inc for raglan before or/and after A.2. Happy knitting!
06.07.2015 - 10:37
![]() Sonia Strauss ha scritto:
Sonia Strauss ha scritto:
Pattern r-676 in med. Not ending w 286 st count after all increases. Starting w 150: 18 [back] + 39 (A2+1+A2) [sleeve] + 36 [front] + 39 (A2+1+A2) [sleeve]+18 [back]. Then starting Raglan increases on 2nd rd I end with 246. then 1 st inc twice each rd at sleeve 4 times and then every 4th rd 6 times [2 sts x 10]=20. I get 266 [246+20]. Where have I gone wrong? I was increasing 1 st at each sleeve in the middle. Should I be increasing 2 sts at each sleeve?
01.07.2015 - 08:26DROPS Design ha risposto:
Dear Mrs Strauss, you inc for body 4 sts 16 times every round + 4 sts 8 times every other round = 96 sts inc for body (2 inc on back piece + 2 inc on front piece) + for sleeves 2 sts per sleeve 4 times every other round + 2 sts per sleeve 6 times every 4th round = 20 sts per sleeve = 40 sts inc in total. You start with 150 sts + 96 + 40 = 286 sts. Happy knitting!
01.07.2015 - 09:47
![]() Claudia Totz ha scritto:
Claudia Totz ha scritto:
Hallo liebes Drops-Team, ich möchte die größte Größe des Modells stricken und bin jetzt einigermaßen wegen der Zunahmen verwirrt: Ich fange mit 166 M an. Im Raglan nehme ich insgesamt 39x4 M zu und bei den Ärmeln 18 M pro Seite. Das ergibt bei mir 358 M statt 394 M. Wo ist mein Denkfehler? Vielen Dank, Claudia Totz
29.06.2015 - 15:45DROPS Design ha risposto:
Sie nehmen am Rumpfteil 39 x 4 M zu = 156 M, an den Ärmeln 18 x 4 M zu = 72 M. Mit den 166 M kommen Sie dann auf 394 M. An den Ärmeln nehmen Sie ja auch jeweils beidseitig an jedem Ärmel zu, also pro Ärmel 2 M.
05.07.2015 - 08:29
![]() Shelly ha scritto:
Shelly ha scritto:
Thank so much for helping me . I have another question: I whant to make this shirt with long sleeves, do you have a pattern I can follow that shows how to make this shirt or a similar one with long sleeves?
25.06.2015 - 07:49Shelly ha scritto:
Should I do the A.2 pattern twice or should I stop the yoke and raglan after the last inc (two rounds before finishing the second A.2 pattern.
23.06.2015 - 09:26DROPS Design ha risposto:
Dear Shelly, stop yoke when all inc for raglan are done and piece measure the correct measurement for your size. Happy knitting!
23.06.2015 - 10:36Shelly ha scritto:
After finishing the yoke the pattern for S size says it should be 17 cm. my work is only 14 cm. what should I do?
21.06.2015 - 08:26DROPS Design ha risposto:
Dear Shelly, remember to check and keep correct tension, ie 21 sts x 28 rows in stocking st = 10 x 10 cm. If your tension in height is too tight, raglan should be too small and armholes too tight, you can work some extra rows without inc evenly between inc row for raglan. Happy knitting!
22.06.2015 - 10:31
![]() Maria Luisa Cevolani ha scritto:
Maria Luisa Cevolani ha scritto:
The increase in the front and in the back you say after the beginning of the work, where should it be and how? Please, I didn't understand!
15.06.2015 - 13:49DROPS Design ha risposto:
Dear Maria Luisa, you can increase on the body and on the sleeves wherever you want, for example using kfb increase. Please feel free to write us if you have any further doubt. Happy knitting!
15.06.2015 - 13:56
|
||||||||||||||||||||||
Esther#esthertop |
||||||||||||||||||||||
 |
 |
|||||||||||||||||||||
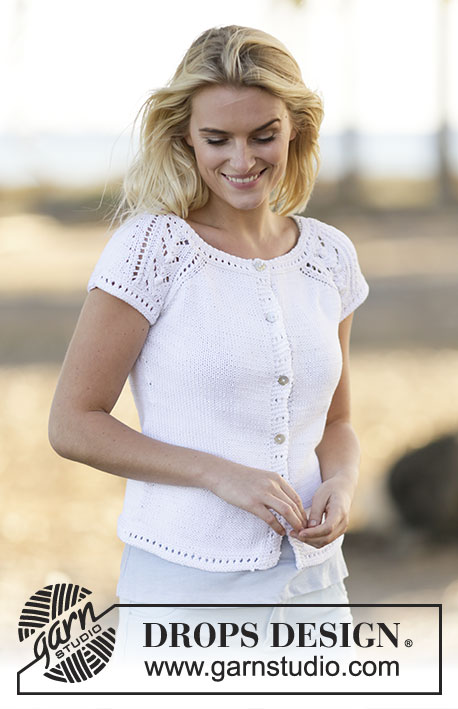
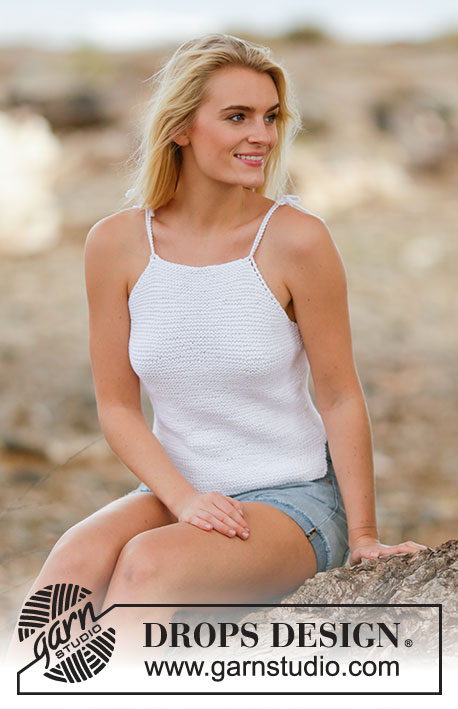
Top DROPS lavorato ai ferri con raglan e motivo traforato, lavorato dall’alto in basso (top down) con maniche corte in ”Muskat”. Taglie: S - XXXL.
DROPS 159-33 |
||||||||||||||||||||||
|
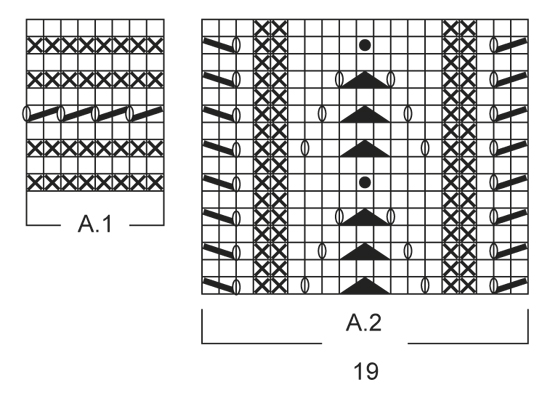
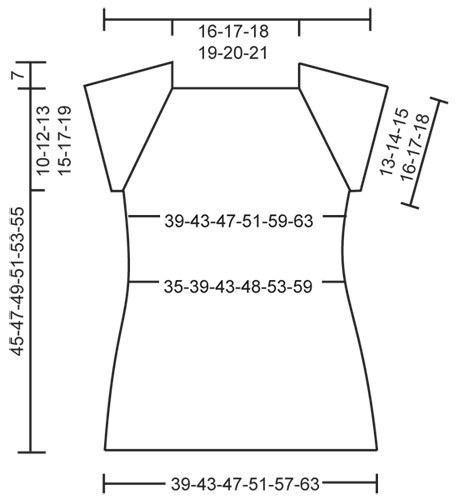
MOTIVO: Vedere i diagrammi A.1-A.2. RAGLAN: Aumentare per il raglan a ogni lato di A.2. Aumentare con 1 gettato, lavorare il gettato a ritorto sul giro successivo per evitare buchi. Gli aumenti sul corpo e le maniche vengono fatte in modo diverso - vedere le spiegazioni qui sotto. SUGGERIMENTO PER GLI AUMENTI: Iniziare 1 m prima del segnapunti e aumentare come segue: 1 gettato, 2 m dir (il segnapunti è tra queste 2 m), 1 gettato. Sul giro successivo lavorare i gettati a dir ritorto per evitare buchi. SUGGERIMENTO PER LE DIMINUZIONI: Diminuire come segue prima del segnapunti: 2 m insieme a dir. Diminuire come segue dopo il segnapunti: passare 1 m a dir senza lavorarla, 1 m dir, accavallare la m passata sopra quella appena lavorata. ---------------------------------------------------------- TOP: Lavorato in tondo con i f circolari, dall’alto in basso (top down). SPRONE: LEGGERE TUTTA LA SEZIONE SEGUENTE PRIMA DI CONTINUARE! Avviare 146-150-154-158-162-166 m con i f circolari n° 3 mm con Muskat. Lavorare A.1. Quando A.1 è stato lavorato, passare ai f circolari n° 4 mm. Lavorare il giro successivo come segue dal centro dietro: lavorare 17-18-19-20-21-22 m a m rasata (= dietro), lavorare A.2 (= 19 m), 1 m a m rasata, A.2 (= 19 m) (= 39 m sulla manica), lavorare 34-36-38-40-42-44 m a m rasata (= davanti), lavorare A.2, 1 m a m rasata e A.2 (= 39 m sulla manica) e finire con 17-18-19-20-21-22 m a m rasata (= dietro). Continuare il motivo in questo modo e ALLO STESSO TEMPO aumentare per il RAGLAN iniziando sul giro successivo – LEGGERE LA SPIEGAZIONE SOPRA. Aumenti davanti e dietro: 1 m su ogni giro per un totale di 14-16-18-20-26-30 volte, poi a giri alterni 7-8-9-10-9-9 volte. Aumenti maniche: 1 m a giri alterni per un totale di 2-4-6-8-10-12 volte e poi ogni 4 giri per un totale di 6 volte per tutte le taglie. Alla fine di tutti gli aumenti ci sono 262-286-310-334-366-394 m sul f, continuare a lavorare fino a quando lavoro misura circa 17-19-20-22-24-26 cm dalla spalla in giù. Lavorare il giro successivo come segue: 38-42-46-50-56-61 m dir (= dietro), trasferire le 55-59-63-67-71-75 m successive su un fermamaglie per la manica, avviare 6-6-6-8-8-10 nuove m, inserire 1 segnapunti al centro delle nuove m, 76-84-92-100-112-122 m dir (= davanti), trasferire le 55-59-63-67-71-75 m successive su un fermamaglie per la manica, avviare 6-6-6-8-8-10 nuove m, inserire 1 segnapunti al centro delle nuove m e lavorare le 38-42-46-50-56-61 m rimaste a dir (= dietro) = 164-180-196-216-240-264 m sul f – ORA MISURARE IL LAVORO DA QUI. CORPO: Continuare a m rasata. Quando il lavoro misura 4 cm, diminuire 1 m a ogni lato dei segnapunti a lato – LEGGERE IL SUGGERIMENTO PER LE DIMINUZIONI (= 4 diminuzioni). Ripetere le diminuzioni ogni 4 cm per un totale di 4 volte = 148-164-180-200-224-248 m. Quando il lavoro misura 22 cm per tutte le taglie, aumentare 1 m a ogni lato dei segnapunti a lato – LEGGERE IL SUGGERIMENTO PER GLI AUMENTI (= 4 aumenti). Ripetere gli aumenti ogni 2 1/2 cm per un totale di 4 volte = 164-180-196-216-240-264 m. Quando il lavoro misura 33-33-34-34-34-34 cm, passare ai f circolari n° 3 mm. Lavorare il motivo secondo il diagramma A.1 e poi intrecciare senza stringere. Il top misura circa 52-54-56-58-60-62 cm dalla spalla in giù. BORDO DELLA MANICA: Lavorato in tondo con i f a doppia punta. Riportare le 55-59-63-67-71-75 m dal fermamaglie sui f a doppia punta n° 3 mm e avviare 6-6-6-8-8-10 nuove m sotto la manica = 61-65-69-75-79-85 m. Lavorare il motivo in tondo secondo il diagramma A.1 e poi intrecciare senza stringere. Lavorare l’altro bordo della manica nello stesso modo. CONFEZIONE: Cucire sotto le maniche. |
||||||||||||||||||||||
Spiegazioni del diagramma |
||||||||||||||||||||||
|
||||||||||||||||||||||
 |
||||||||||||||||||||||
 |
||||||||||||||||||||||
Avete terminato questo modello?Allora taggate le vostre foto con #dropspattern #esthertop o inviatele alla #dropsfan gallery. Avete bisogno di aiuto con questo modello?Troverete 24 video tutorial, una sezione per i commenti/domande e molto altro guardando il modello su www.garnstudio.com © 1982-2026 DROPS Design A/S. Ci riserviamo tutti i diritti. Questo documento, compreso tutte le sue sotto-sezioni, è protetto dalle leggi sul copyright. Potete leggere quello che potete fare con i nostri modelli alla fine di ogni modello sul nostro sito. |
||||||||||||||||||||||


Con oltre 40 anni di esperienza nel design di modelli di maglia e uncinetto, DROPS Design offre la più estesa collezione di modelli gratuiti su internet - tradotti in 17 lingue. Ad oggi vi possiamo fornire 324 cataloghi e 12290 modelli - 9561 dei quali sono tradotti in Italiano.
Ci stiamo impegnando molto per darvi il meglio che vi possiamo offrire in termini di maglia e uncinetto, ispirazioni e consigli così come filati di grande qualità ad un prezzo incredibile! Volete utilizzare i nostri modelli per qualcosa d'altro oltre al vostro uso personale? Potete leggere tutto ciò che è consentito nel testo sul Copyright in basso su tutte le pagine dei nostri modelli. Buon lavoro!
Lasciare un commento sul modello DROPS 159-33
Noi saremmo felici di ricevere i tuoi commenti e opinioni su questo modello!
Se vuoi fare una domanda, fai per favore attenzione a selezionare la categoria corretta nella casella qui sotto per velocizzare il processo di risposta. I campi richiesti sono indicati da *.