
Categorie popolari
State cercando un filato?


Commenti / Domande (97)
![]() Conny Van Noord ha scritto:
Conny Van Noord ha scritto:
Ook ik kom er niet helemaal uit. Per mouw heb ik 2 x a2. Als ik de meerderingen aan beide zijden van de a2 maak, heb ik per mouw 4 meerderingen per keer (1 meerd, 19, 1 meerd. ,1r, 1 meerd, 19, 1 meerd.). Dan kom ik niet goed uit. Moeten de meerderingen misschien alleen in het midden? Zo lijkt het wel op de foto. Ik heb het nu alleen aande buitenkant gedaan, maar dan is de raglan niet het eind van de mouw. Voor ik opnieuw begin, zou ik het graag zeker weten. Alvast bedankt
24.05.2016 - 11:05DROPS Design ha risposto:
Hoi Conny. De A.2 zijn voor de mouw, maar je meerdert zo: brei st achterpand, meerder 1 (= deze is op het achterpand), A.2, meerder 1 (= mouw), 1 r, meerder 1 (= mouw), A.2, meerder 1 (= deze is dan op het voorpand), brei de st voor het voorpand en herhaal bij de tweede mouw.
25.05.2016 - 15:49
![]() Kathleen ha scritto:
Kathleen ha scritto:
Hallo, ich habe nun den Fehler gefunden. Bei Größe XL sollten es laut Anleitung 56 Zunahmen für beide Ärmel sein. Das geht aber nicht, da 8x8 Zunahmen plus 6x8 Zunahmen (also 4 pro Ärmel) sind insgesamt 112 Zunahmen. Bitte den Fehler schnellstmöglich korrigieren! Dankeschön.
02.05.2016 - 07:00DROPS Design ha risposto:
Hallo Kathleen, die Anleitung wurde von uns geprüft und sie ist korrekt. Sie haben 39 Ärmelmaschen und nehmen in in Grösse XL wie folgt zu: beidseitig 8 x in jeder 2. R und dann 6 x in jeder 4. R, also 16 (2 x 8) +12 (2 x 6)+ 39 M = die angegebenen 67 Maschen.
02.05.2016 - 10:01
![]() Kathleen ha scritto:
Kathleen ha scritto:
Nach 15 Zunahmerunden (Vorder- und Rückenteil) haben meine Ärmel bereits 67 Maschen. Ich habe bei den Ärmeln in jeder 2. Runde je 4 M zugenommen (2 für die Raglanschräge und 2 zwischen den Mustern A2). Wo liegt mein Fehler?
01.05.2016 - 18:57DROPS Design ha risposto:
Siehe Antwort zu Ihrem zweiten Kommentar.
02.05.2016 - 10:01
![]() Margriet ha scritto:
Margriet ha scritto:
Waar plaats ik de markeerder of is dit aan het begin en eind van voor-achterpand?
27.04.2016 - 16:44
![]() Deborah Hardie ha scritto:
Deborah Hardie ha scritto:
I cannot seem to get the required number of stitches at the end, and always seem to have too many. Front/back Increase one stitch. Is that one in the front piece and one in the back each round or one stitch per round alternating between front and back? Are the raglan increases in the final count because I would have way too much. The sleeve increase I take it starts from the one stitch between the two A2 sections so that there is an inverted V between the two A2 sections on completion.
11.04.2016 - 19:02DROPS Design ha risposto:
Dear Mrs Hardie, inc for raglan 2 sts on each piece (front, back and each sleeve), dec will be done differently on body (4 sts inc for body on each inc round) and on sleeve (2 sts inc on each sleeve). After all inc for raglan are done, you will then slip sts for sleeve on a st holder and finish body top down. Happy knitting!
12.04.2016 - 09:06
![]() Paulina Krecker ha scritto:
Paulina Krecker ha scritto:
Ich bin mir bei den Raglanzunahmen etwas unsicher. Die Anleitung sagt, beidseitig von A2 wird zugenommen. Ist das dann auf diese Weise richtig?: 1 Zun., (A2, 1 Zun., 1M re, 1 Zun., A2,) 1 Zun.? Hier zählt dann die erste und letzte Zunahme zu dem Vorder- bzw. Rückenteil und das in Klammern ist der Ärmel? Weiter wird in der Anleitung gesagt "An den Ärmeln: 1 M in jeder 2. Rd(...) zunehmen." Wird diese Zunahme zusätzlich zu der Raglanzunahme gemacht?
10.10.2015 - 22:37DROPS Design ha risposto:
Das mit den Zunahmen und der Aufteilung haben Sie richtig verstanden. Die Zunahmebeschreibung für die Ärmel ist nicht zusätzlich, sondern es handelt sich dabei um die Raglanzunahmen. Die Raglanzunahmen an den Ärmeln (also die von Ihnen in Klammern gesetzten Zunahmen) machen Sie anfangs in jeder 2. Rd, dann in jeder 4. Rd, während Sie die Raglanzunahmen an Vorder- und Rückenteil anfangs in JEDER Rd machen, dann in jeder 2. Rd, hier wird also häufiger zugenommen.
13.10.2015 - 17:34
![]() Simard ha scritto:
Simard ha scritto:
Je fait le modele 159-33 et le raglan pour la manche je mais mon marqueur lorsque j'ajoute le jete avant ou apres comme le motif de la manche a 39 mailles merci
19.09.2015 - 19:44DROPS Design ha risposto:
Bonjour Mme Simard, les augmentations du raglan se font avant et après chaque motif A.2, augmentez ainsi: 1 jeté, A.2, 1 jeté, les mailles de A.2 se tricotent les unes au-dessus des autres, les jetés "appartiennent" à la partie tricotée avant ou après en fonction de la position. On augmente 2 m dans chaque pièce (devant, dos, manches) entre chaque motif A.2 à chaque tour d'augmentations (= 8 augmentations par tour au total). Bon tricot!
21.09.2015 - 08:50
![]() Marie ha scritto:
Marie ha scritto:
Chère drops team Je suis en train de tricoter le modèle Esther et d'après mes calculs, il faut 32 tours pour finir toutes les augmentations pour le raglan. Dois-je donc tricoter A2 deux fois ? Amicalement Marie
15.09.2015 - 15:16DROPS Design ha risposto:
Bonjour Marie, vous répétez A.2 en hauteur jusqu'à ce que toutes les augmentations soient faites et que l'ouvrage mesure 17-26 cm (cf taille). Bon tricot!
15.09.2015 - 17:19Danesh ha scritto:
Thanks a lot for your prompt answer. I still do not know for sleeve increase, where exactly should I increase to preserve A2 model? The location of2 increase for each sleeve according to A2?
24.08.2015 - 13:24DROPS Design ha risposto:
Dear Mrs Danesh, inc for sleeve are done between both A.2 for sleeve, ie work back sts (1st sleeve) or front piece (2nd sleeve) (remember inc for raglan), work A.2, inc for sleeve, K1 (first row on sleeve), inc for sleeve, work A.2, ie the number of sts between A2 will increase. Happy knitting!
24.08.2015 - 14:52Danesh ha scritto:
Thanks a lot for the answer. Should the sleeve increase be done from the beginning of raglan increase? Where should the sleeve increase be done?
22.08.2015 - 12:06DROPS Design ha risposto:
Dear Mrs Danesh, you inc for raglan while working A.2 - inc are different on front/back piece and on sleeve: Inc on front/back piece: 1 st every round a total of 14-30 times (see size), then on every other round 7-9 times. Inc on sleeves: 1 st every other round a total of 2-12 times and then every 4th round a total of 6 times. After all dec are done, you should have 262-394 sts and piece should measure 17-26 cm from shoulder, work next round dividing work for body. Happy knitting!
24.08.2015 - 10:33
|
||||||||||||||||||||||
Esther#esthertop |
||||||||||||||||||||||
 |
 |
|||||||||||||||||||||
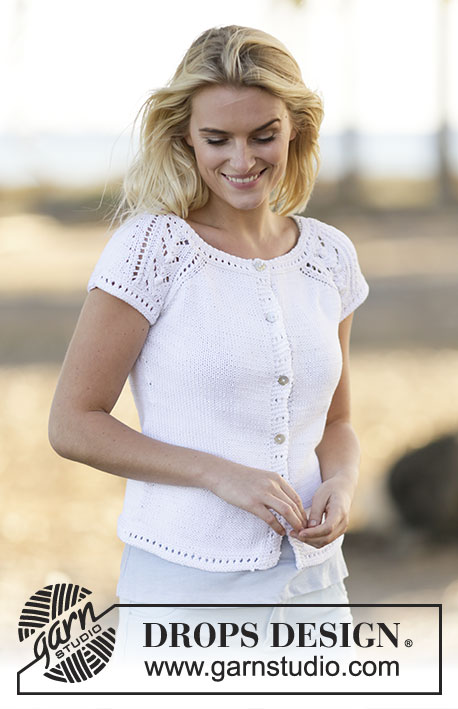
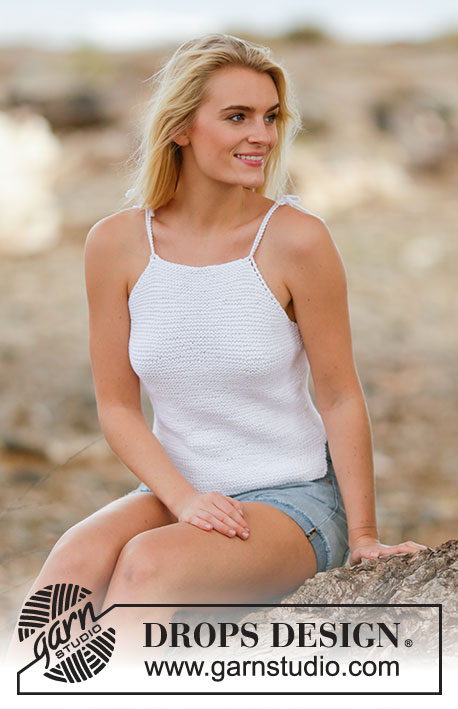
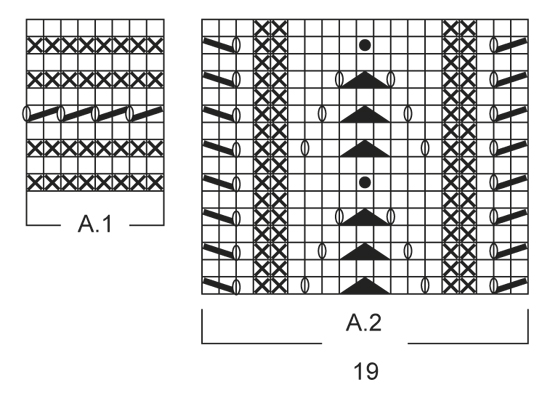
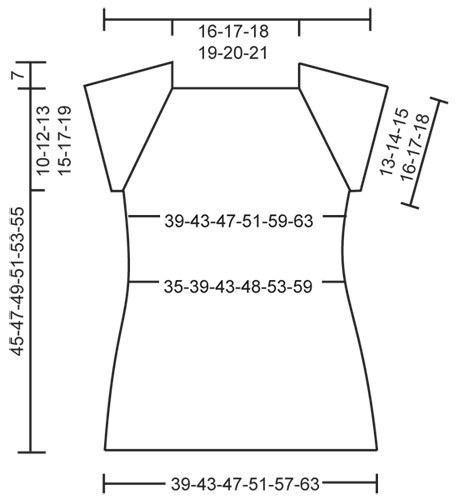
Top DROPS lavorato ai ferri con raglan e motivo traforato, lavorato dall’alto in basso (top down) con maniche corte in ”Muskat”. Taglie: S - XXXL.
DROPS 159-33 |
||||||||||||||||||||||
|
MOTIVO: Vedere i diagrammi A.1-A.2. RAGLAN: Aumentare per il raglan a ogni lato di A.2. Aumentare con 1 gettato, lavorare il gettato a ritorto sul giro successivo per evitare buchi. Gli aumenti sul corpo e le maniche vengono fatte in modo diverso - vedere le spiegazioni qui sotto. SUGGERIMENTO PER GLI AUMENTI: Iniziare 1 m prima del segnapunti e aumentare come segue: 1 gettato, 2 m dir (il segnapunti è tra queste 2 m), 1 gettato. Sul giro successivo lavorare i gettati a dir ritorto per evitare buchi. SUGGERIMENTO PER LE DIMINUZIONI: Diminuire come segue prima del segnapunti: 2 m insieme a dir. Diminuire come segue dopo il segnapunti: passare 1 m a dir senza lavorarla, 1 m dir, accavallare la m passata sopra quella appena lavorata. ---------------------------------------------------------- TOP: Lavorato in tondo con i f circolari, dall’alto in basso (top down). SPRONE: LEGGERE TUTTA LA SEZIONE SEGUENTE PRIMA DI CONTINUARE! Avviare 146-150-154-158-162-166 m con i f circolari n° 3 mm con Muskat. Lavorare A.1. Quando A.1 è stato lavorato, passare ai f circolari n° 4 mm. Lavorare il giro successivo come segue dal centro dietro: lavorare 17-18-19-20-21-22 m a m rasata (= dietro), lavorare A.2 (= 19 m), 1 m a m rasata, A.2 (= 19 m) (= 39 m sulla manica), lavorare 34-36-38-40-42-44 m a m rasata (= davanti), lavorare A.2, 1 m a m rasata e A.2 (= 39 m sulla manica) e finire con 17-18-19-20-21-22 m a m rasata (= dietro). Continuare il motivo in questo modo e ALLO STESSO TEMPO aumentare per il RAGLAN iniziando sul giro successivo – LEGGERE LA SPIEGAZIONE SOPRA. Aumenti davanti e dietro: 1 m su ogni giro per un totale di 14-16-18-20-26-30 volte, poi a giri alterni 7-8-9-10-9-9 volte. Aumenti maniche: 1 m a giri alterni per un totale di 2-4-6-8-10-12 volte e poi ogni 4 giri per un totale di 6 volte per tutte le taglie. Alla fine di tutti gli aumenti ci sono 262-286-310-334-366-394 m sul f, continuare a lavorare fino a quando lavoro misura circa 17-19-20-22-24-26 cm dalla spalla in giù. Lavorare il giro successivo come segue: 38-42-46-50-56-61 m dir (= dietro), trasferire le 55-59-63-67-71-75 m successive su un fermamaglie per la manica, avviare 6-6-6-8-8-10 nuove m, inserire 1 segnapunti al centro delle nuove m, 76-84-92-100-112-122 m dir (= davanti), trasferire le 55-59-63-67-71-75 m successive su un fermamaglie per la manica, avviare 6-6-6-8-8-10 nuove m, inserire 1 segnapunti al centro delle nuove m e lavorare le 38-42-46-50-56-61 m rimaste a dir (= dietro) = 164-180-196-216-240-264 m sul f – ORA MISURARE IL LAVORO DA QUI. CORPO: Continuare a m rasata. Quando il lavoro misura 4 cm, diminuire 1 m a ogni lato dei segnapunti a lato – LEGGERE IL SUGGERIMENTO PER LE DIMINUZIONI (= 4 diminuzioni). Ripetere le diminuzioni ogni 4 cm per un totale di 4 volte = 148-164-180-200-224-248 m. Quando il lavoro misura 22 cm per tutte le taglie, aumentare 1 m a ogni lato dei segnapunti a lato – LEGGERE IL SUGGERIMENTO PER GLI AUMENTI (= 4 aumenti). Ripetere gli aumenti ogni 2 1/2 cm per un totale di 4 volte = 164-180-196-216-240-264 m. Quando il lavoro misura 33-33-34-34-34-34 cm, passare ai f circolari n° 3 mm. Lavorare il motivo secondo il diagramma A.1 e poi intrecciare senza stringere. Il top misura circa 52-54-56-58-60-62 cm dalla spalla in giù. BORDO DELLA MANICA: Lavorato in tondo con i f a doppia punta. Riportare le 55-59-63-67-71-75 m dal fermamaglie sui f a doppia punta n° 3 mm e avviare 6-6-6-8-8-10 nuove m sotto la manica = 61-65-69-75-79-85 m. Lavorare il motivo in tondo secondo il diagramma A.1 e poi intrecciare senza stringere. Lavorare l’altro bordo della manica nello stesso modo. CONFEZIONE: Cucire sotto le maniche. |
||||||||||||||||||||||
Spiegazioni del diagramma |
||||||||||||||||||||||
|
||||||||||||||||||||||
 |
||||||||||||||||||||||
 |
||||||||||||||||||||||
Avete terminato questo modello?Allora taggate le vostre foto con #dropspattern #esthertop o inviatele alla #dropsfan gallery. Avete bisogno di aiuto con questo modello?Troverete 25 video tutorial, una sezione per i commenti/domande e molto altro guardando il modello su www.garnstudio.com © 1982-2026 DROPS Design A/S. Ci riserviamo tutti i diritti. Questo documento, compreso tutte le sue sotto-sezioni, è protetto dalle leggi sul copyright. Potete leggere quello che potete fare con i nostri modelli alla fine di ogni modello sul nostro sito. |
||||||||||||||||||||||


Con oltre 40 anni di esperienza nel design di modelli di maglia e uncinetto, DROPS Design offre la più estesa collezione di modelli gratuiti su internet - tradotti in 17 lingue. Ad oggi vi possiamo fornire 324 cataloghi e 12291 modelli - 9562 dei quali sono tradotti in Italiano.
Ci stiamo impegnando molto per darvi il meglio che vi possiamo offrire in termini di maglia e uncinetto, ispirazioni e consigli così come filati di grande qualità ad un prezzo incredibile! Volete utilizzare i nostri modelli per qualcosa d'altro oltre al vostro uso personale? Potete leggere tutto ciò che è consentito nel testo sul Copyright in basso su tutte le pagine dei nostri modelli. Buon lavoro!
Lasciare un commento sul modello DROPS 159-33
Noi saremmo felici di ricevere i tuoi commenti e opinioni su questo modello!
Se vuoi fare una domanda, fai per favore attenzione a selezionare la categoria corretta nella casella qui sotto per velocizzare il processo di risposta. I campi richiesti sono indicati da *.