
Categorie popolari
State cercando un filato?


Commenti / Domande (114)
![]() Caitlynn ha scritto:
Caitlynn ha scritto:
Hi, I really want to knit this but I'm strugling with the size. I'm right inbetween the S and M/L but I don't know how to change the pattern/ downsize it to fit. Is there a formula I can use to help with that?
23.10.2025 - 14:31DROPS Design ha risposto:
Hi Caithlynn,
Based on the gauge, which tells you how many stitches there are in 10 cm, you can calculate how many stitches you need to cast on, etc., to get different measurements. 23.10.2025 - 17:54
![]() Gudrun ha scritto:
Gudrun ha scritto:
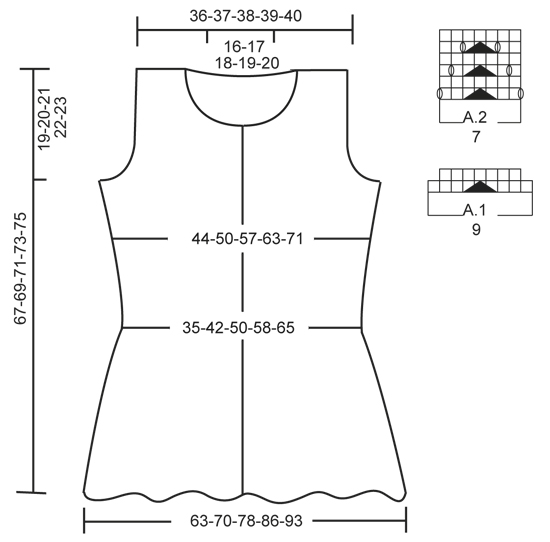
Cast on 402 sts on needle 3.5 mm. Work 2 ridges in GARTER ST. Switch to needle 4 mm. Then work as follows: * P 6, A.1 *, repeat from *-* 12 more times, P 6, insert 1 marker (= back piece), * P 6, A.1 *, repeat from *-* 12 more times, P 6, insert 1 marker (= front piece). Move the markers upwards when working. When A.1 has been worked 1 time vertically, there are 350 sts on needle. 6+13*9+6+6+13*9+6=258, what do i do with the other 144 sts?
15.07.2025 - 11:22DROPS Design ha risposto:
Hi Gudrun, in second row of A.1 you have 7 stitches insted of 9. [(6+A.1)*13]+6= [(6+7)*13+6}=(13*13)+6=169+6=175. 175*2 (front and back)=350. Happy knitting!
17.07.2025 - 11:00
![]() Reiah N ha scritto:
Reiah N ha scritto:
Hi! So I’m at the decrease section in the top where it says to continue decreasing every 4 cm 3 more times for size M. does that mean I have to purl 2 together every 4cm? Or do I have to purl 2 together in every purl section in a row, then leave 4 cm until I start the next decrease row and purl 2 together again and repeat it for the third time, all while doing A.2 between each purl section? Sorry for the bother 😰!
23.01.2025 - 09:39DROPS Design ha risposto:
Dear Reiah, you will decrease as indicated in the first row every 4cm vertically. That is, work 1 decrease row as indicated, work normally until you have worked 4cm from the decrease row, work a decrease row as the previous one (the decreases and the charts); repeat once more 4cm later. Happy knitting!
25.01.2025 - 19:54
![]() Reiah N ha scritto:
Reiah N ha scritto:
Hi! Thank you so much for the answer last time 😍. After finishing the row of A.1, and starting the next row do we have to p 6 (for size m) every time before working A.2 like with A.1 ? Until the piece measures 10 cm? Thank you so much 😁
14.01.2025 - 16:54DROPS Design ha risposto:
Dear Reiah, when A.1 is done, there are 7 sts between each purl section, work now *purl 6, A.2* all the round, then after 10 cm from cast on edge, start decreasing in the purl section as explained in the written pattern. Happy knitting!
15.01.2025 - 08:03
![]() Reiah N ha scritto:
Reiah N ha scritto:
Hi! I’m knitting this in size medium and it says that I’m supposed to p6+7(A.1) x10 , p6, p6+7(A.1) x10 , p6. I have 30 stitches left What do I do with them? Thank you so much 🥰
11.01.2025 - 08:36DROPS Design ha risposto:
Dear Reiah, you work: (purl 6, A.1)x 11 times (10 more, so 11 in total), purl 6, (marker), (purl 6, A.1) x 11 times (total), purl 6, (marker). The charts are read from the bottom up so in the first row of A.1 you have 9 stitches (which are decreased to 7). So you will have: (6+9)x11 + 6 + (6+9)x11 +6 = 342 stitches. Happy knitting!
12.01.2025 - 16:04
![]() Penny ha scritto:
Penny ha scritto:
Is there a straight needle instruction available for this pattern.
18.09.2024 - 06:24DROPS Design ha risposto:
Dear Penny, this lesson might help you adjusting the pattern for straight needles. Happy knitting!
18.09.2024 - 08:57
![]() Nina ha scritto:
Nina ha scritto:
On the back piece when the 33 sts or slipped on a holder are the 22 stitches worked first as before and when the project is turned that's when K together close to the neck sts holder or are they K together at the beginning of the row?
03.06.2024 - 07:30DROPS Design ha risposto:
Dear Nina, work 1 row from RS as before working the first 22 sts and slipping them on a thread or keeping them on the needle but they will be worked later; slip the next 33 sts on a thread for neck and work the last 22 sts for shoulder as before, finish now each shoulder separately. Happy knitting!
03.06.2024 - 08:24
![]() Nina ha scritto:
Nina ha scritto:
When working in round and doing A1 and A2 it says k from RS and P from WS. Does that mean we P6 before A1 and k3 before the passo then k3 after then back to P6 or is the 3 st before the passo part of the P6 or is it P6, P3 then passo?
20.05.2024 - 10:01DROPS Design ha risposto:
Dear Nina, when working in the round you will always work from RS, ie the stitches in A.1 and in A.2 will be knitted on every round, and the purl stitches between diagrams will be always purled. When working in rows after dividing for armholes, you will then purl the stitches in A.2 from wrong side and knit the stitches between diagrams (reversed stocking stitch). Happy knitting!
21.05.2024 - 13:22
![]() Carina ha scritto:
Carina ha scritto:
Hej, Gäller garnval. Om jag vill byta Muskat till t.ex. Cotton Merino eller Merino extra fine, är det möjligt och hur mycket garn behöver jag då. Garnkonverteraren kunde inte svara! TACK
18.04.2024 - 11:53DROPS Design ha risposto:
Hej Carina, jo det kan den, vælg Muskat, vælg antal gram for din størrelse, vælg 1 tråd, så får du både Cotton Merino og Merino Extra Fine med flere :)
19.04.2024 - 14:31
![]() Jenny ha scritto:
Jenny ha scritto:
Hello, in A.2, there should be a yarn-over at the beginning and at the end of each 7 stitches? I just know how to do a yarn-over before knitting the actual stitch, how is it done after knitting a stitch? Or am I misreading this, and there should only be one yarn-over in the first row? But then the total amount of stitches would be exactly the same, whereas there would be more stitches in row 3. thanks!
17.01.2024 - 13:00DROPS Design ha risposto:
Dear Jenny, on first row in A.2 you start and end A.2 with a yarn over and make a double decrease in the middle, so that the number of stitches remains the same, this means work the first row in A.2 as follows: YO, K2, slip 1, K2 tog, psso, K2, YO. Happy knitting!
18.01.2024 - 08:19
|
||||||||||
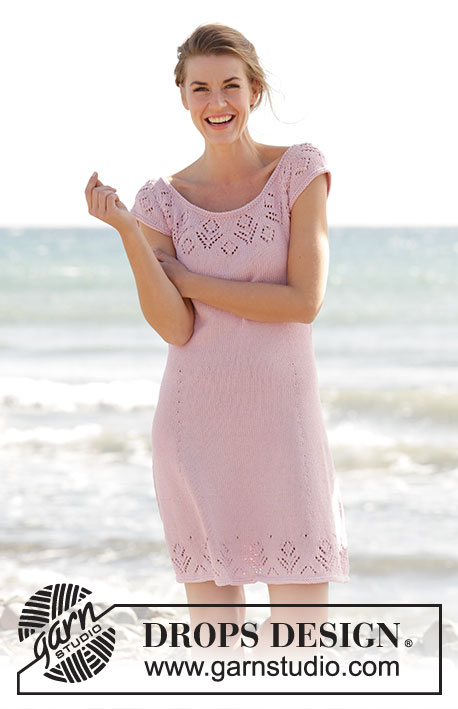
Love Is In The Air#loveisintheairtop |
||||||||||
 |
 |
|||||||||
Top DROPS ai ferri, con motivo traforato, in "Muskat". Taglie: Dalla S alla XXXL.
DROPS 160-24 |
||||||||||
|
PUNTO LEGACCIO (in tondo): Lavorare * 1 giro a dir, 1 giro a rov *, ripetere da *-*. 1 “costa” a legaccio = 2 giri. PUNTO LEGACCIO (avanti e indietro): Lavorare tutti i ferri a dir. 1 “costa” a legaccio = 2 ferri a dir. MOTIVO: Vedere i diagrammi A.1 e A.2. SUGGERIMENTO PER GLI AUMENTI: Lavorare finché non rimane 1 m prima del segno, 1 m gettata, 2 m rov (il segno si trova al centro di queste m), 1 m gettata = sono state aumentate 2 m. Al giro successivo, lavorare la m gettata a rov ritorto per evitare che si formi un buco. ---------------------------------------------------------- TOP: Si lavora in tondo sui ferri circolari. Avviare 302-342-402-430-486 m sui ferri circolari n° 3,5 con il filato Muskat. Lavorare 2 COSTE A LEGACCIO - vedere le spiegazioni sopra. Passare ai ferri circolari n° 4. Proseguire come segue: * 7-6-6-5-5 m rov, diagramma A.1 *, ripetere da *-* altre 8-10-12-14-16 volte, 7-6-6-5-5 m rov, inserire 1 segno (= dietro), * 7-6-6-5-5 m rov, diagramma A.1 *, ripetere da *-* altre 8-10-12-14-16 volte, 7-6-6-5-5 m rov, inserire 1 segno (= davanti). Spostare i segni verso l’alto man mano che si procede con il lavoro. Dopo aver lavorato il diagramma A.1 1 volta in verticale, sui ferri ci sono 266-298-350-370-418 m. Lavorare ora il diagramma A.2 (= 7 m) sul diagramma A.1, fino alla fine del lavoro. Quando il lavoro misura 10 cm, diminuire come segue: * 2 m insieme a rov, 5-4-4-3-3 m rov, diagramma A.2 *, ripetere da *-* altre 8-10-12-14-16 volte, 2 m insieme a rov, 5-4-4-3-3 m rov, segno, * 2 m insieme a rov, 5-4-4-3-3 m rov, diagramma A.2 *, ripetere da *-* altre 8-10-12-14-16 volte, 2 m insieme a rov, 5-4-4-3-3 m rov, segno = 246-274-322-338-382 m (sono state diminuite 20-24-28-32-36 m). Proseguire lavorando a rov e seguendo il motivo come prima finché il lavoro non misura 13-14-14-15-15 cm. Diminuire ora come segue: * 4-3-3-2-2 m rov, 2 m insieme a rov, diagramma A.2 *, ripetere da *-* altre 8-10-12-14-16 volte, 4-3-3-2-2 m rov, 2 m insieme a rov, segno, * 4-3-3-2-2 m rov, 2 m insieme a rov, diagramma A.2 *, ripetere da *-* altre 8-10-12-14-16 volte, 4-3-3-2-2 m rov, 2 m insieme a rov, segno = 226-250-294-306-346 m (sono state diminuite 20-24-28-32-36 m). Proseguire a diminuire (quindi diminuire alternativamente da ciascun lato di ogni gruppo di m lavorate a rov) ogni 3-4-4-5-5 cm, altre 4-3-3-2-2 volte = 146-178-210-242-274 m. Lavorare il giro successivo come segue: * 1 m rov, diagramma A.2 *, ripetere da *-* altre 8-10-12-14-16 volte, 1 m rov, segno, * 1 m rov, diagramma A.2 *, ripetere da *-* altre 8-10-12-14-16 volte, 1 m rov, segno. Proseguire come impostato. Quando il lavoro misura 30 cm, aumentare 1 m da ciascun lato di ogni segno (= 4 m aumentate) - VEDERE IL SUGGERIMENTO PER GLI AUMENTI! Lavorare le m aumentate a rov. Ripetere questi aumenti ogni 1½-2-2½-3½-3½ cm altre 9-7-6-5-5 volte = 186-210-238-266-298 m. Quando il lavoro misura 46-47-48-49-50 cm, lavorare a punto legaccio sulle 7 m da ciascun lato dei segni ai lati (= 14 m a punto legaccio da ciascun lato); lavorare le altre m come prima. Quando il lavoro misura 48-49-50-51-52 cm, lavorare solo le prime 93-105-119-133-149 m del giro (= dietro), mettere in attesa su un ferma maglie le m per il davanti. DIETRO: = 93-105-119-133-149 m. Proseguire ora avanti e indietro. Intrecciare 4 m all’inizio dei 2 ferri successivi per gli scalfi = 85-97-111-125-141 m. Diminuire ora per gli scalfi all’interno delle 3 m a punto legaccio, come segue: diminuire 1 m da ciascun lato ogni 2 ferri 4-10-16-23-29 volte; diminuire lavorando 2 m insieme a rov (quando le diminuzioni interessano le m del diagramma A.2, diminuire lavorando 2 m insieme a dir; lavorare a maglia rasata le m che non possono essere lavorate seguendo il motivo) = 77-77-79-79-83 m. Quando il lavoro misura 65-67-69-71-73 cm, mettere in attesa su un ferma maglie le 31-33-35-37-39 m centrali per lo scollo e finire ogni spalla separatamente = 23-22-22-21-22 m. Nel corso del ferro successivo, lavorare le prime 2 m insieme a dir sul lato dello scollo = 22-21-21-20-21 m. Lavorare a maglia rasata le m ai lati che non possono essere lavorate seguendo il diagramma A.2. Proseguire lavorando il diagramma A.2, a rov e a maglia rasata come prima. Quando il lavoro misura 66-68-70-72-74 cm, lavorare 1 costa a legaccio (vedere le spiegazioni sopra) su tutte le m; intrecciare poi le m. Lavorare l’altra spalla in modo uguale. DAVANTI: = 93-105-119-133-149 m. Lavorare ora avanti e indietro, come indicato per il dietro, finché il lavoro non misura 57-59-61-63-65 cm. Mettere ora in attesa su un ferma maglie le 21-23-25-27-29 m centrali per lo scollo e finire ogni spalla separatamente. Intrecciare ora ogni 2 ferri per lo scollo, come segue: 2 m 2 volte e 1 m 2 volte. Continuare a diminuire per lo scalfo. Terminate tutte le diminuzioni, sui ferri ci sono 22-21-21-20-21 m. Lavorare a maglia rasata le m sul lato che non possono essere lavorate seguendo il diagramma A.2. Continuare con il diagramma A.2, a rov e a maglia rasata come prima. Quando il lavoro misura 66-68-70-72-74 cm, lavorare 1 costa a legaccio su tutte le m (leggere la spiegazione sopra), poi intrecciare. Lavorare l’altra spalla in modo uguale. CONFEZIONE: Cucire le spalle. COLLO: Con i ferri circolari n° 3,5 ed il filato Muskat, riprendere 100-120 m (comprese le maglie messe in attesa sul ferma maglie per lo scollo). Lavorare 2 coste a legaccio. Intrecciare le m. |
||||||||||
Spiegazioni del diagramma |
||||||||||
|
||||||||||
 |
||||||||||
Avete terminato questo modello?Allora taggate le vostre foto con #dropspattern #loveisintheairtop o inviatele alla #dropsfan gallery. Avete bisogno di aiuto con questo modello?Troverete 26 video tutorial, una sezione per i commenti/domande e molto altro guardando il modello su www.garnstudio.com © 1982-2026 DROPS Design A/S. Ci riserviamo tutti i diritti. Questo documento, compreso tutte le sue sotto-sezioni, è protetto dalle leggi sul copyright. Potete leggere quello che potete fare con i nostri modelli alla fine di ogni modello sul nostro sito. |
||||||||||


Con oltre 40 anni di esperienza nel design di modelli di maglia e uncinetto, DROPS Design offre la più estesa collezione di modelli gratuiti su internet - tradotti in 17 lingue. Ad oggi vi possiamo fornire 324 cataloghi e 12290 modelli - 9561 dei quali sono tradotti in Italiano.
Ci stiamo impegnando molto per darvi il meglio che vi possiamo offrire in termini di maglia e uncinetto, ispirazioni e consigli così come filati di grande qualità ad un prezzo incredibile! Volete utilizzare i nostri modelli per qualcosa d'altro oltre al vostro uso personale? Potete leggere tutto ciò che è consentito nel testo sul Copyright in basso su tutte le pagine dei nostri modelli. Buon lavoro!
Lasciare un commento sul modello DROPS 160-24
Noi saremmo felici di ricevere i tuoi commenti e opinioni su questo modello!
Se vuoi fare una domanda, fai per favore attenzione a selezionare la categoria corretta nella casella qui sotto per velocizzare il processo di risposta. I campi richiesti sono indicati da *.