
Categorie popolari
State cercando un filato?


Commenti / Domande (18)
![]() Patricia ha scritto:
Patricia ha scritto:
There are no directions for buttonholes. Please let me know how best to do them Thank you
17.11.2020 - 02:20DROPS Design ha risposto:
Dear Patricia, there are no buttonholes worked on this jacket, you will use the holes on right band to button through. Happy knitting!
17.11.2020 - 10:48
![]() Silvia ha scritto:
Silvia ha scritto:
Buenas tardes: He vuelto a leer el patrón y me he dado cuenta de mi error. Ya he visto que terminan igual. Gracias
12.06.2020 - 14:15
![]() Silvia ha scritto:
Silvia ha scritto:
¿por qué terminan diferente los delanteros? El delantero derecho remata los puntos por el lado derecho y el delantero izquierdo remata los puntos por el lado revés
10.06.2020 - 18:11DROPS Design ha risposto:
Hola Silvia. para obtener el mismo número de filas en cada delantero y debido a que las disminuciones para el escote se trabajan a la inversa en cada delantero, una parte se cierra por el lado derecho y la otra parte se cierra en una fila por el lado revés.
13.06.2020 - 20:24
![]() Richard ha scritto:
Richard ha scritto:
Hi all. After binding off for the neck & continuing as instructed until 53 sts remain with the piece measuring 53cms. Binding off all sts, I will then knit the left side as front piece. The neck edge instructions are to pick up 82-102 sts around neck (includes sts on stitch holders). I am confused, there are a total of 32sts on stitch holders (left/right pieces). How many sts do I have to make up around the neck, excluding the 32sts? Thanks.
26.05.2020 - 11:06DROPS Design ha risposto:
Dear Richard, for the neck you will pick up along the sts slipped on a thread/cast off for neck on each front piece (= 16 sts + 2 sts 2 times + 1 st 2 times on each front piece) + pick up sts along the last row to the shoulder seam on front pieces and on back piece + pick up sts along the 32 middle sts on back piece (see this video and this one. The number of stitches is not that important, make sure to pick up enough sts so that the neck edge won't be too tight nor too loose - adjust the number of sts on first row from WS if necessary. Happy knitting!
26.05.2020 - 12:23
![]() Richard ha scritto:
Richard ha scritto:
Hi everybody. I'm knitting the right front in (L size)., picking up from the 53 sts that were cast off when doing the back. I knit until the piece measures 48cms - then you say "adjust after 1 WHOLE REPETITION of lace pattern - slip the first 16sts on a stitch holder for neck". When you say "repetition", do you mean a total of 10 row (A1 & A2); or approximately 4cms? Finishing on a WS row. Your help is always invaluable. Thank you & be safe. Richard.
25.05.2020 - 17:03DROPS Design ha risposto:
Dear Richard, yes correct, "repetition" means here when the last row of diagrams have been worked (after 10 rows, last row worked from WS). Happy knitting!
26.05.2020 - 08:17
![]() Richard ha scritto:
Richard ha scritto:
Hello. I have aborted knitting this pattern. I should explain - although my tension was correct & using 5mm needles, I was knitting with 'cotton merino' yarn. Now I will use the 'Extra Fine' yarn as specifiedspecified, but the Drops label that came with the yarn states the needle size as 4mm. What should I do? Thank you.
13.05.2020 - 22:11DROPS Design ha risposto:
Dear Richard, please knit a gauge swatch and check agaist what is given in the pattern and go up or down a needle size accordingly. Happy Knitting!
14.05.2020 - 01:41
![]() Richard ha scritto:
Richard ha scritto:
Good morning all. I am making this in size 'L', & my tension is correct . Having cast on 230 stitches, I have made the calculation that this will give a 'circle' measuring 121 cms approx. The measurement shown in the pattern is 58cm (x2) = 116cm. This seems very large (48.42 in). I have completed 10 rows in stocking stitch & it measures 4 cms. Please can you confirm, the measurements are correct. Thank you. ALWAYS WEAR A FACE MASK WHEN YOU ARE OUT...
28.04.2020 - 11:48DROPS Design ha risposto:
Dear Richard, make sure to keep the correct tension, your work might be somewhat larger than it should be - the 5 front band sts on each side are not including, so that it should be right with 19 sts s= 10 cm. Happy knitting!
28.04.2020 - 12:02
![]() Karen ha scritto:
Karen ha scritto:
I'm making the small size and the 80 stitches for the back when cast on the 5 4x is 20 correct? Then 7 on each side is 14..so 80 plus 34 is 114 but says we should have 134..am I missing something..thanks in advance!! Love your patterns!!
19.07.2017 - 23:28DROPS Design ha risposto:
Dear Karen, 80 sts remain on back piece after dividing piece, you then cast on in each side 5 sts 4 times + 7 sts 1 time = 2 x 20 sts + 2 x 7 sts = 54 sts are inc in total (27 sts in each side for each sleeve) so that 80 sts + 54 = 134 sts. Happy knitting!
20.07.2017 - 09:58
![]() Anna Svendsen ha scritto:
Anna Svendsen ha scritto:
Det står inget om knapphål??
12.10.2016 - 22:09Oksana ha scritto:
When it says: cast off on every row from the neck - does that mean in every next (2-d) row or in every row (every first row)? Thank you in advance for the prompt answer!
30.04.2015 - 18:28DROPS Design ha risposto:
Dear Mrs Oksana, you cast off for neck at the beg of every row starting from neck towards shoulder (= every other row). Happy knitting!
02.05.2015 - 14:18
|
|||||||||||||||||||
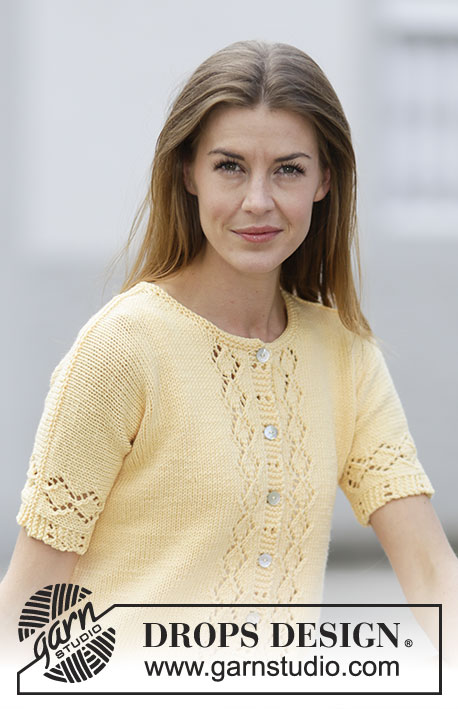
Sweet Vanilla#sweetvanillacardigan |
|||||||||||||||||||
 |
 |
||||||||||||||||||
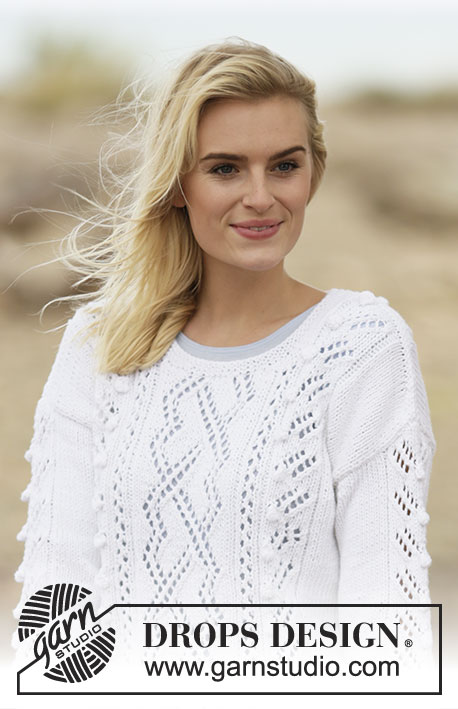
Cardigan DROPS lavorato ai ferri con motivo traforato in ”Merino Extra Fine”. Taglie: S - XXXL.
DROPS 159-14 |
|||||||||||||||||||
|
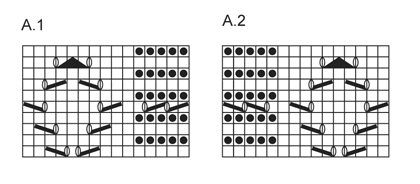
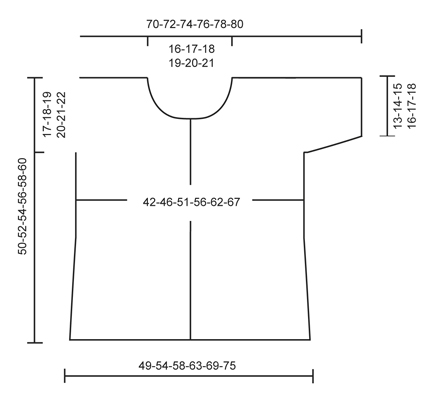
M LEGACCIO (avanti e indietro): Lavorare tutti i f a dir. 1 “costa” a m legaccio = 2 f dir. MOTIVO: Vedere i diagrammi A.1-A.2. I diagrammi mostrano tutti i f del motivo visti dal diritto del lavoro. SUGGERIMENTO PER LE DIMINUZIONI: Diminuire 1 m prima del segnapunti come segue: lavorare fino a quando rimangono 2 m prima del segnapunti, passare 1 m a dir senza lavorarla, 1 m dir, accavallare la m passata sopra quella appena lavorata. Diminuire 1 m dopo il segnapunti come segue: 2 m insieme a dir. ---------------------------------------------------------- CORPO: Lavorato avanti e indietro sui f circolari dal centro davanti. Avviare 198-214-230-250-274-294 m (comprese 5 m per il bordo a ogni lato del lavoro) con i f circolari n° 5 mm con Merino Extra Fine. Lavorare 2 “coste” a M LEGACCIO – leggere la spiegazione sopra, ALLO STESSO TEMPO inserire 2 segnapunti nel lavoro come segue: 52-56-60-65-71-76 m dir, inserire 1 segnapunti, 94-102-110-120-132-142 m dir (= dietro), inserire 1 segnapunti, 52-56-60-65-71-76 m dir. Poi lavorare come segue dal diritto del lavoro: A.1 (= 15 m) 1 volta, m rasata fino a quando rimangono 15 m, lavorare A.2 (= 15 m) 1 volta. FARE ATTENZIONE ALLA TENSIONE DEL LAVORO! Continuare questo modello fino alla fine del lavoro. Quando il lavoro misura 8 cm, diminuire 1 m a ogni lato di tutti i segnapunti (= 4 diminuzioni) – LEGGERE IL SUGGERIMENTO PER LE DIMINUZIONI! Ripetere le diminuzioni ogni 3½-4-4-4-4½-4½ cm altre 6 volte = 170-186-202-222-246-266 m. Quando il lavoro misura 33-34-35-36-37-38 cm, dividerlo, finire il davanti e il dietro in modo separato come segue: trasferire le prime 45-49-53-58-64-69 (= davanti destro) e le ultime 45-49-53-58-64-69 m (= davanti sinistro) su un fermamaglie, tagliare il filo, continuare solo sulle 80-88-96-106-118-128 m centrali (= dietro). DIETRO: = 80-88-96-106-118-128 m. Ora avviare nuove m per la manica a ogni lato del lavoro alla fine di ogni f come segue: avviare 5-4-4-3-3-2 m 4 volte in totale a ogni lato poi avviare 7-8-6-7-3-4 m 1 volta = 134-136-140-144-148-152 m sul f. Lavorare le m aumentate a m rasata. Alla fine di tutti gli aumenti, lavorare il f successivo dal diritto del lavoro come segue: A.1, m rasata fino a quando rimangono 15 m, finire con A.2. Continuare il motivo in questo modo. Quando il lavoro misura 48-50-52-54-56-58 cm, intrecciare le 28-30-32-34-36-38 m centrali per il collo e finire ogni spalla in modo separato. Continuare a intrecciare 1 m sul f successivo dal collo = 52-52-53-54-55-56 m rimaste sul f. Quando il lavoro misura 49-51-53-55-57-59 cm, lavorare 1 f dir dal diritto del lavoro, 1 f dir dal rovescio del lavoro, poi intrecciare tutte le m, il lavoro misura circa 50-52-54-56-58-60 cm. DAVANTI DESTRO: = 45-49-53-58-64-69 m. Continuare a m rasata e con il motivo. ALLO STESSO TEMPO avviare per le maniche alla fine del f dal diritto del lavoro come segue: avviare 5-4-4-3-3-2 m 4 volte in totale a lato e poi avviare 7-8-6-7-3-4 m 1 volta = 72-73-75-77-79-81 m. Lavorare le m aumentate a m rasata. Alla fine di tutti gli aumenti, lavorare il f successivo dal diritto del lavoro come segue: A.1, m rasata fino a quando rimangono 15 m, finire con A.2. Continuare il motivo in questo modo. Quando il lavoro misura 44-46-48-50-52-54 cm – aggiustarlo dopo un’intera ripetizione del motivo traforato – trasferire le prime 14-15-16-17-18-19 m su un fermamaglie per il collo e intrecciare su ogni f dal collo come segue: 2 m 2 volte e 1 m 2 volte = 52-52-53-54-55-56 m rimaste per la spalla. Quando il lavoro misura 49-51-53-55-57-59 cm, lavorare 1 f dir dal diritto del lavoro, poi intrecciare tutte le m, il lavoro misura circa 50-52-54-56-58-60 cm. DAVANTI SINISTRO: Lavorare come per il davanti destro ma a specchio. Lavorare A.1 sulle m delle maniche invece di A.2. Intrecciare per il collo all’inizio del f dal rovescio del lavoro. CONFEZIONE: Cucire i margini delle spalle all’interno del bordo di chiusura. Cucire i margini delle maniche nel filo più esterno delle m di vivagno. Attaccare 6 bottoni in modo uniforme sul bordo sinistro – allacciarli attraverso i buchi sul bordo destro, aggiustarli seguendo i buchi. BORDO DEL COLLO: Riprendere 82-102 m attorno al collo (comprese le m sui fermamaglie) e lavorare 2 “coste”. Intrecciare. |
|||||||||||||||||||
Spiegazioni del diagramma |
|||||||||||||||||||
|
|||||||||||||||||||
 |
|||||||||||||||||||
 |
|||||||||||||||||||
Avete terminato questo modello?Allora taggate le vostre foto con #dropspattern #sweetvanillacardigan o inviatele alla #dropsfan gallery. Avete bisogno di aiuto con questo modello?Troverete 24 video tutorial, una sezione per i commenti/domande e molto altro guardando il modello su www.garnstudio.com © 1982-2026 DROPS Design A/S. Ci riserviamo tutti i diritti. Questo documento, compreso tutte le sue sotto-sezioni, è protetto dalle leggi sul copyright. Potete leggere quello che potete fare con i nostri modelli alla fine di ogni modello sul nostro sito. |
|||||||||||||||||||


Con oltre 40 anni di esperienza nel design di modelli di maglia e uncinetto, DROPS Design offre la più estesa collezione di modelli gratuiti su internet - tradotti in 17 lingue. Ad oggi vi possiamo fornire 324 cataloghi e 12290 modelli - 9561 dei quali sono tradotti in Italiano.
Ci stiamo impegnando molto per darvi il meglio che vi possiamo offrire in termini di maglia e uncinetto, ispirazioni e consigli così come filati di grande qualità ad un prezzo incredibile! Volete utilizzare i nostri modelli per qualcosa d'altro oltre al vostro uso personale? Potete leggere tutto ciò che è consentito nel testo sul Copyright in basso su tutte le pagine dei nostri modelli. Buon lavoro!
Lasciare un commento sul modello DROPS 159-14
Noi saremmo felici di ricevere i tuoi commenti e opinioni su questo modello!
Se vuoi fare una domanda, fai per favore attenzione a selezionare la categoria corretta nella casella qui sotto per velocizzare il processo di risposta. I campi richiesti sono indicati da *.