
Categorie popolari
State cercando un filato?


Commenti / Domande (53)
![]() Jeanette ha scritto:
Jeanette ha scritto:
Are the indications for inc 6 sts and inc 29 sts both to be done on the very first round, or are they to be done on rounds 1, then 2? This is garter stitch in the round, and the first ridge would be the first 2 rounds.
20.03.2026 - 10:13DROPS Design ha risposto:
See below :)
20.03.2026 - 15:30
![]() Jeanette ha scritto:
Jeanette ha scritto:
Do I work the inc 6 stitches and the inc 29 stitches on the very first round of the yoke in the Vanilla Summer Dress?
20.03.2026 - 09:42DROPS Design ha risposto:
Dear Jeanette, in 2nd size you work 1 ridge increasing evenly on first round (= K1 round increasing 6 sts evenly, then purl 1 round), then work one more ridge increasing on first round ( (knit 1 round increasing 29 sts evenly then purl 1 round). Happy knitting!
20.03.2026 - 15:25
![]() Sharon Hunt ha scritto:
Sharon Hunt ha scritto:
Decreasing after working 2.5 cm after which I do the increases. Do I start counting for the next group of increases after working the yo’s as instructed?
17.09.2024 - 22:37DROPS Design ha risposto:
Dear Mrs Hunt, measure 2,5 cm straight in your piece and count how many rows/rounds you need to get this height, let's say 5,5 (if your tension is right), then increase every 6th round. Happy knitting!
18.09.2024 - 08:29
![]() Sharon Hunt-Edwards ha scritto:
Sharon Hunt-Edwards ha scritto:
Hi Can I use use a traveling marker where I had a marker that designated the beg of the round? “When piece measures 3 cm / 1'', inc 1 st on each side of each marker in the sides” are thes new markers between the 8 sts cast on for each sleeve? 🙏 for responding.
16.09.2024 - 20:05DROPS Design ha risposto:
Hi Sharon, Yes, you can allow the marker(s) to follow your work onwards. The markers in each side are in the middle of the cast-on stitches under the sleeves, i.e., with 4 stitches on each side. Happy knitting!
17.09.2024 - 07:02
![]() Sharon Hunt ha scritto:
Sharon Hunt ha scritto:
Hi After completing the yoke which has a length of 9,5 inches do one continue with straight knitting to get yoke’s length before dividing for sleeves? Am at round 39, L is 7,5 may av to adjust but wondering because from my shoulder to under breasts is 15 inches. Making xxxl.
01.09.2024 - 13:59DROPS Design ha risposto:
Dear Mrs Hunt, if your tension is tighter just continue working stocking stitch after A.1 until you reach the measurement for your size (measure on mid front from cast on edge). Happy knitting!
02.09.2024 - 08:42
![]() Darla ha scritto:
Darla ha scritto:
Why No One Cares About Attorneys Accidents attorneys accidents
02.02.2024 - 13:52
![]() Meg ha scritto:
Meg ha scritto:
Hello! I have completed the yoke. When continuing on, am I to add separate balls of yarn for each section (backs, front)? Also, I am not clear on where the 8 cast on stitches should end up. Are they cast on and worked with the backs? Or the front? Thank you for any help you can offer.
13.03.2022 - 04:14DROPS Design ha risposto:
Dear Meg, the 8 sts cast on when dividing yoke are exactly between front and back pieces, they are cast on to replace stitches for sleeve - look at this lesson you will see from picture 9) how the piece is divided, stitches on sleeve slipped on a thread and new stitches cast on under sleeve and how continuing in the round. Happy knitting!
14.03.2022 - 14:12
![]() Rosy Córdoba ha scritto:
Rosy Córdoba ha scritto:
Gracias por sus patrones, he tenido la oportunidad de hacer varias bufandas y gorras y me encantan. Bendiciones.
09.11.2019 - 15:00
![]() Anne Wekking ha scritto:
Anne Wekking ha scritto:
Waar kan ik paris krijgen in zwart
17.12.2018 - 19:15
![]() Séverine Droumaguet ha scritto:
Séverine Droumaguet ha scritto:
Bonjour, Dans les explications, il est écrit: Tricoter les 32 premières m (= demi-dos) EN MÊME TEMPS, glisser les 40m suivantes sur un arrêt de mailles (= manche), monter 8 m sous la manche, placer un marqueur au milieu de ces 8 m, Comment monter les 8m sous la manche ? je ne comprends pas comment m'y prendre... Merci pour votre aide,
08.10.2017 - 17:18DROPS Design ha risposto:
Bonjour Mme Droumaguet, on tricote les premières mailles du dos en augmentant en même temps 2 mailles en taille XXXL donc, en taille S, tricotez les 32 premières mailles du demi-dos sans augmenter, et glissez les 40 m suivante en attente, montez 8 m (voir vidéo, tricotez les 65 m suivantes sans augmenter en taille S, glissez les 40 m suivantes en attente, montez 8 m et tricotez les 33 dernières mailles sans augmenter = 146 m. Bon tricot!
09.10.2017 - 09:14
|
||||||||||||||||
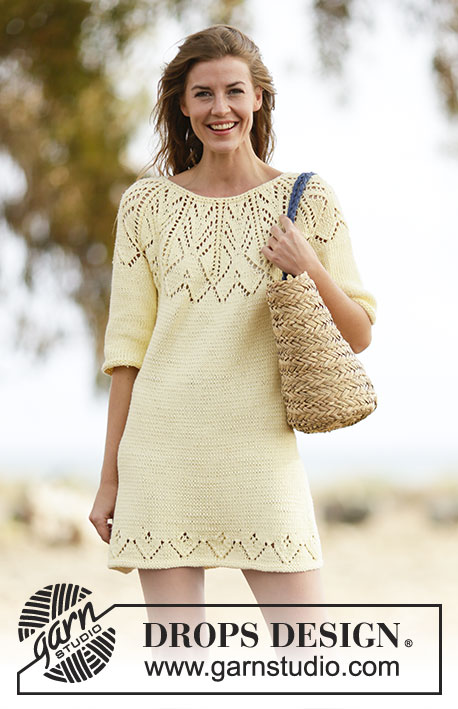
Vanilla Summer#vanillasummerdress |
||||||||||||||||
 |
 |
|||||||||||||||
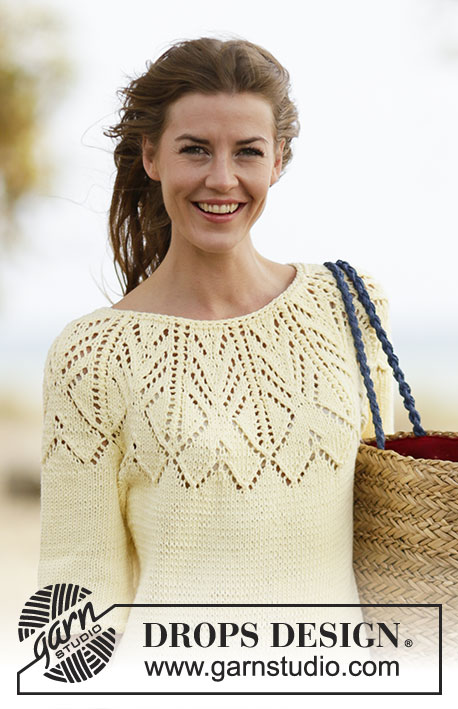
Vestito DROPS lavorato ai ferri con maniche corte, sprone rotondo e motivo traforato in ”Paris”. Lavorato top down (dall’alto in basso). Taglie: S - XXXL.
DROPS 159-6 |
||||||||||||||||
|
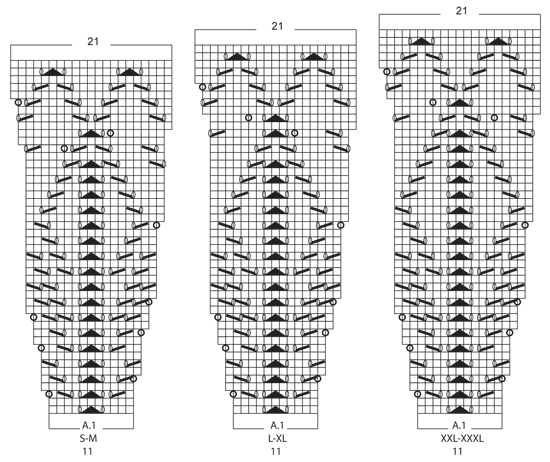
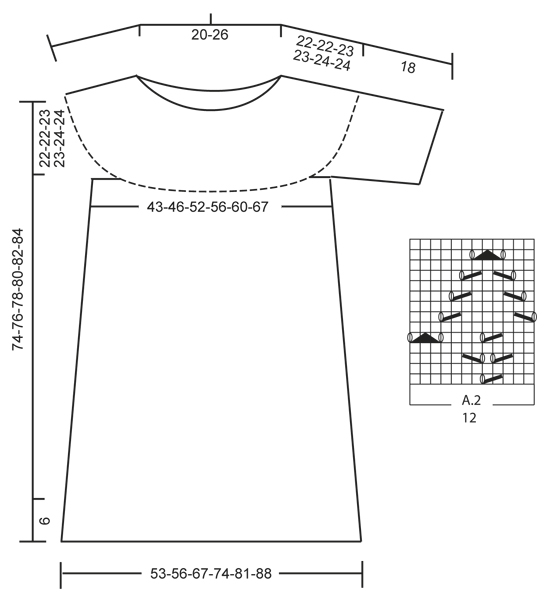
M LEGACCIO (lavorata in tondo): * 1 giro dir e 1 giro rov *, ripetere *-*. 1 “costa” a m legaccio = 2 giri. MOTIVO: Vedere i diagrammi A.1-A.2. SUGGERIMENTO PER LE DIMINUZIONI: Diminuire come segue prima del segnapunti: lavorare fino a quando rimangono 3 m prima del segnapunti, 2 m insieme a dir, 1 m dir. Diminuire come segue dopo il segnapunti: = 1 m dir, passare 1 m a dir senza lavorarla, 1 m dir, accavallare la m passata sopra quella appena lavorata. SUGGERIMENTO PER GLI AUMENTI: Lavorare fino a quando rimane 1 m prima del segnapunti, 1 gettato, 2 m dir (il segnapunti è tra queste m), 1 gettato. Sul giro successivo lavorare il gettato a ritorto per evitare buchi. ---------------------------------------------------------- SPRONE: Lavorato top down (dall’alto in basso) in tondo con i f circolari. Avviare 82-86-88-92-96-100 m con i f circolari n° 4,5 mm con Paris. Lavorare 1 “costa” a M LEGACCIO – leggere la spiegazione sopra e ALLO STESSO TEMPO sul 1° giro distribuire 6-6-6-12-12-12 aumenti in modo uniforme = 88-92-94-104-108-112 m. Lavorare 1 costa e ALLO STESSO TEMPO sul 1° giro distribuire 22-29-38-39-46-53 aumenti in modo uniforme = 110-121-132-143-154-165 m. Lavorare i gettati a rov ritorto sul giro successivo, non devono fare i buchi. Passare ai f circolari n° 5 mm. Poi lavorare A.1 10-11-12-13-14-15 volte in totale in larghezza. FARE ATTENZIONE ALLA TENSIONE DEL LAVORO! Quando A.1 è stato lavorato 1 volta in verticale, ci sono 210-231-252-273-294-315 m sul f. Il lavoro misura circa 22-22-23-23-24-24 cm. Lavorare il giro successive come segue: lavorare le prime 32-36-40-44-47-51 m (= metà dietro) e ALLO STESSO TEMPO distribuire 0-0-0-0-0-2 aumenti in modo uniforme, trasferire le 40-44-46-48-53-56 m successive su un fermamaglie (= manica), avviare 8 nuove m sotto la manica, inserire 1 segnapunti al centro di queste 8 m, lavorare le 65-71-80-89-94-101 m successive (= davanti) e ALLO STESSO TEMPO distribuire 0-0-0-0-0-5 aumenti in modo uniforme, trasferire le 40-44-46-48-53-56 m successive su un fermamaglie (= manica), avviare 8 nuove m sotto la manica, inserire 1 segnapunti al centro di queste 8 m, lavorare le 33-36-40-44-47-51 m rimaste (= metà dietro). ALLO STESSO TEMPO distribuire 0-0-0-0-0-2 aumenti in modo uniforme = 146-159-176-193-204-228 m. CORPO: Ora lavorare a m rasata. Inserire 1 segnapunti nel lavoro, ORA MISURARE IL LAVORO DA QUI. Quando il lavoro misura 3 cm, aumentare 1 m a ogni lato di tutti i segnapunti ai lati (= 4 aumenti) – LEGGERE IL SUGGERIMENTO PER GLI AUMENTI, ripetere gli aumenti ogni 6-6-3½-3½-2½-2½ cm altre 7-7-12-13-17-17 volte = 178-191-228-249-276-300 m. Quando il lavoro misura 45-47-48-50-51-53 cm, distribuire 2-1-0-3-0-0 aumenti in modo uniforme sul giro successivo = 180-192-228-252-276-300 m. Poi lavorare A.2 (= 12 m) 15-16-19-21-23-25 volte in larghezza. Passare ai f circolari n° 4,5 mm. Lavorare 2 “coste” a m legaccio, intrecciare. MANICA: Lavorare le maniche in tondo con i f a doppia punta. Riportare le 40-44-46-48-53-56 m dal fermamaglie sui f a doppia punta n° 5 mm. Avviare 8 nuove m sotto la manica, inserire 1 segnapunti al centro di queste 8 m = 48-52-54-56-61-64 m. Inserire 1 segnapunti nel lavoro, ORA MISURARE IL LAVORO DA QUI. Lavorare a m rasata. Quando il lavoro misura 4 cm, diminuire 1 m a ogni lato del segnapunti (= 2 diminuzioni) – LEGGERE IL SUGGERIMENTO PER LE DIMINUZIONI! Ripetere le diminuzioni quando il lavoro misura 10 cm = 44-48-50-52-57-60 m. Quando il lavoro misura 17 cm, passare ai f a doppia punta n° 4,5 mm e lavorare 2 coste. Intrecciare. Lavorare l’altra manica nello stesso modo. CONFEZIONE: Cucire le aperture sotto le maniche. |
||||||||||||||||
Spiegazioni del diagramma |
||||||||||||||||
|
||||||||||||||||
 |
||||||||||||||||
 |
||||||||||||||||
Avete terminato questo modello?Allora taggate le vostre foto con #dropspattern #vanillasummerdress o inviatele alla #dropsfan gallery. Avete bisogno di aiuto con questo modello?Troverete 25 video tutorial, una sezione per i commenti/domande e molto altro guardando il modello su www.garnstudio.com © 1982-2026 DROPS Design A/S. Ci riserviamo tutti i diritti. Questo documento, compreso tutte le sue sotto-sezioni, è protetto dalle leggi sul copyright. Potete leggere quello che potete fare con i nostri modelli alla fine di ogni modello sul nostro sito. |
||||||||||||||||


Con oltre 40 anni di esperienza nel design di modelli di maglia e uncinetto, DROPS Design offre la più estesa collezione di modelli gratuiti su internet - tradotti in 17 lingue. Ad oggi vi possiamo fornire 324 cataloghi e 12290 modelli - 9561 dei quali sono tradotti in Italiano.
Ci stiamo impegnando molto per darvi il meglio che vi possiamo offrire in termini di maglia e uncinetto, ispirazioni e consigli così come filati di grande qualità ad un prezzo incredibile! Volete utilizzare i nostri modelli per qualcosa d'altro oltre al vostro uso personale? Potete leggere tutto ciò che è consentito nel testo sul Copyright in basso su tutte le pagine dei nostri modelli. Buon lavoro!
Lasciare un commento sul modello DROPS 159-6
Noi saremmo felici di ricevere i tuoi commenti e opinioni su questo modello!
Se vuoi fare una domanda, fai per favore attenzione a selezionare la categoria corretta nella casella qui sotto per velocizzare il processo di risposta. I campi richiesti sono indicati da *.