
Categorie popolari
State cercando un filato?


Commenti / Domande (32)
![]() Margaret ha scritto:
Margaret ha scritto:
The pattern I am after is 158-21 the hat that I’m having problems with I don’t understand it and my grandmother can’t read it as she can’t see clearly thank you again
29.06.2020 - 14:11DROPS Design ha risposto:
Dear Margaret, can you please explain us more? Which part don't you understand? ARe you working on the hat? on the scarf? Do not hesitate to write us more details so that we can help you :)
29.06.2020 - 15:01
![]() Margaret ha scritto:
Margaret ha scritto:
Pattern 158-21 can you please tell me how to do the 3rd row of the pattern please thank you sorry to be a burden but I’m writing this for my grandmother she doesn’t know how to read the pattern so I’m trying to help her
28.06.2020 - 06:44DROPS Design ha risposto:
Dear Margaret, which pattern are you talking about? One of the diagrams? Hat? Scarf? Please let us know more - and remember you will find here how to read knitting diagrams. Happy knitting!
29.06.2020 - 08:20
![]() Margaret Scerri ha scritto:
Margaret Scerri ha scritto:
As I have wrote to you before once I have don the first row of A.1 do I continue to pattern A.2 or repeat A.1 all round
26.06.2020 - 13:04DROPS Design ha risposto:
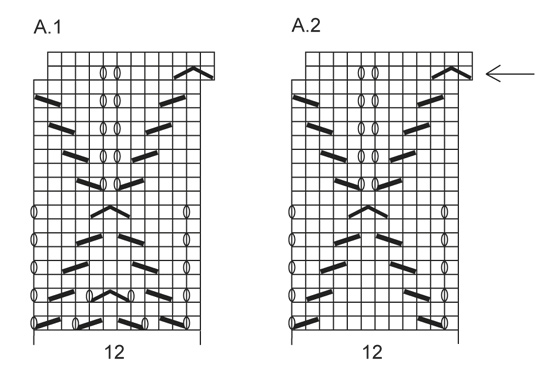
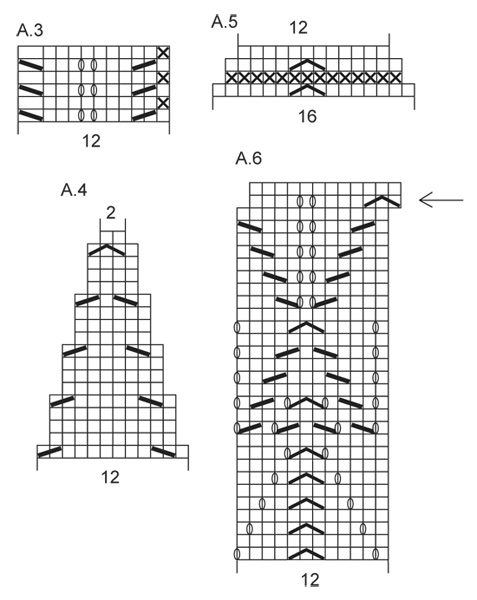
Dear Mrs Scerri, when A.1 (= 20 rows) is done, work A.2 (= 20 rows) one time in height. On next to last row in A.1 you will work the last stitch on round together with the first 2 sts of first repeat of the round and repeat this (= work last st A.1 tog with first 2 sts next A.1). So that beg of round is displaced 1 st towards the right. After A.2 work A.3 (= 12 sts/6 rows). When piece measures 20 cm, work A.4 to the end. Happy knitting!
26.06.2020 - 13:24
![]() Margaret Scerri ha scritto:
Margaret Scerri ha scritto:
Can you please tell me if I’m doing the right thing in the first row of the pattern in the hat (knit 1stitch bring yarn over slip 1 pass slip stitch over knit 1 bring yarn over slip 1stitch pass slip stitch over knit 1 stitch knit 2 together yarn forward knit 1 knit 2together yarn forward knit 1then follow by A2 then A3
25.06.2020 - 12:49DROPS Design ha risposto:
Dear Mrs Scerri, I miss the description of some st, row 1 in A.1 should be worked as follows: (K1, yarn over, slip 1, K1, psso, K1, yarn over, slip 1, K1, psso, K1, K2 tog, yarn over, K1, K2 tog, yarn over) - repeat from (to). Happy knitting!
25.06.2020 - 17:04
![]() Margaret Scerri ha scritto:
Margaret Scerri ha scritto:
Can you please explain the first row of pattern Lake District 158-21 as I am getting confused with it thank you.?
19.06.2020 - 06:46DROPS Design ha risposto:
Dear Mrs Scerri, for the hat you cast on 120 sts and work in rib (K1 twisted, P1) in the round for 3 cm - for the scarf, you cast on 87 and work: 3 sts in garter st, repeat diagram A.5 until 4 sts remain (=5 times in width), 1 stitch as first st in A.5 (= either knit or purl as shown in diagram), 3 sts in garter stitch. You are decreasing 2 sts in the middle of each A.5 on row 1 and 3 = 12 sts remain when A.5 is done (12 sts remain in each repeat). Happy knititng!
19.06.2020 - 08:01
![]() Katharina ha scritto:
Katharina ha scritto:
Hallo, fange ich bei A6 beim Pfeil an und dann von unten nach oben? Danke schon mal
01.07.2019 - 05:30DROPS Design ha risposto:
Liebe Katharina, Diagramm lesen Sie von unten nach oben (mehr lesen Sie hier), der Pfeil in A.6 wird unter MUSTER SCHAL erklärt. Viel Spaß beim stricken!
01.07.2019 - 08:14
![]() Tatiana ha scritto:
Tatiana ha scritto:
This pattern has absolutely same like in Sweet Caroline, drops 131-11
05.04.2019 - 22:52DROPS Design ha risposto:
Dear Tatiana, the two hats are similar, though not the same, and the scarves, though use siilar lace pattern, but they are different as well. Happy knitting!
07.04.2019 - 20:02
![]() Lilli Johansen ha scritto:
Lilli Johansen ha scritto:
Når jeg printer ud, får jeg alle jeres spørgeskemaer, men ikke billede af opskriften. Spild af papir. Lilli Johansen
18.01.2019 - 20:44
![]() Catherine Lejeune ha scritto:
Catherine Lejeune ha scritto:
La 67 ème maille se tricote-t-elle avant les 3 dernières mailles mousses pour tous les diagrammes ?
13.09.2018 - 07:25DROPS Design ha risposto:
Bonjour Mme Lejeune, tricotez A.6 sur les 67 m ainsi: 3 m point mousse, répétez A.6 (= 12 m) x fois (= 5 fois ), terminez par la 1ère m de A.6 (sur l'endroit = 1 m jersey endroit) et 3 m point mousse pour que le motif soit symétrique de chaque côté. Pour A.2, procédez de la même façon: terminez par la 1ère m de A.2 (= 1 m jersey end) avant les 3 dernières m point mousse sur l'endroit. Bon tricot!
13.09.2018 - 08:52
![]() Alison ha scritto:
Alison ha scritto:
Hi Thanks for your previous answer regarding the diagrams. I am now struggling with chart A6. There are 67 stitches. In each row there are 3 stitches garter at each end (6 stitches) and each pattern repeat is 12 stitches - so 5 repeats of the pattern =60, plus 6 garter stitch =66. Where does the extra stitch fit in please?
04.09.2018 - 17:51DROPS Design ha risposto:
Dear Alison, after the last st last repeat work 1 st as the first in A.6 before the last K3 so that pattern will ends as it starts. Happy knitting!
05.09.2018 - 08:00
|
|||||||||||||||||||
Lake District#lakedistrictset |
|||||||||||||||||||
|
|
|||||||||||||||||||
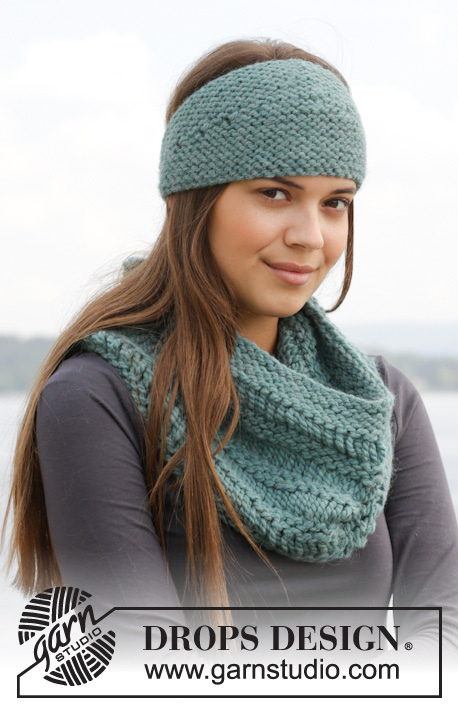
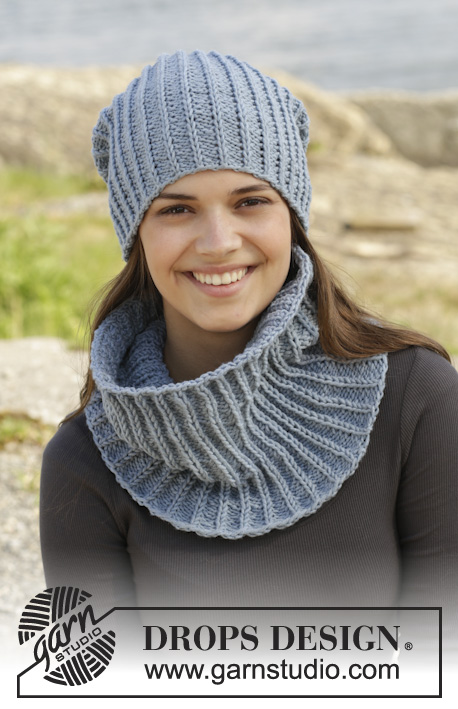
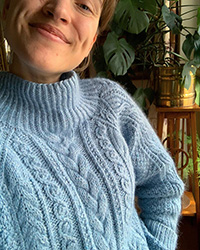
Berretto e sciarpa DROPS ai ferri, con motivo traforato, in "Alpaca".
DROPS 158-21 |
|||||||||||||||||||
|
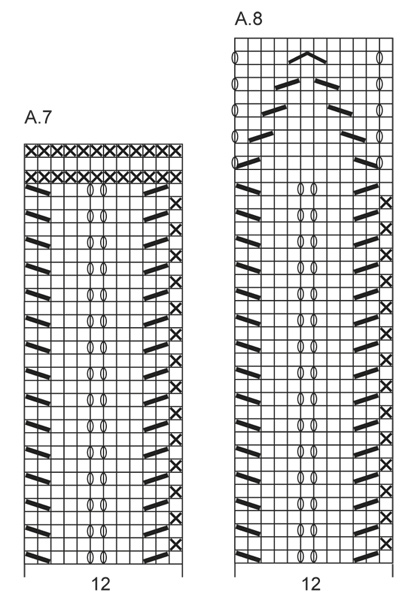
PUNTO LEGACCIO (avanti e indietro sui ferri): Lavorare tutti i ferri a dir. 1 “costa” a legaccio = 2 ferri a dir. MOTIVO PER IL BERRETTO: Vedere i diagrammi da A.1 a A.4. I diagrammi mostrano tutti i giri del motivo, visti sul diritto del lavoro. MOTIVO PER LA SCIARPA: Vedere i diagrammi A.5, A.6, A.2, A.7 e A.8 ATTENZIONE! Nel diagramma A.6 lavorare il primo simbolo della 29a riga come 2 m insieme a dir la prima volta, quindi all'inizio del ferro, lavorare finché non rimangono 2 m, passare 1 m a dir senza lavorarla, 1 m dir, accavallare la m passata sulla m lavorata. Questo vale anche per lo stesso simbolo del diagramma A.2 alla 19a riga - vedere la freccia nel diagramma. I diagrammi mostrano tutti i ferri del motivo visti sul diritto del lavoro. ---------------------------------------------------------- BERRETTO: Si lavora in tondo sui ferri circolari, passare ai ferri a doppia punta quando necessario. Avviare 120 m sui ferri circolari n° 3 con il filato Alpaca. Lavorare a coste (= 1 m a dir ritorto/ 1 m rov) per 3 cm. Passare ai ferri circolari n° 3,5; lavorare a maglia rasata e allo stesso tempo, aumentare 36 m in modo uniforme nel corso del giro = 156 m. Lavorare il diagramma A.1 1 volta in verticale. ATTENZIONE! Dopo aver lavorato il diagramma A.1, il motivo si sposta di 1 m sulla destra. RICORDARSI LA TENSIONE DEL LAVORO! Lavorare ora il diagramma A.2 1 volta in verticale. Proseguire seguendo il diagramma A.3. Quando il lavoro misura 20 cm, lavorare e diminuire seguendo il diagramma A.4, quindi, mentre si lavora il diagramma, vengono diminuite 2 m ogni 4 giri. Terminato il diagramma A.4, sui ferri ci sono 26 m. Al giro successivo, lavorare tutte le m insieme a 2 a 2 a dir = 13 m. Passare il filo attraverso le m rimaste, stringere e fermare il filo. Il lavoro misura ca.26 cm. SCIARPA: Si lavora avanti e indietro sui ferri. Si lavora in 2 parti cucite insieme al centro, sul dietro, alla fine. Avviare 87 m (comprese 3 m vivagno a punto legaccio da ciascun lato) sui ferri n° 3,5 con il filato Alpaca. Lavorare 1 ferro a dir sul rovescio del lavoro. Lavorare il ferro successivo come segue sul diritto del lavoro: 3 m a PUNTO LEGACCIO - vedere le spiegazioni sopra, ripetere il diagramma A.5 finché non rimangono 4 m, lavorare 1 m come la prima m del diagramma e finire con 3 m a punto legaccio. Proseguire in questo modo. Dopo aver lavorato il diagramma A.5 1 volta in verticale, ci sono 67 m sui ferri. Proseguire lavorando il diagramma A.6 1 volta in verticale con le 3 m ai lati a punto legaccio fino alla fine del lavoro e il diagramma A.2 1 volta in verticale. Lavorare ora il diagramma A.7. Dopo aver lavorato il diagramma A.7 per un totale di 5 volte in verticale, lavorare il diagramma A.8 1 volta in verticale. Lavorare 2 coste a legaccio. Intrecciare le m senza stringere troppo il filo, sul diritto del lavoro. Lavorare la seconda parte in modo uguale. CONFEZIONE: Cucire le due parti insieme bordo contro bordo lungo il bordo di chiusura delle m al centro, sul dietro. |
|||||||||||||||||||
Spiegazioni del diagramma |
|||||||||||||||||||
|
|||||||||||||||||||
 |
|||||||||||||||||||
 |
|||||||||||||||||||
 |
|||||||||||||||||||
Avete terminato questo modello?Allora taggate le vostre foto con #dropspattern #lakedistrictset o inviatele alla #dropsfan gallery. Avete bisogno di aiuto con questo modello?Troverete 21 video tutorial, una sezione per i commenti/domande e molto altro guardando il modello su www.garnstudio.com © 1982-2026 DROPS Design A/S. Ci riserviamo tutti i diritti. Questo documento, compreso tutte le sue sotto-sezioni, è protetto dalle leggi sul copyright. Potete leggere quello che potete fare con i nostri modelli alla fine di ogni modello sul nostro sito. |
|||||||||||||||||||


Con oltre 40 anni di esperienza nel design di modelli di maglia e uncinetto, DROPS Design offre la più estesa collezione di modelli gratuiti su internet - tradotti in 17 lingue. Ad oggi vi possiamo fornire 324 cataloghi e 12190 modelli - 9461 dei quali sono tradotti in Italiano.
Ci stiamo impegnando molto per darvi il meglio che vi possiamo offrire in termini di maglia e uncinetto, ispirazioni e consigli così come filati di grande qualità ad un prezzo incredibile! Volete utilizzare i nostri modelli per qualcosa d'altro oltre al vostro uso personale? Potete leggere tutto ciò che è consentito nel testo sul Copyright in basso su tutte le pagine dei nostri modelli. Buon lavoro!
Lasciare un commento sul modello DROPS 158-21
Noi saremmo felici di ricevere i tuoi commenti e opinioni su questo modello!
Se vuoi fare una domanda, fai per favore attenzione a selezionare la categoria corretta nella casella qui sotto per velocizzare il processo di risposta. I campi richiesti sono indicati da *.