


Komentáře / Otázky (31)
![]() Hélène Monette napsala:
Hélène Monette napsala:
Bonjour, je suis bloquée au rang 29, diag. A6. Est-ce que je fais le point mousse en début de rang ou 2 m ens ? et ensuite est-ce que je suis le schéma avec les surjets ou je continu les dimutions avec 2 m. ens. Merci
02.04.2025 - 16:26Odpověď DROPS Design :
Bonjour Mme Monette, au début du rang, tricotez 2 m ens à l'end au lieu du surjet double, puis tricotez la dernière maille de chaque motif avec les 2 premières mailles du motif suivant; à la fin du rang, terminez par 1 diminution - cf POINT FANTAISIE ÉCHARPE: - Si vous avez mis des marqueurs entre chaque motif, pensez à bien vérifier que vous avez toujours bien 12 m dans chaque A.6. Bon tricot!
03.04.2025 - 08:19
![]() Florencia napsala:
Florencia napsala:
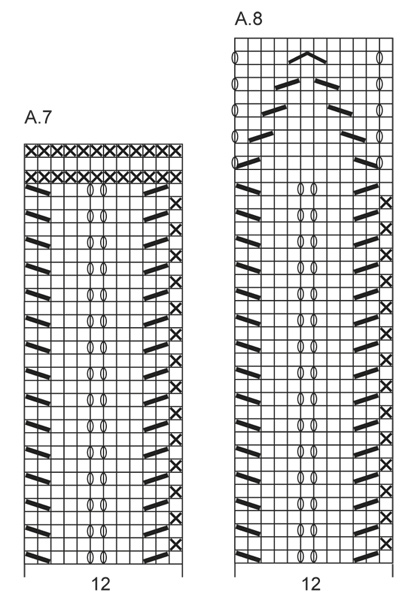
Hola! El diagrama A.7 hay que repetirlo 5 veces? Si lo hago asi quedaria mas largo de lo sugerido de 156 cm
02.08.2024 - 21:32Odpověď DROPS Design :
Hola Florencia, sí, repites A.7 5 veces. La bufanda son 156 cm si cumples la tensión correcta de 30 filas en pt jersey = 10 cm. A.5 +A.6 + 5 veces de A.7 + A.8 = aprox. 234 filas, que son aprox. 78 cm. Teniendo en cuenta que trabajas 2 mitades de una bufanda de 156cm (78 cm cada mitad más o menos) entonces el largo es correcto.
05.08.2024 - 23:33
![]() Paola napsala:
Paola napsala:
Ancora una cosa.....all'inizio delle spiegazioni si legge "ripetere il diagramma A.5 finché non rimangono 4 m, lavorare 1 m come la prima m del diagramma..." non riesco a capire...il diagramma A.5 è costituito da 4 ferri, quindi le spiegazioni si riferiscono all'ultimo ferro che si presenta a rovescio e significa che quindi faccio 4 m a rovescio ed una a diritto??
12.11.2022 - 09:36Odpověď DROPS Design :
Buonasera Paola, deve continuare a ripetere la 1° riga del diagramma A.5 fino a quando rimangono 4 maglie, poi lavorare la 1° maglia del diagramma e le 3 maglie di vivagno. Questa sequenza va ripetuta per le altre righe del diagramma. Buon lavoro!
12.11.2022 - 23:58
![]() Paola napsala:
Paola napsala:
Salve, scusate. DOpo l'avvio di 87 maglie, si esegue il diagramma A5, ed alla fine si hanno 67 maglie sui ferri. Si continua la lavorazione come indicato, mi sembrano non ci siano aumenti da fare. Mi chiedo: se proseguo con 67 maglie, non mi sembra possibile avere 38 cm di larghezza della sciarpa. Secondo il campione indicato (23 m per 10 cm) i 38 cm corrispondono a 87 maglie. GRazie se potete spiegarmi questo
11.11.2022 - 19:33Odpověď DROPS Design :
Buonasera Paola, è corretto, la sciarpa è più larga all'inizio e alla fine del lavoro. Buon lavoro!
12.11.2022 - 23:56
![]() Kate Ritchie napsala:
Kate Ritchie napsala:
I purchased the Lake District pattern z-685. I am an experienced knitter however the instructions are incomprehensible. I am trying to start the scarf however I can't reconcile the initial stitch numbers with pattern requirements. Can you please clarify.
12.08.2021 - 04:48Odpověď DROPS Design :
Dear Mrs Ritchie, for the scarf you cast on 87 stitches, purl 1 row (= wrong side) then work as follows (from right side): 3 sts in garter stitch, work A.5 (= 16 sts on first row) until 4 sts remain (= 5 times), work the first stitch in A.5 (so that pattern is symmetrical) and end with 3 sts in garter stitch. You will decrease 2 sts on row 1 and on row 3 in each A.5 = 12 sts remain when A.5 is done: 3 sts garter st + 12 sts x 5 repeats + 1st st A.5 + 3 sts garter st = 67 sts remain. Hope this will help, happy knitting!
12.08.2021 - 08:47
![]() Julie napsala:
Julie napsala:
Pour l’écharpe Je monte mes 87 m après tricote premier rang endroit après je commence la figure 5 . Doit ton toujours commencer de bas en haut. Et de gauche vers la droite ou l’inverse Merci
28.02.2021 - 04:09Odpověď DROPS Design :
Bonjour Julie, le diagramme est lu de bas en haut. Sur l'endroit nous lisons le diagramme de droite à gauche, et sur l'envers dans le sens opposé (de gauche a droite). Bon tricot!
28.02.2021 - 22:15
![]() Heike Kopp napsala:
Heike Kopp napsala:
Guten Tag Ich habe eine Frage zu A7 - Rückreihe. Die Angabe im Diagramm "1M re in Rück-R, 1 M li in Hin-R" verwirrt mich etwas. Was für eine Masche muss ich als 1. in der Rückreihe stricken (nach den 3 Randmaschen) und als letztes (vor den 3 Randmaschen) Mit freundlichen Grüßen
30.10.2020 - 14:01Odpověď DROPS Design :
Liebe Frau Kopp, die 1. Masche in A.7 wird rechts bei den Hin- sowie den Rückreihen gestrickt =diese Masche wird kraus rechts gestrickt - Am Ende der Reihe enden Sie mit der 1. Masche in A.7 (damit das Muster symetrisch ist) = 1 Kraus rechts Masche vor den 3 letzten Maschen. Viel Spaß beim stricken!
30.10.2020 - 15:14
![]() Heike Kopp napsala:
Heike Kopp napsala:
Guten Morgen, Muss nach Muster A5 weiter so gestrickt werden: .... "bis zu den letzten 4 M, 1 M wie die 1. M im Diagramm (damit das Muster symmetrisch wird) und 3 M kraus re." Einen schönen Gruß
28.10.2020 - 08:28Odpověď DROPS Design :
Liebe Frau Kopp, stimmt ja, enden Sie die Hinreihen mit 1 M wie die 1. M im Diagram (und 3 M kraus re). Viel Spaß beim stricken!
28.10.2020 - 15:19
![]() Margaret napsala:
Margaret napsala:
The pattern I am after is 158-21 the hat that I’m having problems with I don’t understand it and my grandmother can’t read it as she can’t see clearly thank you again
29.06.2020 - 14:11Odpověď DROPS Design :
Dear Margaret, can you please explain us more? Which part don't you understand? ARe you working on the hat? on the scarf? Do not hesitate to write us more details so that we can help you :)
29.06.2020 - 15:01
![]() Margaret napsala:
Margaret napsala:
Pattern 158-21 can you please tell me how to do the 3rd row of the pattern please thank you sorry to be a burden but I’m writing this for my grandmother she doesn’t know how to read the pattern so I’m trying to help her
28.06.2020 - 06:44Odpověď DROPS Design :
Dear Margaret, which pattern are you talking about? One of the diagrams? Hat? Scarf? Please let us know more - and remember you will find here how to read knitting diagrams. Happy knitting!
29.06.2020 - 08:20
|
|||||||||||||||||||
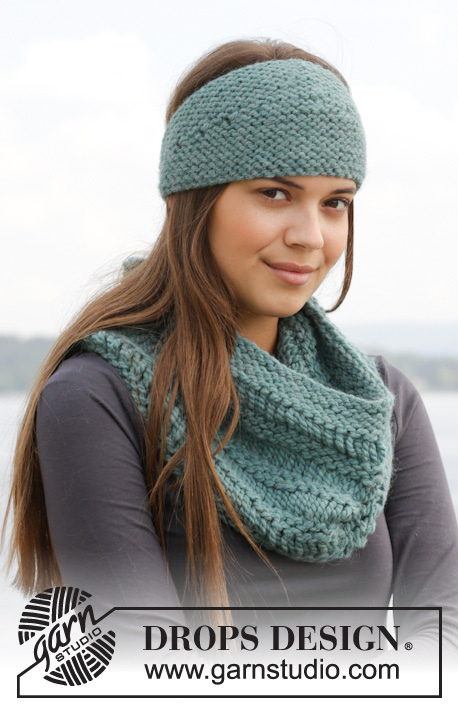
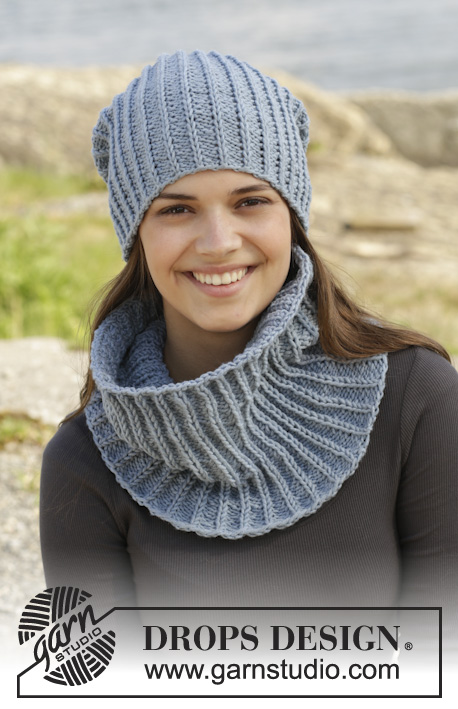
Lake District#lakedistrictset |
|||||||||||||||||||
|
|
|||||||||||||||||||
DROPS čepice a šála s krajkovým vzorem pletené z příze "Alpaca".
DROPS 158-21 |
|||||||||||||||||||
|
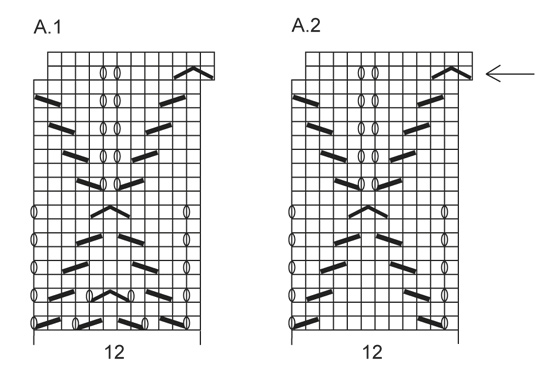
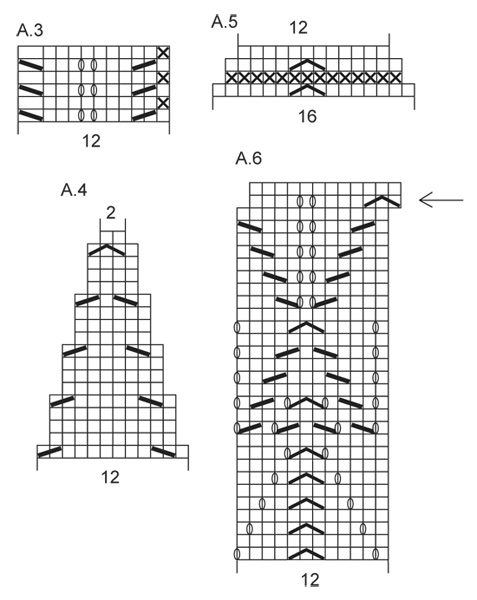
VROUBKOVÝ VZOR: Pleteme stále hladce, lícové i rubové řady. 1 vroubek = 2 řady hladce. VZOR – ČEPICE: Viz schémata A.1 až A.4. Zobrazeny jsou všechny řady/kruhové řady vzoru nahlížené z lícové strany. VZOR - ŠÁLA: Viz schémata A.5, A.6, A.2, A.7 a A.8. POZOR! Ve vzoru A.6 pleteme první symbol ve 29. řadě jako když poprvé splétáme 2 oka hladce, tj. na začátku řady; pleteme po poslední 2 oka, 1 oko sejmeme hladce, 1 upleteme hladce a sejmuté přes ně přetáhneme. Stejně tak postupujeme u stejného symbolu ve vzoru A.2 v 19. řadě – viz šipku ve schématu. Schémata zobrazují všechny řady vzoru nahlížené z lícové strany. ---------------------------------------------------------- ČEPICE: Pleteme v kruhových řadách na kruhové jehlici, ppř. ponožkových jehlicích. Na kruhovou jehlici č.3 nahodíme přízí Alpaca 120 ok a pleteme pružným vzorem: střídáme 1 oko hladce za zadní nit a 1 oko obrace. Ve výši 3 cm převedeme pleteninu na kruhovou jehlici č.3,5 a pleteme lícovým žerzejem, SOUČASNĚ přidáme v 1. kruhové řadě rovnoměrně 36 ok = 156 ok. Upleteme 1 celou sekvenci vzoru A.1 (na výšku). POZOR! Po dokončení celé sekvence je vzor posunutý o 1 oko doprava. Upleteme 1 celou sekvenci vzoru A.2 (na výšku) a pokračujeme vzorem A.3. Ve výši 20 cm pleteme a ujímáme dle vzoru A.4, ujímáme (ve shodě se schématem) 2 oka v každé 4. kruhové řadě. Po dokončení celé sekvence vzoru A.4 máme na jehlici 26 ok. V následující kruhové řadě splétáme každá 2 oka hladce = 13 ok. Přízi odstřihneme, protáhneme ji zbylými oky, stáhneme a zapošijeme. Čepice je vysoká asi 26 cm. ---------------------------------------------------- ŠÁLA: Pleteme v řadách na jehlici. Upleteme 2 stejné díly, které nakonec sešijeme (díky tomu bude vzor na obou koncích šály identický). Na jehlice č.3,5 nahodíme přízí Alpaca 87 ok (včetně 3 krajových ok vroubkovým vzorem na každé straně) a upleteme 1 rubovou řadu hladce. Následující lícovou řadu pleteme takto: 3 oka vroubkovým vzorem – viz výše, vzor A.5 – opakujeme až po poslední 4 oka, upleteme 1 oko stejně jako 1. oko vzoru a končíme 3 oky vroubkovým vzorem. V tomto rozvržení pokračujeme. Po dokončení 1 celé sekvence vzoru A.5 (na výšku) máme na jehlici 67 ok. Pak upleteme 1 celou sekvenci vzoru A.6 a vzoru A.2 (na výšku). Nyní pleteme vzor A.7 – když upleteme celkem 5 celých sekvencí vzoru A.7 (na výšku), upleteme 1 celou sekvenci vzoru A.8 (na výšku). Poté upleteme 2 vroubky a v následující lícové řadě všechna oka volně uzavřeme. Stejným způsobem upleteme i druhý díl. DOKONČENÍ: Oba díly sešijeme. |
|||||||||||||||||||
Vysvětlivky ke schématu |
|||||||||||||||||||
|
|||||||||||||||||||
|
|||||||||||||||||||
|
|||||||||||||||||||
|
|||||||||||||||||||
Dokončili jste tento model?Pak označte své fotky tagem #dropspattern #lakedistrictset nebo je pošlete do galerie #dropsfan. Potřebujete s tímto návodem poradit?Otevřete-li si návod na stránce garnstudio.com, najdete tam 19 výukových video-ukázek, Komentáře/Dotazy a další užitečné informace. © 1982-2025 DROPS Design A/S. Vyhrazujeme si veškerá práva. Tento dokument, včetně všech jeho dílčích částí, podléhá autorským právům. Podrobnější komentář k možnostem užití našich návodů najdete dole pod každým návodem na našich stránkách. |
|||||||||||||||||||


V oblasti pletené a háčkované módy působí DROPS Design více než 40 let. Díky tomu vám můžeme nabídnout jednu z nejrozsáhlejších kolekcí modelů s bezplatnými návody dostupnými na internetu - navíc v 17 jazycích. K dnešnímu dni máme na 314 katalogů a 11822 návodů celkem - z nich je už 7048 dostupných v [češtině].
Přidejte komentář k návodu DROPS 158-21
Rádi bychom věděli, co si o tomto modelu myslíte!
Pokud se chcete na něco zeptat, dbejte prosím na to, abyste ve formuláři níže vybrali správnou kategorii - díky tomu se dříve dozvíte, co potřebujete vědět. Povinná pole jsou označena *.