
Categorie popolari
State cercando un filato?


Commenti / Domande (25)
![]() Avril McKoy ha scritto:
Avril McKoy ha scritto:
Hello, I am a little confused when doing the raglan increase. For sleeves, each side of raglan meaning increasing by 4 stitches per sleeve each increase? And for body 4 stitches? In total per round of increase? Thanks ☺️
28.10.2023 - 15:19DROPS Design ha risposto:
Dear Avril, as explained in RAGLAN, you increase 1 stitch on each side of A.1. Even though A.1 is in the sleeves, the increases are divided into the parts as follows: Before the first A.1, the increase will go for the right side of the back, after the first A.1 and before the second A.1 the increases are for the right sleeve. After the second A.1 and before the 3rd A.1 the increases are for the front piece. After the 3rd A.1 and before the 4th A.1 the increases are for the left sleeve. After the 4th A.1, the last increase is for the back piece. So, when you increase for the sleeves or for the body you work the increases indicated above for the body or the sleeves. Happy knitting!
29.10.2023 - 20:33Barbara ha scritto:
Hello, Iam working this pattern with two strands air and my gauge is as requested. I have finished the raglan part on size XL after 38 rows, my problem is that it is 28cm instead of 33cm. Thank you
27.11.2018 - 23:38DROPS Design ha risposto:
Dear Barbara, for raglan sweater it is very important to have the proper gauge for not only the stitchcount, but also for the rows as well. If you knit to few rows the shoulder / yoke will be too short. You can compensate for this, if, at regular intrewalls insert a round without increases at the yoke. I hope this helps. Happy Knitting!
28.11.2018 - 03:45
![]() Anne Olsen ha scritto:
Anne Olsen ha scritto:
Jeg forstår ikke hvor ofte jeg skal øke. Hver 2. omg. 4 ganger (jeg skal strikke L), men bare 1. gang den 4. omg. og igjen 4. ganger på hver 6. omg. Skal jeg da etter hver bare øke hver 2. og 6. når jeg har økt den 4. omg. én gang?
20.03.2017 - 21:18DROPS Design ha risposto:
Hej Anne. Först öker du i hver 2. omg 4 ganger (paa bolen) og först naar du er faerdig gaar du videre med at öke i hver 4. omg (1 gang) og til sidst i hver 6. omg (4 ganger). Husk at samtidig öker du ogsaa paa ermerne de antal gange som din str siger.
21.03.2017 - 14:49
![]() Marianne ha scritto:
Marianne ha scritto:
Mijn vraag lijkt niet geplaatst te zijn, ik probeer het nog eens. In het gedeelte " lijf" moet een markeerder geplaatst worden in de averechte steek. Moet deze steek over het hele deel vanaf de oksel tot de onderkant averecht gebreid blijven worden? Zodat een soort averechte "naad" ontstaat? Of moet deze, nadat de markeerder is geplaatst, in het gerstekorrelpatroon worden meegebreid?
21.10.2016 - 13:27DROPS Design ha risposto:
Hoi. Jawel :) Zie mijn antwoord hieronder.
21.10.2016 - 15:05
![]() Marianne ha scritto:
Marianne ha scritto:
Ik begrijp dat ik een markeerder moet plaatsen bovenaan de zijkant, in de oksel, in een averechte steek. Maar moet ik die averechte steek blijven breien in de volgende toeren? Ofwel: ontstaat er een soort zijnaad met een averechte steek? Of wordt het in de volgende toeren gewoon meegenomen in de gerstekorrel?
21.10.2016 - 12:51DROPS Design ha risposto:
Hoi Marianne. Je breit deze st steeds av - je krijgt dan een "lijn" in de zijkanten. Je breit de st NIET in gerstekorrel
21.10.2016 - 15:04Shilpa ha scritto:
Thanks for your speedy reply! Just to clarify, when you say 'at the same time', doesn't that mean some of the increase rounds will have 12 increases? Or do the sleeve increases start after the all the body increases are complete? And, if there are 8/increase row as you've mentioned, doesn't that mean the stitch count for the sleeves is too low? Thanks!
23.06.2016 - 00:22DROPS Design ha risposto:
Dear Shilpa, all raglan inc are done when working yoke, but you will not inc on every inc round on all pieces, ie in larger size, you will inc on first round: 2 sts on each sleeve only (= every round = 4 sts inc), then on next round, you will inc 2 sts in all pieces (= every other round in body and every round in sleeve = 8 sts inc), repeat these 2 rounds a total of 3 times = you have inc 6 times every round on sleeves and 3 times every other round on body. ie you will inc sometimes only on sleeve (= + 4 sts inc on round), only on body (= + 4 sts inc on round) and on each pieces (= +8 sts inc on round). Happy knitting!
23.06.2016 - 08:55Shilpa ha scritto:
Hello! I'm knitting the XXXL with 10ply on 8.0mm and am confused by the increases. Increases are by 4 stitches only (NOT 8), the difference is where these increases go, correct? This creates 47st per sleeve (38 from sleeve increases and 9 from 2xA1 with k in between), but then the A1 section creates a straight stripe for a long portion, unlike the picture. I've been increasing 8/round, which seems to create more shoulder space, and matches the picture, but doesn't add up. Help, please!
22.06.2016 - 14:52DROPS Design ha risposto:
Dear Shilpa, you inc for raglan either 4 sts (when inc only in sleeve or only in body) or 8 sts (when inc both in body and sleeve), ie in larger size, you will inc 8 times every other round, 3 times every 4th round and 2 times every 6th round, and at the same time, you inc for sleeve 6 times every round, 9 times every other round and 4 times every round. Increase are made before A.1 (when inc at beg of piece) or after A.1 (when inc at the end of piece). Happy knitting!
22.06.2016 - 15:00
![]() Elisabeth ha scritto:
Elisabeth ha scritto:
Merci infiniment de votre patience et de vos conseils. Cette fois, j'ai compris ! Bonne journée.
11.05.2016 - 15:55
![]() Elisabeth ha scritto:
Elisabeth ha scritto:
Bonjour, Je tricote la taille XXL. Les manches se situeront autour de la maille endroit entre les deux A1, non ? Je me rapproche du cas désespéré :-)
11.05.2016 - 14:12DROPS Design ha risposto:
Bonjour Elisabeth, la m end tricotée au tout 1er tour, entre chaque A.1 correspond effectivement aux manches. En taille XXL, tricotez 5 fois: 1 tour avec 8 augm = 1 avant + 1 après chaque A.1 (= augm manches, dos et devant) et 1 tour avec 4 augm = 1 m après le A.1 de chaque manche + 1 m avant le A.1 de chaque manche) - Au 6ème tour, pas d'augm. Au 7ème tour, augmentez 8 m (= manches, dos et devant) et ainsi de suite. Bon tricot!
11.05.2016 - 15:49
![]() Elisabeth ha scritto:
Elisabeth ha scritto:
Bonjour, Une toute dernière question, svp : au premier tour, je commence par une augmentation avant le premier marqueur, si j'ai bien compris ? Merci encore de votre patience. Bien cordialement.
11.05.2016 - 10:27DROPS Design ha risposto:
Bonjour Elisabeth, les augmentations se font après le marqueur (le marqueur doit être et rester après A.1) et après le marqueur (le marqueur doit être et rester avant A.1) quand on augmente 2 m au total dans chaque pièce. Ainsi, vous augmentez 2 m entre chaque motif de A.1 (soit pour les manches, soit pour le dos/le devant) - notez bien les augmentations à faire pour votre taille, vous n'augmenterez pas pour chaque pièce à chaque fois. Indiquez moi la taille que vous réalisez pour plus de détail. Bon tricot!
11.05.2016 - 11:51
|
|||||||
Day After Day#dayafterdaysweater |
|||||||
|
|
|||||||
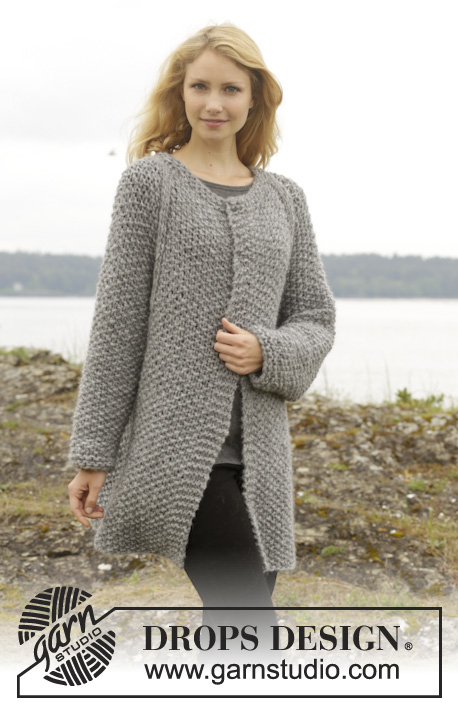
Maglione DROPS lavorato ai ferri a grana di riso e raglan, lavorato top down in "Cloud" o "Snow". Taglie: S - XXXL.
DROPS 157-27 |
|||||||
|
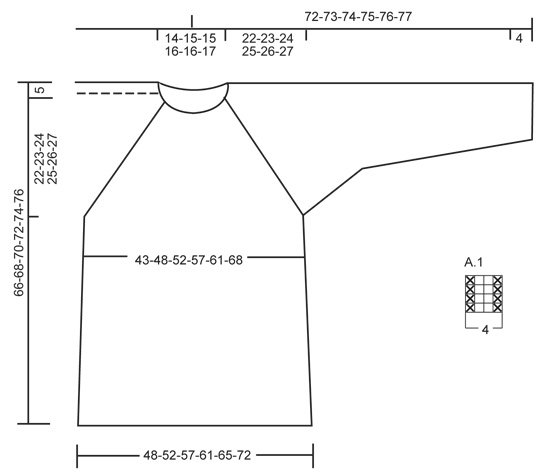
SUGGERIMENTO PER LE MISURAZIONI: A causa del peso del filato tutte le misurazioni devono essere fatte con l’indumento appeso altrimenti risulterà troppo lungo una volta indossato. M LEGACCIO (avanti e indietro sui f): Lavorare tutti i f a dir. 1 “costa” a m legaccio = 2 f dir. M LEGACCIO (in tondo sui f circolari): * 1 giro dir e 1 giro rov *, ripetere *-*. 1 “costa” a m legaccio = 2 giri. MOTIVO: Vedere il diagramma A.1. Il diagramma mostra tutti i f del motivo visti dal diritto del lavoro. GRANA DI RISO: 1° f/giro: * 1 m dir, 1 m rov *, ripetere *-*. 2° f/giro: dir su rov e rov su dir. Ripetere il 2° f/giro. RAGLAN: Aumentare per il raglan lavorando 1 gettato a ogni lato di A.1 in ogni raglan. Sul f successivo lavorare i gettati a ritorto (cioè lavorare nel filo dietro della m invece di quello davanti) per evitare buchi. NOTA: Lavorare le nuove m a grana di riso. SUGGERIMENTO PER GLI AUMENTI: Aumentare 1 m facendo 1 gettato. Sul giro successivo lavorare i gettati a ritorto (cioè lavorare nel filo dietro della m invece di quello davanti) per evitare buchi. NOTA: Lavorare le nuove m a grana di riso. SUGGERIMENTO PER LE DIMINUZIONI: Diminuire all’interno della m di vivagno a m legaccio a ogni lato. Diminuire come segue dopo la m di vivagno a m legaccio: 2 m insieme a dir. Diminuire come segue prima della m a m legaccio e 2 m a grana di riso: passare 1 m a dir senza lavorarla, 1 m dir, accavallare la m passata sopra quella appena lavorata, 1 m di vivagno a m legaccio. ---------------------------------------------------------- MAGLIONE: Lavorato top-down in tondo con i f circolari. Avviare 44-48-52-56-60-64 m con i f circolari n° 10 mm con Cloud o Snow. Lavorare 1 giro a m rasata e ALLO STESSO TEMPO distribuire 10 aumenti in modo uniforme = 54-58-62-66-70-74 m. Ora inserire 4 segnapunti nel lavoro, iniziare dalle m del raglan sul lato destro sul dietro: inserire un segnapunti, A.1 (= 4 m), 1 m dir, A.1 (= manica), inserire un segnapunti, 18-20-22-24-26-28 m a GRANA DI RISO – leggere la spiegazione sopra (= davanti), inserire un segnapunti, A.1, 1 m dir, A.1 (= manica), inserire un segnapunti, 18-20-22-24-26-28 m a grana di riso (= dietro). Continuare in questo modo e ALLO STESSO TEMPO sul giro successivo iniziare gli aumenti per il RAGLAN – leggere la spiegazione sopra! NOTA! Aumentare in modo diverso sul corpo e sulle maniche. FARE ATTENZIONE ALLA TENSIONE DEL LAVORO! CORPO DEL RAGLAN: Aumentare a giri alterni 2-3-4-5-6-8 volte, ogni 4 f 1-1-1-2-2-3 volte e ogni 6 f 4-4-4-3-3-2 volte. Ora ci sono 32-36-40-44-48-54 m sia sul dietro che sul davanti. MANICA A RAGLAN: Aumentare su ogni gir 3-4-4-5-5-6 volte, a giri alterni 7-7-8-8-9-9 volte e ogni 4 giri 4 volte per tutte le taglie. Ci sono 37-39-41-43-45-47 m per ogni manica. Alla fine di tutti gli aumenti ci sono 138-150-162-174-186-202 m sul giro. Il lavoro misura 27-28-29-30-31-32 cm – leggere il SUGGERIMENTO PER LE MISURAZIONI. Ora trasferire le prima 37-39-41-43-45-47 m su un fermamaglie per la manica, avviare 7 nuove m sotto la manica, lavorare le 32-36-40-44-48-54 m successive (= davanti), trasferire le 37-39-41-43-45-47 m successive su un fermamaglie per la manica, avviare 7 nuove m sotto la manica, lavorare le 32-36-40-44-48-54 m rimaste (= dietro). CORPO: Ora ci sono 78-86-94-102-110-122 m per il corpo. Continuare a grana di riso sulle 3 m successive, 1 m rov (= lato), inserire un segnapunti in questa m, grana di riso sulle 38-42-46-50-54-60 m successive, 1 m rov (= lato), inserire un segnapunti in questa m, grana di riso sulle 38-42-46-50-54-60 m rimaste sul giro. ORA MISURARE IL LAVORO DA QUI. Quando il lavoro misura 7 cm, aumentare 1 m a ogni lato delle m rov con i segnapunti a ogni lato – LEGGERE IL SUGGERIMENTO PER GLI AUMENTI. Ripetere gli aumenti quando il lavoro misura 22-23-24-25-26-27 cm = 86-94-102-110-118-130 m. Continuare a lavorare fino a quando il lavoro misura 66-68-70-72-74-76 cm in totale – ricordarsi del SUGGERIMENTO PER LE MISURAZIONI. Intrecciare con dir su dir e rov su rov. MANICA: La manica è lavorata avanti e indietro sui f circolari. Riportare le 37-39-41-43-45-47 m dal fermamaglie sui f di lavoro n° 10 mm. Ora continuare a grana di riso su tutte le m. Avviare 4 m alla fine dei 2 f successivi = 45-47-49-51-53-55 m. NOTA: Lavorare le nuove m a grana di riso con 1 m di vivagno a m legaccio a ogni lato. Sul f successivo diminuire 1 m a ogni lato del lavoro – leggere il SUGGERIMENTO PER LE DIMINUZIONI! Ripetere le diminuzioni su ogni f dal diritto del lavoro altre 4 volte = 35-37-39-41-43-45 m. Poi diminuire ogni 4½-3½-3½-3-3-3 cm altre 6-7-7-8-9-9 volte = 23-23-25-25-25-27 m. Quando le maniche misurano 39-38-38-38-38-37 cm dalle nuove m avviate sotto le maniche – ricordarsi del SUGGERIMENTO PER LE MISURAZIONI – passare ai f circolari n° 9 mm. Lavorare 2 “coste” a M LEGACCIO – leggere la spiegazione sopra. Intrecciare. Lavorare l’altra manica nello stesso modo. CONFEZIONE: Cucire i margini sotto le braccia all’interno della m di vivagno a m legaccio. Cucire le aperture sotto le maniche. Tagliare il filo e affrancarlo. BORDO DEL COLLO: Riprendere 44-48-52-56-60-64 m (= 1 m in ogni m del bordo di avvio) attorno al collo con i f circolari n° 9 mm con Cloud o Snow. Lavorare 1 “costa”, ALLO STESSO TEMPO aggiustare il n° di m a 48-50-50-52-52-54. Lavorare 2 “coste”. Intrecciare. |
|||||||
Spiegazioni del diagramma |
|||||||
|
|||||||
 |
|||||||
Avete terminato questo modello?Allora taggate le vostre foto con #dropspattern #dayafterdaysweater o inviatele alla #dropsfan gallery. Avete bisogno di aiuto con questo modello?Troverete 25 video tutorial, una sezione per i commenti/domande e molto altro guardando il modello su www.garnstudio.com © 1982-2026 DROPS Design A/S. Ci riserviamo tutti i diritti. Questo documento, compreso tutte le sue sotto-sezioni, è protetto dalle leggi sul copyright. Potete leggere quello che potete fare con i nostri modelli alla fine di ogni modello sul nostro sito. |
|||||||


Con oltre 40 anni di esperienza nel design di modelli di maglia e uncinetto, DROPS Design offre la più estesa collezione di modelli gratuiti su internet - tradotti in 17 lingue. Ad oggi vi possiamo fornire 324 cataloghi e 12290 modelli - 9561 dei quali sono tradotti in Italiano.
Ci stiamo impegnando molto per darvi il meglio che vi possiamo offrire in termini di maglia e uncinetto, ispirazioni e consigli così come filati di grande qualità ad un prezzo incredibile! Volete utilizzare i nostri modelli per qualcosa d'altro oltre al vostro uso personale? Potete leggere tutto ciò che è consentito nel testo sul Copyright in basso su tutte le pagine dei nostri modelli. Buon lavoro!
Lasciare un commento sul modello DROPS 157-27
Noi saremmo felici di ricevere i tuoi commenti e opinioni su questo modello!
Se vuoi fare una domanda, fai per favore attenzione a selezionare la categoria corretta nella casella qui sotto per velocizzare il processo di risposta. I campi richiesti sono indicati da *.