
Categorie popolari
State cercando un filato?


Commenti / Domande (273)
![]() Celeste Allain ha scritto:
Celeste Allain ha scritto:
I'm sorry. I know this question has been asked before but I just don't understand. When the directions say to work rib as follows: for size M, work until 11 sts. remain before side marker, P2, K2, P4 is only 8 sts. How do I possibly make this work? Thank you.
17.03.2024 - 16:45DROPS Design ha risposto:
Dear Mrs Allain, after you have worked these 8 sts just repeat from *to* as before, that's okay that there are not 11 sts as the "missing" 3 sts are the first 3 sts from the repeat from *to*. Happy knitting!
18.03.2024 - 09:25
![]() Diane Rawlings ha scritto:
Diane Rawlings ha scritto:
As Linda below, I am struggling with following the pattern increase instructions. All great up to this point. Thank you. Diane
03.03.2024 - 14:59DROPS Design ha risposto:
Dear Diane, which increases are you referring to? There are many different increases: raglan increases, increases towards the sides, rib increases, sleeve increases. Could you please indicate the specific section you are struggling with? Happy knitting!
03.03.2024 - 23:37
![]() Marie ha scritto:
Marie ha scritto:
Bonjour merci de vos modeles super beau mais j 'ai un petit probleme je n aimes pas du tout tricoter de bas en haut et le modele 156-19 nr peut il se tricoter de bas en haut merci de ce que vous ppurrez me dire pour realiser ce modele
17.02.2024 - 19:29DROPS Design ha risposto:
Bonjour Marie, vous pouvez probablement adapter les explications pour le tricoter de bas en haut, mais il paraît plus simple de tricoter comme indiqué; retrouvez sinon tous nos pulls tricotés de bas en haut avec torsades ici, n'hésitez pas à ajouter des filtres si besoin. Bon tricot!
19.02.2024 - 09:12
![]() Celeste Allain ha scritto:
Celeste Allain ha scritto:
This is by far the most confusing pattern I have ever seen. I have another question, please. When I'm decreasing and increasing at the same time after putting sleeves stitches on holders, I'm confused. I've figured out where to decrease, both decreases. I don't know where to increase. At the last cable near the sleeves on front and back, do I increase on the side front and back or under the armhole where I originally added the 12 stitches? Thank you.
05.02.2024 - 04:32DROPS Design ha risposto:
Dear Mrs Allain, you will increase the number of stitches in the Purl sections after the cable on previous raglan at the end of left front piece, before the cable on previous raglan at the beg of back piece, after the cable on previous raglan at the end of back piece and before the cable on previous raglan at the beg of right front piece = 2 sts are increased on each side, 4 sts in total. Happy knitting!
05.02.2024 - 15:43
![]() Celeste Allain ha scritto:
Celeste Allain ha scritto:
Please ignore my last question. I found a few lines of the directions that didn't print out for some reason. Thanks!
02.02.2024 - 01:13
![]() Celeste Allain ha scritto:
Celeste Allain ha scritto:
Near the end of the body, when I have 324 sts. for size M , the directions say to put a marker and to measure the piece from there. But then there is only one more row of ribbing in the directions. Do I do more than one row and when do I bind off??? Thank you.
02.02.2024 - 00:43DROPS Design ha risposto:
Hi Celeste, You measure the ribbing from this last marker - first 2 cm of rib, then increase 1 stitch before each purled section, then work until the ribbing measures a total of 5 cm in size M before binding off. Happy knitting!
02.02.2024 - 08:01
![]() Celeste Allain ha scritto:
Celeste Allain ha scritto:
I\'m making size M. Once I have 388 sts. the directions say to increase 4 more times on sleeve and inside A.1 and A.2. That would be 8 sts. every row. Two questions: will this be done every row or every other row as before? Then I have too many stitches to have the rest of the directions be accurate for the M size. Should I only do this 3 times instead of 4? Thank you.
24.01.2024 - 17:07DROPS Design ha risposto:
Dear Mrs Allain, these sections explain how to work the new stitches increased for raglan, this means when all increases are done, you have 388 sts on needle and piece measures 28 cm from shoulder down, now divide piece as explained just afterwards. Happy knitting!
25.01.2024 - 08:34
![]() Celeste Allain ha scritto:
Celeste Allain ha scritto:
I'm currently increasing for raglan. until I have 388 sts. But where it says PATTERN: P the inc sts. on sleeves. Then it says work the first 6 sts. inc in A.2, P 9 sts, next 6 inc. sts. in A.2, P 9 sts. Where are those sts if I'm supposed to be purling the inc. sts?
06.01.2024 - 16:53DROPS Design ha risposto:
Dear Mrs Allain, the new stitches increased on sleeves are always purled, but the new stitches for raglan on front and back piece will be worked in pattern: first work the first 6 increases as shown in A.2, then purl the next 8 increaes, then work the next 6 increases as in A.2, and purl the next 9 increases. Happy knitting!
08.01.2024 - 10:18
![]() Celeste Allain ha scritto:
Celeste Allain ha scritto:
For DECREASE TIP (sleeves) it says work until 3 stitches remain before marker, P 2 tog, P2, P 2 tog. That requires 6 stitches. I'm confused yet again by your instructions. Please advise? Thank you.
03.01.2024 - 20:04DROPS Design ha risposto:
Hi Celeste, The marker sits in the middle of the 2 purled stitches and you purl 2 together on each side of these 2 purled stitches and marker (which covers 6 stitches). Happy knitting!
04.01.2024 - 07:46
![]() Celeste Allain ha scritto:
Celeste Allain ha scritto:
When reading instructions for increasing for raglan, it says to K the YOs twisted. Then to P the new stitches on sleeves. But when reading instructions where it says INCREASE TIP, it says to P YOs twisted then to P the new stitches. I'm confused as to whether to K or P?
03.01.2024 - 19:23DROPS Design ha risposto:
Dar Mrs Allain, the yarn overs will be knitted twisted on next round then work either purl or knit depending on the pattern, but you can choose to work them purl twisted from the beg if you like to. Happy knitting!
04.01.2024 - 08:12
|
||||||||||||||||||||||||||||
Alana#alanasweater |
||||||||||||||||||||||||||||
 |
 |
|||||||||||||||||||||||||||
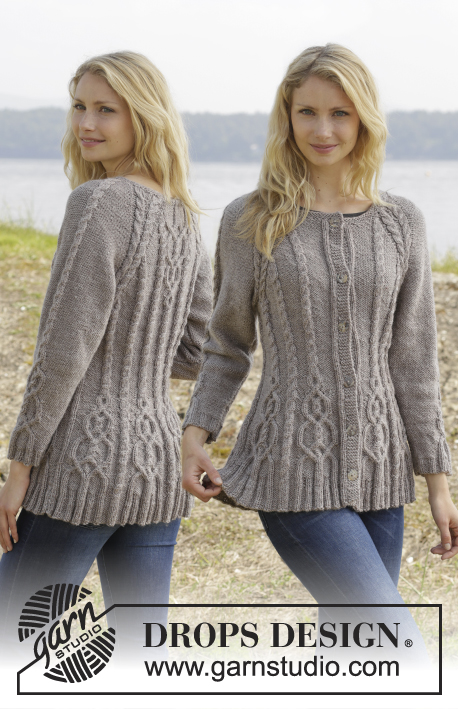
Maglione DROPS lavorato ai ferri con trecce e raglan in ”Karisma”, lavorato top down. Taglie: S-XXL.
DROPS 156-19 |
||||||||||||||||||||||||||||
|
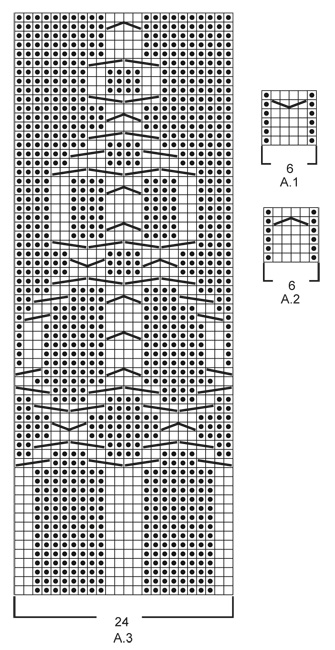
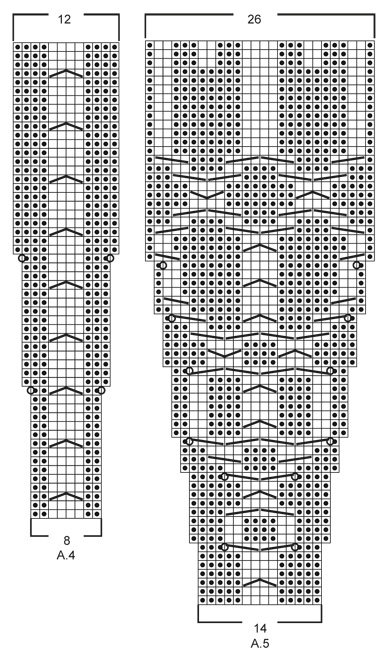
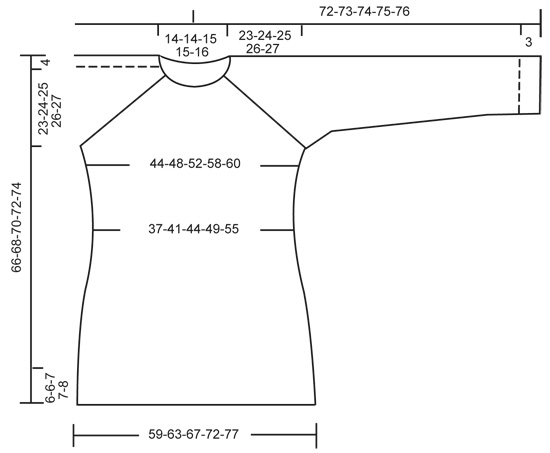
M LEGACCIO (in tondo con i f circolari): * 1 giro dir e 1 giro rov *, ripetere *-*. 1 “costa” a m legaccio = 2 giri. M LEGACCIO (avanti e indietro sui f): Lavorare tutti i f a dir. 1 “costa” a m legaccio = 2 f dir. MOTIVO: Vedere i diagrammi A.1 - A.5. I diagrammi mostrano tutti i f del motivo visti dal diritto del lavoro. RAGLAN: Aumentare a ogni lato delle m del raglan (A.1/A.2, segnapunti, A.2/A.1) facendo 1 gettato = 8 aumenti sul giro. Sul giro successivo lavorare i gettati a dir ritorto per evitare buchi. Poi lavorare a rov le nuove m sulle maniche, e sul davanti e dietro lavorare le nuove m con il motivo come spiegato sotto. SUGGERIMENTO PER LE DIMINUZIONI (applicato alle maniche): Diminuire a ogni lato del segnapunti come segue: lavorare fino a quando rimangono 3 m prima del segnapunti, 2 m insieme a rov, 2 m rov, 2 m insieme a rov = 2 diminuzioni. SUGGERIMENTO PER GLI AUMENTI: Aumentare 1 m facendo 1 gettato. Sul giro successivo lavorare i gettati a rov ritorto, cioè lavorare nel filo dietro della m per evitare buchi. Lavorare a rov le nuove m. ---------------------------------------------------------- MAGLIONE: Lavorato top down in tondo con i f circolari. Lavorare la manica in tondo con i f circolari/a doppia punta. SPRONE: Avviare 92-92-97-97-101 m con i f circolari n° 4 mm con Karisma. Lavorare 3 “coste” a M LEGACCIO in tondo con i f circolari – leggere la spiegazione sopra. Continuare a lavorare un’alzata a M LEGACCIO avanti e indietro – leggere la spiegazione sopra, dal centro dietro come segue (1° f = diritto del lavoro): ora lavorare 5-5-7-7-9 m, girare, lavorare 10-10-14-14-18 m, girare, lavorare 15-15-19-19-23 m, girare, lavorare 20-20-24-24-28 m, girare, lavorare 25-25-29-29-33 m, girare, lavorare 30-30-34-34-38 m, girare, lavorare 35-35-39-39-43 m, girare, lavorare 40-40-43-43-48 m, girare, tornare indietro fino all’inizio del giro. Ora lavorare 1 giro dir e ALLO STESSO TEMPO distribuire 24-24-23-23-27 aumenti in modo uniforme = 116-116-120-120-128 m. Lavorare 18-18-19-19-21 m rov, inserire qui il 1° segnapunti (= ora questo è l’inizio del giro), A.2, 2 m rov, A.2, 2 m rov, A.1, inserire qui il 2° segnapunti, A.2, 0-0-1-1-3 m rov, A.3, 0-0-1-1-3 m rov, A.1, inserire qui il 3° segnapunti, A.2, 2 m rov, A.2, 2 m rov, A.1, inserire qui il 4° segnapunti, A.2, 0-0-1-1-3 m rov, A.3, 0-0-1-1-3 m rov, A.1. LEGGERE LE 2 SEZIONI SUCCESSIVE PRIMA DI CONTINUARE! FARE ATTENZIONE ALLA TENSIONE DEL LAVORO! Sul giro successivo iniziare ad aumentare per il RAGLAN – leggere la spiegazione sopra, ALLO STESSO TEMPO lavorare il motivo come segue: RAGLAN: Ripetere gli aumenti su ogni giro 0-2-10-20-20 volte in totale. Poi aumentare a giri alterni 23-32-30-26-27 volte e poi ogni 3 giri 6-0-0-0-0 volte = 348-388-440-488-504 m. MOTIVO: Lavorare il motivo sul corpo come segue (lavorare a rov gli aumenti sulle maniche): lavorare le prime 6 m aumentate in A.2, poi lavorare a rov le 8-9-7-8-8 m aumentate successive, lavorare le successive 6 m aumentate in A.2, lavorare a rov le 8-9-7-8-8 aumentate successive. NOTA: (Per le taglie M-L-XL-XXL): Dopo aver lavorato A.3 1 volta in verticale, proseguire con A.2 sulla treccia e lavorare a rovescio le restanti m di A.3 fino all'inizio del corpo. S/M: Poi aumentare come prima sulla manica e aumentare all’interno di A.1/A.2 (cioè tra A.1 e A.2, verso il segnapunti per il raglan) sul davanti e dietro altre 1-4 volte. Lavorare a rov le nuove m. L/XL/XXL: Continuare con A.2 sulle 6 m aumentate successive, lavorare a rov le successive 7-8-8 m aumentate, poi aumentare come prima sulla manica e aumentare all’interno di A.1/A.2 (cioè tra A.1 e A.2, verso il segnapunti per il) sul davanti e dietro altre 1-4 volte. Lavorare a rov le ultime 1-4-5 m aumentate. Il lavoro ora misura 27-28-29-30-31 cm dalla spalla. Ora lavorare come segue: trasferire le prime 80-90-102-114-116 m su un fermamaglie per la manica, avviare 12 nuove m sotto la manica, inserire un segnapunti blu al centro di queste nuove m, lavorare le 94-104-118-130-136 m successive (= davanti), trasferire le 80-90-102-114-116 m successive su un fermamaglie per la manica, avviare 12 nuove m sotto la manica, inserire un segnapunti blu al centro di queste nuove m, lavorare le 94-104-118-130-136 m rimaste sul giro (= dietro). ORA MISURARE IL LAVORO DA QUI. CORPO: Ora ci sono 212-232-260-284-296 m per il corpo. Poi continuare il motivo come segue: S/M: 6-3 m rov, * A.2 0-1 volte in larghezza, 7-7 m rov, A.2, 8-9 m rov, inserire un segnapunti, A.2, 8-9 m rov, inserire un segnapunti, A.2, 9-9 m rov, A.2, 9-9 m rov, A.2, inserire un segnapunti, 8-9 m rov, A.2, inserire un segnapunti, 8-9 m rov, A.1 *, 7-7 m rov, ripetere *-* un’altra volte, 1-4 m rov. L/XL/XXL: 3-3-0 m rov, * A.2 1-1-2 volte in larghezza, 4-6-5 m rov, A.2, 7-8-8 m rov, inserire un segnapunti, A.2, 7-8-8 m rov, inserire un segnapunti, A.2, 7-8-8 m rov, inserire un segnapunti, A.2, 10-11-12 m rov, A.2, 10-11-12, A.2 m rov, inserire un segnapunti, 7-8-8 m rov, A.2, inserire un segnapunti, 7-8-8 m rov, A.2, inserire un segnapunti, 7-8-8 m rov, A.1 *, 4-6-5 m rov, ripetere *-* un’altra volta, 1-3-5 m rov. LEGGERE LE 2 SEZIONI SUCCESSIVE PRIMA DI CONTINUARE! Ora diminuire e aumentare allo stesso tempo come segue: DIMINUZIONI: Diminuire in modo diverso come segue – LEGGERE IL SUGGERIMENTO PER LE DIMINUZIONI: Diminuire 1 m a ogni lato della treccia centrale sul davanti e sul dietro. Ripetere le diminuzioni ogni 2-2-1½-1½-1½ cm altre 3-3-4-4-6 volte. ALLO STESSO TEMPO diminuire 1 m verso la treccia in ogni sezioni con m a rov con il segnapunti (= 8-8-12-12-12 segnapunti). Ripetere le diminuzioni ogni 3-2½-5-4-4 cm altre 2-3-1-2-2 volte. AUMENTI (verso i lati): Quando il lavoro misura 3 cm, aumentare lungo la treccia verso la manica (cioè la treccia dal raglan) nelle sezioni a rov verso i lati – LEGGERE IL SUGGERIMENTO PER GLI AUMENTI! Aumentare 4 m sul giro. Ripetere gli aumenti ogni 1½-1½-2½-1½-1 cm altre 3-4-2-4-10 volte. Alla fine di tutte le diminuzioni e aumenti, rimangono 188-204-228-248-276 m. Quando il lavoro misura 11-12-12-13-14 cm, lavorare il motivo come segue: 6-3-6-6-0 m rov, A.2 0-1-1-1-2 volte in larghezza, 7-8-6-11-15 m rov, A.4 0-0-1-1-1 volte in larghezza, * A.5, A.4 *, ripetere *-* altre 2-2-3-3-3 volte in larghezza, A.5 1-1-0-0-0 volte in larghezza, 7-8-6-11-15 m rov, A.2 0-1-1-1-2 volte in larghezza, 7-8-6-11-15 m rov, A.4 0-0-1-1-1 volte in larghezza, * A.5, A.4 *, ripetere *-* altre 2-2-3-3-3 volte in larghezza, A.5 1-1-0-0-0 volte in larghezza, 1-5-0-5-15 m rov. NOTA: Aggiustare la 1° treccia in A.4 e A.5 per ottenere un bel passaggio tra i diagrammi. Continuare con il motivo e gli aumenti secondo il diagramma. Quando A.4 e A.5 sono stati lavorati in verticale e il lavoro misura circa 33-34-34-35-35 cm, ci sono 308-324-364-384-412 m sul f. Inserire un segnapunti qui. ORA MISURARE IL LAVORO DA QUI. Ora lavorare a coste come segue: S/M: * lavorare dir su dir e rov su rov fino a quando rimangono 7-11 m prima del segnapunti blu a lato, 2 m rov, 2 m dir, 3-4 m rov *, ripetere *-* un’altra volta e continuare con dir su dir e rov su rov per il resto del giro. L/XL/XXL: * lavorare dir su dir e rov su rov fino a quando rimangono 8-14-21 m prima del segnapunti blu a lato, 2-2-2 m dir, 3-4-3 m rov, 0-2-2 m dir, 0-3-3 m rov, 0-0-2 m dir, 0-0-3 m rov *, ripetere *-* un’altra volta e continuare con dir su dir e rov su rov per il resto del giro. Quando le coste sono state lavorate per 2 cm dal segnapunti, aumentare facendo 1 gettato prima della 1° m rov nella sezione a rov – ricordarsi del SUGGERIMENTO PER GLI AUMENTI. Quando le coste sono state lavorate per 5-5-6-6-6 cm, intrecciare con dir su dir e rov su rov. MANICHE: Riportare le 80-90-102-114-116 m dal fermamaglie sui f circolari. Lavorare 1 f dir su tutte le m e avviare 12 nuove m alla fine del f = 92-102-114-126-128 m. Inserire un segnapunti al centro delle nuove m (cioè 6 m a ogni lato del segnapunti). ORA MISURARE IL LAVORO DA QUI. Poi lavorare la manica in tondo con i f circolari/doppia punta. Continuare la treccia centrale sulla manica come prima ma lavorare a rov sulle trecce nel raglan. Sul 2° giro iniziare a diminuire a ogni lato del segnapunti – LEGGERE IL SUGGERIMENTO PER LE DIMINUZIONI. Ripetere le diminuzioni a giri alterni altre 6 volte = 78-88-100-112-114 m. Poi diminuire 1 m a ogni lato del segnapunti ogni 2-1½-1-1-1 cm 13-17-22-27-27 volte = 52-54-56-58-60 m. ALLO STESSO TEMPO quando il lavoro misura 15 cm, lavorare A.5 sulla treccia al centro della manica – aggiustare la 1° treccia in A.5 per ottenere un bel passaggio tra i diagrammi. NOTA: non aumentare in A.5 sulla manica, cioè non lavorare I gettati nel diagramma. Alla fine di A.5 e quando la manica misura 37 cm, lavorare a coste come segue dal segnapunti all’inizio del giro: 0-0-1-2-3 m rov, 1-2-2-2-2 m dir, 3 m rov, 2 m dir, 3 m rov, 2 m dir, 2 m rov, continuare a coste come sull’ultimo f in A.5 (= 26 m), 2 m rov, 2 m dir, 3 m rov, 2 m dir, 3 m rov, 1-2-2-2-2 m dir, 0-0-1-2-3 m rov. Continuare in questo modo per 3 cm, intrecciare con dir su dir e rov su rov. CONFEZIONE: Cucire i buchi sotto le maniche. |
||||||||||||||||||||||||||||
Spiegazioni del diagramma |
||||||||||||||||||||||||||||
|
||||||||||||||||||||||||||||
 |
||||||||||||||||||||||||||||
 |
||||||||||||||||||||||||||||
 |
||||||||||||||||||||||||||||
Avete terminato questo modello?Allora taggate le vostre foto con #dropspattern #alanasweater o inviatele alla #dropsfan gallery. Avete bisogno di aiuto con questo modello?Troverete 24 video tutorial, una sezione per i commenti/domande e molto altro guardando il modello su www.garnstudio.com © 1982-2026 DROPS Design A/S. Ci riserviamo tutti i diritti. Questo documento, compreso tutte le sue sotto-sezioni, è protetto dalle leggi sul copyright. Potete leggere quello che potete fare con i nostri modelli alla fine di ogni modello sul nostro sito. |
||||||||||||||||||||||||||||


Con oltre 40 anni di esperienza nel design di modelli di maglia e uncinetto, DROPS Design offre la più estesa collezione di modelli gratuiti su internet - tradotti in 17 lingue. Ad oggi vi possiamo fornire 324 cataloghi e 12239 modelli - 9509 dei quali sono tradotti in Italiano.
Ci stiamo impegnando molto per darvi il meglio che vi possiamo offrire in termini di maglia e uncinetto, ispirazioni e consigli così come filati di grande qualità ad un prezzo incredibile! Volete utilizzare i nostri modelli per qualcosa d'altro oltre al vostro uso personale? Potete leggere tutto ciò che è consentito nel testo sul Copyright in basso su tutte le pagine dei nostri modelli. Buon lavoro!
Lasciare un commento sul modello DROPS 156-19
Noi saremmo felici di ricevere i tuoi commenti e opinioni su questo modello!
Se vuoi fare una domanda, fai per favore attenzione a selezionare la categoria corretta nella casella qui sotto per velocizzare il processo di risposta. I campi richiesti sono indicati da *.