
Categorie popolari
State cercando un filato?


Commenti / Domande (39)
Magda ha scritto:
Thank You!
03.07.2015 - 17:47Magda ha scritto:
Magda 03.07.2015 kl. 10:42: Yes, but You are counting sts after doing row 3. Before, You have 301 sts on needles and You increase 4 sts, so You should have 305 sts after row 3. 297 sts after a3-a8. Inc 4 on first row a9-a11= 301 sts. Inc 4 sts on row 3 = 305. But You have counted 303 sts after row3. It's 2 sts to much on needles before row3 to perform rest of the diagrams correctly.
03.07.2015 - 11:54DROPS Design ha risposto:
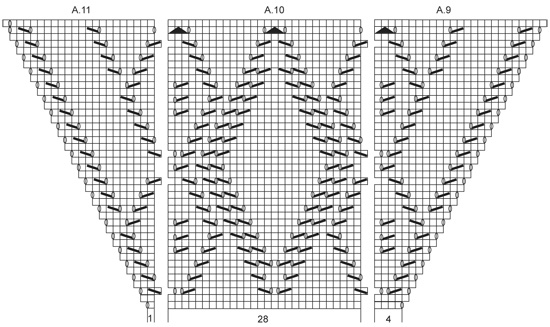
Dear Magda, to get the pattern right, please dec 1 st in last row in A.5 + A.6 (1 st each side of mid st - see new diagram) = 295 sts at the end of this part. Then work A.9 (= 4 sts), A.10 (= 28 sts) x 5 times and A.11 (= 1 st - instead of 2 sts) = 381 sts when diagrams have been worked 1 time in height (see new diagram A.11). Happy knitting!
03.07.2015 - 14:43Magda ha scritto:
Yes, but You are counting sts after doing row 3. Before, You have 301 sts on needles and You increase 4 sts, so You should have 305 sts after row 3. 297 sts after a3-a8. Inc 4 on first row a9-a11= 301 sts. Inc 4 sts on row 3 = 305. But You have counted 303 sts after row3. It's 2 sts to much on needles before row3 to perform rest of the diagrams correctly.
03.07.2015 - 10:42Magda ha scritto:
Sorry, but I don't understand how You counted, on row 3, 5 sts + 1 inc in A9 and 2sts+ 1inc inA11. In A9 there are only 4 sts plus 3 YO (YO, K1, K2tog, YO,K1, YO,) and in A11 there are 3sts plus 1inc (slip1sts as if to K, K1,psso, YO). The Effect: after the last YO in A11 there is one st left before mid st.
02.07.2015 - 21:20DROPS Design ha risposto:
Dear Magda, on row 3 in A.9 you work: (YO (= inc), K1, K2 tog, YO, K1, YO = 5 sts + 1 inc), in A.11 on same row you have: slip 1 as if to K, K1, psso, K1, YO (= inc) = 2 sts + 1 inc = 3 sts. you should always have 28 sts in A.10. Happy knitting!
03.07.2015 - 09:32Magda ha scritto:
So On the second row (WS) we have 301 sts (280+ 10 stsA9 + 6 stsA11 + 5 garter). And now the problem begins..on 3rd row we have only 299 sts to be done in diagrams ( 280sts + only 8 sts A9 + 6 sts A11 + 5 sts garter and 4 sts increased) ...And 301 sts on needles after 2nd row. Can You see the problem now?
02.07.2015 - 11:07DROPS Design ha risposto:
On row 3 you work: 2 edge sts, then [(A.9=5 sts + 1 inc), (A.10 x 5), (A.11 = 2 sts + 1 st)], 1 mid st, repeat from [to], 2 edge sts, ie : 2 + (6+140+3) + 1 + (6+140+3) + 2 =303 sts. Happy knitting!
02.07.2015 - 15:08Magda ha scritto:
After diagrams A3-A8 we've got 297 sts. 1st row of A9-A11 have the same number of sts to be done (280sts of A10 + 4sts two times of A9 + 2sts two times A11 + 5 sts in garter) and 4 Sts increased by YO at the beg, mid and end.
02.07.2015 - 11:06DROPS Design ha risposto:
Dear Magda, after 1st row in A.9, A.10, A.11, you have 301 sts: row 2 edge sts, [(A.9 = 4 sts + 1 inc), (A.10 = 28 sts x 5), (A.11 = 2 sts + 1 st inc)], 1 mid st, repeat [to] and 2 edge sts. (see next row under other question).
02.07.2015 - 15:06Magda ha scritto:
Thank You for the answear...but there are 2 sts more to stitch than in the row 3of the diagrams. K2 tog at the beg of A11 compensates YO at the end of A10...
02.07.2015 - 09:12DROPS Design ha risposto:
Dear Magda, that's correct, on row 4 you have 6 sts in A.9, 28 sts in each A.10 and 3 sts in A.11. Happy knitting!
02.07.2015 - 10:24Magda ha scritto:
I think there's a mistake in diagrams A9,A10,A11, specifically in third row (RS)...after adding 4 sts in first row there are 301 sts but in diagrams there are only 299 to be done. Am I wrong?
30.06.2015 - 14:12DROPS Design ha risposto:
Dear Magda, on 3rd row in A.9, A.10, A.11, there is a YO at the end of A.9, then K2 tog at the beg of A.10 and K2 tog at the beg of A.11, ie you should in 4 sts on this row as before, all other dec are compensated by 1 yo. Happy knitting!
30.06.2015 - 16:15
![]() Bucaille Claudine ha scritto:
Bucaille Claudine ha scritto:
Pouvez-vous me donner votre adresse Email que je puisse vous envoyer une photo des jours en question. Merci, en réponse ou par mail
01.06.2015 - 22:23DROPS Design ha risposto:
Bonjour Mme Bucaille, vous pouvez volontiers l'envoyer par mail à france@garnstudio.com - merci. Bon tricot!
02.06.2015 - 08:34
![]() Bucaille Claudine ha scritto:
Bucaille Claudine ha scritto:
Je ne peux pas vous donner de plus amples explications concernant la laine d'une autre couleur à passer dans les jours; j'ai vu cette option lorsque j'ai imprimer les explications du châle !!! je veux dire qu'il y avait cette page avec une laine passée dans les jours qui s'est trouvée imprimée en même temps que les explications. Ce n'est pas grave si vous ne pouvez pas y répondre
01.06.2015 - 22:11
|
||||||||||||||||||||||||||||
Provence#provenceshawl |
||||||||||||||||||||||||||||
|
|
||||||||||||||||||||||||||||
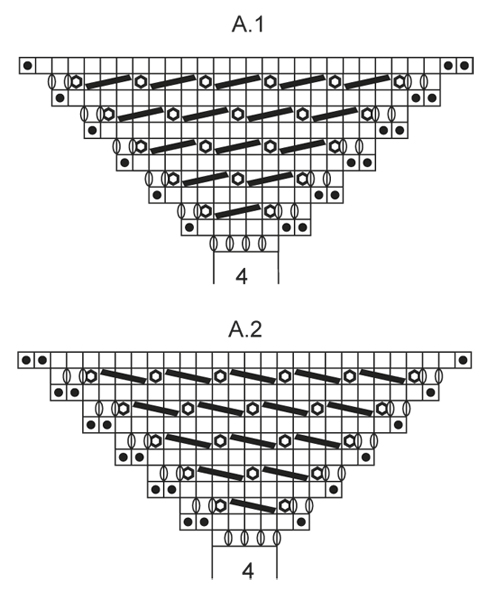
Scialle DROPS lavorato ai ferri a maglia legaccio con motivo traforato e a stella in "BabyAlpaca Silk".
DROPS 158-19 |
||||||||||||||||||||||||||||
|
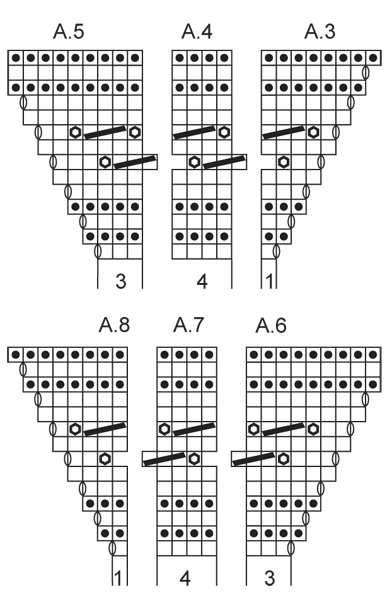
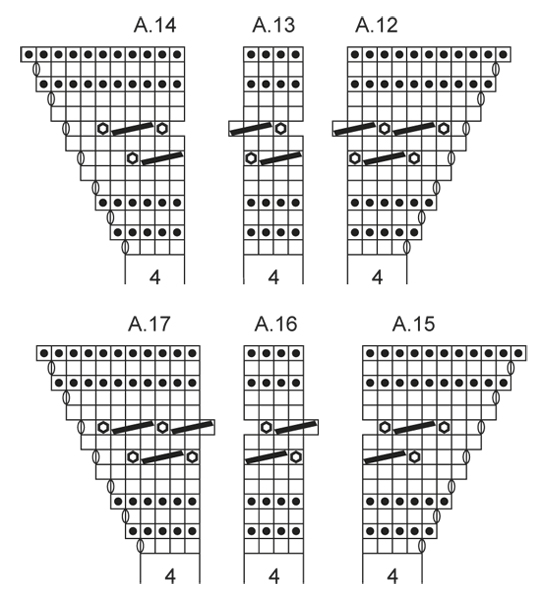
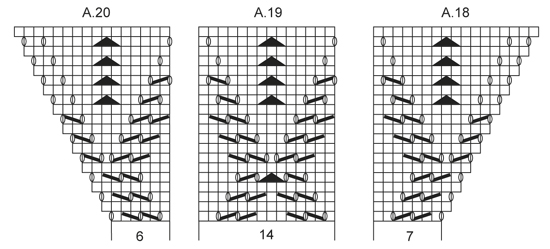
MOTIVO: Vedere i diagrammi A.1 e A.20. Il diagramma mostra il motivo visto dal diritto del lavoro. La 2 m di vivagno a ogni lato e la m centrale non sono nel diagramma. M LEGACCIO (avanti e indietro sui f): Lavorare tutti i f a dir. 1 “costa” a m legaccio = 2 f dir. MOTIVO A STELLA: Il motivo a stella è spiegato nel diagramma A.1 e A.2, lavorare in modo diverso sul lato destro e sinistro dello scialle. LATO DESTRO: 1 m rov, 3 m insieme a dir senza farle cadere dal f, 1 gettato. Lavorare ancora insieme a dir le stesse 3 m e farle cadere dal f = 1 stella. LATO SINISTRO: 1 m rov, 3 m insieme a dir ritorto senza farle cadere dal f. 1 gettato, lavorare ancora insieme a dir ritorto le stesse 3 m e farle cadere dal f = 1 stella. SUGGERIMENTO PER LE MISURE: Tutte le misurazioni devono essere fatte con l’indumento appeso perchè il motivo a stella si accorcerà. ---------------------------------------------------------- SCIALLE: Lavorato avanti e indietro sui f circolari per avere spazio per tutte le m. Lo scialle è lavorato dal centro dietro verso il basso. Avviare 9 m con i f circolari n° 3 mm con BabyAlpaca Silk. Poi lavorare come segue: 2 m di vivagno a M LEGACCIO – leggere la spiegazione sopra, 1 gettato, 2 m dir, 1 gettato, 1 m a m legaccio (= m centrale), 1 gettato, 2 m dir, 1 gettato, 2 m di vivagno a m legaccio. Lavorare a dir dal rovescio del lavoro, lavorare i gettati a dir per fare i buchi = 13 m. Lavorare 2 m di vivagno a ogni lato e 1 m centrale a m legaccio fino alla fine del lavoro, queste m non sono nel diagramma. FARE ATTENZIONE ALLA TENSIONE DEL LAVORO! Poi lavorare come segue secondo il diagramma A.1 e A.2 (1° f = diritto del lavoro): 2 m di vivagno a m legaccio, diagramma A.1 (= 4 m), 1 m a m legaccio (= m centrale), diagramma A.2 (= 4 m) e 2 m di vivagno a m legaccio. Aumentare 8 m nel diagramma su ogni f dal diritto del lavoro. Continuare a lavorare come mostrato nel diagramma. LEGGERE MOTIVO A STELLA e SUGGERIMENTO PER LE MISURAZIONI. Su ogni aumento c’è spazio per una ripetizione in più del motivo a stella a ogni lato della m centrale. Continuare a lavorare e aumentare come nel diagramma fino a quando ci sono 44 stelle a ogni lato della m centrale, il lavoro misura circa 38 cm misurati lungo la m centrale. Ora ci sono 357 m sul f in totale (178 m a ogni lato della m centrale). Finire dopo 1 f dal rovescio del lavoro, lavorare 1 f a dir dal diritto del lavoro e ALLO STESSO TEMPO distribuire 44 diminuzioni in modo uniforme a ogni lato della m centrale (diminuire lavorando insieme circa ogni 3° e 4° m, non diminuire sul bordo e sulla m centrale) = 269 m sul f (ci sono 134 m a ogni lato della m centrale). Lavorare 1 f rov dal rovescio del lavoro. Il lavoro misura circa 39 cm misurati lungo la m centrale. Ora lavorare come segue: 2 m di vivagno a m legaccio, A.3 (= 1 m), ripetere A.4 fino a quando rimangono 3 m prima della m centrale, A.5 (= 3 m), 1 m a m legaccio (= m centrale), A.6 (= 1 m), ripetere A.7 fino a quando rimangono 5 m, A.8 (= 3 m) e 2 m di vivagno a m legaccio. Lavorare i diagrammi 1 volta in verticale = 295 m. Poi lavorare come segue: 2 m di vivagno a m legaccio, A.9 (= 4 m), ripetere A.10 fino a quando rimangono 1 m prima della m centrale, A.11 (= 1 m), 1 m a m legaccio (= m centrale) A.9 (= 4 m), ripetere A.10 fino a quando rimangono 3 m, A.11 (= 1 m) e 2 m di vivagno a m legaccio. Lavorare i diagrammi 1 volta in verticale = 381 m. Poi lavorare come segue: 2 m di vivagno a m legaccio, A.12 (= 4 m), ripetere A.13 fino a quando rimangono 4 m prima della m centrale, A.14 (= 4 m), 1 m a m legaccio (= m centrale) A.15 (= 4 m), ripetere A.16 fino a quando rimangono 6 m, A.17 (= 4 m) e 2 m di vivagno a m legaccio. Lavorare i diagrammi 1 volta in verticale = 409 m. Lavorare 1 f dir dal diritto del lavoro e ALLO STESSO TEMPO distribuire 7 aumenti in modo uniforme con i gettati a ogni lato della m centrale (14 aumenti in totale) = 423 m (211 m a ogni lato della m centrale). Lavorare 1 f rov dal rovescio del lavoro, lavorare i gettati del f precedente a rov ritorto per evitare buchi. Alla fine lavorare come segue: 2 m di vivagno a m legaccio, A.18 (= 7 m), ripetere A.19 fino a quando rimangono 6 m prima della m centrale, A.20 (= 6 m), 1 m a m legaccio (= m centrale) A.18 (= 7 m), ripetere A.19 fino a quando rimangono 8 m, A.20 (= 6 m) e 2 m di vivagno a m legaccio. Lavorare i diagrammi 1 volta in verticale = 463 m. Intrecciare senza stringere. Il lavoro misura circa 68 cm misurati lungo la m centrale. MESSA IN FORMA: Mettere il lavoro in acqua tiepida fino a quando è bagnato. Eliminare delicatamente l’acqua – non strizzare. Poi avvolgere il lavoro in un asciugamano e far uscire altra acqua – il lavoro ora sarà solo umido. Posizionarlo su un tappeto o materasso – tirarlo delicatamente fino alle misure indicate in cima al modello. Lasciarlo asciugare. Ripetere il processo quando l’indumento è stato lavato. |
||||||||||||||||||||||||||||
Spiegazioni del diagramma |
||||||||||||||||||||||||||||
|
||||||||||||||||||||||||||||
 |
||||||||||||||||||||||||||||
 |
||||||||||||||||||||||||||||
 |
||||||||||||||||||||||||||||
 |
||||||||||||||||||||||||||||
 |
||||||||||||||||||||||||||||
Avete terminato questo modello?Allora taggate le vostre foto con #dropspattern #provenceshawl o inviatele alla #dropsfan gallery. Avete bisogno di aiuto con questo modello?Troverete 16 video tutorial, una sezione per i commenti/domande e molto altro guardando il modello su www.garnstudio.com © 1982-2026 DROPS Design A/S. Ci riserviamo tutti i diritti. Questo documento, compreso tutte le sue sotto-sezioni, è protetto dalle leggi sul copyright. Potete leggere quello che potete fare con i nostri modelli alla fine di ogni modello sul nostro sito. |
||||||||||||||||||||||||||||


Con oltre 40 anni di esperienza nel design di modelli di maglia e uncinetto, DROPS Design offre la più estesa collezione di modelli gratuiti su internet - tradotti in 17 lingue. Ad oggi vi possiamo fornire 324 cataloghi e 12290 modelli - 9561 dei quali sono tradotti in Italiano.
Ci stiamo impegnando molto per darvi il meglio che vi possiamo offrire in termini di maglia e uncinetto, ispirazioni e consigli così come filati di grande qualità ad un prezzo incredibile! Volete utilizzare i nostri modelli per qualcosa d'altro oltre al vostro uso personale? Potete leggere tutto ciò che è consentito nel testo sul Copyright in basso su tutte le pagine dei nostri modelli. Buon lavoro!
Lasciare un commento sul modello DROPS 158-19
Noi saremmo felici di ricevere i tuoi commenti e opinioni su questo modello!
Se vuoi fare una domanda, fai per favore attenzione a selezionare la categoria corretta nella casella qui sotto per velocizzare il processo di risposta. I campi richiesti sono indicati da *.