
Categorie popolari
State cercando un filato?


Commenti / Domande (141)
![]() Sandra ha scritto:
Sandra ha scritto:
Ahh. ich habs jetzt auch verstanden... die brushed alpaca silk hat 9 Knäuel zu 25g... ich bräuchte bei der air also auch 9 Knäuel... Aber trotzdem ein super cooles Modell und tolle Wolle!! :-)
22.01.2016 - 09:40DROPS Design ha risposto:
Antwort siehe unten! :-) Viel Spaß beim Weiterstricken!
30.01.2016 - 11:12
![]() Sandra ha scritto:
Sandra ha scritto:
Guten Morgen! Ich versuche das Modell (Größe M) mit der Drops Air zu stricken... da beide Garne zur gleichen Gruppe gehören, habe ich ebenfalls 5 Knäuel gekauft. Aber reicht das? Ich habe schon ~3 Knäuel verstrickt und habe erst 10 cm vom Rumpfteil gestrickt (beim Anprobieren gerade unterhalb der Brust). Die Größen stimmen, aber ich kann mir nicht vorstellen, dass 2 halbe Knäuel für den Rumpf und einer für beide Ärmel reicht? Gibt es mit der Air Erfahrungen? Vielen Dank schonmal, Sandra
22.01.2016 - 09:25DROPS Design ha risposto:
Sie müssen stets bei einem Alternativgarn die Lauflänge des Garns beachten und dementsprechend umrechnen. Brushed Alpaca Silk hat 140 m auf 25 g, also benötigen Sie für den Pulli für Größe M (225 g) 1260 m (9 x 25 g). Drops Air hat 150 m pro 50 g, also rechnen Sie 1260 m durch 150 m = 8,4, also auch 9 Knäuel.
30.01.2016 - 11:12
![]() Marie France Milette ha scritto:
Marie France Milette ha scritto:
Bonjour merci pour ce patron voici ma question. Pour l'empiècement, lorsque je fais les 23 m en fausse côte est ce que les jeter sont calculé comme une mailles ? merci
21.12.2015 - 02:27DROPS Design ha risposto:
Bonjour Mme Milette, les jetés ne comptent pas comme des mailles (ils "appartiennent" à la m glissée). Bon tricot!
21.12.2015 - 11:26
![]() Elke ha scritto:
Elke ha scritto:
Habe den Pullover nochmal gestrickt mit Nadelstärke 8 statt 9. Das kommt an der Raglanpasse gut hin, wahrscheinlich hätte ich auch Stärke 7 nehmen können. Die Breite des Strickstücks entspricht allerdings eher Größe L als M, trotz der nochmal überprüften korrekten Maschenprobe. Da ich normalerweise eng stricke, verstehe ich das nicht wirklich. Durch die Weite wirkt der Pulli nicht ganz so elegant wie auf dem Bild, sieht aber trotzdem schön aus und die Wolle ist superweich. LG, Elke
16.12.2015 - 18:07
![]() Elke ha scritto:
Elke ha scritto:
Habe den Pullover fast fertig, er ist aber zu weit und sieht viel gröber aus als auf dem Bild,! Obwohl die Maschenprobe glatt rechts genau gestimmt , hat. Maschenprobe rundgestricktes falsches Patent gejt ja nicht, habe jich deshalb auf glatt rechts verlassen. Habt ihr einen Tipp, mit welchet Nadelstärke ich en feineres Strickbild und 10 cm weniger in der Breite hinbekomme? LG, Elke
01.12.2015 - 18:45DROPS Design ha risposto:
Das lässt sich pauschal nicht sagen, Sie müssten es selbst herausfinden, indem Sie ein Probestück im falschen Patent mit einer dünneren Nadel stricken und dann mit Ihrem Pullover vergleichen (auf 10 cm umgerechnet). Damit können Sie ermitteln, um wie viel der Pullover enger wird, wenn Sie ihn mit einer dünneren Nadel stricken. Achten Sie aber darauf, dass die Höhenmaße bleiben, Sie sollten bei der Raglanpasse immer mal wieder vergleichen und ggf. eine Ziwschenreihe einfügen, sollte die Passe kürzer werden.
05.12.2015 - 17:51
![]() Gerrie Hekman ha scritto:
Gerrie Hekman ha scritto:
Wellicht is het handig om bij een patroon te vermelden dat als je een garenalternatief neemt dat de looplengte van groot belang is. (Als wiskundige had ik dit natuurlijk moeten weten). Ik ben bezig met 157-20 en had geen zin in pluizige wol (brushed alpaca silk) en ben gegaan voor een aangeraden alternatief Big Fabel 912, ik had al extra genomen, maar ik heb nog niet genoeg en nu is deze wol uit het assortiment.
11.11.2015 - 15:40
![]() Gerrie ha scritto:
Gerrie ha scritto:
Is het nodig om voor de hals, de steken op te nemen en dan nog eens 2 ribbels te breien, of kan dat ook meteen aan het begin.
25.10.2015 - 08:15DROPS Design ha risposto:
Hoi Gerrie. Ik denk dat je ook kan beginnen met de 2 ribbels
27.10.2015 - 14:43
![]() Lene Hasle ha scritto:
Lene Hasle ha scritto:
For mig at se blir der ikke falsk patent, hvis man følger strikkeanvisningen
21.10.2015 - 14:47
![]() Ellen ha scritto:
Ellen ha scritto:
När jag lagt upp 55 maskor och ska börja sticka runt på rundstickan (80 cm) så är ju kabeln alldeles för lång för att jag ska kunna sticka runt. Ska jag använda strumpstickorna tills jag ökat tillräckligt många maskor? Tacksam för snabbt svar! Tack!
27.07.2015 - 21:42DROPS Design ha risposto:
Hej Ellen, Ja börja med strumpst eller så får du börja med en mindre rundsticka. Lycka till!
28.07.2015 - 12:31Cathy Atlija ha scritto:
Sorry, last question (I hope) - can I replace the false english rib with english rib? The stitches are about the same but the rows are different, would that totally throw off the raglan seams? Because this yarn is so fluffy and you're increasing on every other row, I'm finding it really hard to see the pattern in the few rows I've knitted and it just doesn't look right. Wish I could translate all the other comments and see if others had this problem!
07.04.2015 - 05:09DROPS Design ha risposto:
Dear Mrs Atlija, you can work another pattern but remember to check your gauge. You may have to knit some cm before pattern can be visible (make a swatch first to get used to work the pattern and see after some cm how it will look). Remember you can also get help from your DROPS store. Happy knitting!
07.04.2015 - 10:36
|
|
Lazy Afternoon#lazyafternoonsweater |
|
|
|
|
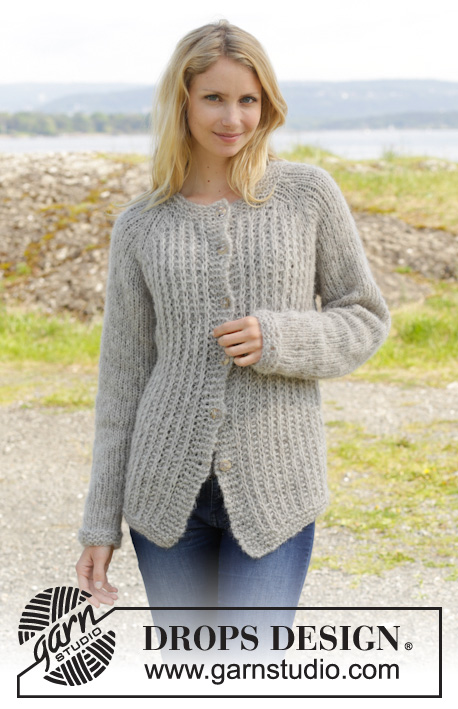
Maglione DROPS ai ferri, con maniche a raglan in false coste inglesi, lavorato dall'alto verso il basso, con 2 capi del filato "Brushed Alpaca Silk". Taglie: Dalla S alla XXXL.
DROPS 157-20 |
|
|
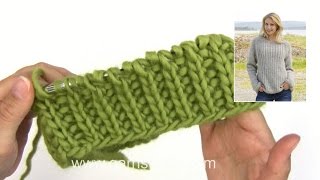
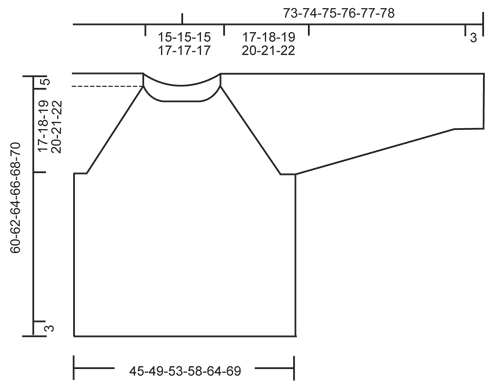
PUNTO LEGACCIO (in tondo, sui ferri circolari): Lavorare * 1 giro a dir e 1 giro a rov *, ripetere da *-*. 1 “costa” a legaccio = 2 giri. FALSE COSTE INGLESI (in tondo, sui ferri circolari): GIRO 1: * 1 m dir, 1 m gettata, passare 1 m a rov senza lavorarla *, ripetere da *-* finché non rimane 1 m, finire con 1 m dir. GIRO 2: * 1 m rov, lavorare insieme a dir la m gettata e la m passata del giro precedente *, ripetere da *-* finché non rimane 1 m, finire con 1 m rov. Ripetere i giri 1 e 2. RAGLAN: Aumentare da ciascun lato di ogni segno, come segue: Lavorare finché non rimane 1 m prima del segno, 1 m gettata, lavorare 2 m a maglia rasata e 1 m gettata. Ripetere in corrispondenza di ogni segno presente sul giro. Nel corso del giro successivo, lavorare le m gettate a dir ritorto (lavorare quindi le m nel filo posteriore e non in quello anteriore) per evitare che si formino dei buchi. SUGGERIMENTO PER LE DIMINUZIONI (per le maniche): Diminuire come segue, PRIMA della m con il segno: passare 1 m a dir senza lavorarla, 1 m dir, accavallare la m passata sulla m lavorata. Diminuire come segue, DOPO la m con il segno: lavorare 2 m insieme a dir. ---------------------------------------------------------- MAGLIONE: Si lavora dall’alto verso il basso, in tondo sui ferri circolari /ferri a doppia punta. Alla fine del lavoro, riprendere le m intorno allo scollo e lavorare il collo a punto legaccio. SPRONE: Avviare 55-55-55-59-59-59 m con 2 capi del filato Brushed Alpaca Silk sui ferri circolari n° 9. Lavorare 1 COSTA A LEGACCIO - vedere le spiegazioni sopra; ALLO STESSO TEMPO, nel corso del secondo giro, aumentare 9 m in modo uniforme per tutte le taglie = 64-64-64-68-68-68 m. Al giro successivo, lavorare come segue iniziando dal lato destro del raglan sul dietro: 1 m a maglia rasata, inserire il 1° segno qui, 9 m a maglia rasata, inserire il 2° segno qui, 1 m a maglia rasata, 21-21-21-23-23-23 m in FALSE COSTE INGLESI – vedere le spiegazioni sopra (= davanti), 1 m a maglia rasata, inserire il 3° segno qui, 9 m a maglia rasata, inserire il 4° segno qui, 1 m a maglia rasata, 21-21-21-23-23-23 m in false coste inglesi (= dietro). Proseguire in questo modo; ALLO STESSO TEMPO, nel corso del giro successivo, iniziare gli aumenti per il RAGLAN – vedere le spiegazioni sopra ! Ripetere questi aumenti ogni 2 giri altre 5-7-10-13-18-22 volte, e poi ogni 4 giri per 5-5-4-3-1-0 volte = 152-168-184-204-228-252 m. ATTENZIONE: Lavorare le m aumentate sul davanti e sul dietro in false coste inglesi e lavorare le m aumentate sulle maniche a maglia rasata. RICORDARSI LA TENSIONE DEL LAVORO! Il lavoro misura 22-23-24-25-26-27 cm dalla spalla. Lavorare ancora 1 giro seguendo il motivo come prima, ma ora fermarsi 1 m prima del 1° segno (quindi 1 m prima dell’inizio del giro). Mettere in attesa su un ferma maglie le 33-37-41-45-51-57 m successive (= manica), avviare 7 nuove m sotto la manica, lavorare le 43-47-51-57-63-69 m successive (= davanti), mettere in attesa su un ferma maglie le 33-37-41-45-51-57 m successive (= manica), avviare 7 nuove m sotto la manica, lavorare le 43-47-51-57-63-69 m successive (= dietro). DAVANTI E DIETRO: Ci sono ora 100-108-116-128-140-152 m. Proseguire in false coste inglesi come prima. Lavorare a rov la m centrale delle 7 nuove m avviate sotto ogni manica e lavorare le rimanenti m in false coste inglesi. Proseguire in questo modo finché il lavoro non misura 35-36-37-38-39-40 cm dall’avvio delle nuove m sotto le maniche. Lavorare ora 3 coste a legaccio; intrecciare poi le m senza stringere troppo il filo. MANICHE: Riportare sui ferri a doppia punta le 33-37-41-45-51-57 m messe in attesa. Lavorare 1 ferro a maglia rasata su tutte le m. Avviare ora 7 m alla fine del ferro = 40-44-48-52-58-64 m. Inserire un segno al centro delle nuove m avviate sotto la manica. DA ADESSO IN AVANTI MISURARE IL LAVORO DA QUESTO PUNTO. Lavorare ora la manica a maglia rasata, in tondo. Quando il lavoro misura 4 cm, iniziare a diminuire – VEDERE IL SUGGERIMENTO PER LE DIMINUZIONI. Ripetere queste diminuzioni ogni 5½-5-4-3½-2½-2½ cm altre 6-7-9-10-13-15 volte = 26-28-28-30-30-32 m. Quando il lavoro misura 41-41-41-40-40-40 cm, lavorare 3 coste a legaccio e intrecciare le m senza stringere troppo il filo. CONFEZIONE: Cucire le aperture sotto le maniche. COLLO: Con 2 capi del filato Brushed Alpaca Silk, riprendere 1 m in ogni costa a legaccio intorno allo scollo = 55-55-55-59-59-59 m. Lavorare 2 coste a legaccio e intrecciare le m senza stringere troppo il filo. |
|
 |
|
Avete terminato questo modello?Allora taggate le vostre foto con #dropspattern #lazyafternoonsweater o inviatele alla #dropsfan gallery. Avete bisogno di aiuto con questo modello?Troverete 23 video tutorial, una sezione per i commenti/domande e molto altro guardando il modello su www.garnstudio.com © 1982-2026 DROPS Design A/S. Ci riserviamo tutti i diritti. Questo documento, compreso tutte le sue sotto-sezioni, è protetto dalle leggi sul copyright. Potete leggere quello che potete fare con i nostri modelli alla fine di ogni modello sul nostro sito. |


Con oltre 40 anni di esperienza nel design di modelli di maglia e uncinetto, DROPS Design offre la più estesa collezione di modelli gratuiti su internet - tradotti in 17 lingue. Ad oggi vi possiamo fornire 324 cataloghi e 12290 modelli - 9561 dei quali sono tradotti in Italiano.
Ci stiamo impegnando molto per darvi il meglio che vi possiamo offrire in termini di maglia e uncinetto, ispirazioni e consigli così come filati di grande qualità ad un prezzo incredibile! Volete utilizzare i nostri modelli per qualcosa d'altro oltre al vostro uso personale? Potete leggere tutto ciò che è consentito nel testo sul Copyright in basso su tutte le pagine dei nostri modelli. Buon lavoro!
Lasciare un commento sul modello DROPS 157-20
Noi saremmo felici di ricevere i tuoi commenti e opinioni su questo modello!
Se vuoi fare una domanda, fai per favore attenzione a selezionare la categoria corretta nella casella qui sotto per velocizzare il processo di risposta. I campi richiesti sono indicati da *.