
Categorie popolari
State cercando un filato?


Commenti / Domande (141)
Cathy Atlija ha scritto:
I'm so sorry for all the questions! I'm past the casting on now, woohoo! Now I think I'm doing the False English Rib wrong! When you read the instructions and then watch the video, they don't seem to jive. In both rounds of False English Rib, where it says '1 stitch in garter stitch' - I've been doing it as a knit stitch on both rounds, is that wrong? I wish the instructions were a little bit clearer. Thank you.
22.03.2015 - 03:03DROPS Design ha risposto:
Dear Mrs Atlija, when you work garter st in the round, you will work alternately K 1 round, P1 round - the st worked in garter st in the False English rib will be worked K on 1st round and P on 2nd round (= Round 1: K1, YO, slip 1 as if to P - Round 2: P1, K tog YO ans slipped st). Happy knitting!
23.03.2015 - 09:37Cathy Atlija ha scritto:
There are 9 stitches added in the 2nd row anyways, would this really affect the pattern that much if I added them into the cast on instead of the 2nd row? I didn't get my yarn from a store, I ordered online from Nordicmart.
20.03.2015 - 17:26DROPS Design ha risposto:
Dear Mrs Atlija, you are right, you can cast on 9 sts more and then don't increase these 9 sts on 2nd round - check then by the neck if you like to keep these 9 sts extra or dec them. You can contact Nordicmart also per mail or telephone if requested, they'll answer. Happy knitting!
21.03.2015 - 10:12Cathy Atlija ha scritto:
I did cast on with 2 needles, I have extra big loops but bottom of stitches where connected istill very tight. Someone suggested stretchy or provisional cast on. What if I add the 9 sts that are added into the 2nd row into the number of cast on stitches? Would that affect look of the pattern after? Or should I try the stretchy or provisional cast on - the provisional allows me to pick the neck edges easier at the end where you have to knit 2 ridges of garter stitch. .
19.03.2015 - 19:17DROPS Design ha risposto:
Dear Mrs Atlija, if you add some sts, this will then affect pattern, you will have to distribute them and adapt rest of pattern. There are different techniques to cast on, you can try to find the one you rather and adjust this way. Remember you will get tips & advice from your DROPS store. Happy knitting!
20.03.2015 - 09:08Cathy Atlija ha scritto:
Are all the increases for the raglan arms done on Round 2 of False English Rib? Thank you.
16.03.2015 - 20:37DROPS Design ha risposto:
Dear Mrs Atlija, that's correct the increase for raglan will be done when working round 2 of false English rib over body. Happy knitting!
17.03.2015 - 08:58
![]() Anna ha scritto:
Anna ha scritto:
Warum wird die Halsblende nicht ganz am Anfang an gestrickt, sondern später durch Auffassen?
08.02.2015 - 18:55DROPS Design ha risposto:
Die Halsrand wird etwas stabiler, wenn man die Blende nachträglich anstrickt.
17.02.2015 - 10:45
![]() Dominique Trujillo ha scritto:
Dominique Trujillo ha scritto:
Bonjour, pourquoi n'y a-t-il plus les explications en français dans la rubrique "Astuces et Aide" Leçons de tricot etc...? C'était très pratique avant. Merci et bonne journée
24.01.2015 - 11:32DROPS Design ha risposto:
Bonjour Mme Trujillo, ces pages ont été modifiées et seront de nouveau bientôt disponibles en français. Merci pour votre patience. Bon tricot!
26.01.2015 - 09:34
![]() Marjolein Gertner ha scritto:
Marjolein Gertner ha scritto:
Is dat dan de omslag of de av afhalen? Ik vermoed de omslag maar ik weet het liever zeker.
06.01.2015 - 21:49DROPS Design ha risposto:
Hoi Marjolein. Het is voor mij moeilijk te zeggen omdat ik niet kan kijken op je werk. Maar je moet de patentsteken blijven breien zoals eerst (de steken niet verschuiven). Een herhaling van "patentsteek" is 1 ribbel, omslag, 1 st av afhalen = 2 st + omslag, dus als je 1 st hebt gemeerderd heb je niet "ruimte" voor een nieuwe herhaling, dus ik zou deze eerst in tricotst breien tot je de volgende st hebt gemeerderd en je een nieuwe herhaling patent kan maken. Kijk bij het breien wat voor jou het beste uitkomt.
07.01.2015 - 11:29
![]() Marjolein Gertner ha scritto:
Marjolein Gertner ha scritto:
Ik vermoed dat mijn vorige vraag niet is opgemerkt door de feestdagen? Kan iemand mij hiermee helpen?
06.01.2015 - 09:42DROPS Design ha risposto:
Hoi Marjolein. Ivm de kerstvakantie heb ik niet vragen beantwoord. Ik probeer alle binnenkomende vragen zo snel mogelijk te beantwoorden. Kan je niet wachten, dan kan je ook contact opnemen met het verkooppunt waarin je het garen hebt gekocht voor ondersteuning.
06.01.2015 - 10:19
![]() Marjolein Gertner ha scritto:
Marjolein Gertner ha scritto:
Om na de meerdering in valse patentsteek verder te breien, begin ik dan gewoon terug met 1 recht, 1 omslag, 1 av afhalen, of moet ik beginnen met 1 omslag, aangezien er een steek extra op de naald staat?
31.12.2014 - 17:23DROPS Design ha risposto:
Hoi Marjolein. Je moet ervoor zorgen dat de patentsteek verder gaat op dezelfde lijn, dus je moet niet opnieuw beginnen met de patentsteek (dan wordt ie scheef), maar met de eerstvolgende steek voor de patent.
06.01.2015 - 17:06
![]() Elfililoo ha scritto:
Elfililoo ha scritto:
Bonjour, j'aimerai faire ce modele en taille L (le diagramme du pull ce sont les dimensions en CM?)mais avec la laine drops paris qui me parait plus epaisse et pourtant classe C comme la drops brushed alpaca... je suis un peu perdue est ce que je dois l'utiliser en la tricotant a deux fils ou pas ? pour ce model en taille L quelle quantite de pelote de DROPS paris dois je acheter svp? merci de votre aide je suis debutante desole si ma question vous parait un peu bete :)
19.12.2014 - 14:50DROPS Design ha risposto:
Bonjour Elfililoo, (les mesures du schéma sont en cm) -effectivement si Brushed Alpaca Silk et Paris sont du même groupe (tension identique), leurs caractéristiques sont différentes et le rendu final le sera aussi. Vous pouvez essayer un échantillon avec 2 fils Paris pour mieux vous rendre compte du rendu final avant de commencer. Pour toute assistance individuelle,n'hésitez pas à contacter votre magasin DROPS. Bon tricot!
19.12.2014 - 17:17
|
|
Lazy Afternoon#lazyafternoonsweater |
|
|
|
|
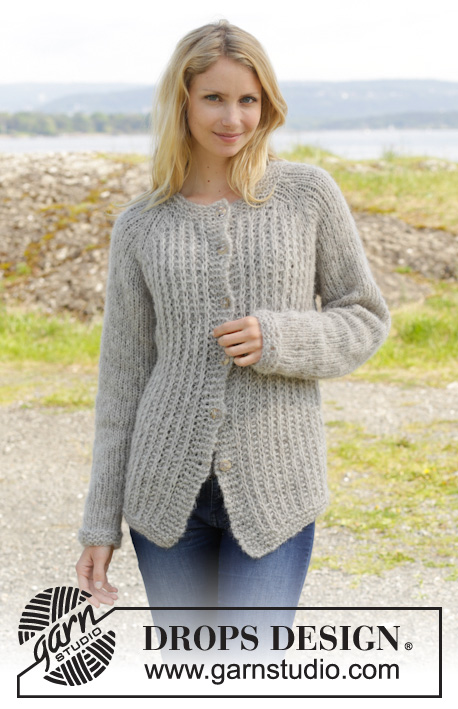
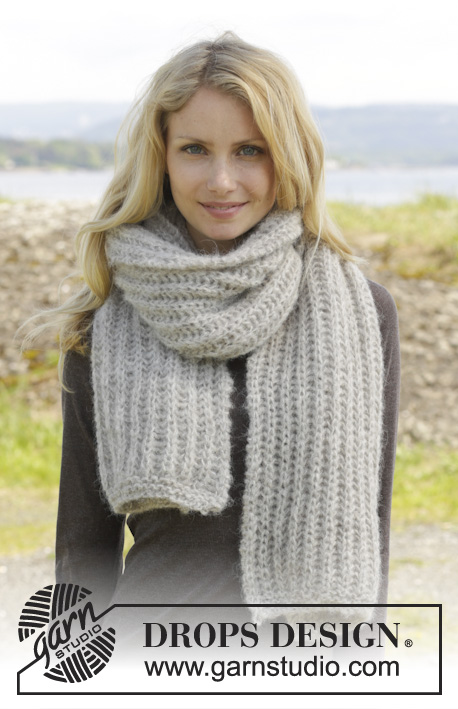
Maglione DROPS ai ferri, con maniche a raglan in false coste inglesi, lavorato dall'alto verso il basso, con 2 capi del filato "Brushed Alpaca Silk". Taglie: Dalla S alla XXXL.
DROPS 157-20 |
|
|
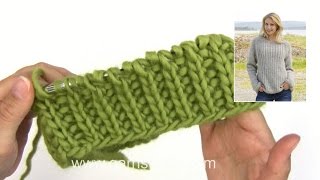
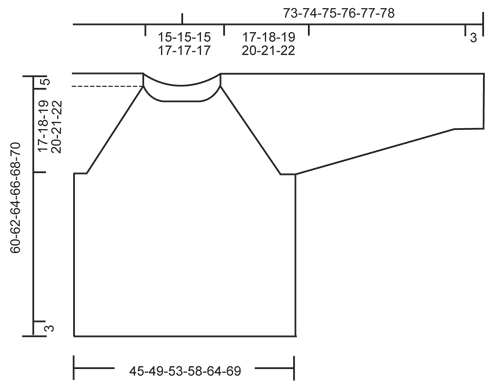
PUNTO LEGACCIO (in tondo, sui ferri circolari): Lavorare * 1 giro a dir e 1 giro a rov *, ripetere da *-*. 1 “costa” a legaccio = 2 giri. FALSE COSTE INGLESI (in tondo, sui ferri circolari): GIRO 1: * 1 m dir, 1 m gettata, passare 1 m a rov senza lavorarla *, ripetere da *-* finché non rimane 1 m, finire con 1 m dir. GIRO 2: * 1 m rov, lavorare insieme a dir la m gettata e la m passata del giro precedente *, ripetere da *-* finché non rimane 1 m, finire con 1 m rov. Ripetere i giri 1 e 2. RAGLAN: Aumentare da ciascun lato di ogni segno, come segue: Lavorare finché non rimane 1 m prima del segno, 1 m gettata, lavorare 2 m a maglia rasata e 1 m gettata. Ripetere in corrispondenza di ogni segno presente sul giro. Nel corso del giro successivo, lavorare le m gettate a dir ritorto (lavorare quindi le m nel filo posteriore e non in quello anteriore) per evitare che si formino dei buchi. SUGGERIMENTO PER LE DIMINUZIONI (per le maniche): Diminuire come segue, PRIMA della m con il segno: passare 1 m a dir senza lavorarla, 1 m dir, accavallare la m passata sulla m lavorata. Diminuire come segue, DOPO la m con il segno: lavorare 2 m insieme a dir. ---------------------------------------------------------- MAGLIONE: Si lavora dall’alto verso il basso, in tondo sui ferri circolari /ferri a doppia punta. Alla fine del lavoro, riprendere le m intorno allo scollo e lavorare il collo a punto legaccio. SPRONE: Avviare 55-55-55-59-59-59 m con 2 capi del filato Brushed Alpaca Silk sui ferri circolari n° 9. Lavorare 1 COSTA A LEGACCIO - vedere le spiegazioni sopra; ALLO STESSO TEMPO, nel corso del secondo giro, aumentare 9 m in modo uniforme per tutte le taglie = 64-64-64-68-68-68 m. Al giro successivo, lavorare come segue iniziando dal lato destro del raglan sul dietro: 1 m a maglia rasata, inserire il 1° segno qui, 9 m a maglia rasata, inserire il 2° segno qui, 1 m a maglia rasata, 21-21-21-23-23-23 m in FALSE COSTE INGLESI – vedere le spiegazioni sopra (= davanti), 1 m a maglia rasata, inserire il 3° segno qui, 9 m a maglia rasata, inserire il 4° segno qui, 1 m a maglia rasata, 21-21-21-23-23-23 m in false coste inglesi (= dietro). Proseguire in questo modo; ALLO STESSO TEMPO, nel corso del giro successivo, iniziare gli aumenti per il RAGLAN – vedere le spiegazioni sopra ! Ripetere questi aumenti ogni 2 giri altre 5-7-10-13-18-22 volte, e poi ogni 4 giri per 5-5-4-3-1-0 volte = 152-168-184-204-228-252 m. ATTENZIONE: Lavorare le m aumentate sul davanti e sul dietro in false coste inglesi e lavorare le m aumentate sulle maniche a maglia rasata. RICORDARSI LA TENSIONE DEL LAVORO! Il lavoro misura 22-23-24-25-26-27 cm dalla spalla. Lavorare ancora 1 giro seguendo il motivo come prima, ma ora fermarsi 1 m prima del 1° segno (quindi 1 m prima dell’inizio del giro). Mettere in attesa su un ferma maglie le 33-37-41-45-51-57 m successive (= manica), avviare 7 nuove m sotto la manica, lavorare le 43-47-51-57-63-69 m successive (= davanti), mettere in attesa su un ferma maglie le 33-37-41-45-51-57 m successive (= manica), avviare 7 nuove m sotto la manica, lavorare le 43-47-51-57-63-69 m successive (= dietro). DAVANTI E DIETRO: Ci sono ora 100-108-116-128-140-152 m. Proseguire in false coste inglesi come prima. Lavorare a rov la m centrale delle 7 nuove m avviate sotto ogni manica e lavorare le rimanenti m in false coste inglesi. Proseguire in questo modo finché il lavoro non misura 35-36-37-38-39-40 cm dall’avvio delle nuove m sotto le maniche. Lavorare ora 3 coste a legaccio; intrecciare poi le m senza stringere troppo il filo. MANICHE: Riportare sui ferri a doppia punta le 33-37-41-45-51-57 m messe in attesa. Lavorare 1 ferro a maglia rasata su tutte le m. Avviare ora 7 m alla fine del ferro = 40-44-48-52-58-64 m. Inserire un segno al centro delle nuove m avviate sotto la manica. DA ADESSO IN AVANTI MISURARE IL LAVORO DA QUESTO PUNTO. Lavorare ora la manica a maglia rasata, in tondo. Quando il lavoro misura 4 cm, iniziare a diminuire – VEDERE IL SUGGERIMENTO PER LE DIMINUZIONI. Ripetere queste diminuzioni ogni 5½-5-4-3½-2½-2½ cm altre 6-7-9-10-13-15 volte = 26-28-28-30-30-32 m. Quando il lavoro misura 41-41-41-40-40-40 cm, lavorare 3 coste a legaccio e intrecciare le m senza stringere troppo il filo. CONFEZIONE: Cucire le aperture sotto le maniche. COLLO: Con 2 capi del filato Brushed Alpaca Silk, riprendere 1 m in ogni costa a legaccio intorno allo scollo = 55-55-55-59-59-59 m. Lavorare 2 coste a legaccio e intrecciare le m senza stringere troppo il filo. |
|
 |
|
Avete terminato questo modello?Allora taggate le vostre foto con #dropspattern #lazyafternoonsweater o inviatele alla #dropsfan gallery. Avete bisogno di aiuto con questo modello?Troverete 23 video tutorial, una sezione per i commenti/domande e molto altro guardando il modello su www.garnstudio.com © 1982-2026 DROPS Design A/S. Ci riserviamo tutti i diritti. Questo documento, compreso tutte le sue sotto-sezioni, è protetto dalle leggi sul copyright. Potete leggere quello che potete fare con i nostri modelli alla fine di ogni modello sul nostro sito. |


Con oltre 40 anni di esperienza nel design di modelli di maglia e uncinetto, DROPS Design offre la più estesa collezione di modelli gratuiti su internet - tradotti in 17 lingue. Ad oggi vi possiamo fornire 324 cataloghi e 12290 modelli - 9561 dei quali sono tradotti in Italiano.
Ci stiamo impegnando molto per darvi il meglio che vi possiamo offrire in termini di maglia e uncinetto, ispirazioni e consigli così come filati di grande qualità ad un prezzo incredibile! Volete utilizzare i nostri modelli per qualcosa d'altro oltre al vostro uso personale? Potete leggere tutto ciò che è consentito nel testo sul Copyright in basso su tutte le pagine dei nostri modelli. Buon lavoro!
Lasciare un commento sul modello DROPS 157-20
Noi saremmo felici di ricevere i tuoi commenti e opinioni su questo modello!
Se vuoi fare una domanda, fai per favore attenzione a selezionare la categoria corretta nella casella qui sotto per velocizzare il processo di risposta. I campi richiesti sono indicati da *.