
Categorie popolari
State cercando un filato?


Commenti / Domande (38)
![]() Thelma ha scritto:
Thelma ha scritto:
One more question, so before the increase I have 72sc. Then after the increase row, should I have total 86dc or 94dc in the end of that row? Because you say I should do 1dc in every sc to the second marker, that is 8sc right? meaning i should do 8dc right? Then in the next 64sc do 86dc evenly throughout those 64sc to the end. Then it will be 94dc in the end(counting the 8dc between the markers with) , right? I dont know why, but how this is put up is so confusing haha
15.09.2019 - 18:27DROPS Design ha risposto:
Dear Thelma, at the end of the first row, there will be 94 sts but you won't work anymore the first 8 stitches at the beg of the row (= between both markers) = you are now working over 86 sts only (from 2nd marker from RS to 1st marker from RS, then turn and work next row from WS from the first marker to the 2nd marker and so on). Happy crocheting!
16.09.2019 - 11:21
![]() Thelma ha scritto:
Thelma ha scritto:
One more question, so before the increase I have 72sc. Then after the increase row, should I have total 86dc or 94dc in the end of that row? Because you say I should do 1dc in every sc to the second marker, that is 8sc right? meaning i should do 8dc right? Then in the next 64sc do 86dc evenly throughout those 64sc to the end. Then it will be 94dc in the end(counting the 8dc between the markers with) , right? I dont know why, but how this is put up is so confusing haha
15.09.2019 - 17:35
![]() Thelma ha scritto:
Thelma ha scritto:
Hi again, also I dont understand when you say: (do not work over the 6-6-6-8 (8-8) sc between the 2 markers). Should i skip those 8sc between the marker and make my next dc in the sc after that or what does that mean? That would make a strange hole in the bonnet right? And also I find it confusing on how many rows i should be continuing on doing after the first part I dont understand what row you are talking about at what time. Is the ALL SIZES just one row of dc? And then the texture row
15.09.2019 - 16:59DROPS Design ha risposto:
Dear Thelma, as said previously, you will crochet the first 8 sts on the row (= between markers) only on first row, then only crochet over the remaining 64 sts inc 22 sts = 86 sts. From RS you will crochet this row with dc, then turn and work textured rows = 1 row with sc from WS, 1 row with dc from RS, and repeat these 2 rows. Happy crocheting!
16.09.2019 - 11:19
![]() Thelma ha scritto:
Thelma ha scritto:
Hello, I find this pattern very confusing when you come to the ALL SIZES section. I dont understand where to increase? For the biggest size I now have 72 sc. Then you say for my size I should increase 22dc evenly. Then you say it should be 86dc at the end of that round? That doesnt add up. Do you mean I should increase evenly over the 64sc(72sc -8 sc between the markers) or do i increase evenly over the 8sc. Wouldnt that make a strange bump? Can you clarify this part for me
15.09.2019 - 16:45DROPS Design ha risposto:
Dear Thelma, on this row, you first crochet the first 8 stitches (inserting one marqueur at the beg of round + 1 marker after these 8 sts = 64 sts remain; then work the next 64 sts increasing 22 sts evenly = 86 sts, and continue working back and forth over these 86 sts, ie you won't crochet the 8 sts from the beg of the row anymore. Happy crocheting!
16.09.2019 - 11:16
![]() Lorraine ha scritto:
Lorraine ha scritto:
Hi on the bonnet front part its say to start with DC on (ws) and carry on with the textured pattern ut the pattern is on the (ws) and the last school on on the (rs)have a done this wrong
23.04.2019 - 14:21DROPS Design ha risposto:
Dear Lorraine, pattern has been edited to start this row from RS so that you can then continue in texture pattern. Happy crocheting!
07.05.2019 - 08:33
![]() Irene ha scritto:
Irene ha scritto:
Hej! Varför blir mössan lite ”toppig” i mitten där man startar? Känns som att det är för få stolpar eller gör jag ngt fel?
17.05.2018 - 10:02DROPS Design ha risposto:
Hej Irene, det kan have noget med hæklefastheden at gøre. Hækler du i DROPS Baby Alpaca Silk og har du 22 st på 10 cm?
17.05.2018 - 14:38
![]() KellyAnn ha scritto:
KellyAnn ha scritto:
Im getting a point in the back is that normal?
07.02.2017 - 23:58DROPS Design ha risposto:
Dear KellyAnn, you may have a small one but remember to check and keep correct tension while working. Happy crocheting!
08.02.2017 - 09:12
![]() Susanne ha scritto:
Susanne ha scritto:
Vil det så sige at jeg skal hækle feks 61 masker
07.03.2016 - 15:35DROPS Design ha risposto:
Ja det stemmer :)
07.03.2016 - 16:02
![]() Susanne ha scritto:
Susanne ha scritto:
Jeg hækler i str 1/3 måneder og er kommet til hulkant til bindebånd, hvor man skal justere antallet så det er delbart med 5 +1, jeg forstår den ikke, hvordan skal jeg gøre det
07.03.2016 - 12:57DROPS Design ha risposto:
Jo du kan tage 1 m ud ifølge udtagningstipset, så 5 går op i maskeantallet og så lægger du 1 til. God fornøjelse!
07.03.2016 - 15:10
![]() Hana Mikulandová ha scritto:
Hana Mikulandová ha scritto:
Není možnost foto postup? Ze začátku mám kolečko,ale nechápu jak mám pak dělat ten rup a líc... Děkuju
02.02.2016 - 10:06DROPS Design ha risposto:
Seznam video-ukázek k tomuto návodu najdete v záložce vedle hlavní fotky modelu. Rubovou a lícovou řadu začnete háčkovat po dokončení kolečka, takto: označte si začátek kruhové řady a druhou značku vložte za 6. oko (od začátku kruhové řady). Práci otočíte a háčkujete od začátku kruhové řady (od 1. značky) rubovou řadu "zpátky" až ke 2. značce. Tam práci opět otočíte a háčkujete k 1. značce. Prostor mezi značkami (= 6 ok) zůstane bez háčkování - bude ležet vzadu na krku. Hodně zdaru! Hana
02.03.2016 - 11:10
|
||||||||||
Camille#camillebonnet |
||||||||||
|
|
||||||||||
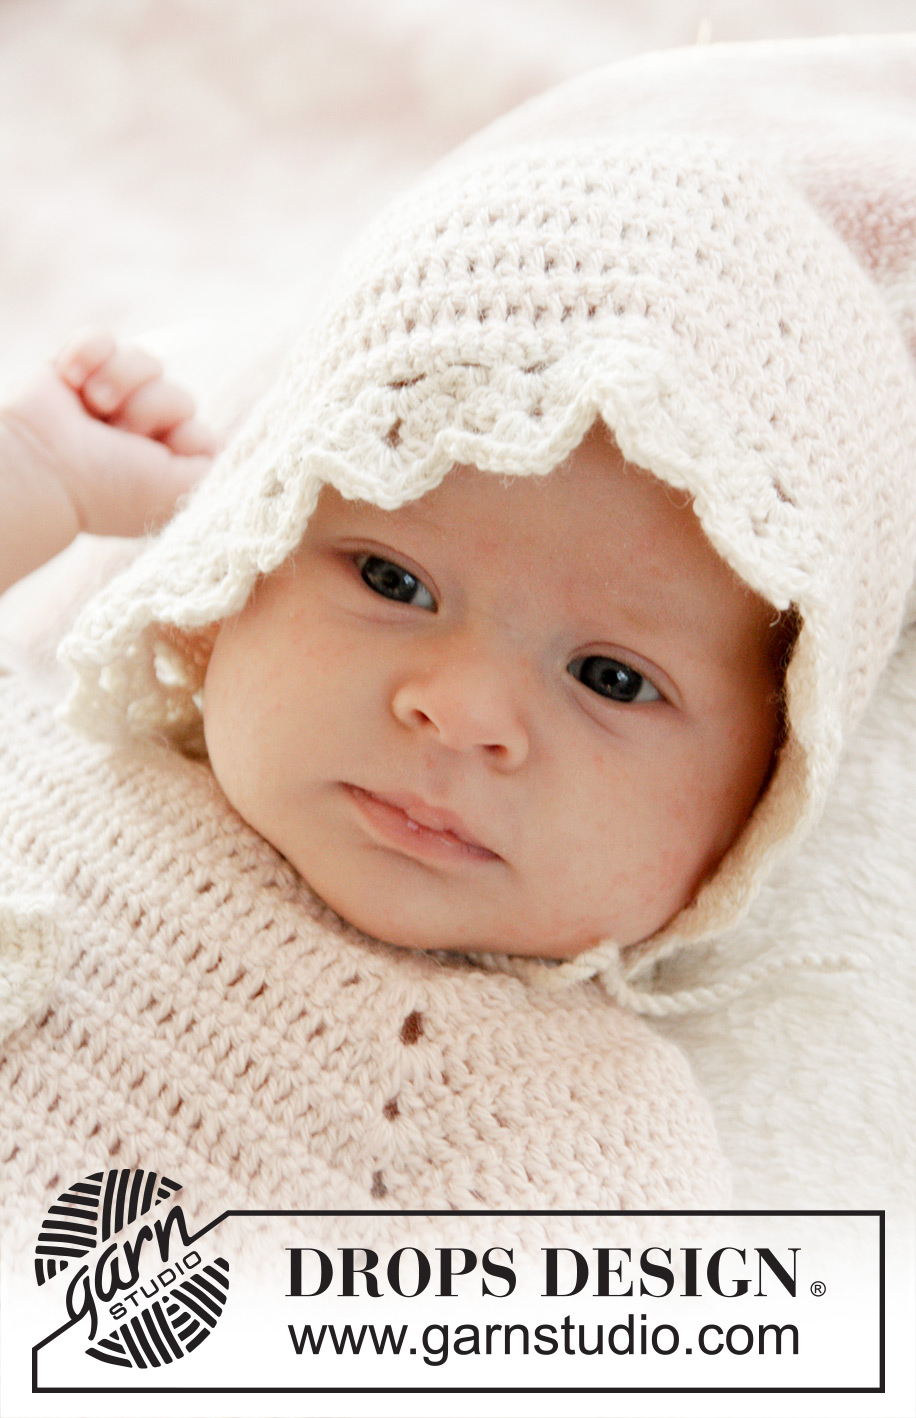
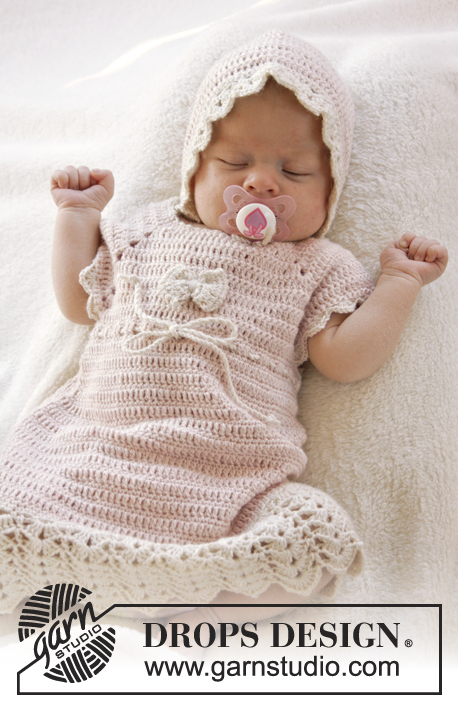
Cappello all'uncinetto con motivo a ventagli per neonati, in DROPS BabyAlpaca Silk. Taglie: Da 0 a 4 anni.
DROPS Baby 25-14 |
||||||||||
|
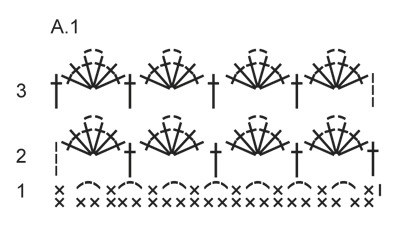
INFORMAZIONI PER IL LAVORO: Sostituire la prima m.b all’inizio di ogni riga/giro di m.b con 1 cat. Finire ogni giro con 1 m.bss nella cat iniziale del giro. Finire ogni riga con 1 m.b nella 3a cat dall’inizio della riga precedente. Sostituire la prima m.a all’inizio di ogni riga/giro di m.a con 3 cat. Finire ogni giro con 1 m.bss nella 3a cat dall’inizio del giro. Finire ogni riga con 1 m.a nella cat all’inizio della riga precedente. RIGA A PUNTO FANTASIA: * 1 riga di m.b sul rovescio del lavoro, 1 riga di m.a sul diritto del lavoro *, ripetere da *-* (1 riga di m.b + 1 riga di m.a = 1 riga a punto fantasia). SUGGERIMENTO PER GLI AUMENTI: Per aumentare 1 m.b/m.a lavorare 2 m.b/m.a nella stessa m. MOTIVO: Vedere il diagramma A.1. ---------------------------------------------------------- BERRETTO: Si lavora inizialmente in tondo, dal centro, sul dietro; proseguire poi avanti e indietro per la parte superiore della testa. Avviare 4 cat con l’uncinetto n° 3,5 con il colore polvere e formare un anello con 1 m.bss nella prima cat. GIRO 1: Vedere le INFORMAZIONI PER IL LAVORO! Lavorare 12 m.a nell’anello di cat. GIRO 2: Lavorare 1 m.b in ogni m.a = 12 m.b. GIRO 3: Lavorare 2 m.a in ogni m.b = 24 m.a. GIRO 4: Lavorare 1 m.b in ogni m.a = 24 m.b. GIRO 5: * Lavorare 1 m.a nella prima m.b, 2 m.a nella m.b successiva *, ripetere da *-* su tutto il giro = 36 m.a. GIRO 6: Lavorare 1 m.b in ogni m.a = 36 m.b. GIRO 7: * Lavorare 1 m.a in ognuna delle prime 2 m.b, 2 m.a nella m.b successiva *, ripetere da *-* su tutto il giro = 48 m.a. GIRO 8: Lavorare 1 m.b in ogni m.a = 48 m.b. Fermarsi qui per le taglie 0/1 + 1/3 mesi. GIRO 9: * Lavorare 1 m.a in ognuna delle prime 3 m.b, 2 m.a nella m.b successiva *, ripetere da *-* su tutto il giro = 60 m.a. GIRO 10: Lavorare 1 m.b in ogni m.a = 60 m.b. Fermarsi qui per le taglie 6/9 + 12/18 mesi. GIRO 11: * Lavorare 1 m.a in ognuna delle prime 4 m.b, 2 m.a nella m.b successiva*, ripetere da *-* su tutto il giro = 72 m.a. GIRO 12: Lavorare 1 m.b in ogni m.a = 72 m.b. Fermarsi qui per le taglie 2 + 3/4 anni. TUTTE LE TAGLIE: Inserire 1 segno all’inizio del giro e 1 segno dopo 6-6-6-8 (8-8) m (visto sul diritto del lavoro). Iniziare sul diritto del lavoro del lavoro in corrispondenza del segno all’inizio del giro e lavorare 1 m.a in ogni m.b fino al secondo segno; ALLO STESSO TEMPO, aumentare 20-26-20-28 (20-22) m.a in modo uniforme – VEDERE IL SUGGERIMENTO PER GLI AUMENTI = 62-68-74-80 (84-86) m.a (non lavorare sulle 6-6-6-8 (8-8) m.b tra i 2 segni). Proseguire ora a RIGHE A PUNTO FANTASIA avanti e indietro – vedere le spiegazioni sopra, finché il lavoro non misura ca.8-9-10-11 (12-13) cm dai segni – finire dopo 1 riga di m.b sul rovescio del lavoro. Tagliare il filo. RIGA TRAFORATA PER I CORDINI: Lavorare il seguente bordo nella parte in basso del berretto, con il colore polvere, come segue: iniziare sul diritto del lavoro e lavorare m.b lungo uno dei lati corti nella parte in basso del berretto (lavorare 1 m.b in ogni riga di m.b e 2-3 m.b in ogni riga di m.a), lavorare 1 m.b in ognuna delle 6-6-6-8 (8-8) m.b tra i 2 segni del giro e lavorare m.b lungo l’altro lato corto (1 m.b in ogni riga di m.b e 2-3 m.b in ogni riga di m.a). Girare il lavoro e lavorare un'altra riga di m.b; ALLO STESSO TEMPO, aggiustare il n° di m.b in modo che sia divisibile per 5 + 1. Lavorare la riga successiva come segue: 1 cat, 1 m.b in ognuna delle prime 2 m.b, * saltare 2 m.b, 2 cat, 1 m.b in ognuna delle 3 m.b successive *, ripetere da *-* finché non rimangono 4 m, saltare 2 m.b, lavorare 2 cat e 1 m.b in ognuna delle ultime 2 m.b. Lavorare 2 righe di m.b avanti e indietro (1 m.b in ogni m.b e 2 m.b in ogni arco di cat). Tagliare il filo. CORDINO: Tagliare 4 capi del colore panna lunghi ca. 2,5 metri ognuno, avvolgerli insieme finché non oppongono resistenza, piegarli in due in modo che si avvolgano ancora; fare un nodo ad ogni estremità. Far passare il cordino attraverso i buchi della riga traforata. BORDO A VENTAGLI: Con il colore panna, lavorare 1 riga di m.b sul rovescio del lavoro nella parte davanti del berretto e, ALLO STESSO TEMPO, aumentare in modo uniforme in modo da avere 64-70-76-82 (88-94) m.b – VEDERE IL SUGGERIMENTO PER GLI AUMENTI. Proseguire con il motivo a ventagli seguendo il diagramma A.1, quindi lavorare come segue: RIGA 1 (= diritto del lavoro): 1 cat, 1 m.b nella prima m.b, * 3 cat, saltare 2 m, 1 m.b nella m successiva *, ripetere da *-* su tutta la riga = 21-23-25-27 (29-31) archi di cat, girare. RIGA 2 (= rovescio del lavoro): 3 cat (= 1 m.a), 3 m.a + 2 cat + 3 m.a nel primo arco di cat, * 1 m.a nell'arco di cat successivo, 3 m.a + 2 cat + 3 m.a nell'arco di cat successivo*, ripetere da *-* su tutta la riga e finire con 1 m.a nella prima m.b dall’inizio della riga precedente = 11-12-13-14 (15-16) gruppi di m.a con 1 m.a tra ogni gruppo di m.a, girare il lavoro. RIGA 3 (= diritto del lavoro): 3 cat (= 1 m.a), 3 m.a + 2 cat + 3 m.a nell'arco di cat del primo gruppo di m.a, * 1 m.a nella m.a successiva, 3 m.a + 2 cat + 3 m.a nell'arco di cat al centro del gruppo di m.a successivo *, ripetere da *-* su tutta la riga e finire con 1 m.a nella 3a cat dall’inizio della riga precedente. Tagliare il filo. |
||||||||||
Spiegazioni del diagramma |
||||||||||
|
||||||||||
 |
||||||||||
Avete terminato questo modello?Allora taggate le vostre foto con #dropspattern #camillebonnet o inviatele alla #dropsfan gallery. Avete bisogno di aiuto con questo modello?Troverete 11 video tutorial, una sezione per i commenti/domande e molto altro guardando il modello su www.garnstudio.com © 1982-2026 DROPS Design A/S. Ci riserviamo tutti i diritti. Questo documento, compreso tutte le sue sotto-sezioni, è protetto dalle leggi sul copyright. Potete leggere quello che potete fare con i nostri modelli alla fine di ogni modello sul nostro sito. |
||||||||||


Con oltre 40 anni di esperienza nel design di modelli di maglia e uncinetto, DROPS Design offre la più estesa collezione di modelli gratuiti su internet - tradotti in 17 lingue. Ad oggi vi possiamo fornire 324 cataloghi e 12290 modelli - 9561 dei quali sono tradotti in Italiano.
Ci stiamo impegnando molto per darvi il meglio che vi possiamo offrire in termini di maglia e uncinetto, ispirazioni e consigli così come filati di grande qualità ad un prezzo incredibile! Volete utilizzare i nostri modelli per qualcosa d'altro oltre al vostro uso personale? Potete leggere tutto ciò che è consentito nel testo sul Copyright in basso su tutte le pagine dei nostri modelli. Buon lavoro!
Lasciare un commento sul modello DROPS Baby 25-14
Noi saremmo felici di ricevere i tuoi commenti e opinioni su questo modello!
Se vuoi fare una domanda, fai per favore attenzione a selezionare la categoria corretta nella casella qui sotto per velocizzare il processo di risposta. I campi richiesti sono indicati da *.