
Categorie popolari
State cercando un filato?


Commenti / Domande (56)
![]() Doris Holley ha scritto:
Doris Holley ha scritto:
Help! I am at the part where you add stitches at the armhole and switch to size 6 needles, then work in garter stitch until finished. Finished What?? the row?? the whole top?? How many more inches or rows before I decrease? Thank you. I love this pattern
24.06.2014 - 18:18DROPS Design ha risposto:
Dear Mrs Holley, you continue in garter st until finished measurements. Happy knitting!
24.06.2014 - 18:38Jan ha scritto:
Hi....I have bought the yarn for this and have only done two rows. The next part of the pattern advises to work pattern according to diagram A1. Do I work from the bottom up or the top down of the diagram?! I am confused as I would normally work a chart from the bottom up, but given that this is a top down pattern I am uncertain whether i have to work the chart from top to bottom. Thank you
17.05.2014 - 12:31DROPS Design ha risposto:
Dear Jan, this top is worked from bottom up (pattern is the bottom edge). Start reading diagram from bottom corner on the right side towards the left on every round (1 square = 1 st x 1 row). Happy knitting!
19.05.2014 - 08:44
![]() Tone Synnøve Tonheim ha scritto:
Tone Synnøve Tonheim ha scritto:
Hvis hele toppen skal strikkes med en tråd av hver så kan det da ikke stemme at det skal være 3 ganger så mye av det ene?
02.05.2014 - 22:39DROPS Design ha risposto:
Der er mange flere meter i et nöste med DROPS Kid Silk end hvad der er i et nöste med DROPS Cotton Viscose :)
07.05.2014 - 10:49Jan ha scritto:
Hi....I would love to make this top, but the yarn looks very shiny but the actual top doesn't (in fact it looks a little fluffy)?! Is it possible to confirm what yarn was used for this as I have to buy the yarn online from overseas and I don't want to be disappionted. Thank you ...
29.04.2014 - 03:44DROPS Design ha risposto:
Dear Jan, this top is worked with 2 yarns held together: 1 strand Cotton Viscose (shiny effect) and 1 strand Kid-Silk (fluffly effect). Click on each shademap (under material list)to read more about both yarns. Happy knitting!
29.04.2014 - 09:36
![]() Gabva ha scritto:
Gabva ha scritto:
Hurra, die Tunika ist fertig und sieht einfach nur toll aus. Habe sie schon getragen und viel Lob dafür geerntet. Danke für die tolle Anleitung. War leicht nachzustricken. Das Garn ließ sich gut verarbeiten. Fühlt sich auf der Haut sehr gut an, auch nicht zu warm.
28.04.2014 - 12:10
![]() María ha scritto:
María ha scritto:
Buenas Estoy tejiendo la primera parte de las dismunciones, y a cada lado de los marcadores me quedan unos huecos muy antiestéticos. ¿Cómo puedo tejer estas disminuciones para evitar estos huecos? Saludos y gracias por adelantado.
25.04.2014 - 18:41DROPS Design ha risposto:
Hola María. En el apartado de VIDEOS ( al lado de los MATERIALES) tienes las recomendaciones sobre como trabajar las dism. Es importante, trabajar los pts con la misma tensión ajustando bien el hilo.
28.04.2014 - 11:16
![]() Huguenin Ruth ha scritto:
Huguenin Ruth ha scritto:
Wird der Pullover von A - Z mit beiden Garnen gestrick? oder wird nur der Anschlag so gemacht? Besten Dank für Ihre Antowrt.
06.03.2014 - 18:09DROPS Design ha risposto:
Liebe Ruth, ja der Pulli wird komplett mit beiden Garnen gestrickt - nur die Häkelränder sind aus doppeltem Kid Silk.
06.03.2014 - 18:42
![]() Roxane ha scritto:
Roxane ha scritto:
Je vous remercie pour votre réponse très rapide. Merci pour votre explications qui est très clair. Je vais pouvoir finir mon pull. Cordialement, Roxane.
24.02.2014 - 15:02
![]() Roxane ha scritto:
Roxane ha scritto:
Bonjour. Je me tricote actuellement le pull mais arrivé vers la fin je n'arrive pas à comprendre ce qu'il faut faire. " Continuer au point mousse jusqu'à la fin, EN MÊME TEMPS diminuer 1 m alternativement à droite et gauche des marqueurs ainsi: Taille XL: 17 fois tous les 4 tours et 2 fois tous les 2 tours. Quand toutes les diminutions sont faites, il reste 79-81-83-85-87-89 m. Tricoter 1 côte mousse et rabattre. " Merci d'avance pour votre réponse. Cordialement, Roxane.
24.02.2014 - 13:27DROPS Design ha risposto:
Bonjour Roxane, Quand vous avez placé vos 9 marqueurs, vous diminuez 1 m à droite de chaque marqueur (= avant les marqueurs), tricotez 3 tours sans diminuer, au tour suivant (= 4ème tour), diminuez 1 m à gauche de chaque marqueur (= après les marqueurs). Répétez ces diminutions encore 15 fois (= 17 fois au total) tous les 4 tours, puis 2 fois tous les 2 tours, il reste 85 m. Bon tricot!
24.02.2014 - 13:44
![]() Wally ha scritto:
Wally ha scritto:
Wann kommt für diese sehr schöne Tunika das Strickmuster?
29.01.2014 - 16:33
|
|||||||||||||
Tinkerbell#tinkerbelltop |
|||||||||||||
|
|
|||||||||||||
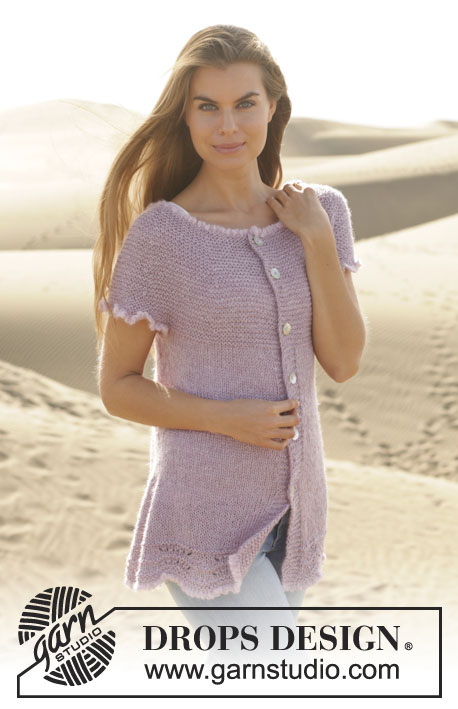
Maglia DROPS ai ferri, con motivo ondulato e sprone rotondo, in "Cotton Viscose" e "Kid-Silk". Taglie: Dalla S alla XXXL.
DROPS 155-32 |
|||||||||||||
|
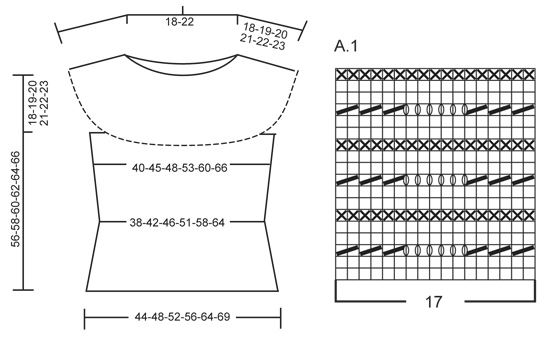
PUNTO LEGACCIO (in tondo, sui ferri circolari): Lavorare * 1 giro a dir e 1 giro a rov *, ripetere da *-*. 1 “costa” a legaccio = 2 giri. MOTIVO: Vedere il diagramma A.1. -------------------------------------------------------- MAGLIA: Si lavora in tondo sui ferri circolari. Avviare 153-170-187-204-221-238 m sui ferri circolari n° 5 con 1 capo del filato Cotton Viscose e 1 capo del filato Kid-Silk (= 2 capi). Lavorare 2 coste a legaccio - vedere le spiegazioni sopra. Al giro successivo lavorare il motivo ripetendo il diagramma A.1 (= 17 m) 9-10-11-12-13-14 volte in larghezza. Dopo aver lavorato il diagramma A.1 una volta in verticale, lavorare 1 giro a dir e, ALLO STESSO TEMPO, diminuire 5-6-11-10-7-4 m in modo uniforme sul giro = 148-164-176-194-214-234 m. Inserire 2 segni nel lavoro, a distanza di 74-82-88-97-107-117 m l’uno dall’altro. Proseguire a maglia rasata. RICORDARSI LA TENSIONE DEL LAVORO! Quando il lavoro misura 10 cm, diminuire 1 m da ciascun lato di ogni segno (= 4 m diminuite). Ripetere queste diminuzioni ogni 2 cm altre 4 volte (= 5 volte in tutto) = 128-144-156-174-194-214 m. Quando il lavoro misura 23 cm, aumentare 1 m da ciascun lato di ogni segno (= 4 m aumentate). Ripetere questi aumenti quando il lavoro misura 33-34-35-36-37-38 cm = 136-152-164-182-202-222 m. Quando il lavoro misura 38-39-40-41-42-43 cm, lavorare il giro successivo come segue: Intrecciare 8 m da ciascun lato per gli scalfi (intrecciare quindi le 4 m che precedono e le 4 m che seguono ogni segno) = sui ferri rimangono 120-136-148-166-186-206 m. Al giro successivo, avviare 48-50-54-56-60-64 nuove m sulle 8 m intrecciate = 216-236-256-278-306-334 m. Passare ai ferri circolari n° 4. Poi proseguire a punto legaccio fino alla fine del lavoro. Lavorare 1 giro e, ALLO STESSO TEMPO, diminuire 20-20-20-22-30-38 m in modo uniforme = 196-216-236-256-276-296 m. Inserire ora 9 segni come segue: 21-24-28-32-32-32 m, inserire un segno, 21-24-26-28-32-33 m, inserire un segno, 22-24-26-28-32-33 m, inserire un segno, poi inserire i 6 segni successivi a distanza di 22-24-26-28-30-33 m l’uno dall’altro. Proseguire a punto legaccio fino alla fine del lavoro; ALLO STESSO TEMPO, diminuire 1 m alternativamente alla destra e alla sinistra di ogni segno come segue: Taglie S-M-L: Ogni 6 giri: 6-4-0 volte e poi ogni 4 giri: 7-11-17 volte. Taglie XL-XXL-XXXL: Ogni 4 giri: 17-17-17 volte e poi ogni 2 giri: 2-4-6 volte. Terminate tutte le diminuzioni, sui ferri rimangono 79-81-83-85-87-89 m. Lavorare 1 costa a legaccio; intrecciare le m. BORDO ALL’UNCINETTO: Con l’uncinetto n° 5 e 2 capi del filato Kid-Silk, lavorare un bordo intorno alle aperture delle maniche, come segue: * 1 m.b, 3 cat, saltare ca.½ cm *, ripetere da *-*, finire con 1 m.b nella 1a m.b all’inizio del giro. Lavorare un bordo uguale intorno al collo e sul bordo inferiore della maglia. |
|||||||||||||
Spiegazioni del diagramma |
|||||||||||||
|
|||||||||||||
 |
|||||||||||||
Avete terminato questo modello?Allora taggate le vostre foto con #dropspattern #tinkerbelltop o inviatele alla #dropsfan gallery. Avete bisogno di aiuto con questo modello?Troverete 21 video tutorial, una sezione per i commenti/domande e molto altro guardando il modello su www.garnstudio.com © 1982-2026 DROPS Design A/S. Ci riserviamo tutti i diritti. Questo documento, compreso tutte le sue sotto-sezioni, è protetto dalle leggi sul copyright. Potete leggere quello che potete fare con i nostri modelli alla fine di ogni modello sul nostro sito. |
|||||||||||||


Con oltre 40 anni di esperienza nel design di modelli di maglia e uncinetto, DROPS Design offre la più estesa collezione di modelli gratuiti su internet - tradotti in 17 lingue. Ad oggi vi possiamo fornire 324 cataloghi e 12290 modelli - 9561 dei quali sono tradotti in Italiano.
Ci stiamo impegnando molto per darvi il meglio che vi possiamo offrire in termini di maglia e uncinetto, ispirazioni e consigli così come filati di grande qualità ad un prezzo incredibile! Volete utilizzare i nostri modelli per qualcosa d'altro oltre al vostro uso personale? Potete leggere tutto ciò che è consentito nel testo sul Copyright in basso su tutte le pagine dei nostri modelli. Buon lavoro!
Lasciare un commento sul modello DROPS 155-32
Noi saremmo felici di ricevere i tuoi commenti e opinioni su questo modello!
Se vuoi fare una domanda, fai per favore attenzione a selezionare la categoria corretta nella casella qui sotto per velocizzare il processo di risposta. I campi richiesti sono indicati da *.