
Categorie popolari
State cercando un filato?


Commenti / Domande (78)
![]() Susan ha scritto:
Susan ha scritto:
I am working the body, but am not sure where I measure for the length? I am making a size medium, so I need to reach 43 cm (17"). I do not see that measurement on the diagram.
26.09.2019 - 20:37DROPS Design ha risposto:
Hi Susan, The measurement is from where you divided for body and sleeves. Happy knitting!
27.09.2019 - 07:35
![]() Sharon ha scritto:
Sharon ha scritto:
I am sorry to again be asking for help but I do not understand the instructions for the size M increase where it says: "SIZE M: Inc every round on front/back piece 3 times and inc on 3rd round 1 time on sleeves. Work 2 rounds without inc = 248 sts on needle" What do you mean by "every round"? Do you mean each ROW of the 4 row repeat in A1 pattern? Or do you mean 4 pattern rows = one round? I only need to gain 16 sts. I need a simpler step by step explanation .
03.09.2019 - 15:36DROPS Design ha risposto:
Dear Sharon, you first increase a total of 20 times 8 sts per inc-round alternately every 2nd and every 3rd round, then work some more inc round in size M: increase on the next 2 rounds on body (= 4 sts inc per round), then increase on body + sleeve on next round (= 8 sts inc), work 2 rounds without inc, you should have now 248 sts on neede and raglan are done. Happy knitting!
05.09.2019 - 16:12
![]() Sharon ha scritto:
Sharon ha scritto:
The first stitch of my row 3 (of A1), is a YO increase from the previous round. Have I made a mistake? I ask because I can't K that YO twisted when A1 tells me for the start of row 3 to K2tog . I am following the instructions for A1 which you gave to Margaret on pg. 2 of these comments. Thank you, Sharon
31.08.2019 - 02:21DROPS Design ha risposto:
Dear Sharon, the increased stitches before/after A.1 have to be worked in A.1 when there are enough stitches to work them in pattern, ie you need to have increased 2 times to have enough stitches to work the increases in A.1, after 1st round increases, K the YO (= increases) twisted and work A.1 as before, after 2nd row with inc, work the 2 new stitches in A.1 (= like row 2 or4 = K twisted). Happy knitting!
02.09.2019 - 09:15
![]() Sharon ha scritto:
Sharon ha scritto:
When I come to the 3 stitches between the markers, do I knit them in stockinette or do I work the A1 pattern through it?
30.08.2019 - 14:50DROPS Design ha risposto:
Dear Sharon, the 3 stitches in stocking stitch are the raglan lines, they are worked in stocking stitch all the way, only the increases are worked in A.1. Happy knitting!
30.08.2019 - 15:10
![]() Sharon ha scritto:
Sharon ha scritto:
Can you please tell me which length needle I use to cast on? The directions say I need both a 32" and a 16", but no indication when to use each one.
26.08.2019 - 23:38DROPS Design ha risposto:
Dear Sharon, you can start with the smaller one then when you have i ncreased for raglan, you can change to the longer one. Happy knitting!
27.08.2019 - 09:13
![]() Jutta ha scritto:
Jutta ha scritto:
Hallo, muss ich diazugenommen Umschläge der Raglanschrägung in der nächsten R immer erst rechts verschränkt stricken und dann in der dann folgenden R ins Muster integrieren ?
26.08.2019 - 21:52DROPS Design ha risposto:
Liebe Jutta, ja genau, die Umschläge der Raglanschrägung werden rechts verschränkt gestrickt, dann im Muster A.1 gestrickt, wenn Sie genügend Maschen für 1 Rapport haben, und rechts gestrickt, wenn Sie noch nicht genügend Maschen für 1 Rapport haben. Viel Spaß beim stricken!
27.08.2019 - 09:12
![]() Wendy Emo ha scritto:
Wendy Emo ha scritto:
Thank you so much for having the comment thread. I see that mine have been asked and answered! Yay. And thank you for doing this in so many languages.
05.08.2019 - 23:21
![]() Anita ha scritto:
Anita ha scritto:
Tak
07.04.2019 - 14:01
![]() Anita ha scritto:
Anita ha scritto:
Bluse 154-2. Diagram A.1 viser 4 omgange med 2 "blanke" - men diagram forklaringen ser anderledes ud - ret fra retsiden el vrang fra vrangen - slå om mellem 2 m - og så de samme 2 som i A.1. Det kan jeg ikke forstå.
30.03.2019 - 16:37DROPS Design ha risposto:
Hei Anita. Diagram A.1 strikkes slik: rad 1: 1 kast (symbol 2), ta 1 m løst av p som om den skulle strikkes rett, 1 m rett, løft den løse m over (symbol 3). Rad 2: begge makene strikkes rett (symbol 1). Rad 3: 2 masker rett sammen (symbol 4), 1 kast (symbol 2). Rad 4: begge maskene strikkes rett (symbol 1). God fornøyelse
05.04.2019 - 14:48
![]() Andrea Hölzl ha scritto:
Andrea Hölzl ha scritto:
Guten Tag, kann man diesen Pullover auch als Jacke stricken?
21.08.2018 - 14:55DROPS Design ha risposto:
Hallo Andrea, leider haben wir für dieses Modell keine entsprechende Jacke. Als Jacke müsste in Hin- und Rück-Reihen gestrickt werden sowie an den vorderen Rändern jeweils eine Blende gestrickt werden. Wie gesagt haben wir dafür aber keine Anleitung. Vielleicht stöbern Sie einmal bei unseren Jacken und finden dort ein Modell, das Ihnen auch gefällt.
27.08.2018 - 10:18
|
|||||||||||||
Long Beach#longbeachsweater |
|||||||||||||
|
|
|||||||||||||
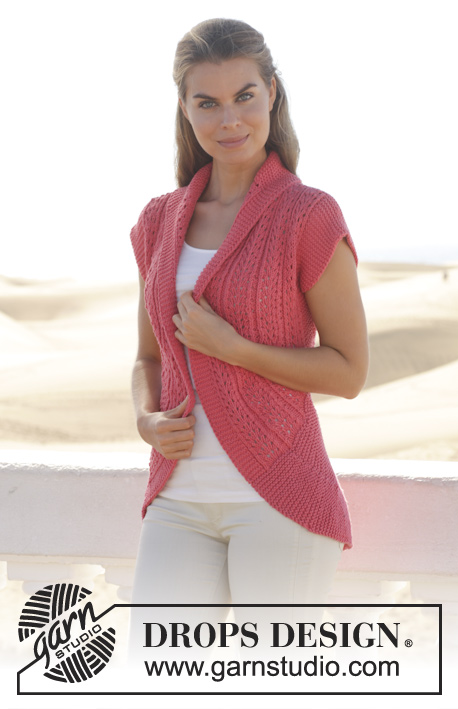
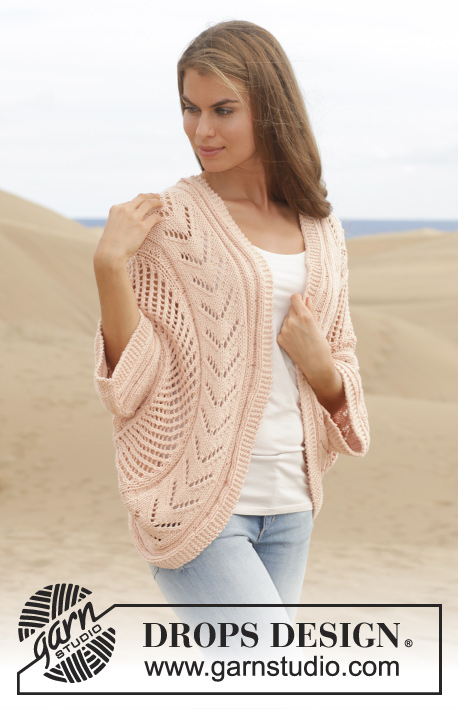
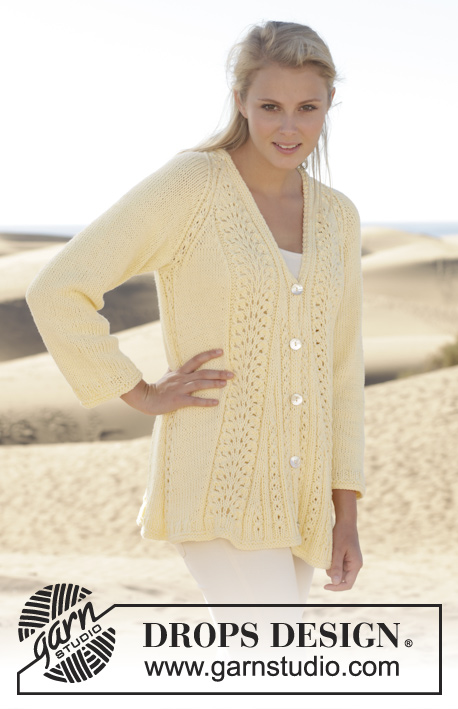
Maglione DROPS lavorato ai ferri con motivo a pizzo, lavorato dall’alto in basso in "Paris". Taglie: S - XXXL.
DROPS 154-2 |
|||||||||||||
|
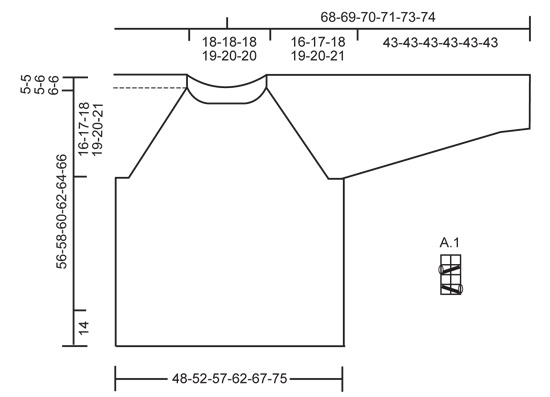
M LEGACCIO (in tondo sui f circolari/doppia punta): * 1 giro dir e 1 giro rov *, ripetere *-*. 1 “costa” a m legaccio = 2 giri. M LEGACCIO (avanti e indietro sui f): Lavorare tutti i f a dir. MOTIVO: Vedere il diagramma A.1. Il diagramma mostra tutti i f del motivo visti dal diritto del lavoro. RAGLAN: Aumentare 8 m su ogni giro con gli aumenti. Aumentare a ogni lato delle 3 m a m rasata che separano il dietro, il davanti e le maniche. Aumentare facendo 1 gettato, lavorare il gettato a dir ritorto sul f successivo per evitare buchi. Lavorare gli aumenti nel motivo A.1: aumentare ogni 2 e 3 giri 20-20-22-20-22-14 volte in totale. Poi lavorare e aumentare in modo diverso sulle maniche e sul davanti/dietro per le diverse taglie come segue: TAGLIA S: Lavorare altri 3 giri senza aumenti = 232 m sul f. TAGLIA M: aumentare su ogni giro sul davanti/dietro 3 volte e aumentare sul 3 giri 1 volta sulle maniche. Lavorare 2 giri senza aumenti = 248 m sul f. TAGLIA L: aumentare su ogni giro 4 volte sul davanti/dietro, non aumentare sulle maniche = 264 m sul f. TAGLIA XL: aumentare su ogni giro 9 volte sul davanti/dietro e aumentare ogni 3 giri 3 volte sulle maniche = 288 m sul f. TAGLIA XXL: aumentare su ogni giro 9 volte sul davanti/dietro e aumentare ogni 3 giri 2 volte sulle maniche = 304 m sul f. TAGLIA XXXL: Aumentare su ogni giro 23 volte sul davanti/dietro e aumentare a giri alterni 11 volte sulle maniche = 332 m sul f. SUGGERIMENTO PER LE DIMINUZIONI: Diminuire a ogni lato delle 3 m a m rasata al centro sotto la manica. Diminuire come segue prima delle m: lavorare fino a quando rimangono 2 m prima delle 3 m, passare 1 m a dir senza lavorarla, 1 m dir, accavallare la m passata sopra quella appena lavorata. Diminuire come segue dopo le m: lavorare 2 m insieme a dir. ---------------------------------------------------------- MAGLIONE: Lavorato dall’alto in basso. Avviare 84-84-84-92-96-96 m con i f circolari n° 5,5 e lavorare 2 “coste” in tondo sui f. Lavorare 1 giro dir e distribuire 12 diminuzioni in modo uniforme per tutte le taglie = 72-72-72-80-84-84 m. Lavorare 1 giro rov – ALLO STESSO TEMPO inserire i segnapunti nel lavoro come segue: 1° segnapunti all’inizio del giro (= inizio del dietro), 2° segnapunti dopo 18-18-18-18-20-20 m (= fine del dietro), 3° segnapunti dopo 3 m, 4° segnapunti dopo 12-12-12-16-16-16 m (= manica sinistra), 5° segnapunti dopo 3 m, 6° segnapunti dopo 18-18-18-18-20-20 m (= fine del davanti), 7° segnapunti dopo 3 m, 8° segnapunti dopo 12-12-12-16-16-16 m (= manica destra). Poi lavorare secondo il diagramma A.1 sul davanti, dietro e le maniche, ALLO STESSO TEMPO aumentare per il RAGLAN – leggere la spiegazione sopra a ogni lato delle 3 m a m rasata che separano le maniche, il davanti e il dietro. Dopo gli aumenti del raglan ci sono 232-248-264-288-304-332 m sul f. Sul giro successivo lavorare A.1 sulle 58-64-70-76-82-94 m sul dietro, intrecciare 3 m, lavorare A.1 sulle 52-54-56-62-64-66 m sulla manica destra, trasferire le m della manica su un fermamaglie. Intrecciare 3 m, lavorare A.1 sulle 58-64-70-76-82-94 m sul davanti e intrecciare 3 m, lavorare A.1 sulle 52-54-56-62-64-66 m sulla manica sinistra, trasferire le m della manica su un fermamaglie e intrecciare 3 m. Poi lavorare il corpo e le maniche in modo separato. CORPO: Lavorare il f successivo come segue: A.1 sulle 58-64-70-76-82-94 m successive (= dietro), avviare 4 nuove m sotto la manica destra, A.1 sulle 58-64-70-76-82-94 m successive (= davanti) e avviare 4 nuove m sotto la manica sinistra = 124-136-148-160-172-196 m. Inserire un segnapunti al centro delle 4 nuove m sotto ogni manica e spostare questi segnapunti durante il lavoro. Unire il lavoro e lavorare in tondo secondo A.1 su tutte le m fino a quando il lavoro misura 41-43-45-47-49-51 cm. Lavorare 2 “coste” su 4 m a ogni lato dei segnapunti e A.1 sulle altre m come prima. (= 8 m a ogni lato della m legaccio). Sul giro successivo dividere il lavoro all’altezza dei segnapunti e lavorare il davanti e il dietro in modo separato fino alla fine del lavoro con 4 m a m legaccio a ogni lato = 62-68-74-80-86-98 m sul f. Lavorare fino a quando il lavoro misura 54-56-58-60-62-64 cm e lavorare 2 “coste”. Lavorare 1 f dir e ALLO STESSO TEMPO distribuire 10-10-12-14-14-14 aumenti in modo uniforme = 72-78-86-94-100-112 m. Lavorare 1 f dir e intrecciare senza stringere. Il lavoro ora misura circa 56-58-60-62-64-66 cm. MANICA: Riportare le m della manica sui f di lavoro = 52-54-56-62-64-66 m, avviare 3 nuove m e unire il lavoro e continuare in tondo sui f circolari/doppia punta = 55-57-59-65-67-69 m. Lavorare le 3 nuove m sotto la manica a m rasata e lavorare le altre m secondo il diagramma A.1 come prima. Inserire un segnapunti al centro sotto la manica, misurare il lavoro da qui. Quando il lavoro misura 2 cm, diminuire 1 m a ogni lato delle 3 m a m rasata al centro sotto la manica – LEGGERE IL SUGGERIMENTO PER LE DIMINUZIONI sopra, ripetere le diminuzioni ogni 2½-2-2-2-1½-1½ cm altre 15-16-16-18-19-19 volte (16-17-17-19-20-20 diminuzioni in totale) = 23-23-25-27-27-29 m. Lavorare fino a quando il lavoro misura circa 41 cm dal segnapunti, 1 giro dir, 1 giro rov, 1 giro dir e 1 giro rov e ALLO STESSO TEMPO distribuire 4 aumenti in modo uniforme = 27-27-29-31-31-33 m, lavorare 1 giro rov e intrecciare senza stringere. Il lavoro misura circa 43 cm (la stessa lunghezza per tutte le taglie a causa della maggiore ampiezza del corpo nelle taglie più grandi). CONFEZIONE: Cucire le aperture sotto le maniche. |
|||||||||||||
Spiegazioni del diagramma |
|||||||||||||
|
|||||||||||||
 |
|||||||||||||
Avete terminato questo modello?Allora taggate le vostre foto con #dropspattern #longbeachsweater o inviatele alla #dropsfan gallery. Avete bisogno di aiuto con questo modello?Troverete 22 video tutorial, una sezione per i commenti/domande e molto altro guardando il modello su www.garnstudio.com © 1982-2026 DROPS Design A/S. Ci riserviamo tutti i diritti. Questo documento, compreso tutte le sue sotto-sezioni, è protetto dalle leggi sul copyright. Potete leggere quello che potete fare con i nostri modelli alla fine di ogni modello sul nostro sito. |
|||||||||||||


Con oltre 40 anni di esperienza nel design di modelli di maglia e uncinetto, DROPS Design offre la più estesa collezione di modelli gratuiti su internet - tradotti in 17 lingue. Ad oggi vi possiamo fornire 324 cataloghi e 12290 modelli - 9561 dei quali sono tradotti in Italiano.
Ci stiamo impegnando molto per darvi il meglio che vi possiamo offrire in termini di maglia e uncinetto, ispirazioni e consigli così come filati di grande qualità ad un prezzo incredibile! Volete utilizzare i nostri modelli per qualcosa d'altro oltre al vostro uso personale? Potete leggere tutto ciò che è consentito nel testo sul Copyright in basso su tutte le pagine dei nostri modelli. Buon lavoro!
Lasciare un commento sul modello DROPS 154-2
Noi saremmo felici di ricevere i tuoi commenti e opinioni su questo modello!
Se vuoi fare una domanda, fai per favore attenzione a selezionare la categoria corretta nella casella qui sotto per velocizzare il processo di risposta. I campi richiesti sono indicati da *.