
Categorie popolari
State cercando un filato?


Commenti / Domande (66)
![]() Nathalie ha scritto:
Nathalie ha scritto:
Aussi j'aimerais savoir si à la suite des 149 mailles on doit avoir encore des augmentations ou bien le nombres de mailles demeure inchangé jusqu’à la fin à partir de ce point car à la fin de mon rang 3 du rang ajouré j'ai 1 maille de plus donc 150, peut-être que je ne dois pas faire le jeté avant d 'entreprendre mes 4 dernières mailles de ce rang? Merci pour votre aide , c'est très apprécié
08.03.2018 - 21:58DROPS Design ha risposto:
Bonjour Nathalie, les augmentations continuent également dans le point ajouré. Répétez bien les 4 rangs comme indiqué. Bon tricot!
09.03.2018 - 09:01
![]() Nathalie ha scritto:
Nathalie ha scritto:
Bonjour, j'ai atteint les 149 mailles sur un rang 5, donc j'ai débuté mon point ajouré après celui-ci et là ça ne va pas du tout car mon rang 3 termine sur le côté sans augmentation pourtant dans les explications on obtiens 149 mailles suite au rang 5
08.03.2018 - 21:27DROPS Design ha risposto:
Bonjour Nathalie, terminez d'abord par un rang 2 (= sur l'envers) pour commencer le point ajouré par le rang 1 (= sur l'endroit). Bon tricot!
09.03.2018 - 08:56
![]() Anke ha scritto:
Anke ha scritto:
Endlich habe ich eine Anleitung für ein langes, flaches Dreiecktuch gefunden. Habe die Videoanleitung nachgearbeitet und parallel das Schema auf Karopapier aufgezeichnet. Dann visualisiert man das besser. Super Ergebnis!!!
24.11.2017 - 11:04
![]() Marie-France Dionne ha scritto:
Marie-France Dionne ha scritto:
Bonjour J'aimerais faire se châle mais j'ai 200g /500mêtre de fils DK Es-ce que je peut le faire quand même? Car selon le patron sa prend 668 metre. Je le commence et j'arrête quand je n'ai plus de fil? Merci
11.08.2017 - 03:52DROPS Design ha risposto:
Bonjour Mme Dionne, ce modèle a été écrit pour BabyAlpaca Silk qui est plutôt un fil "5 ply/Sport" - vous pouvez utiliser une qualité similaire du même groupe de fils (voir ici - Cliquez ici pour en savoir plus sur les alternatives. Bon tricot!
11.08.2017 - 10:09Eleanor Cole ha scritto:
I am ready to begin the Lace pattern & despite watching the video I am confused! At end of rows 2&4 of Lace instructions it says to knit all stitches then YO , yet on video this is not done . I would be happy to follow video as I can't work out how to YO at end of row anyway, but don't want to make a mistake & have to undo......again! Please advise.
12.07.2015 - 15:59DROPS Design ha risposto:
Dear Mrs Cole, on row 2 and 4 you have to K all sts + YOs from previous row, you don't finish with YO, ie you can follow the video. Happy knitting!
27.07.2015 - 10:19
![]() Angela ha scritto:
Angela ha scritto:
Hello, I have now started the portion called the lace pattern, I think I must have missed something here, I have been steadily making my increases per the pattern but should I begin a decrease soon somewhere to start making the other side, I do not see the corresponding decrease in the lace to give this the V shape as in the picture.
29.05.2015 - 04:42DROPS Design ha risposto:
Dear Angela, there are no dec in this shawl, you start to knit on one of the tip at the top working sideways to the opposite side of triangle. Happy knitting!
29.05.2015 - 09:39
![]() Marise ha scritto:
Marise ha scritto:
Je ne comprends pas de quel côté on doit mesurer? ´Mesurer du côté de l'aiguille du petit coté' Est-ce du côté sur lequel je tricote mon point ajouré? Merci pour votre précison.
07.05.2015 - 17:28DROPS Design ha risposto:
Bonjour Marise, quand vous posez votre châle à plat, vous avez un des côtés qui est plus court (sans augmentations) et l'autre (côté augmentations) qui est plus long, mesurez le long du côté sans les augmentations. Bon tricot!
08.05.2015 - 09:30
![]() AnnaRita Romagnoli ha scritto:
AnnaRita Romagnoli ha scritto:
Quando si inizia il lavoro con il punto traforato, sul ferro ci sono 149 maglie. Il numero delle maglie rimane invariato fino alla fine del lavoro? Se non é così quante maglie si aumentano/diminuiscono ad ogni ferro 1 e 3? Alla chiusura delle maglie a cm 106 ferro corto quante maglie dovrebbero esserci? Grazie e complimenti per i bei lavori che pubblicate.
03.01.2015 - 14:06DROPS Design ha risposto:
Buonasera AnnaRita. Quando sui ferri ci sono 149 m, prosegue con il motivo traforato: aumenta quindi 2 m alla fine di ogni ferro 3 del motivo traforato (sono le ultime 2 m gettate sul ferro), dando così la forma corretta allo scialle. Non ci sono aumenti nel ferro 1. Prosegue in questo modo fino alla misura indicata o desiderata. Buon lavoro!
03.01.2015 - 18:18
![]() Terry ha scritto:
Terry ha scritto:
I have just started the lace pattern on 149 stitches. Does the stitch count remain at 149 stitches throughout this pattern. The way I calculate it, each 3rd row increases 2 stitches while each 1st row is an even row.
01.12.2014 - 17:06DROPS Design ha risposto:
Dear Terry, you are correct, number of sts will inc every time row 3 in pattern is worked. Happy knitting!
02.12.2014 - 09:02
|
|
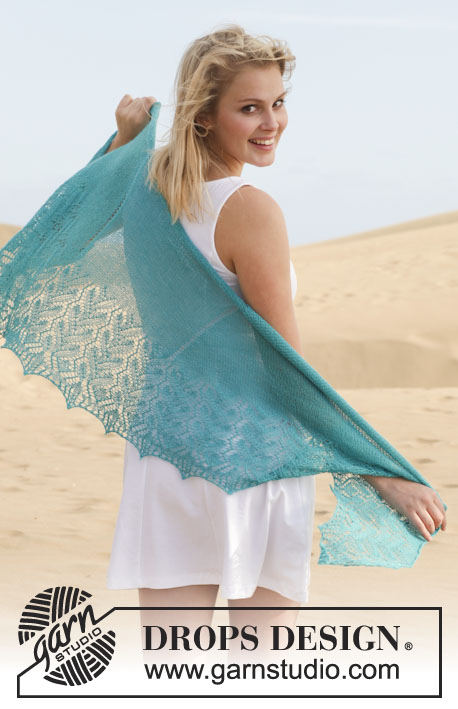
Soir d'Été#soirdeteshawl |
|
 |
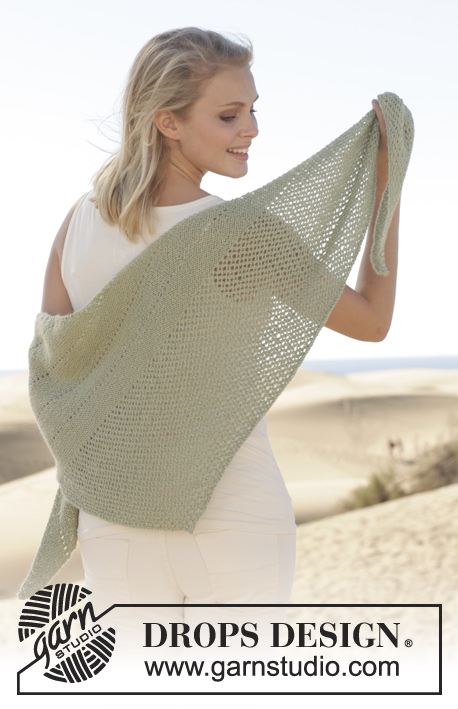 |
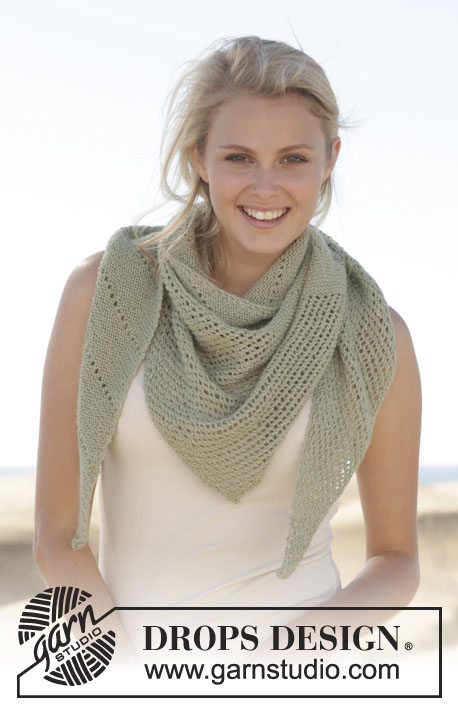
Scialle DROPS ai ferri, a punto legaccio e con motivo traforato, in "BabyAlpaca Silk".
DROPS 152-16 |
|
|
PUNTO LEGACCIO (avanti e indietro sui ferri): Lavorare tutti i ferri a dir. 1 “costa” a legaccio = 2 ferri a dir. RIGA CON I FORI: Lavorare una riga con i fori ogni 11 coste a legaccio; lavorare la prima riga con i fori quando sui ferri ci sono 17 m. La riga con i fori è sempre lavorata al ferro 3, quindi al ferro che inizia con 2 m insieme a dir. Lavorare la riga con i fori come segue: 2 m insieme a dir, * 1 m gettata, 2 m insieme a dir *, ripetere da *-* finché non rimane 1 m, 1 m gettata e 1 m dir. MOTIVO TRAFORATO: Ferro 1: 2 m insieme a dir, * 1 m gettata, 2 m insieme a dir *, ripetere da *-* finché non rimane 1 m, 1 m gettata e 1 m dir. Ferro 2: lavorare tutte le m e le m gettate a dir. Ferro 3: 1 m dir, * 2 m insieme a dir, 1 m gettata *, ripetere da *-* finché non rimangono 4 m, 2 m dir, 1 m gettata, 1 m dir, 1 m gettata e 1 m dir. Ferro 4: lavorare tutte le m e le m gettate a dir. Ripetere i ferri da 1 a 4. ---------------------------------------------------------- SCIALLE: Si lavora avanti e indietro sui ferri circolari. Avviare 3 m sui ferri circolari n° 3,5 con il filato BabyAlpaca Silk e lavorare 1 ferro a dir. Proseguire a PUNTO LEGACCIO - vedere le spiegazioni sopra, come segue: FERRO 1: 1 m dir, 1 m gettata, 1 m dir, 1 m gettata e 1 m dir = 5 m. FERRO 2: Lavorare tutte le m a dir. FERRO 3: 2 m insieme a dir (lavorare senza stringere troppo il filo), lavorare a dir finché non rimane 1 m, 1 m gettata e 1 m dir. Questo ferro viene sostituito da un ferro con i fori ogni 11 coste a legaccio. FERRO 4: Lavorare tutte le m a dir. FERRO 5: Lavorare a dir finché non rimangono 2 m, 1 m gettata, 1 m dir, 1 m gettata e 1 m dir. Ripetere ora i ferri da 2 a 5 finché sui ferri con ci sono 17 m. ** Proseguire come prima, ma sostituire il ferro 3 con un ferro con i fori - vedere le spiegazioni sopra. Proseguire come prima a punto legaccio e aumentando /diminuendo come prima senza il ferro con il motivo traforato finché non sono state aumentate 12 nuove m ** = sui ferri ci sono 29 m. Ripetere da **-** finché non sono stati lavorati 11 ferri con i fori (sono state aumentate 12 nuove m). Lavorare il ferro con i fori quando ci sono: 17, 29, 41, 53, 65, 77, 89, 101, 113, 125 e 137 m sui ferri. Proseguire a punto legaccio aumentando/ diminuendo come prima finché sui ferri non ci sono 149 m. Proseguire con il MOTIVO TRAFORATO - vedere le spiegazioni sopra. Ripetere i ferri da 1 a 4 del motivo traforato finché il lavoro non misura ca.106 cm misurati lungo il ferro /lato corto. Finire dopo il ferro 2 o 4 del motivo traforato; intrecciare,senza stringere troppo il filo, e lavorando le m a dir. Tagliare e fermare il filo. |
|
Avete terminato questo modello?Allora taggate le vostre foto con #dropspattern #soirdeteshawl o inviatele alla #dropsfan gallery. Avete bisogno di aiuto con questo modello?Troverete 10 video tutorial, una sezione per i commenti/domande e molto altro guardando il modello su www.garnstudio.com © 1982-2026 DROPS Design A/S. Ci riserviamo tutti i diritti. Questo documento, compreso tutte le sue sotto-sezioni, è protetto dalle leggi sul copyright. Potete leggere quello che potete fare con i nostri modelli alla fine di ogni modello sul nostro sito. |
|


Con oltre 40 anni di esperienza nel design di modelli di maglia e uncinetto, DROPS Design offre la più estesa collezione di modelli gratuiti su internet - tradotti in 17 lingue. Ad oggi vi possiamo fornire 324 cataloghi e 12290 modelli - 9561 dei quali sono tradotti in Italiano.
Ci stiamo impegnando molto per darvi il meglio che vi possiamo offrire in termini di maglia e uncinetto, ispirazioni e consigli così come filati di grande qualità ad un prezzo incredibile! Volete utilizzare i nostri modelli per qualcosa d'altro oltre al vostro uso personale? Potete leggere tutto ciò che è consentito nel testo sul Copyright in basso su tutte le pagine dei nostri modelli. Buon lavoro!
Lasciare un commento sul modello DROPS 152-16
Noi saremmo felici di ricevere i tuoi commenti e opinioni su questo modello!
Se vuoi fare una domanda, fai per favore attenzione a selezionare la categoria corretta nella casella qui sotto per velocizzare il processo di risposta. I campi richiesti sono indicati da *.