
Categorie popolari
State cercando un filato?


Commenti / Domande (36)
Marya ha scritto:
I V finished with front and back piece but when i wanted to sew the shoulder i v 2 cm lelt on the top(i think it s the texture row we add a the end )when i sew them edge to edge i v the front piece taller than the back piece pls could u tell me how shall i do thanks
10.03.2015 - 22:57DROPS Design ha risposto:
Dear Marya, both front pieces should have same length as back piece, the last 2 rows worked on each shoulder on back piece are done 2 cm before final measurements, you may require to crochet more rows to reach same height. Happy crocheting!
11.03.2015 - 08:57Marya ha scritto:
I m working M size i divide for armholes in 46cm but there s no hole ,will the hole be created in the last row over 24 sts and please can u tel me how should i sew the sleeve thanks
06.03.2015 - 13:28DROPS Design ha risposto:
Dear Marya, you will sew the last 24 sts on back piece each side together with the 24 sts on right and left shoulder, this will create a hole (from where you divide work to shoulder) where you can then sew sleeve. Happy crocheting!
06.03.2015 - 14:31Marya ha scritto:
I m a little confused,the pattern says "Sew the shoulder seams. Sew sleeve seams" dont know where shall i sew the sleeves ,i see no hole please i need some clarification thanks
06.03.2015 - 08:14DROPS Design ha risposto:
Dear Marya, the armholes are created when you divide the bottom of jacket when piece measures 45-50 cm (see size) and finish each piece separately. The shoulders are the last row of each front piece + the 22-35 sts each side of back piece. Happy crocheting!
06.03.2015 - 09:14
![]() Rita ha scritto:
Rita ha scritto:
Klopt de hoeveelheid garen wel? Het vest (L) is af, het past perfect maar ik heb 3 bollen Nepal over!
27.10.2014 - 10:48DROPS Design ha risposto:
We geven het door aan onze designafdeling.
27.10.2014 - 16:07
![]() Rita ha scritto:
Rita ha scritto:
Ben er inmiddels uit. Nog bedankt.
26.10.2014 - 11:29
![]() Rita ha scritto:
Rita ha scritto:
Snap het langs hals nu wel maar 1e toer onderaan linker voorpand nog niet (ben een beginner) Er staat : * sla 1 dstk over, haak in volgende dstk 2 dstk en 2l en 2 dstk en 2 l *, herhaal van *-* langs rechter voorpand, langs de hals op het achterpand en naar beneden langs het linker voorpand. Het is me niet duidelijk wat ik moet doen na de allerlaatste 2 dstk onderaan
25.10.2014 - 20:02
![]() Rita ha scritto:
Rita ha scritto:
Ik kom niet uit het laatste stuk, de voorbies. Ik snap niet hoe je de eerste toer eindigt en evenmin hoe je langs de hals op het achterpand haakt aangezien de dstk daar anders lopen dan langs de rand van het voorpand.
25.10.2014 - 17:54DROPS Design ha risposto:
U kunt gewoon verder gaan op dezelfde manier, als u maar zorgt dat u de steken over ongeveer hetzelfde aantal cm verdeelt zodat het mooi doorloopt, dan is het niet zo belangrijk dat de steken waarin u haakt iets anders zijn. Denk alsof u deze rand al gehaakt heeft en gelijkmatig vastnaait. U eindigt zoals u begint, dus met 1 v.
25.10.2014 - 18:45
![]() Kelly ha scritto:
Kelly ha scritto:
I for some reason, cannot figure out the last of this pattern. I do not understand the 1-1-1-1-2-3 I normally can read a simple pattern and I cannot figure it out for some reason, Please help!
21.10.2014 - 23:35DROPS Design ha risposto:
Dear Kelly, each number apply to the matching size, ie first 4 "1" applies to first 4 sizes (= S, M, L, XL), the "2" apply to size XXL and "3" to size XXXL. Happy crocheting!
22.10.2014 - 09:38
![]() Fanny ha scritto:
Fanny ha scritto:
Versuche es hier nochmal, häkel die jacke nach Anleitung nach aber irgendwie verstehe ich nicht wo ich die armlöcher abk soll. Danke schon mal im voraus
27.08.2014 - 20:14DROPS Design ha risposto:
Die Jacke wird für die Armausschnitte einfach nur geteilt, d.h. Sie häkeln zunächst nur über die äußersten 22-24-26-29-32-35 M an der einen Seite, dies ist das eine Vorderteil. Dann setzen Sie den Faden neu an und häkeln über die äußersten 22-24-26-29-32-35 M an der anderen Seite (= anderes Vorderteil). Dann häkeln Sie die mittleren M weiter. Nun haben Sie also zwei "Einschnitte" in der Jacke, dies sind die Armausschnitte.
01.09.2014 - 00:35
![]() Fanny ha scritto:
Fanny ha scritto:
Ich finde die Jacke auch sehr schön bin dabei sie nachzuhäkeln aber irgendwie verstehe ich nicht wo ich die armlöcher abk soll
27.08.2014 - 19:49DROPS Design ha risposto:
Antwort siehe oben! :-)
01.09.2014 - 13:43
|
||||||||||
Otus#otuscardigan |
||||||||||
|
|
||||||||||
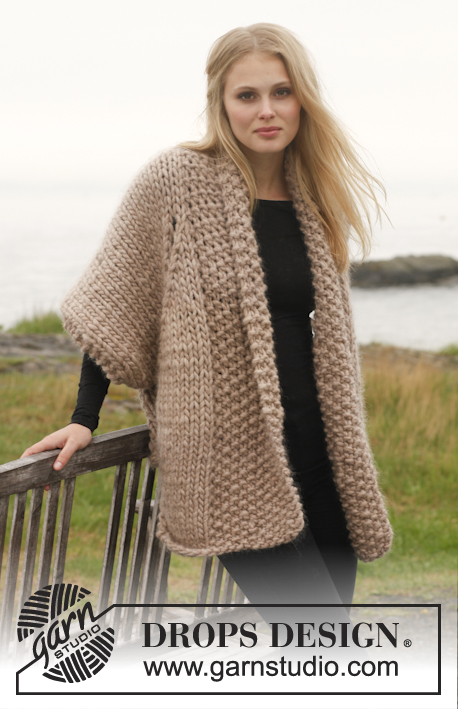
Giacchino DROPS lavorato all’uncinetto con bordi con motivo a ventaglio in "Nepal". Taglie: S - XXXL.
DROPS 151-26 |
||||||||||
|
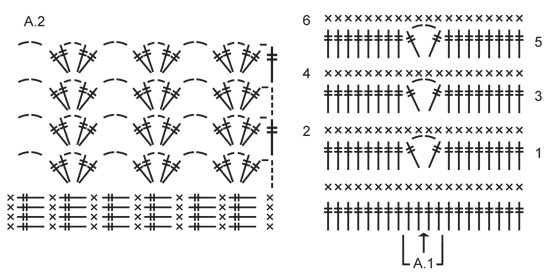
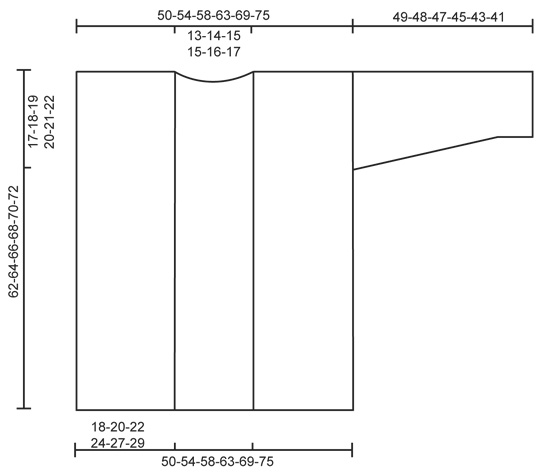
INFORMAZIONI PER IL LAVORO: All’inizio di ogni riga a m.b. iniziare con 1 cat, poi lavorare 1 m.b. nella 1° m. prima di continuare con 1 m.b. in ogni m. (la cat. NON conta come 1 m.). Finire la riga con 1 m.b. nella 4° cat. dall’inizio della riga precedente. All’inizio di ogni riga a m.a.d. iniziare con 4 cat. nella 1° m., poi lavorare 1 m.a.d. in ogni m. (4 cat. = 1° m.a.d.). Finire la riga con 1 m.a.d. nella 1° m.b. dall’inizio della riga precedente. RIGHE A PUNTO FANTASIA: * 1 riga a m.a.d., 1 riga a m.b. *, ripetere *-* fino alla fine del lavoro - NOTA: lavorare in ogni m.b./m.a.d. della riga precedente e non tra le m. MOTIVO: Vedere il diagramma A.1 (applicato alle maniche) e A.2 (applicato al bordo). ---------------------------------------------------------- GIACCHINO: Avviare 139-151-163-179-196-213 cat. con l’uncinetto n° 5 mm con Nepal. Lavorare la 1° riga come segue: 1 m.b. nella 2° cat. dall’uncinetto, * 1 m.b. in ognuna delle 3 cat. successive, saltare 1 cat. *, ripetere *-* fino a quando rimangono 1-1-1-1-2-3 cat. e finire con 1 m.b. in ognuna delle ultime cat. = 104-113-122-134-147-160 m.b., girare il lavoro. LEGGERE LE INFORMAZIONI PER IL LAVORO e lavorare le RIGHE A PUNTO FANTASIA verso l’alto – leggere la spiegazione sopra. FARE ATTENZIONE ALLA TENSIONE DEL LAVORO! Quando il lavoro misura circa 45-46-47-48-49-50 cm, dividerlo per gli scalfi e finire ogni parte in modo separato come segue: DAVANTI: Continuare con le righe a punto fantasia avanti e indietro sulle 22-24-26-29-32-35 m. più esterne in un lato del lavoro (= davanti). Quando il lavoro misura circa 62-64-66-68-70-72 cm – finire dopo 1 riga a m.b., tagliare il filo. Ripetere sulle 22-24-26-29-32-35 m. più esterne dall’altro lato del lavoro. DIETRO: Continuare con le righe a punto fantasia avanti e indietro sulle 60-65-70-76-83-90 m. del dietro fino a quando il lavoro misura circa 60-62-64-66-68-70 cm – aggiustarlo in modo che l’ultima riga sia una riga a m.b. Ora lavorare 1 riga a punto fantasia (cioè 1 riga a m.a.d. + 1 riga a m.b.) avanti e indietro sulle 22-24-26-29-32-35 m. più esterne sulla spalla. Tagliare il filo e ripetere sulle 22-24-26-29-32-35 m. più esterne sull’altro lato (cioè non lavorare sulle 16-17-18-18-19-20 m. centrali = scollatura sul dietro del collo). Chiudere. MANICA: Avviare 35-37-37-40-40-43 cat. con l’uncinetto n° 5 mm con Nepal. Lavorare la 1° riga come segue: 1 m.b. nella 2° cat. dall’uncinetto, * 1 m.b. in ognuna delle 3 cat. successive, saltare 1 cat. *, ripetere *-* fino a quando rimangono 1-3-3-2-2-1 cat. e finire con 1 m.b. in ognuna delle ultime cat. = 26-28-28-30-30-32 m.b., girare il lavoro. Poi lavorare le righe a punto fantasia avanti e indietro. LEGGERE IL RESTO DELLA SPIEGAZIONE DELLA MANICA PRIMA DI CONTINUARE! ALLO STESSO TEMPO sulla 5° riga (cioè sulla 3° riga a m.a.d.), inserire 1 segnapunti al centro del lavoro. Lavorare a m.a.d. come prima fino a quando rimangono 2 m. prima del segnapunti, lavorare il motivo secondo il diagramma A.1 sulle 4 m. successive, cioè lavorare come segue: saltare 1 m., 1 m.a.d. nella m. successiva, 2 cat., 1 m.a.d. nella m. successiva, saltare 1 m. e continuare il resto della riga a m.a.d. come prima. Continuare il motivo come mostrato in A.1 (la freccia al centro di A.1 indica il segnapunti). ALLO STESSO TEMPO sulla 4°-4°-4°-4°-3°-3° riga a m.a.d. (il lavoro misura circa 9-9-9-9-6-6 cm), aumentare 1 m.a.d. a ogni lato lavorando 2 m.a.d. nella 2° e nella penultima m.a.d. a ogni lato. Ripetere gli aumenti a righe a m.a.d. alterne altre 6-4-3-3-2-1 volte (= 7-5-4-4-3-2 aumenti in totale a ogni lato) e poi su ogni riga a m.a.d. 0-3-5-5-7-8 volte in totale = 40-44-46-48-50-52 m. Quando il lavoro misura 49-48-47-45-43-41 cm (misure più corte per le taglie più grandi a causa della maggiore ampiezza delle spalle), tagliare il filo. Lavorare un’altra manica nello stesso modo. CONFEZIONE: Cucire i margini delle spalle. Cucire i bordi delle maniche margine a margine nel filo davanti delle m. più esterne. Attaccare le maniche agli scalfi con piccoli punti ordinati – assicurarsi di evitare una cucitura stretta. BORDO: Iniziare dal diritto del lavoro in basso sul davanti destro e lavorare come mostrato nel diagramma A.2, cioè lavorare come segue: RIGA 1: 1 m.b. nella 1° m., 5 cat. (= 1 m.a.d. + 1 cat.), nella 1° m.a.d. lavorare 2 m.a.d. + 2 cat. + 2 m.a.d. + 2 cat., * saltare 1 m.a.d., nella m.a.d. successiva lavorare 2 m.a.d. + 2 cat. + 2 m.a.d. + 2 cat. *, ripetere *-* lungo il davanti destro, lungo la scollatura, sul dietro del collo e giù lungo il davanti sinistro. Girare il lavoro. RIGA 2: 5 cat. (= 1 m.a.d. + 1 cat.), poi lavorare come segue in ogni spazio di cat. al centro di ogni gruppo di m.a.d.: 2 m.a.d. + 2 cat. + 2 m.a.d., 2 cat. Ripetere la 2° riga fino a quando sono state lavorate un totale di 4-4-5-5-5-5 righe. Lavorare l’ultima riga come segue: 5 cat. (= 1 m.a.d. + 1 cat.), poi lavorare come segue in ogni spazio di cat. al centro di ogni gruppo di m.a.d.: 3 m.a.d. + 2 cat. + 3 m.a.d. + 2 cat. Quando la riga è finita, tagliare il filo. Affrancare tutti i fili. |
||||||||||
Spiegazioni del diagramma |
||||||||||
|
||||||||||
 |
||||||||||
 |
||||||||||
Avete terminato questo modello?Allora taggate le vostre foto con #dropspattern #otuscardigan o inviatele alla #dropsfan gallery. Avete bisogno di aiuto con questo modello?Troverete 4 video tutorial, una sezione per i commenti/domande e molto altro guardando il modello su www.garnstudio.com © 1982-2026 DROPS Design A/S. Ci riserviamo tutti i diritti. Questo documento, compreso tutte le sue sotto-sezioni, è protetto dalle leggi sul copyright. Potete leggere quello che potete fare con i nostri modelli alla fine di ogni modello sul nostro sito. |
||||||||||


Con oltre 40 anni di esperienza nel design di modelli di maglia e uncinetto, DROPS Design offre la più estesa collezione di modelli gratuiti su internet - tradotti in 17 lingue. Ad oggi vi possiamo fornire 324 cataloghi e 12290 modelli - 9561 dei quali sono tradotti in Italiano.
Ci stiamo impegnando molto per darvi il meglio che vi possiamo offrire in termini di maglia e uncinetto, ispirazioni e consigli così come filati di grande qualità ad un prezzo incredibile! Volete utilizzare i nostri modelli per qualcosa d'altro oltre al vostro uso personale? Potete leggere tutto ciò che è consentito nel testo sul Copyright in basso su tutte le pagine dei nostri modelli. Buon lavoro!
Lasciare un commento sul modello DROPS 151-26
Noi saremmo felici di ricevere i tuoi commenti e opinioni su questo modello!
Se vuoi fare una domanda, fai per favore attenzione a selezionare la categoria corretta nella casella qui sotto per velocizzare il processo di risposta. I campi richiesti sono indicati da *.