
Categorie popolari
State cercando un filato?


Commenti / Domande (36)
![]() Manuela Pereira ha scritto:
Manuela Pereira ha scritto:
Obrigada pela partilha deste bonito modelo. Estou na fase das orlas frentes, diagrama A.2, e não sei o que fazer com os 2 pc do fim de cada carreira. É que as instruções não dizem como finalizar o último leque de cada carreira. Obrigada.
02.11.2022 - 23:33DROPS Design ha risposto:
Bom dia, Os 2 pc servem para ligar os leques. No fim de cada carreira, faz 1 pad tal como fez no princípio. Bons crochés!
03.11.2022 - 10:07
![]() Ourd59 ha scritto:
Ourd59 ha scritto:
Bonjour Je veux réaliser ce modèle , j’ai réalisé l’échantillon et je constate que les DB sont sur l’envers Est ce normal ? Merci
14.12.2021 - 22:03DROPS Design ha risposto:
Bonjour Ourd59, en général, les rangs de double-brides sont sur l'endroit et ceux de mailles serrées sur l'envers, mais ce peut être un choix personnel. Si vous voulez les double-brides sur l'endroit, considérez le tout premier rang du bas de la veste comme un rang sur l''envers. Bon crochet!
15.12.2021 - 08:06
![]() Ourd59 ha scritto:
Ourd59 ha scritto:
Bonjour , J’ai l’intention de réaliser ce gilet et j’ai fait l’échantillon et je constate que les DB sont sur l’envers de l’ouvrage et les ms sur l’endroit . Est ce normal ? Merci
14.12.2021 - 21:58
![]() Stephanie ha scritto:
Stephanie ha scritto:
Bonjour. Je ne comprend pas la 2ème partie du DOS.après les 60cm de hauteur. Que faire? Merci
11.06.2019 - 14:15DROPS Design ha risposto:
Bonjour Stéphanie, vous allez maintenant former l'encolure en ne crochetant que les 22 premières du rang (taille S): tournez, crochetez 1 rang de double-brides sur les 22 premières mailles, tournez, crochetez 1 rang de ms sur ces 22 m, coupez le fil. Crochetez maintenant les 22 m de l'autre épaule de la même façon en laissant les 16 mailles centrales non travaillées, elles vont former l'encolure dos. Bon crochet!
11.06.2019 - 14:59
![]() Becky ha scritto:
Becky ha scritto:
Hi! Lovely pattern - quick question. This is the first piece of clothing I’ve ever crocheted. When I do the assembly, which side of the fabric is the “right” side? I see texture on both! Would it be the side that is facing me when I am working the single crochet? (I am right handed.) Thank you!
07.08.2018 - 05:23DROPS Design ha risposto:
Dear Becky, the right side of piece is the side where you crocheted trebles (the single crochets were worked from WS). Happy crocheting!
07.08.2018 - 09:41
![]() Val ha scritto:
Val ha scritto:
Hello I have worked the jacket front & back pieces to the point where all is level at 64cm tall (size M). I do not understand where the next instructions are worked. \"Now work 1 texture row back and forth over the outermost 24 sts on shoulder\" I have not cut the yarn at the end of the back piece but I am not sure I then continue from the same point. The picture or diagrams are not helpful to me. Please help. Thanks in advance. Val :-)
13.04.2018 - 16:52DROPS Design ha risposto:
Dear Val, When back piece measures 62 cm in size M (or adjust after a row with dc), you will now shape neck working only on the first sts on each side for the shoulder, ie turn and work 1 textured row over the first 24 sts, cut yarn. And work now 1 textured row over the first 24 sts from the other side = leave the middle 17 sts unworked for neckline on back piece. Happy crocheting!
13.04.2018 - 17:16
![]() Val ha scritto:
Val ha scritto:
Hello I am making this in size M but may want the jacket to be slightly longer than 64cm. If I add more rows to the jacket, will it mess up the band later? I have read the instructions for the band and it seems to me that the band works with a certain number of rows. Could you please confirm what multiples I need to work with? Thanks in advance :-)
02.04.2018 - 17:04DROPS Design ha risposto:
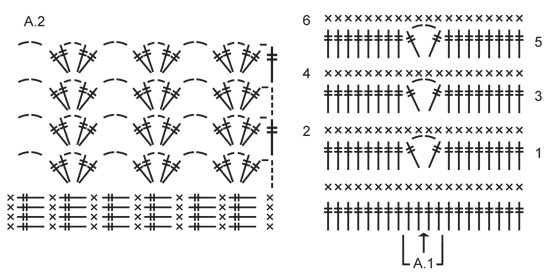
Dear Val, each fan in A.2 is worked over 4 sts, to get A.2 working around you will have to get the number of rows matching. You can always adjust by working the front bands skipping more/less rows to get the front band working. Happy crocheting!
03.04.2018 - 09:32
![]() Martha Van Dam ha scritto:
Martha Van Dam ha scritto:
Waar kan ik maten vinden zodat ik kan kijken welke ik moet nemen bedankt Martha
27.01.2016 - 13:25DROPS Design ha risposto:
Hoi Martha. Onderaan het patroon vind je de afmetingen per maat in cm.
27.01.2016 - 15:26Rose ha scritto:
Is the jacket part of the pattern supposed to be just the back of the cardigan of does it include the from as well ? My current jacket part has an enormous width (100 cm) and I'm reaching gauge. It's either too big for just the back or too small for being both...
09.01.2016 - 12:41DROPS Design ha risposto:
Dear Rose, the jacket part consists on both front pieces + back piece worked together to armholes, you then finish each piece separately. You will find check measurements for each size in chart at the bottom of the pattern. Happy crocheting!
11.01.2016 - 09:41
![]() Aida ha scritto:
Aida ha scritto:
Hi i'm a bit confuse i have finish the piece at 45 cm, i don't understand divide for the armholes, what do you mean divide , fold the piece ?? Please help!
15.05.2015 - 18:43DROPS Design ha risposto:
Dear Aida, body is worked in one piece to armholes. When piece measures 45 cm, you continue each piece separately to shoulders, ie work only over the first 22 sts in one side for first front, then in the other side for 2nd front, and work over the middle 60 sts on back piece. Happy crocheting!
16.05.2015 - 09:47
|
||||||||||
Otus#otuscardigan |
||||||||||
|
|
||||||||||
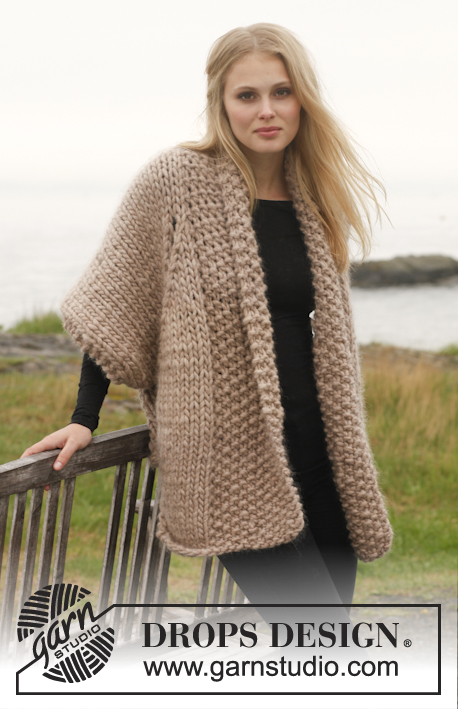
Giacchino DROPS lavorato all’uncinetto con bordi con motivo a ventaglio in "Nepal". Taglie: S - XXXL.
DROPS 151-26 |
||||||||||
|
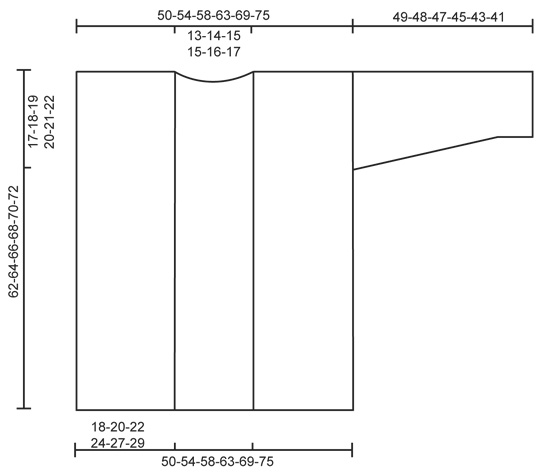
INFORMAZIONI PER IL LAVORO: All’inizio di ogni riga a m.b. iniziare con 1 cat, poi lavorare 1 m.b. nella 1° m. prima di continuare con 1 m.b. in ogni m. (la cat. NON conta come 1 m.). Finire la riga con 1 m.b. nella 4° cat. dall’inizio della riga precedente. All’inizio di ogni riga a m.a.d. iniziare con 4 cat. nella 1° m., poi lavorare 1 m.a.d. in ogni m. (4 cat. = 1° m.a.d.). Finire la riga con 1 m.a.d. nella 1° m.b. dall’inizio della riga precedente. RIGHE A PUNTO FANTASIA: * 1 riga a m.a.d., 1 riga a m.b. *, ripetere *-* fino alla fine del lavoro - NOTA: lavorare in ogni m.b./m.a.d. della riga precedente e non tra le m. MOTIVO: Vedere il diagramma A.1 (applicato alle maniche) e A.2 (applicato al bordo). ---------------------------------------------------------- GIACCHINO: Avviare 139-151-163-179-196-213 cat. con l’uncinetto n° 5 mm con Nepal. Lavorare la 1° riga come segue: 1 m.b. nella 2° cat. dall’uncinetto, * 1 m.b. in ognuna delle 3 cat. successive, saltare 1 cat. *, ripetere *-* fino a quando rimangono 1-1-1-1-2-3 cat. e finire con 1 m.b. in ognuna delle ultime cat. = 104-113-122-134-147-160 m.b., girare il lavoro. LEGGERE LE INFORMAZIONI PER IL LAVORO e lavorare le RIGHE A PUNTO FANTASIA verso l’alto – leggere la spiegazione sopra. FARE ATTENZIONE ALLA TENSIONE DEL LAVORO! Quando il lavoro misura circa 45-46-47-48-49-50 cm, dividerlo per gli scalfi e finire ogni parte in modo separato come segue: DAVANTI: Continuare con le righe a punto fantasia avanti e indietro sulle 22-24-26-29-32-35 m. più esterne in un lato del lavoro (= davanti). Quando il lavoro misura circa 62-64-66-68-70-72 cm – finire dopo 1 riga a m.b., tagliare il filo. Ripetere sulle 22-24-26-29-32-35 m. più esterne dall’altro lato del lavoro. DIETRO: Continuare con le righe a punto fantasia avanti e indietro sulle 60-65-70-76-83-90 m. del dietro fino a quando il lavoro misura circa 60-62-64-66-68-70 cm – aggiustarlo in modo che l’ultima riga sia una riga a m.b. Ora lavorare 1 riga a punto fantasia (cioè 1 riga a m.a.d. + 1 riga a m.b.) avanti e indietro sulle 22-24-26-29-32-35 m. più esterne sulla spalla. Tagliare il filo e ripetere sulle 22-24-26-29-32-35 m. più esterne sull’altro lato (cioè non lavorare sulle 16-17-18-18-19-20 m. centrali = scollatura sul dietro del collo). Chiudere. MANICA: Avviare 35-37-37-40-40-43 cat. con l’uncinetto n° 5 mm con Nepal. Lavorare la 1° riga come segue: 1 m.b. nella 2° cat. dall’uncinetto, * 1 m.b. in ognuna delle 3 cat. successive, saltare 1 cat. *, ripetere *-* fino a quando rimangono 1-3-3-2-2-1 cat. e finire con 1 m.b. in ognuna delle ultime cat. = 26-28-28-30-30-32 m.b., girare il lavoro. Poi lavorare le righe a punto fantasia avanti e indietro. LEGGERE IL RESTO DELLA SPIEGAZIONE DELLA MANICA PRIMA DI CONTINUARE! ALLO STESSO TEMPO sulla 5° riga (cioè sulla 3° riga a m.a.d.), inserire 1 segnapunti al centro del lavoro. Lavorare a m.a.d. come prima fino a quando rimangono 2 m. prima del segnapunti, lavorare il motivo secondo il diagramma A.1 sulle 4 m. successive, cioè lavorare come segue: saltare 1 m., 1 m.a.d. nella m. successiva, 2 cat., 1 m.a.d. nella m. successiva, saltare 1 m. e continuare il resto della riga a m.a.d. come prima. Continuare il motivo come mostrato in A.1 (la freccia al centro di A.1 indica il segnapunti). ALLO STESSO TEMPO sulla 4°-4°-4°-4°-3°-3° riga a m.a.d. (il lavoro misura circa 9-9-9-9-6-6 cm), aumentare 1 m.a.d. a ogni lato lavorando 2 m.a.d. nella 2° e nella penultima m.a.d. a ogni lato. Ripetere gli aumenti a righe a m.a.d. alterne altre 6-4-3-3-2-1 volte (= 7-5-4-4-3-2 aumenti in totale a ogni lato) e poi su ogni riga a m.a.d. 0-3-5-5-7-8 volte in totale = 40-44-46-48-50-52 m. Quando il lavoro misura 49-48-47-45-43-41 cm (misure più corte per le taglie più grandi a causa della maggiore ampiezza delle spalle), tagliare il filo. Lavorare un’altra manica nello stesso modo. CONFEZIONE: Cucire i margini delle spalle. Cucire i bordi delle maniche margine a margine nel filo davanti delle m. più esterne. Attaccare le maniche agli scalfi con piccoli punti ordinati – assicurarsi di evitare una cucitura stretta. BORDO: Iniziare dal diritto del lavoro in basso sul davanti destro e lavorare come mostrato nel diagramma A.2, cioè lavorare come segue: RIGA 1: 1 m.b. nella 1° m., 5 cat. (= 1 m.a.d. + 1 cat.), nella 1° m.a.d. lavorare 2 m.a.d. + 2 cat. + 2 m.a.d. + 2 cat., * saltare 1 m.a.d., nella m.a.d. successiva lavorare 2 m.a.d. + 2 cat. + 2 m.a.d. + 2 cat. *, ripetere *-* lungo il davanti destro, lungo la scollatura, sul dietro del collo e giù lungo il davanti sinistro. Girare il lavoro. RIGA 2: 5 cat. (= 1 m.a.d. + 1 cat.), poi lavorare come segue in ogni spazio di cat. al centro di ogni gruppo di m.a.d.: 2 m.a.d. + 2 cat. + 2 m.a.d., 2 cat. Ripetere la 2° riga fino a quando sono state lavorate un totale di 4-4-5-5-5-5 righe. Lavorare l’ultima riga come segue: 5 cat. (= 1 m.a.d. + 1 cat.), poi lavorare come segue in ogni spazio di cat. al centro di ogni gruppo di m.a.d.: 3 m.a.d. + 2 cat. + 3 m.a.d. + 2 cat. Quando la riga è finita, tagliare il filo. Affrancare tutti i fili. |
||||||||||
Spiegazioni del diagramma |
||||||||||
|
||||||||||
 |
||||||||||
 |
||||||||||
Avete terminato questo modello?Allora taggate le vostre foto con #dropspattern #otuscardigan o inviatele alla #dropsfan gallery. Avete bisogno di aiuto con questo modello?Troverete 4 video tutorial, una sezione per i commenti/domande e molto altro guardando il modello su www.garnstudio.com © 1982-2026 DROPS Design A/S. Ci riserviamo tutti i diritti. Questo documento, compreso tutte le sue sotto-sezioni, è protetto dalle leggi sul copyright. Potete leggere quello che potete fare con i nostri modelli alla fine di ogni modello sul nostro sito. |
||||||||||


Con oltre 40 anni di esperienza nel design di modelli di maglia e uncinetto, DROPS Design offre la più estesa collezione di modelli gratuiti su internet - tradotti in 17 lingue. Ad oggi vi possiamo fornire 324 cataloghi e 12290 modelli - 9561 dei quali sono tradotti in Italiano.
Ci stiamo impegnando molto per darvi il meglio che vi possiamo offrire in termini di maglia e uncinetto, ispirazioni e consigli così come filati di grande qualità ad un prezzo incredibile! Volete utilizzare i nostri modelli per qualcosa d'altro oltre al vostro uso personale? Potete leggere tutto ciò che è consentito nel testo sul Copyright in basso su tutte le pagine dei nostri modelli. Buon lavoro!
Lasciare un commento sul modello DROPS 151-26
Noi saremmo felici di ricevere i tuoi commenti e opinioni su questo modello!
Se vuoi fare una domanda, fai per favore attenzione a selezionare la categoria corretta nella casella qui sotto per velocizzare il processo di risposta. I campi richiesti sono indicati da *.