
Categorie popolari
State cercando un filato?


Commenti / Domande (221)
![]() Agnes ha scritto:
Agnes ha scritto:
Pour confirmation les shémas A1 et A2 se tricotent sur 27 rangs endroits et par conséquent 28 rangs envers. Merci
15.01.2014 - 13:51DROPS Design ha risposto:
Bonjour Agnès, les diagrammes A.1 et A.2 se tricotent sur 14 rangs (1 case = 1 m x 1 rang): tous les rangs figurent dans le diagramme, ceux sur l'endroit mais aussi ceux sur l'envers. Ainsi, la torsade se fait au 5ème rang de chaque diag, puis se répète tous les 14 rangs. Bon tricot!
15.01.2014 - 14:30
![]() Emma ha scritto:
Emma ha scritto:
Bonjour ,c'est vraiment magnifique ! mais vous n'avez pas indiquer commet augmenter au fur et a mesure pour arriver a 160 cm a la fin . Pouvez vous m'expliquez s'il vous plait ? je suis un peu perdu ..
18.12.2013 - 19:04DROPS Design ha risposto:
Bonjour Emma, on tricote en rangs raccourcis, en commençant à droite par le côté milieu dos/milieu devant (début de rang sur l'endroit), ainsi on va former un cercle en tricotant plus de rangs sur l'extérieur que sur l'intérieur (côté poignet). Bon tricot!
19.12.2013 - 08:50Mahtab ha scritto:
Cast on ........ Work 1 RIDGE in garter s....... it means work the first row of it or knit 4 rows then start the pattern????
17.12.2013 - 12:36DROPS Design ha risposto:
Dear Mahtab, just after cast on, you work 1 ridge in garter st, ie knit 2 rows and then start pattern with short rows. Happy knitting!
17.12.2013 - 13:33
![]() Hepnarová ha scritto:
Hepnarová ha scritto:
Dobrý den, v popisu na tento fantastický kabátek mi chybí okamžik, kdy mám plést ZKRÁCENÉ ŘADY. Byli byste tak laskavi a podívali se na to? Jsem blbá anebo se vloudila chybička :).? Moc děkuji Hepnarová
16.11.2013 - 11:12DROPS Design ha risposto:
Dobrý den, paní Hepnarová, zkrácené řady pletete od samého začátku a nyní je Vám k dispozici u návodné video - viz seznam u návodu. Hodně zdaru!
03.03.2014 - 18:11Amna Hassan ha scritto:
Hello, the pattern is "5 sts in garter st, K 2, P 3, K 2, P 3, A.1 (= 10 sts), P 3, A.2 (= 10 sts), P 3, K 2, 12-18-24 sts RIDGE PATTERN, K 2, P 3, A.2 (= 10 sts), P 3, K 2, P 3, K 2, 18 sts in garter st.These are 104 sts for L/XL where will the short rows come?Thank you.
14.10.2013 - 13:30DROPS Design ha risposto:
Dear Mrs Hassan, short rows in size L/XL will be worked as follows (start from RS): 2 rows on the first 10 sts, 2 rows on the firt 41 sts, 2 rows on the first 63 sts, 2 rows on all sts. Repeat these 8 rows until finished measurements. Happy knitting!
14.10.2013 - 15:37
![]() Marité ha scritto:
Marité ha scritto:
C'est fait. Que du bonheur !
07.10.2013 - 21:01
![]() Agnes ha scritto:
Agnes ha scritto:
J'aimerai savoir comment tricote t'on les 10 premières mailles, je comprends les 41 suivantes. Au départ 2 rangs endroits sur toutes les mailles, et après comment faire les 10 suivantes ou la côte mousse se fait que sur 10 mailles ? merci de votre aide
01.10.2013 - 13:11DROPS Design ha risposto:
Bonjour Agnès, on tricote toutes les mailles ainsi: 5 m au point mousse, 2 m end, 3 m env, 2 m end, 3 m env, A.1, 3 m env, A.2, 3 m env, 2 m end, 12-18-24 m en point mousse fantaisie, 2 m end, 3 m env, A.2, 3 m env, 2 m end, 3 m env, 2 m end, 18 m au point mousse. Mais juste après la côte mousse, on commence les rangs raccourcis. Les 10 premières m = 5 m point mousse + 2 m end + 3 m env. Bon tricot!
01.10.2013 - 15:12
![]() BARBION ha scritto:
BARBION ha scritto:
Très beau modèle, mais pas simples à comprendre... Je suis un peu perdue et un schéma complet aurait été le bienvenu. Je suis en train de m'en créer un et j'aurais une question: comment tricoter sur le rang retour (envers de l'ouvrage) les "2 m end, 3 m env, 2 m end, 3 m env" du rang aller (donc les "tronçons" hors point mousse, torsades et mousse-fantaisie)? Merci par avance pour votre réponse.
10.09.2013 - 10:04DROPS Design ha risposto:
Bonjour Mme Barbion, ces mailles se tricotent en jersey end/jersey env (comme des côtes), ainsi, si vous avez, sur l'endroit : 2 m end, 3 m env, 2 m end, 3 m env, vous tricoterez sur l'envers 3 m end, 2 m env, 3 m end, 2 m env. Bon tricot!
10.09.2013 - 10:48
![]() Anja ha scritto:
Anja ha scritto:
Het mooiste is het 2e gedeelte de kabels andersom de kruisen zodat als je de delen aan elkaar naait de kabels het zelfde eruit zien
05.09.2013 - 22:12
![]() Anja ha scritto:
Anja ha scritto:
Bij de verkorte toeren staan 8 pennen beschreven. Maar het eindigt met de opmerking ", dus 8 nld aan de breedste kant en 2 nld aan smalste kant in 1 herhaling. " dat is als ik goed tel 10'pennen klopt patroon niet of is dit een "schrijf" fout
05.09.2013 - 22:10DROPS Design ha risposto:
Hoi Anja. Je breit in totaal 8 nld. Volg je de instructie heb je dan 8 nld aan de breedste kant gebreid, maar alleen 2 nld aan de smalste kant = de laatste twee nld over alle st.
10.09.2013 - 17:07
|
||||||||||
Barroque#barroquejacket |
||||||||||
 |
 |
|||||||||
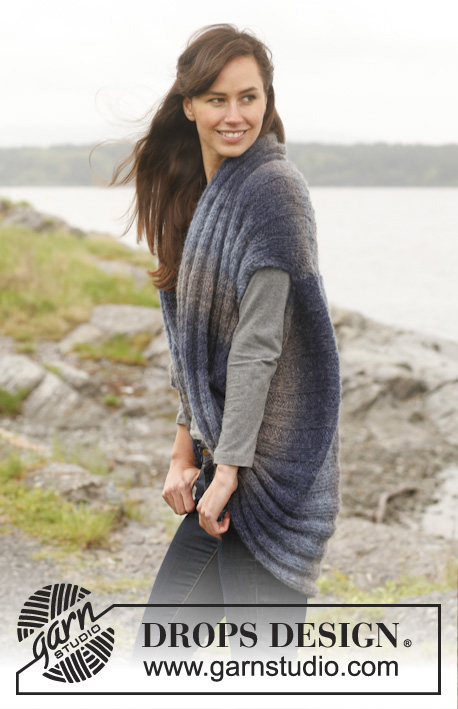
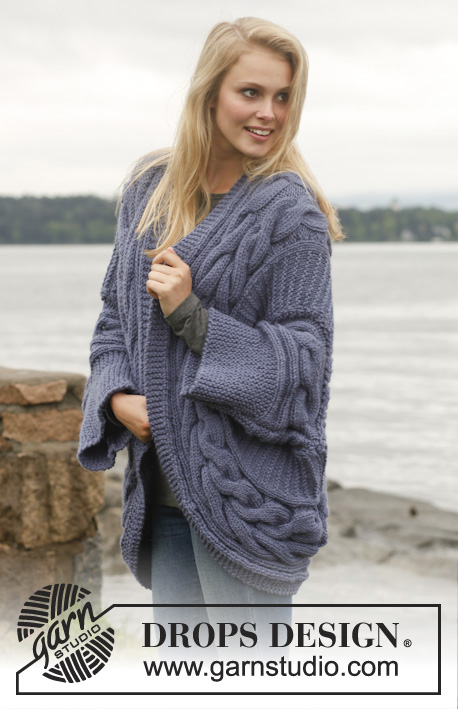
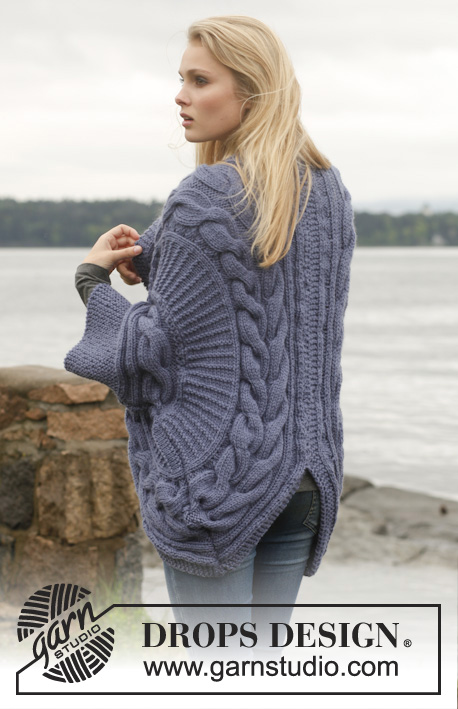
Giacca DROPS lavorato in cerchio, con trecce, in "Alaska". Dalla S alla XXXL.
DROPS 149-6 |
||||||||||
|
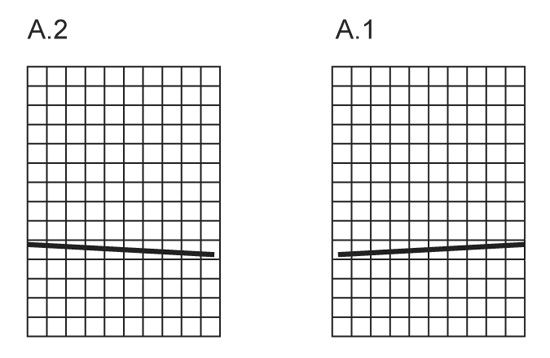
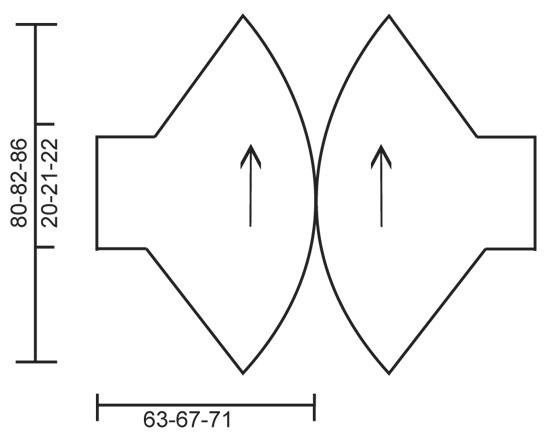
PUNTO LEGACCIO (avanti e indietro sul f): Lavorare tutti i ferri sul diritto. 1 “cresta” legaccio = 2 ferri a dir. PUNTO LEGACCIO FANTASIA: 1° ferro (= sul diritto): dir 2° ferro (= sul rovescio): rov 3° ferro (= sul diritto): dir 4° ferro (= sul rovescio): dir Ripetere questi 4 ferri. MOTIVO: Ved diag A.1 e A.2. Il diag mostra tutti i ferri del motivo sul diritto del lavoro. FERRI ACCORCIATI: * Lavorare 1 f sopra le prime 10 m, girare e lavorare il ferro di ritorno. Lavorare 1 f sopra le prime 41 m, girare e lavorare il ferro di ritorno. Lavorare 1 f sopra le prime 57-63-69 m, girare e lavorare il ferro di ritorno. Lavorare 1 f sopra tutte le m, girare e lavorare il ferro di ritorno.* Ripetere da *-*, vuol dire 1 ripetizione = 8 f dal lato più largo e 2 ferri dal lato più stretto. ---------------------------------------------------------- CORPO (DAVANTI&DIETRO): Si lavora avanti e indietro sui ferri circolari. Avviare 98-104-110 m con i ferri circ 7 e Alaska. Lavorare 1 CRESTA LEGACCIO – vedere le spiegazioni sopra. Continuare a seguire il motivo, ALLO STESSO TEMPO, lavorare a FERRI ACCORCIATI – vedere le spiegazioni sopra (1° ferro = sul diritto): 5 m punto legaccio, 2 m dir, 3 m rov, 2 m dir, 3 m rov, A.1 (= 10 m), 3 m rov, A.2 (= 10 m), 3 m rov, 2 m dir, 12-18-24 m PUNTO LEGACCIO FANTASIA – vedere le spiegazioni sopra, 2 m dir, 3 m rov, A.2 (= 10 m), 3 m rov, 2 m dir, 3 m rov, 2 m dir, 18 m punto legaccio. Continuare così finché il lavoro non misuri 40-41-43 cm dal lato più stretto e 160-164-172 cm dal lato più largo. Lavorare 1 cresta legaccio e intrecciare. Cucire il bordo d’avvio con il bordo con le maglie intrecciate. Lavorare una altro pezzo così. CONFEZIONE: Posizionare i 2 pezzi uno sopra l’altro in modo da avere le 5 m a punto legaccio si ricoprono, e fare una cucitura di ca 58-62 cm in mezzo dietro – fare attenzione che la cucitura di ogni pezzo sia in mezzo sotto le maniche. |
||||||||||
Spiegazioni del diagramma |
||||||||||
|
||||||||||
 |
||||||||||
 |
||||||||||
Avete terminato questo modello?Allora taggate le vostre foto con #dropspattern #barroquejacket o inviatele alla #dropsfan gallery. Avete bisogno di aiuto con questo modello?Troverete 11 video tutorial, una sezione per i commenti/domande e molto altro guardando il modello su www.garnstudio.com © 1982-2026 DROPS Design A/S. Ci riserviamo tutti i diritti. Questo documento, compreso tutte le sue sotto-sezioni, è protetto dalle leggi sul copyright. Potete leggere quello che potete fare con i nostri modelli alla fine di ogni modello sul nostro sito. |
||||||||||


Con oltre 40 anni di esperienza nel design di modelli di maglia e uncinetto, DROPS Design offre la più estesa collezione di modelli gratuiti su internet - tradotti in 17 lingue. Ad oggi vi possiamo fornire 324 cataloghi e 12290 modelli - 9561 dei quali sono tradotti in Italiano.
Ci stiamo impegnando molto per darvi il meglio che vi possiamo offrire in termini di maglia e uncinetto, ispirazioni e consigli così come filati di grande qualità ad un prezzo incredibile! Volete utilizzare i nostri modelli per qualcosa d'altro oltre al vostro uso personale? Potete leggere tutto ciò che è consentito nel testo sul Copyright in basso su tutte le pagine dei nostri modelli. Buon lavoro!
Lasciare un commento sul modello DROPS 149-6
Noi saremmo felici di ricevere i tuoi commenti e opinioni su questo modello!
Se vuoi fare una domanda, fai per favore attenzione a selezionare la categoria corretta nella casella qui sotto per velocizzare il processo di risposta. I campi richiesti sono indicati da *.