
Categorie popolari
State cercando un filato?


Commenti / Domande (68)
![]() Iris ha scritto:
Iris ha scritto:
Ik wil de sok maat 41/43 maken dus tot tour 16. Na tour 12 heb ik 42 vaste. Bij tour 14 moet ik 40 vast hebben. Er staat: TOER 14: * 1 v in elke van de eerste 6 v, 2 v in volgende v *, herhaal van *-* 5 keer in totaal = 40 v. Hoe kan ik van 42 vaste naar 40 vaste gaan?
10.11.2020 - 19:21
![]() Alexandra ha scritto:
Alexandra ha scritto:
Bonjour! Je voulais savoir si vous pensez que c'est possible de faire ce modèle avec 100gr de laine 60% acrylique, 20% nylon et 20% merino? J'ai un restant chez moi et je voulais faire quelque chose avec! Merci beaucoup! J'adore votre site! :)
07.11.2020 - 18:19DROPS Design ha risposto:
Bonjour Alexandra, je ne connais pas votre fil, il est donc difficile de vous répondre, vous trouverez toutefois quelques éléments de réponse à propos des alternatives ici - n'hésitez pas à contacter le magasin où vous avez acheté votre laine pour toute assistance personnalisée. Bon crochet!
09.11.2020 - 10:06
![]() LEROUX ha scritto:
LEROUX ha scritto:
Can y have the pattern in frénch? Thank you
30.08.2020 - 15:58DROPS Design ha risposto:
Bonjour Mme Leroux, tous nos modèles sont disponibles en français, cliquez sur le menu déroulant sous la photo pour changer la langue. Bon crochet!
31.08.2020 - 10:28
![]() Jacquelien ha scritto:
Jacquelien ha scritto:
Kunt u mij helpen met de gehaakte sokken ik ben linkshandig en ik zoek een ju tube fimpje
08.05.2020 - 13:37DROPS Design ha risposto:
Dag Jacquelien,
De tip voor linkshandigen is om de filmpjes met een spiegel te bekijken.
13.05.2020 - 10:04
![]() Anna Grethe Berg Madsen ha scritto:
Anna Grethe Berg Madsen ha scritto:
Jeg synes det virker lidt spøjst, at i Glider af på spørgsmålene/ kommentarerne omkring bredden på skaftet! Der er ingen kvinder med en fod i en str 38/40 der kun er 16 cm rundt om underbenet. Hvis sokken og skaftet skal passe sammen, så skal skaftet være Mindst 22 cm, som jeg ser det. Opskrifterne skal vel også Kunne fungere i real Life?
14.03.2020 - 19:54
![]() Rebecka ha scritto:
Rebecka ha scritto:
Har jag förstått rätt att jag ska ersätta första fm med en luftmaska, och sedan i slutet av varvet avsluta med en sm i denna? När jag virkar så får jag en skarv tvärsöver hela sockan. Ska det vara så?
11.02.2020 - 10:45DROPS Design ha risposto:
Hei Rebecka. I denne oppskriften står det: VIRKA RUNT I CIRKEL: Efter den sista fm på v, fortsätt till nästa v med 1 fm i nästa fm (= 1:a fm från föregående v) Altså første fm skal ikke erstattes med en luftmaske. God Fornøyelse!
11.02.2020 - 19:03
![]() Se Over Denne Oppskriften ha scritto:
Se Over Denne Oppskriften ha scritto:
Vær så snill å gå over denne oppskriften en gang til, den stemmer ikke. Skaftet blir ikke stort nok og når ikke rundt.
04.12.2019 - 17:16
![]() Nora ha scritto:
Nora ha scritto:
Jag har fastnar redan på varv 1, är nybörjare och förstår inte hur jag virkar 6-6-5 runt i cirkel? Kan inte hitta någon video på detta till hjälp...
01.12.2019 - 14:57DROPS Design ha risposto:
Hei Nora! Her er en video som viser hvordan man hekler rundt med fastmasker. Lykke til!
02.12.2019 - 10:46
![]() Skald ha scritto:
Skald ha scritto:
Do I still have to sl st and chain 1 at the end of each row even when I'm crocheting in a circle? I was wondering why there are too many stitches every row even though they're meant to stay the same and realized that I was adding an extra stitch every time I chained 1 at the beginning. What is the purpose of sl st when I could just sc the last stitch like the rest of the stitches?
29.10.2019 - 14:43DROPS Design ha risposto:
Dear Skald, when you crochet in the round at the beginning of the foot, you don't crochet any slip stitche nor any chain 1 to start the round, just insert a marking thread between last stitch on first round and first stitch on next round and continue working sc increasing as stated - see WORK IN THE ROUND IN A CIRCLE at the beginning of the pattern. Happy crocheting!
04.11.2019 - 13:22
![]() Laetitia Sénécot ha scritto:
Laetitia Sénécot ha scritto:
It's a great pattern! I love it! It fits perfectly. Thank you!
24.07.2019 - 21:24
|
|
Comfort Rib#comfortribsocks |
|
|
|
|
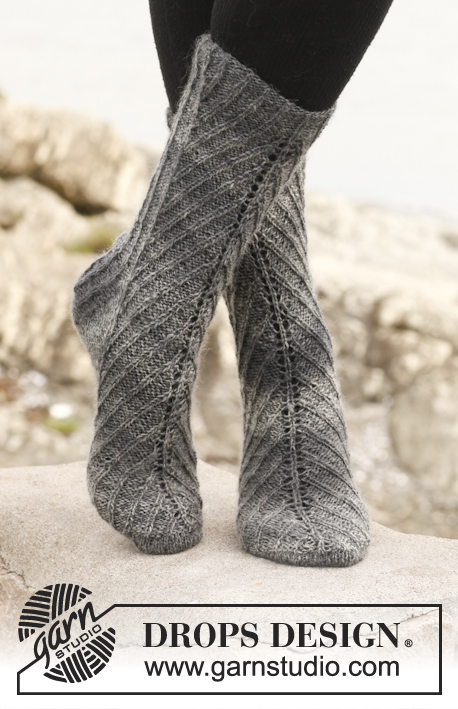
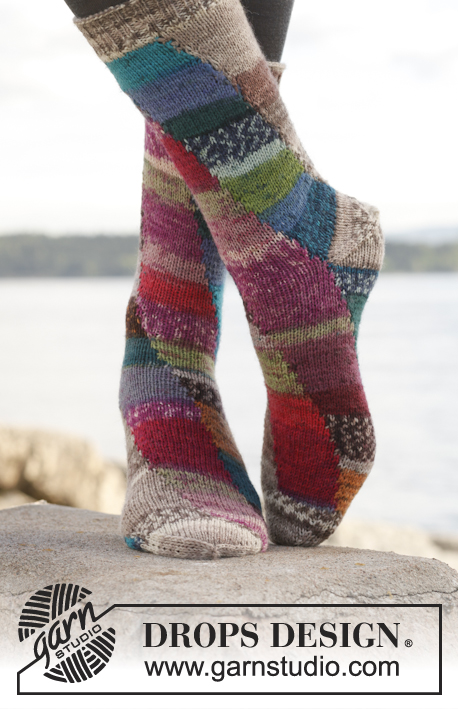
Calze DROPS all’uncinetto in "Alaska". Taglie: Dalla 35 alla 43.
DROPS 149-21 |
|
|
LAVORARE ALL’UNCINETTO IN TONDO, A SPIRALE: Dopo aver lavorato l’ultima m.b del giro, proseguire il giro successivo lavorando 1 m.b nella m.b successiva (= 1a m.b del giro precedente). ATTENZIONE: inserire un segno all’inizio del giro tra l’ultima m.b e la 1a m.b del giro successivo; spostare il segno progressivamente verso l’alto, man mano che si procede con il lavoro. INFORMAZIONI PER IL LAVORO: Sostituire la 1a m.b all’inizio di ogni riga di m.b con 1 cat. Finire ogni riga con 1 m.bss nella cat iniziale della riga precedente. SUGGERIMENTO PER LE DIMINUZIONI: Lavorare 1 m.b ma aspettare a chiudere l’ultima gettata (= 2 m sull’uncinetto), lavorare la m.b successiva e all’ultima chiusura, passare il filo attraverso tutte e 3 le m sull’uncinetto = è stata diminuita 1 m.b. ---------------------------------------------------------- CALZE: Si lavorano in tondo dalla punta fino al collo del piede; proseguire avanti e indietro fino al centro del tallone, sul dietro. Infine, lavorare la gamba nel senso della lunghezza e unirla alla calza, all’uncinetto. Con l’uncinetto n° 3,5 ed il filato Alaska, avviare 4 cat e formare 1 anello con 1 m.bss nella 1a cat. GIRO 1: Lavorare 6-6-5 m.b nell’anello di cat - vedere LAVORARE ALL’UNCINETTO IN TONDO, A SPIRALE. GIRO 2: Lavorare 2 m.b in ogni m.b = 12-12-10 m.b. GIRO 3 (ed ogni 2 giri): Lavorare 1 m.b in ogni m.b. GIRO 4: * 1 m.b nella 1a m.b, 2 m.b nella m.b successiva *, ripetere da *-* 6-6-5 volte in tutto = 18-18-15 m.b. GIRO 6: * 1 m.b in ognuna delle 2 m.b successive, 2 m.b nella m.b successiva *, ripetere da *-* 6-6-5 volte in tutto = 24-24-20 m.b. GIRO 8: * 1 m.b in ognuna delle 3 m.b successive, 2 m.b nella m.b successiva *, ripetere da *-* 6-6-5 volte in tutto = 30-30-25 m.b. GIRO 10: * 1 m.b in ognuna delle 4 m.b successive, 2 m.b nella m.b successiva *, ripetere da *-* 6-6-5 volte in tutto = 36-36-30 m.b. Sono ora finiti gli aumenti per la taglia 35/37. GIRO 12: * 1 m.b in ognuna delle 5 m.b successive, 2 m.b nella m.b successiva *, ripetere da *-* 6-5 volte in tutto = 42-35 m.b. Sono ora finiti gli aumenti per la taglia 38/40. GIRO 14: * 1 m.b in ognuna delle 6 m.b successive, 2 m.b nella m.b successiva *, ripetere da *-* 5 volte in tutto = 40 m.b. GIRO 16: * 1 m.b in ognuna delle 7 m.b successive, 2 m.b nella m.b successiva *, ripetere da *-* 5 volte in tutto = 45 m.b. Sono ora finiti gli aumenti per la taglia 41/43. TUTTE LE TAGLIE: = 36-42-45 m.b. Lavorare in tondo con 1 m.b in ogni m.b, finché il lavoro non misura 14-16-18 cm. Proseguire a m.b, avanti e indietro, sulle prime 24-30-32 m.b (quindi non lavorare più le ultime 12-12-13 m.b) - vedere le INFORMAZIONI PER IL LAVORO ! Quando la calza misura 20-22-25 cm (quindi ca. 6-6-7 cm da dove è stato diviso), inserire 1 segno al centro (= 12-15-16 m.b da ciascun lato del segno). Alla riga successiva, diminuire 1 m.b da ciascun lato del segno, quindi iniziare 2 m prima del segno e lavorare le 4 m.b successive insieme a 2 a 2 – VEDERE IL SUGGERIMENTO PER LE DIMINUZIONI (= sono state diminuite 2 m.b). Lavorare 1 riga senza diminuzioni. Ripetere queste diminuzioni alla riga successiva (= sono state diminuite 2 m.b) = rimangono 20-26-28 m. Lavorare 1 riga senza diminuzioni; la calza misura ora ca. 22-24-27 cm dalla punta al tallone. Lasciare il lavoro in sospeso. GAMBA: Lavorare la gamba come segue: con l’uncinetto n° 3,5 ed il filato Alaska, avviare 33 cat morbide. Lavorare 1 m.b nella 2a cat dall’uncinetto, poi lavorare 1 m.b in ogni cat su tutta la riga = 32 m.b. Lavorare a m.b avanti e indietro, puntando l’uncinetto solo nell’asola posteriore delle m, finché il lavoro non misura 16-16-18 cm, o fino a quando il lato corrisponde all’apertura della calza. Mettere la gamba e l’apertura della calza uno contro l’altro e unirli, sul rovescio del lavoro, con una riga di m.bss, puntando l’uncinetto attraverso entrambi gli strati. ATTENZIONE – l’apertura della calza si deve trovare al centro, sul dietro. CONFEZIONE: Girare la calza dentro fuori, piegarla in due e cucire al centro, sul dietro, sul rovescio del lavoro, con una riga di m.bss, puntando l’uncinetto attraverso entrambi gli strati. Tagliare e fermare il filo. |
|
Avete terminato questo modello?Allora taggate le vostre foto con #dropspattern #comfortribsocks o inviatele alla #dropsfan gallery. Avete bisogno di aiuto con questo modello?Troverete 9 video tutorial, una sezione per i commenti/domande e molto altro guardando il modello su www.garnstudio.com © 1982-2026 DROPS Design A/S. Ci riserviamo tutti i diritti. Questo documento, compreso tutte le sue sotto-sezioni, è protetto dalle leggi sul copyright. Potete leggere quello che potete fare con i nostri modelli alla fine di ogni modello sul nostro sito. |


Con oltre 40 anni di esperienza nel design di modelli di maglia e uncinetto, DROPS Design offre la più estesa collezione di modelli gratuiti su internet - tradotti in 17 lingue. Ad oggi vi possiamo fornire 324 cataloghi e 12290 modelli - 9561 dei quali sono tradotti in Italiano.
Ci stiamo impegnando molto per darvi il meglio che vi possiamo offrire in termini di maglia e uncinetto, ispirazioni e consigli così come filati di grande qualità ad un prezzo incredibile! Volete utilizzare i nostri modelli per qualcosa d'altro oltre al vostro uso personale? Potete leggere tutto ciò che è consentito nel testo sul Copyright in basso su tutte le pagine dei nostri modelli. Buon lavoro!
Lasciare un commento sul modello DROPS 149-21
Noi saremmo felici di ricevere i tuoi commenti e opinioni su questo modello!
Se vuoi fare una domanda, fai per favore attenzione a selezionare la categoria corretta nella casella qui sotto per velocizzare il processo di risposta. I campi richiesti sono indicati da *.