
Categorie popolari
State cercando un filato?


Commenti / Domande (138)
![]() Agnès ha scritto:
Agnès ha scritto:
Bonjour, Je ne comprends pas le départ, si je compte bien, 2 +17+(5+34) x3+5+17 = 158, or il faut monter 156m. Merci pour l'aide
11.02.2020 - 11:44DROPS Design ha risposto:
Bonjour Agnès, c'est votre 2 en premier qui n'est pas juste, vous devez tricoter les 156 m ainsi: A.1 (= 17 m), * A.2 (= 5m), A.3 (= 34 m) *, répéter de *-* 3 fois au total (= 34+5 x3= 117 m) , A.2 (= 5 m), A.4 (= 17 m) et vous avez ainsi: 17+117+5+17= 156 m. Les 2 côtes au point mousse se tricotent sur toutes les mailles (= autrement dit, vous devez tricoter 4 rangs endroit avant de tricoter les diagrammes). Bon tricot!
11.02.2020 - 12:01
![]() Janine Möhrke ha scritto:
Janine Möhrke ha scritto:
Hallo Ich frage mich grade wie ich das Seidenband nachher durch die Krausrippen ziehen soll. Können Sie mir bitte helfen?
17.12.2019 - 20:31DROPS Design ha risposto:
Liebe Frau Möhrke, das Seidenband ziehen Sie durch die Maschen zwischen den beiden ersten Krausrippen. Viel Spaß beim stricken!
18.12.2019 - 07:44
![]() Kate Andritsopoulou ha scritto:
Kate Andritsopoulou ha scritto:
Thank you for your help. However the pattern continues \"When A.2 has been worked 1 time vertically, there are 348 sts on needle in both sizes. \" If I am knitting A3 over A1/A4 where do I knit A2?
30.04.2019 - 08:39DROPS Design ha risposto:
Dear Mrs Andritsopoulou, A.2 will be worked over A.2 as before = just continkue working A.2 as before, the only change is here to work A.3 over A.1/A.4. Happy knitting!
30.04.2019 - 10:07
![]() Kate Andritsopoulou ha scritto:
Kate Andritsopoulou ha scritto:
Good evening! Can you please explain: "Now continue to work in the round over all sts, continue with A.3 over A.1/A.4." Thank you.
29.04.2019 - 19:45DROPS Design ha risposto:
Hi Kate, You have started the piece working back and forth to give the split mid front. Once the split is finished you continue in the round (so do not turn the piece, but continue straight on) to work the body of the poncho. The last part means that where you previously worked A.1/A.4 you now work A.3. I hope this helps and happy knitting!
30.04.2019 - 07:46
![]() Nina Sarkki ha scritto:
Nina Sarkki ha scritto:
Hej! När jag nu stickat första rapporten A1 och A4 en gång och ska göra rapporten en gång till inför att sedan sticka ihop alla maskor så undrar jag hur/var jag fortsätter att sticka rapport A2, från början 5/21 jag får då inte maskantalet att stämma med omslagen?? Mvh Nina
02.06.2018 - 08:28DROPS Design ha risposto:
Hei Nina. Du skal bare fortsette A.2 videre oppover som anvist i diagrammet – altså du fortsetter med omgang 17 om du strikker størrelse S/M/L, eller med omgang 34 om du strikker størrelse XL/XXL/XXXL. God fornøyelse
07.06.2018 - 15:32
![]() Lesley Steinmeier ha scritto:
Lesley Steinmeier ha scritto:
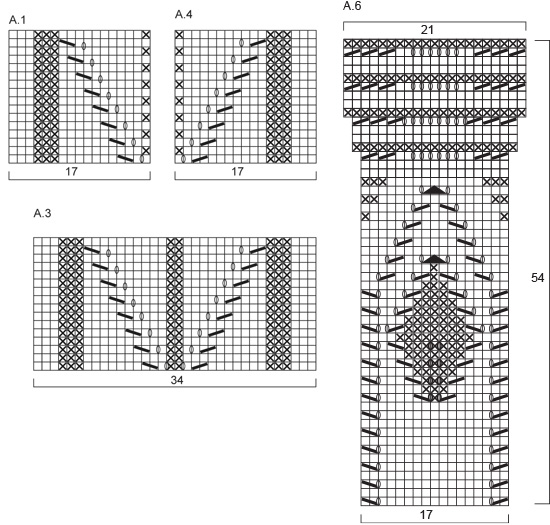
Klopt het dat in A6 tussen al die X'en (av goede kant) vanaf rij 14 in het midden, ook nog 0'en staan? Misschien ligt het aan mn telefoon, maar ik kan het heel slecht zien (misschien een overbodige vraag omdat ik anders moet minderen, maar voorkomen beter dan genezen...)
30.04.2018 - 17:17DROPS Design ha risposto:
Hallo Lesley, Het ligt niet aan je telefoon, hoor. Ze zijn inderdaad wat lastig om te zien maar in toer 13, 15, 17 en 19 van A.6 zitten aan beide kanten van de middelste steek een omslag. Er is een verzoek naar de designafdeling gestuurd om deze wat duidelijker in beeld te krijgen.
02.05.2018 - 21:15
![]() Katri ha scritto:
Katri ha scritto:
A question has been asked here several times in different languages i.e. how to proceed with the A6 pattern plus the 2sts from pattern A5. Total being 696 sts at this point, how do you reach the total of 1072 sts at the end? One pattern A6 adding only 4sts and there being in total 40 x A6 pattern, this adds only 160 sts to the 696 sts = 856. Where do the rest over 200 sts come from? Does one add an YO to the 2first sts of A5 pattern on each round and how?
08.04.2018 - 10:32DROPS Design ha risposto:
Dear Katri, you will inc 1 st in each A.5A and 1 st in each A.5C on every other row, ie you will inc (2 sts x 27 inc row = every other row in A.6) x 4 repeats in width = 216 sts inc = there will be a total of 1072 sts after A.6 has been worked 1 time in height (including the sts inc in A.5A and A.5C). Happy knitting!
09.04.2018 - 13:27
![]() Maria ha scritto:
Maria ha scritto:
Jag förstår inte detta mönster efter varv 2 i A6. Var placerar jag de ökade maskorna i A.5 A / A.5 C fortsättningsvis för att få ihop mönstret korrekt i slutändan? Alltså, hur fortsätter jag varv 3 efter 2 X A.6??? Tacksam för svar.
08.12.2017 - 22:15DROPS Design ha risposto:
Hej, de ökade maskorna i A.5 ska stickas räta.
11.12.2017 - 17:02
![]() Kerstin Vogel ha scritto:
Kerstin Vogel ha scritto:
Rest von Frage: Muss ich dann 2Ma re 1 U 1 Ma re und dann A6 stricken oder beginne ich immer mit 1Ma re 1U 1 Ma re dann die Maschen re die dazugekommen sind und dann Muster A6 weiter? Vielen Dank schon mal für die Antwort. Mit freundlichen Grüßen Kerstin V.
26.08.2016 - 13:09DROPS Design ha risposto:
Hallo Kerstin, diese Frage wurde auch bei Ihrer anderen Frage beantwortet.
29.08.2016 - 09:27
![]() Kerstin Vogel ha scritto:
Kerstin Vogel ha scritto:
Rest von Frage: Muss ich dann 2Ma re 1 U 1 Ma re und dann A6 stricken oder beginne ich immer mit 1Ma re 1U 1 Ma re dann die Maschen re die dazugekommen sind und dann Muster A6 weiter? Vielen Dank schon mal für die Antwort. Mit freundlichen Grüßen Kerstin V.
21.08.2016 - 18:20
|
|||||||||||||||||||
Honeymoon#honeymoonponcho |
|||||||||||||||||||
 |
 |
||||||||||||||||||
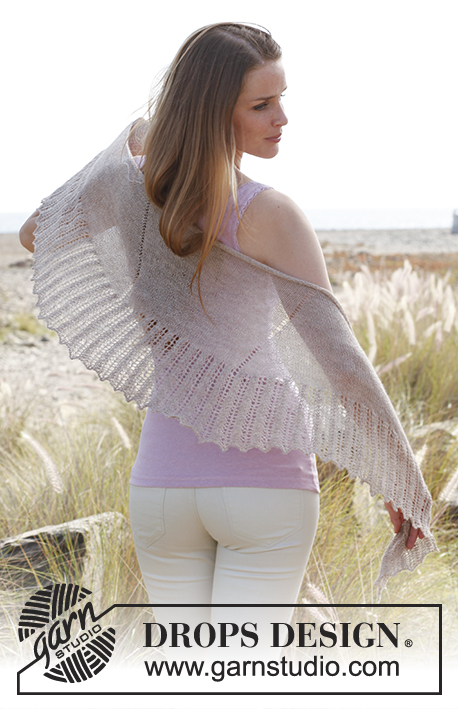
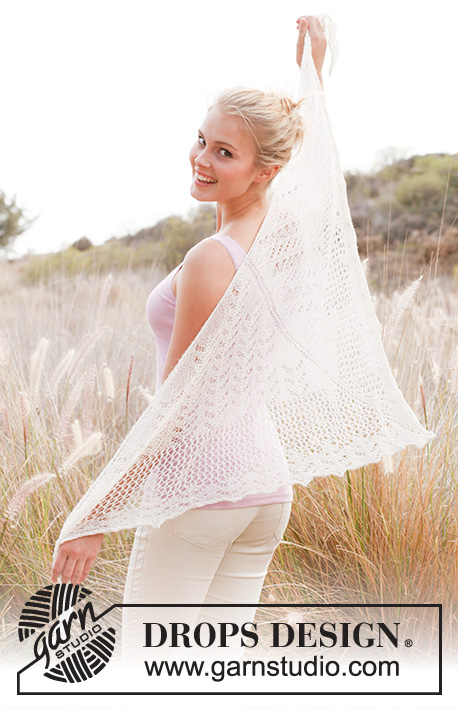
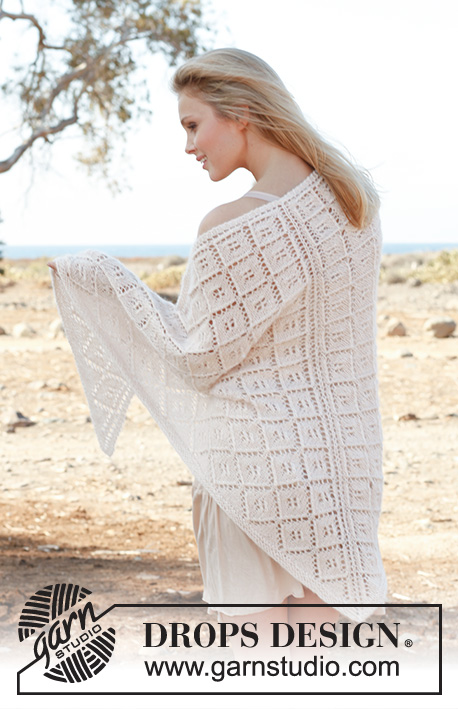
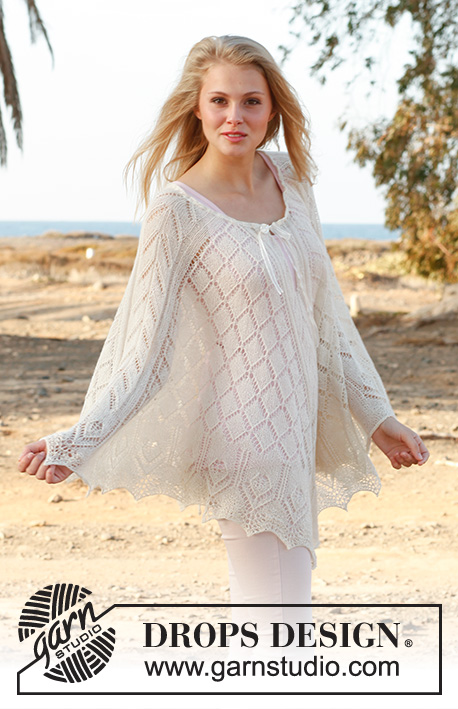
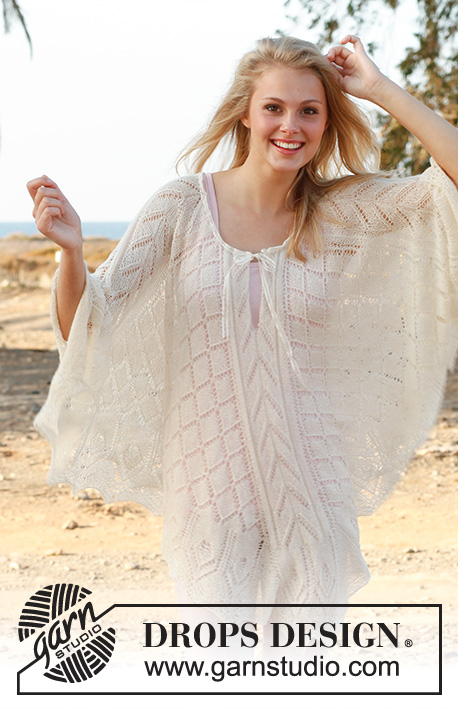
Poncho DROPS lavorato ai ferri con motivo a pizzo in "BabyAlpaca Silk" o "Lace". Taglie: S - XXXL.
DROPS 146-4 |
|||||||||||||||||||
|
TENSIONE DEL LAVORO: Questo capo va bagnato e bloccato fino alla lunghezza corretta alla fine. La tensione del lavoro quindi non è così importante, ma indica se state lavorando in modo troppo stretto o lasso, 23 m. x 30 f. con i f. n° 3,5 mm = circa 10 x 10 cm. ---------------------------------------------------------- M. LEGACCIO (avanti e indietro sui f.): Lavorare tutti i f. a dir. 1 “cresta” a m. legaccio = 2 f. dir. M. LEGACCIO (in tondo sui f. circolari): 1 “cresta” a m. legaccio = * 1 giro dir. e 1 giro rov. *, ripetere *-*. MOTIVO: Vedere i diagrammi A.1-A.6. Il diagramma mostra tutti i f. del motivo visti dal diritto del lavoro. Vedere la freccia per la vostra taglia nel diagramma A.2. ---------------------------------------------------------- PONCHO: E’ lavorato dall’alto in basso, prima avanti e indietro sui f. circolari e poi in tondo. Questo per realizzare uno spacco al centro davanti. Avviare 156-220 m. con i f. circolari n° 3,5 mm (40 cm) con Baby Alpaca Silk o Lace. Lavorare 2 “creste” a M. LEGACCIO – leggere la spiegazione sopra. Poi lavorare come segue: A.1 (= 17 m.), * A.2 (= 5-21 m.), A.3 (= 34 m.) *, ripetere *-* 3 volte in totale, A.2 (= 5-21 m.), A.4 (= 17 m.). Continuare questo motivo avanti e indietro fino a quando sono state lavorate 2 ripetizioni in verticale di A.1/A.4, finire quando rimangono 17 m. sul f. Ora questo è l’inizio del giro. Ora continuare a lavorare in tondo su tutte le m., continuare con A.3 su A.1/A.4. Continuare questo motivo verso l’alto, passare ai f. circolari più lunghi quando necessario. Quando A.2 è stato lavorato 1 volta in verticale, ci sono 348 m. sul f. in entrambe le taglie. Poi lavorare come segue: * A.3, A.5A, A.5B 2 volte, A.5C *, ripetere *-* 4 volte in totale. Ogni volta che A.5 è stato lavorato 1 volta in verticale, c’è un A.5B in più tra ogni A.5A and A.5C. Continuare questo motivo fino a quando è stato lavorato un totale di 9-8 ripetizioni di A.3 e 8-8 ripetizioni di A.5 in verticale = 732 m. sul f. in entrambe le taglie. Lavorare 1 giro a dir. su tutte le m., su tutti gli A.5 distribuire 9 diminuzioni in modo uniforme (= 140 m. rimaste su ogni A.5, 696 m. in totale). Poi lavorare come segue: * A.6 2 volte, continuare con le prime 2 m. in A.5A, lavorare A.6 8 volte, lavorare le ultime 2 m. in A.5C, * ripetere *-* 4 volte in totale. Continuare in questo modo fino a quando A.6 è stato lavorato 1 volta in verticale – lavorare a dir. le m. aumentate in A.5 = 1072 m. Intrecciare senza stringere. BLOCCAGGIO: Se il poncho è stato lavorato in Lace, è necessario bloccarlo per ottenere la giusta misura e forma. Se è stato lavorato in Baby Alpaca Silk, tiratelo leggermente o usate un po’ di vapore. Mettere il poncho in acqua tiepida fino a quando non sia bagnato. Strizzarlo leggermente per far uscire l’acqua dal poncho – non attorcigliare il poncho – poi arrotolare il poncho in un asciugamano e strizzarlo per togliere più acqua possibile – il poncho ora sarà solo umido. Mettere il poncho su un tappeto o un materasso – tirarlo delicatamente per portarlo alla misura giusta in un cerchio e affrancarlo con degli spilli. Lasciarlo asciugare. Ripetere il processo quando il poncho è stato lavato. Far passare il nastrino di seta su e giù nelle “creste” sul collo del poncho e fare un fiocco. |
|||||||||||||||||||
Spiegazioni del diagramma |
|||||||||||||||||||
|
|||||||||||||||||||
 |
|||||||||||||||||||
 |
|||||||||||||||||||
Avete terminato questo modello?Allora taggate le vostre foto con #dropspattern #honeymoonponcho o inviatele alla #dropsfan gallery. Avete bisogno di aiuto con questo modello?Troverete 11 video tutorial, una sezione per i commenti/domande e molto altro guardando il modello su www.garnstudio.com © 1982-2026 DROPS Design A/S. Ci riserviamo tutti i diritti. Questo documento, compreso tutte le sue sotto-sezioni, è protetto dalle leggi sul copyright. Potete leggere quello che potete fare con i nostri modelli alla fine di ogni modello sul nostro sito. |
|||||||||||||||||||


Con oltre 40 anni di esperienza nel design di modelli di maglia e uncinetto, DROPS Design offre la più estesa collezione di modelli gratuiti su internet - tradotti in 17 lingue. Ad oggi vi possiamo fornire 325 cataloghi e 12298 modelli - 9569 dei quali sono tradotti in Italiano.
Ci stiamo impegnando molto per darvi il meglio che vi possiamo offrire in termini di maglia e uncinetto, ispirazioni e consigli così come filati di grande qualità ad un prezzo incredibile! Volete utilizzare i nostri modelli per qualcosa d'altro oltre al vostro uso personale? Potete leggere tutto ciò che è consentito nel testo sul Copyright in basso su tutte le pagine dei nostri modelli. Buon lavoro!
Lasciare un commento sul modello DROPS 146-4
Noi saremmo felici di ricevere i tuoi commenti e opinioni su questo modello!
Se vuoi fare una domanda, fai per favore attenzione a selezionare la categoria corretta nella casella qui sotto per velocizzare il processo di risposta. I campi richiesti sono indicati da *.