
Categorie popolari
State cercando un filato?


Commenti / Domande (205)
![]() Louise ha scritto:
Louise ha scritto:
I would like to know exactly what the run on sentence is saying."Continue with short rows until 2 sts less remain for every turn until 2 rows have been worked over the last 2 sts,..."
19.06.2014 - 17:21DROPS Design ha risposto:
Dear Louise, you should work short rows to create the shape for shawl, ie work 2 rows over the sts, leaving 2 more sts unworked at the end of the 1st of these 2 rows as you did before: 2 rows over 58 sts, 2 rows over 56 sts, 2 rows over 54 sts and so on. Happy knitting!
19.06.2014 - 17:35
![]() Roxanne ha scritto:
Roxanne ha scritto:
How many balls of yarn do I need to knit this shawl?
22.05.2014 - 03:46DROPS Design ha risposto:
Dear Roxane, you will find amount of yarn at the right side of the picture : 350 g Drops delight / 50 g a ball Delight = 7 balls Delight are required for the shawl. Happy knitting!
22.05.2014 - 08:50
![]() Ulla Olsen ha scritto:
Ulla Olsen ha scritto:
Jeg har strikke opskrift 145-3 (sjal) men kan ikke finde ud af hvor jeg skal trække det sammen hilsen ulla
02.05.2014 - 12:50DROPS Design ha risposto:
Du träkker det sammen i den side hvor du har mindst antal pinde, der hvor pindene mödes i en spids.
07.05.2014 - 10:55
![]() Tineke ha scritto:
Tineke ha scritto:
De tweede naald: brei tot er 54 steken over zijn, bedoelen ze dan je tot 6 steken van het eind van de naald moet breien? Dat je dus na de meerdering 54 steken moet breien?
05.04.2014 - 11:55DROPS Design ha risposto:
Dit betekent dat je 6 steken breit, er zijn dan 54 steken over op de linkernaald. Dan keren.
07.04.2014 - 18:58
![]() Sofia ha scritto:
Sofia ha scritto:
", até 2 carreiras terem sido tricotadas nas 2 últimas ms/pts, tricotar 2 carreiras em todas as ms/pts". Esta é a explicação da parte final da 1.ª parte e que, segundo as minhas contas, corresponde às carreiras 55 a 60. Se a 58 e 59 são em jarreteira em todas as malhas, o que fazer nas carreiras 55 a 58?
20.02.2014 - 13:38DROPS Design ha risposto:
Há que conjugar as carreiras com os aumentos conforme explicado mais abaixo nas explicações de maneira a que, nas carreiras 55 a 58 ainda haja malhas suficientes para fazer carreiras encurtadas. Bom tricô!
22.02.2014 - 10:34
![]() Mouna ha scritto:
Mouna ha scritto:
Bonjour Pour que je comprenne bien le déroulement, après la deuxième série on repart en rang raccourcis avec combien de points a laisser je pense 80 mais suis pas certaine Par avance merci à vous pour votre réponse
08.02.2014 - 00:19DROPS Design ha risposto:
Bonjour Mouna, c'est tout à fait exact. Bon tricot!
08.02.2014 - 10:07
![]() Maibrit ha scritto:
Maibrit ha scritto:
Flot opskrift. Desværre kan jeg ikke få maskeantal til at passe: 60 m slås op 1. Rapport: Der tages 1 m ud på hver 6. pind 10 gange = 10 m PLUS 1 m på 5. og 11. p = 2 m I alt udtages altså 12 m på 1. rapport, hvorefter man skulle have i alt 72 m hvis man følger opskriften slavisk. Men i opskriften skulle man ende på 70 m Hvor går det galt med min udregning? :-)))) Vh Maibrit
03.12.2013 - 08:26DROPS Design ha risposto:
Du tager ialt ud 10 gange (og det er i samme side), første gang er på 5.pind næste gang er på 11.p osv. God fornøjelse!
05.12.2013 - 08:46
![]() Heidi ha scritto:
Heidi ha scritto:
NEJ!!!!!! Jag blir tokig!!!!Ränderna kommer inte som på bilden, önskar att jag kunde rita en bild så att ni förstod! Ränderna kommer rakt parallellt med vänstra kanten, alltså kanten på lilla "triangeln". Jag vill ha ränderna parallellt med högra kanten, dvs stora triangeln.
04.10.2013 - 09:18DROPS Design ha risposto:
Sticka de första 24 varven och skicka en bild till mig :) danmark@garnstudio.com
04.10.2013 - 10:47
![]() Jette ha scritto:
Jette ha scritto:
Jeg vil gerne vid om jeg skal strikke, hver anden gang til 58 masker og hver anden gang til 68 masker når jeg skal vende, eller jeg øger efter det antal jeg har udtaget (10 og 12 masker?
22.09.2013 - 17:09DROPS Design ha risposto:
Jeg ved ikke lige hvor du får de 68 m fra... Men hver eneste af de første pinde er beskrevet i opskriften, så bare følg den: Slå 60 m op. Strik således – med start fra retten: 1 p til der er 58 m tilbage, vend og strik tilbage. 1 p til der er 56 m tilbage, vend og strik tilbage. Strik 2 m i første m, strik til der er 54 m tilbage, vend og strik tilbage. 1 p til der er 52 m tilbage, vend og strik tilbage. Osv
02.10.2013 - 12:26
![]() Heidi ha scritto:
Heidi ha scritto:
Såg nu att antalet maskor på slutet är angivet, så då kan jag sticka tvärtom och börja med 208m och minska istället. Tips till er som vill sticka den större men vill slippa räkna: Sticka den i big delight istället eller lägg till en tråd kid silk, så blir den ca 180. Om nu denna beskrivning överhuvudtaget stämmer. Vore kul att höra om någon stickat denna och hur det blev
19.09.2013 - 09:42
|
|
Jay bird#jaybirdshawl |
|
 |
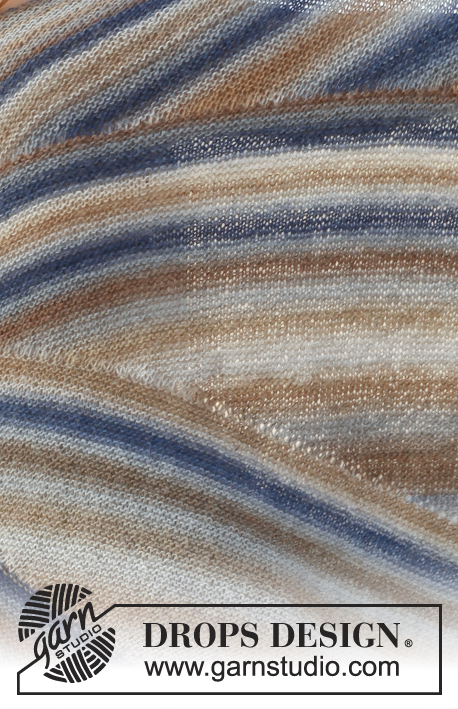 |
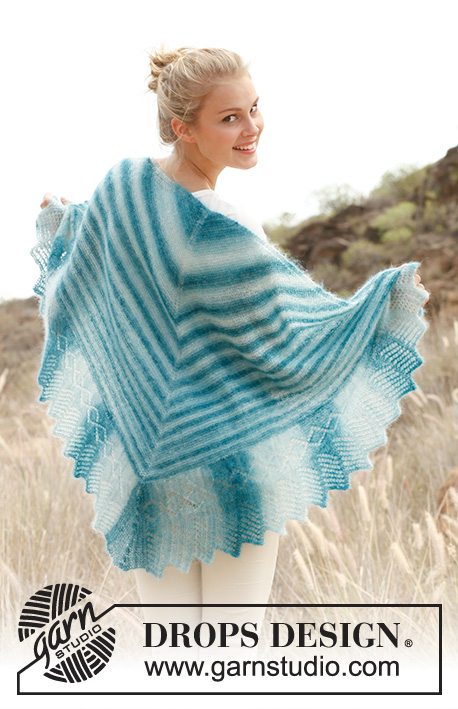
Scialle DROPS lavorato ai ferri a maglia legaccio a ferri accorciati in "Delight".
DROPS 145-3 |
|
|
M. LEGACCIO (avanti e indietro sui f.): Lavorare tutti i f. a dir. 1 “cresta” a m. legaccio = 2 f. dir. SUGGERIMENTO PER IL LAVORO: Quando girate al centro, passate la prima m. Tirate il filo e continuate come prima. Viene fatto per evitare buchi nei punti di passaggio. -------------------------------------------------------- SCIALLE: Lavorato avanti e indietro sui f. circolari. Avviare 60 m. con i f. circolari n° 4 mm con Delight. Lavorare a m. legaccio come segue – iniziare dal diritto del lavoro: 1 f. fino a quando rimangono 58 m., girare e tornare indietro. 1 f. fino a quando rimangono 56 m., girare e tornare indietro. Lavorare 2 m. nella prima m., lavorare fino a quando rimangono 54 m., girare e tornare indietro. 1 f. fino a quando rimangono 52 m., girare e tornare indietro. 1 f. fino a quando rimangono 50 m., girare e tornare indietro. Lavorare 2 m. nella prima m., lavorare fino a quando rimangono 48 m., girare e tornare indietro. Continuare a f. accorciati con 2 m. in meno rimaste ad ogni giro e fino a quando sono stati lavorati 2 f. sulle ultime 2 m., lavorare 2 f. su tutte le m. ALLO STESSO TEMPO ogni 6 f., lavorare 2 m. nella prima m. sul f. dal diritto del lavoro. Alla fine di un’intera ripetizione (= 60 f.), sono state aumentate 10 m. = 70 m. Lavorare la ripetizione successiva come segue dal diritto del lavoro: 1 f. fino a quando rimangono 68 m., girare e tornare indietro. 1 f. fino a quando rimangono 66 m., girare e tornare indietro. Lavorare 2 m. nella prima m., lavorare fino a quando rimangono 64 m., girare e tornare indietro. 1 f. fino a quando rimangono 62 m., girare e tornare indietro. 1 f. fino a quando rimangono 60 m., girare e tornare indietro. Lavorare 2 m. nella prima m., 1 f. fino a quando rimangono 58 m., girare e tornare indietro. Continuare a f. accorciati con 2 m. in meno rimaste alla fine del giro e fino a quando sono stati lavorati 2 f. sulle ultime 2 m., lavorare 2 f. su tutte le m. ALLO STESSO TEMPO ogni 6 f., lavorare 2 m. nella prima m. sul f. dal diritto del lavoro. Alla fine di un’intera ripetizione (= 70 f.), sono state aumentate 12 m. = 82 m. Continuare nello stesso modo verso l’alto, per ogni ripetizione lavorata ci sono più m. nella ripetizione e la ripetizione si estende su diversi f. Continuare fino a quando sono state lavorate 8 ripetizioni – ora ci sono circa 206 m. sul f. Intrecciare. Tirare forte al centro facendo passare un filo nelle m. più interne e tirare forte. BORDO ALL’UNCINETTO: Lavorare un bordo attorno a tutto lo scialle con l’uncinetto n° 3 mm con Delight come segue: 1 m.b., * 3 cat., 1 m.a. nella 1° cat., saltare circa 1 cm, 1 m.b. *, ripetere *-* e finire con 1 m.bss. nella 1° m.b. |
|
Avete terminato questo modello?Allora taggate le vostre foto con #dropspattern #jaybirdshawl o inviatele alla #dropsfan gallery. Avete bisogno di aiuto con questo modello?Troverete 14 video tutorial, una sezione per i commenti/domande e molto altro guardando il modello su www.garnstudio.com © 1982-2026 DROPS Design A/S. Ci riserviamo tutti i diritti. Questo documento, compreso tutte le sue sotto-sezioni, è protetto dalle leggi sul copyright. Potete leggere quello che potete fare con i nostri modelli alla fine di ogni modello sul nostro sito. |
|


Con oltre 40 anni di esperienza nel design di modelli di maglia e uncinetto, DROPS Design offre la più estesa collezione di modelli gratuiti su internet - tradotti in 17 lingue. Ad oggi vi possiamo fornire 324 cataloghi e 12290 modelli - 9561 dei quali sono tradotti in Italiano.
Ci stiamo impegnando molto per darvi il meglio che vi possiamo offrire in termini di maglia e uncinetto, ispirazioni e consigli così come filati di grande qualità ad un prezzo incredibile! Volete utilizzare i nostri modelli per qualcosa d'altro oltre al vostro uso personale? Potete leggere tutto ciò che è consentito nel testo sul Copyright in basso su tutte le pagine dei nostri modelli. Buon lavoro!
Lasciare un commento sul modello DROPS 145-3
Noi saremmo felici di ricevere i tuoi commenti e opinioni su questo modello!
Se vuoi fare una domanda, fai per favore attenzione a selezionare la categoria corretta nella casella qui sotto per velocizzare il processo di risposta. I campi richiesti sono indicati da *.