
Categorie popolari
State cercando un filato?


Commenti / Domande (105)
![]() Vicki Parrish ha scritto:
Vicki Parrish ha scritto:
I am confused by the instructions for the short rows. On the first piece I cast on the required number of stitches but after I do the first set of short rows it says to knit in stockinette over all the stitches. However not all the stitches that were cast on are used in the short rows so there are some left over. How can I knit over ALL the stitches unless it only means the stitches in the short rows? Then what happens to the extra stitches?
05.03.2020 - 02:41DROPS Design ha risposto:
Dear Mrs Parrish, when you work the short rows, you always work the first 3 sts from RS in garter stitch and the next 32-102 sts (depending on the row - the remaining sts on left needle are unworked) in stocking stitch (= K from RS, P from WS), and finish the repeat of the short rows with 8 rows garter stitch on all stitches (=4 ridges on all stitches). You have now worked 8 rows on the top of piece (towards shoulder) and 18 rows on the bottom of piece (bottom edge). Happy knitting!
05.03.2020 - 10:25
![]() Judith ha scritto:
Judith ha scritto:
I’m confused as to “work 3 stitches in garter (which I assume means knit) work in stockinette over the next 32 (does this mean purl), turn and work return row (do I knit the return?)
03.02.2019 - 14:00DROPS Design ha risposto:
Dear Judith, on RS rows you will knit the sts in garter stitch and the sts in stocking stitch, but from WS you will then purl the sts in stocking st andn K the stitch in garter st. On row 1, work; K3, K32 (= stocking st), then turn and work row back = P32, K3. Happy knitting!
04.02.2019 - 12:31Minni ha scritto:
Hi, my problem is the needle sizing. To knit 24 sts for 10 cm I need to use needles size 5 (and that way I'll knit 25sts which is the closest fit). This means fairly loose knitting. Will this affect badly the completed work? Usually I need to swapt for needles one size larger, but I don't understand why I now need two sizes larger. I'm hesitant to start.
17.05.2017 - 17:13DROPS Design ha risposto:
Dear Minni, 24 sts for 10 cm is a quite usual tension for Fabel. You can work your swatch with different needle size, wash and block them then find out the best needle size. Happy knitting!
18.05.2017 - 08:34
![]() Mieke Lubbers ha scritto:
Mieke Lubbers ha scritto:
Drops 145-23 Begin ik het linker voorpand middenvoor te breien of vanaf de zijnaad?
20.09.2016 - 12:04DROPS Design ha risposto:
Deze vraag is twee keer gesteld. U kunt het antwoord hieronder vinden.
20.09.2016 - 13:10
![]() M.Lubbers-Ciggaar ha scritto:
M.Lubbers-Ciggaar ha scritto:
Drops 145-23 Begin ik het linker voorpand vanaf middenvoor of vanaf de zijnaad?
20.09.2016 - 12:02DROPS Design ha risposto:
U begint aan de zijkant, net als bij het rechtervoorpand. Verder volgt u alle aanwijzingen voor het rechtervoorpand en zoals aangegeven staat, begint u de verkorte toeren aan de verkeerde kant.
20.09.2016 - 13:09
![]() Ria Schoonhoven-van Der Steen ha scritto:
Ria Schoonhoven-van Der Steen ha scritto:
Ik heb patroon 145-33 gemaakt. Nu blijkt dat - door het gewicht van het materiaal - het vest langer is (20 cm) dan het oorspronkelijke patroon. Het vest is dwars gebreid. Is er dan ook een manier om het korter te maken?? Ik hoor graag van U. Hartelijke groet, Ria
06.04.2015 - 13:54DROPS Design ha risposto:
Maak altijd eerst een proeflapje en was dit ook voor het breien van een heel vest. Een lapje kan er eerst behoorlijk vast uitzien, maar na het wassen een stuk losser worden. Pas dan de naaldgrootte aan.
06.04.2015 - 15:23
![]() Miekelien ha scritto:
Miekelien ha scritto:
Wanneer met je Ocean Blue gebruiken en wanneer beige?
03.02.2015 - 06:24DROPS Design ha risposto:
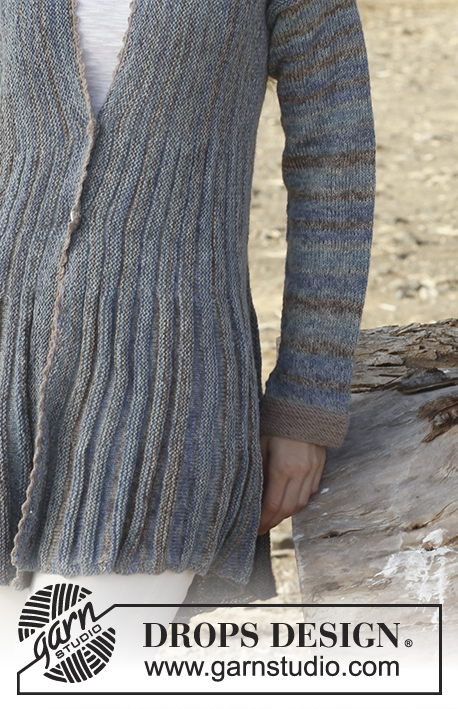
Hoi Miekelien. Je gebruikt alleen de beige voor het begin van de mouwen en de gehaakte rand. De rest wordt alleen met de Ocean Blue gebreid. In deze kleur zit ook stukken beige. Veel breiplezier.
03.02.2015 - 11:58
![]() Mareike ha scritto:
Mareike ha scritto:
Hallo liebes Drops-Team! Ich habe noch keine Antwort auf meine Frage vom 03.01.15 bekommen ! Ich muß bald neue Wolle bestellen , weil "burgunder" nicht reicht. Ich möchte dann die andere Farbe mitbestellen. Es eilt! Danke!
15.01.2015 - 10:42DROPS Design ha risposto:
Liebe Mareike, die Farbwahl ist letztendlich immer Geschmackssache. Sie könnten Baby Merino Nr. 27 oder Alpaca Nr. 3720 ausprobieren.
15.01.2015 - 15:54
![]() Mareike ha scritto:
Mareike ha scritto:
Hallo, ich stricke mir die Jacke gerade in der Farbe "burgunder" und habe mir für den Häkelrand die Farbe "cerise" bestellt. Das ist viel zu grell, welche Farbe kann ich nehmen? Muß nicht "Fabel" sein. Am besten wäre der helle Ton, der in "burgunder" vorkommt! Auf dem Bildschirm sind die Farben verfälscht.
03.01.2015 - 11:54
![]() Sabine VR ha scritto:
Sabine VR ha scritto:
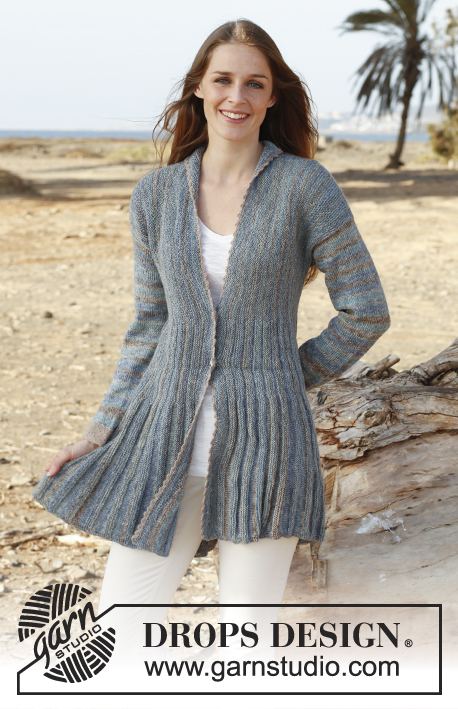
Hallo, ich habe mir diese Jacke in der Farbe "forest" (Garn: Fabel) gestrickt. Sie ist sehr angenehm, beschwingt, individuell und ungewöhnlich. Auf diese Jacke bin ich schon mehrfach angesprochen worden.
29.09.2014 - 14:04
|
|
Stormcloud#stormcloudjacket |
|
 |
 |
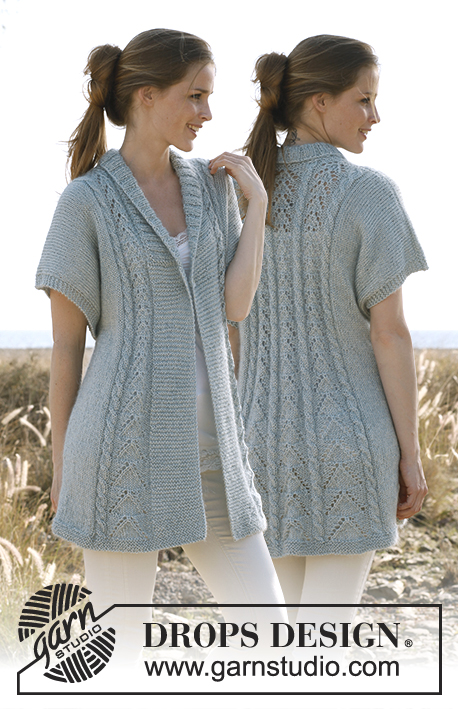
Giacca DROPS a ferri accorciati e collo a scialle, in " Fabel". Taglie: Dalla S alla XXXL.
DROPS 145-23 |
|
|
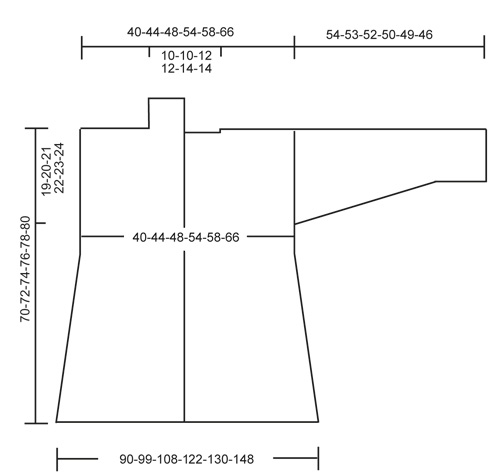
PUNTO LEGACCIO (avanti e indietro sui ferri): Lavorare tutti i ferri a dir. 1 "costa" a legaccio = 2 ferri a dir. PUNTO LEGACCIO (in tondo, sui ferri circolari): 1 "costa a legaccio" = 2 giri: lavorare * 1 giro a dir, 1 giro a rov *, ripetere da *-*. -------------------------------------------------------- DIETRO: Si lavora da lato a lato, avanti e indietro sui ferri circolari per avere sufficiente spazio per tutte le m. Avviare 168-172-178-182-188-192 m sui ferri circolari n° 3 con il filato vista sul mare. Inserire 1 segno nel lavoro quando sul ferro rimangono 46-48-50-52-54-56 (visto sul diritto del lavoro). Questo segno indica dove le maniche vengono cucite al corpo. Lavorare 6 "coste" a legaccio – vedere le spiegazioni sopra ! Proseguire a ferri accorciati come segue, iniziando sul diritto del lavoro (lavorare sempre le prime 3 m a punto legaccio): * Lavorare 3 m a punto legaccio, lavorare le 32 m successive a maglia rasata, girare e lavorare il ferro di ritorno. Lavorare 3 m a punto legaccio, lavorare le 67 m successive a maglia rasata, girare e lavorare il ferro di ritorno. Lavorare 3 m a punto legaccio, lavorare le 102 m successive a maglia rasata, girare e lavorare il ferro di ritorno. Lavorare 3 m a punto legaccio, lavorare le 67 m successive a maglia rasata, girare e lavorare il ferro di ritorno. Lavorare 3 m a punto legaccio, lavorare le 32 m successive a maglia rasata, girare e lavorare il ferro di ritorno. Lavorare 8 ferri a punto legaccio avanti e indietro su tutte le m *; ripetere da *-*; 1 ripetizione = 8 ferri nella parte superiore e 18 ferri nella parte inferiore. RICORDARSI LA TENSIONE DEL LAVORO! Proseguire a punto legaccio e a ferri accorciati a maglia rasata finché il lavoro non misura 15-17-18-21-22-26 cm, misurati sul lato più corto. Al ferro successivo, sul rovescio del lavoro, intrecciare le prime 5 m per il collo = 163-167-173-177-183-187 m. Proseguire a punto legaccio e a ferri accorciati a maglia rasata. Quando il lavoro misura 25-27-30-33-36-40 cm (10-10-12-12-14-14 cm da dove sono state intrecciate le m per il collo), avviare 5 nuove m alla fine del ferro successivo sul diritto del lavoro = 168-172-178-182-188-192 m. Proseguire come prima. Quando il lavoro misura 40-44-48-54-58-66 cm (sono state lavorate lo stesso numero di coste a legaccio prima e dopo aver intrecciato per il collo – assicurarsi di aver completato una intera ripetizione + 2 coste a legaccio su tutte le m), inserire un segno nel lavoro quando sul ferro rimangono 46-48-50-52-54-56 m (visto sul diritto del lavoro). Questo segno indica dove le maniche vengono cucite al corpo. Intrecciare le m nel corso del ferro successivo. DAVANTI DESTRO: Si lavora da lato a lato, avanti e indietro sui ferri circolari per avere sufficiente spazio per tutte le m. Si inizia dal lato e si procede verso il centro. Avviare 168-172-178-182-188-192 m sui ferri circolari n° 3 con il filato vista sul mare. Inserire 1 segno nel lavoro quando sul ferro rimangono 46-48-50-52-54-56 m (visto sul diritto del lavoro). Questo segno indica dove le maniche vengono cucite al corpo. Lavorare 6 coste a legaccio – vedere le spiegazioni sopra ! Proseguire ora a ferri accorciati come segue, iniziando sul diritto del lavoro (lavorare sempre le prime 3 m a punto legaccio): * Lavorare 3 m a punto legaccio, lavorare le 32 m successive a maglia rasata, girare e lavorare il ferro di ritorno. Lavorare 3 m a punto legaccio, lavorare le 67 m successive a maglia rasata, girare e lavorare il ferro di ritorno. Lavorare 3 m a punto legaccio, lavorare le 102 m successive a maglia rasata, girare e lavorare il ferro di ritorno. Lavorare 3 m a punto legaccio, lavorare le 67 m successive a maglia rasata, girare e lavorare il ferro di ritorno. Lavorare 3 m a punto legaccio, lavorare le 32 m successive a maglia rasata, girare e lavorare il ferro di ritorno. Lavorare 8 ferri a punto legaccio avanti e indietro su tutte le m *; ripetere da *-*; 1 ripetizione = 8 ferri nella parte superiore e 18 ferri nella parte inferiore. Proseguire a punto legaccio e a ferri accorciati a maglia rasata finché il lavoro non misura 15-17-18-21-22-26 cm, misurati lungo il lato più corto. Alla fine del ferro successivo sul diritto del lavoro, avviare 20-20-22-22-24-24 nuove m per il colletto = 188-192-200-204-212-216 m. Proseguire a punto legaccio e a ferri accorciati a maglia rasata. Quando il lavoro misura 20-22-24-27-29-33 cm (5-5-6-6-7-7 cm da dove sono state avviate le nuove m per il colletto – fermarsi subito prima degli 8 ferri a dir di una ripetizione), lavorare a punto legaccio su tutte le m per 1 cm. Intrecciare ora le m per le asole come segue - sul diritto del lavoro: Lavorare 82-84-88-92-96-100 m, 2 m insieme a dir, 1 m gettata, lavorare 16 m, 2 m insieme a dir, 1 m gettata. Lavorare le restanti m sul ferro. Proseguire a punto legaccio per 3 cm in tutto. Intrecciare tutte le m. DAVANTI SINISTRO: Lavorare come indicato per il DAVANTI DESTRO ma a specchio. Iniziare i ferri accorciati sul rovescio del lavoro. Non intrecciare le m per le asole. MANICHE: Si lavorano in tondo sui ferri a doppia punta. Avviare 56-58-60-62-64-66 m sui ferri a doppia punta n° 3 con il filato beige. Lavorare a PUNTO LEGACCIO per 4 cm - vedere le spiegazioni sopra. Proseguire con il colore vista sul mare. Lavorare ora a maglia rasata. Inserire 1 segno all’inizio del giro. Quando il lavoro misura 8 cm, aumentare 1 m da ciascun lato del segno, ripetere questi aumenti ogni 2½-2-2-2-1½-1½ cm altre 17-18-19-20-21-22 volte (18-19-20-21-22-23 aumenti in tutto) = 92-96-100-104-108-112 m. Quando il lavoro misura 54-53-52-50-49-46 cm (misure più corte per le taglie più grandi perché le spalle sono più larghe), intrecciare tutte le m. CONFEZIONE: Cucire le spalle. Cucire i lati dal segno verso il basso. Cucire le maniche. Cucire le estremità del colletto al centro, sul dietro e cucire il colletto alla scollatura, sul dietro. Attaccare i bottoni sul davanti sinistro. BORDO ALL’UNCINETTO: Lavorare un bordo tutto intorno all’apertura sul davanti della giacca, iniziando in basso sul davanti destro, lavorare intorno al collo e ridiscendere lungo il davanti sinistro. Con l’uncinetto n° 3 ed il filato colore beige, lavorare come segue: 1 m.b * 3 cat, 1 m.a nella 1° cat, saltare ca.1 cm, 1 m.b *, ripetere da *-*. Tagliare e fermare il filo. |
|
 |
|
Avete terminato questo modello?Allora taggate le vostre foto con #dropspattern #stormcloudjacket o inviatele alla #dropsfan gallery. Avete bisogno di aiuto con questo modello?Troverete 16 video tutorial, una sezione per i commenti/domande e molto altro guardando il modello su www.garnstudio.com © 1982-2026 DROPS Design A/S. Ci riserviamo tutti i diritti. Questo documento, compreso tutte le sue sotto-sezioni, è protetto dalle leggi sul copyright. Potete leggere quello che potete fare con i nostri modelli alla fine di ogni modello sul nostro sito. |
|


Con oltre 40 anni di esperienza nel design di modelli di maglia e uncinetto, DROPS Design offre la più estesa collezione di modelli gratuiti su internet - tradotti in 17 lingue. Ad oggi vi possiamo fornire 324 cataloghi e 12290 modelli - 9561 dei quali sono tradotti in Italiano.
Ci stiamo impegnando molto per darvi il meglio che vi possiamo offrire in termini di maglia e uncinetto, ispirazioni e consigli così come filati di grande qualità ad un prezzo incredibile! Volete utilizzare i nostri modelli per qualcosa d'altro oltre al vostro uso personale? Potete leggere tutto ciò che è consentito nel testo sul Copyright in basso su tutte le pagine dei nostri modelli. Buon lavoro!
Lasciare un commento sul modello DROPS 145-23
Noi saremmo felici di ricevere i tuoi commenti e opinioni su questo modello!
Se vuoi fare una domanda, fai per favore attenzione a selezionare la categoria corretta nella casella qui sotto per velocizzare il processo di risposta. I campi richiesti sono indicati da *.