
Categorie popolari
State cercando un filato?


Commenti / Domande (46)
![]() Sh ha scritto:
Sh ha scritto:
Hej jeg ville vide hvis man strikker huen uden halestykket hvor meget garn skal der bruges til strl 2 ?
23.08.2025 - 19:52DROPS Design ha risposto:
Hej. Det har vi dessvärre ingen uppgift om. Mvh DROPS Design
26.08.2025 - 13:53
![]() Sh ha scritto:
Sh ha scritto:
Hej jeg vil gerne strikke huen, men uden halestykket, hvordan skal man så lukke det af?
13.01.2025 - 21:42DROPS Design ha risposto:
Hej, da syr du bare de 2 stykker sammen istedet for at sætte maskerne fra Halestykket på strømpepinde :)
14.01.2025 - 11:58
![]() Sabrina ha scritto:
Sabrina ha scritto:
Hallo liebes Team, ich stricke die Mütze und bin nun beim "Schwanzteil" angekommen. Ich verstehe leider nicht, wie die Abnahmen da funktionieren sollen. Soll ich die M vor und die nach der re M auf der Hilfsnadel zusammenstricken, und wenn ja, was bedeutet dann "die M auf der Hilfsnadel über die zusammengestrickten M legen?" Wie viele M werden da auf einmal abgenommen? Bitte um eine klare Schritt für Schritt Beschreibung! Lieben Gruß, Sabrina
11.12.2024 - 20:28DROPS Design ha risposto:
Liebe Sabrina, in diesem Video zeigen wir, wie man so abnimmt: die mittlere Masche im Video ist diejenige die bei der Mütze hier krausrechts gestrickt wird, die Masche davor + die nächste werden zusammengestrickt und die krausrechte Masche darüber gezogen. So nehmen Sie 1 der Masche von hinten + 1 der neuen Maschen jeweils ab - diese Abnahmen an beiden Seiten (= an beiden "Übergang" zwischen die Maschen der Mütze und die neuen Maschen wiederholen. Viel Spaß beim Stricken!
12.12.2024 - 09:53
![]() Marjorie Magrath ha scritto:
Marjorie Magrath ha scritto:
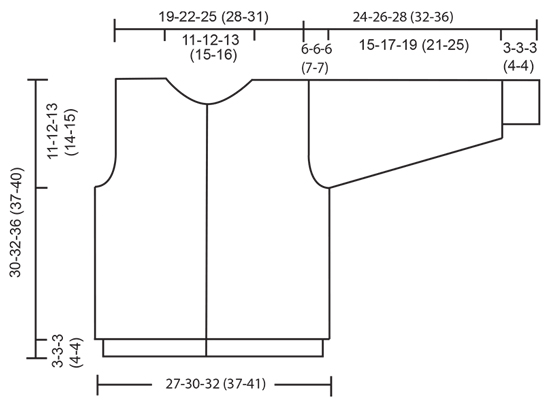
Please explain cast off 6 stitches mid underarm is this at the beginning of the round . Do I continue on double pointed to shape sleeve cap or use straight needles.
27.10.2024 - 15:47DROPS Design ha risposto:
Dear Marjorie, the mid under the sleeve should be the beginning of the row. So when you cast off 6 stitches you should cast off 3 at the start and 3 at the end (at each side of the mid under the sleeve or starting point. You can continue with circular needles, to work back and forth. Happy knitting!
27.10.2024 - 22:33
![]() Marjorie Magrath ha scritto:
Marjorie Magrath ha scritto:
I am knitting the right front is it the first 9 stitches I slip onto a thread before shaping the neckline. Also can I use circular needles instead double pointed for the sleeves. When you say mid under arm is this the start of the row.
20.10.2024 - 10:13DROPS Design ha risposto:
Dear Marjorie, you should slip the stitches to shape the neckline at the front middle, wich is for the right front is the fiest few stitches on the right side. (it will be the first few stitches on the wrong side row of the left front). Yes, you can use circular needles, if that is what more comfortable for you. Happy Knitting!
20.10.2024 - 11:09
![]() Marjorie ha scritto:
Marjorie ha scritto:
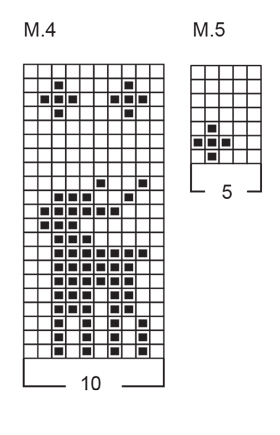
I am confused I am knitting on circular needles knitting the cardigan so using charts m1 m2 m3 m4 m5 .are these charts read from the right every time for every row. Also there are 11 rows in the pattern are these 11 rows repeated to the required length.
15.10.2024 - 10:15DROPS Design ha risposto:
Hi Marjorie, When you work back from the wrong side, you read the charts from left to right. M.1 is repeated in height to the correct length, the other charts are worked just the once. Happy knitting!
15.10.2024 - 10:31
![]() Marjorie Magrath ha scritto:
Marjorie Magrath ha scritto:
I am knitting the cardigan little dancer I don't understand the instruction in brackets incl 1 edge stitch both sides towards mid front. Is this a knit stitch? And how many stitches in?
13.10.2024 - 17:24DROPS Design ha risposto:
Dear Marjorie, you cast on the number of stitches indicated. In this number of stitches you already include the edge stitches in garter stitch (you don't need to add stitches for it). These edge stitches in garter stitch are always knitted (both from the right side and the wrong side). The edge stitches are located at the edge/side of the piece you are working, so they will be the first and last stitch in the row. You can click on the word "edge stitch" in the pattern for more information. Happy knitting!
13.10.2024 - 22:24
![]() Margarita ha scritto:
Margarita ha scritto:
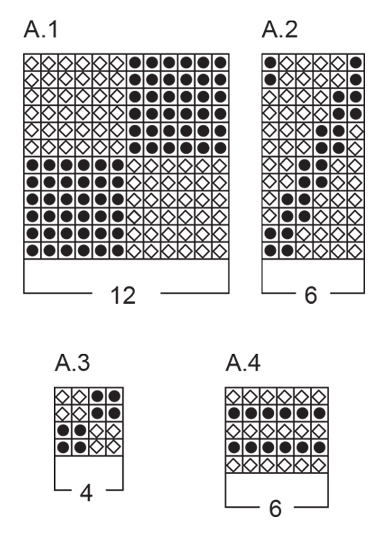
No entiendo el patrón de la manta. ¿Los centímetros que aparecen son los de las filas o los de los puntos de cada muestra? ¿Para qué sirven los diagramas A1,A2,A3 y A4?. No veo que aparezcan en ningún patrón . ¿Podríais enviarme una foto de la manta tejida? En la web los 3 enlaces enseñan la misma foto.
09.06.2024 - 09:00DROPS Design ha risposto:
Hola Margarita, los cm son en vertical. Trabajas el patrón sobre todos los 120 pts centrales. Hay una errata en el patrón; en la manta se trabajan los diagramas A; los M son para el jersey. Entonces, trabajas todas las filas de A.3 y repites hasta tener 8 cm en vertical del patrón A.3. Después trabajar una repetición en vertical de A.4. Después trabajar aprox. 10 cm de A.1, asegurándose de acabar con una repetición completa en vertical. Continuar como se indica en el patrón. No disponemos de más fotos del patrón que las mostradas en la página online.
09.06.2024 - 20:52
![]() May ha scritto:
May ha scritto:
Bonjour, je fais la cagoule, je ne comprends pas le patron quand on commence à tricoter la pointe. Le patron dit qu'il faut continuer "1 m lis au point mousse de chaque côté" et diminuer tous les deux rangs. Combien de diminutions et de rangs faut-il faire avant de commencer à tricoter en rond pour faire les diminutions tous les 4 tours?? Ou faut il tricoter en rond tout de suite??
03.10.2023 - 08:53DROPS Design ha risposto:
Bonjour May, la pointe se tricote en rond et on doit diminuer tous les 4-4-5 (4-5) tours jusqu'à ce qu'il reste 10 mailles (correction faite, merci). Autrement dit, on va diminuer de chaque côté de la partie centrale et en même temps les mailles de chaque côté. Bon tricot!
04.10.2023 - 07:33
![]() Christine Barrington ha scritto:
Christine Barrington ha scritto:
How do I work the button bands for Little Dancer? Do I knit the bands as I am knitting the garment, or at the end? How many stitches is the band worked on? Thank you.
16.09.2021 - 02:37DROPS Design ha risposto:
Dear Mrs Barrington, front band edges are worked separately at the end, they are explained under the section called Assembly. Happy knitting!
16.09.2021 - 07:35
|
|||||||||||||
Little Dancer#littledancerjacket |
|||||||||||||
 |
 |
||||||||||||
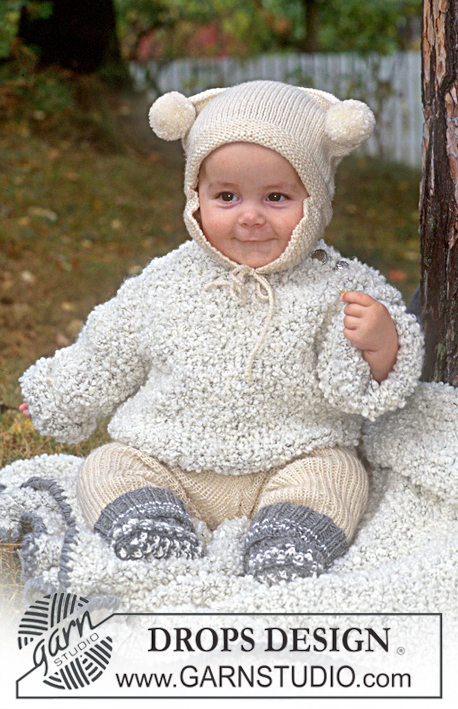
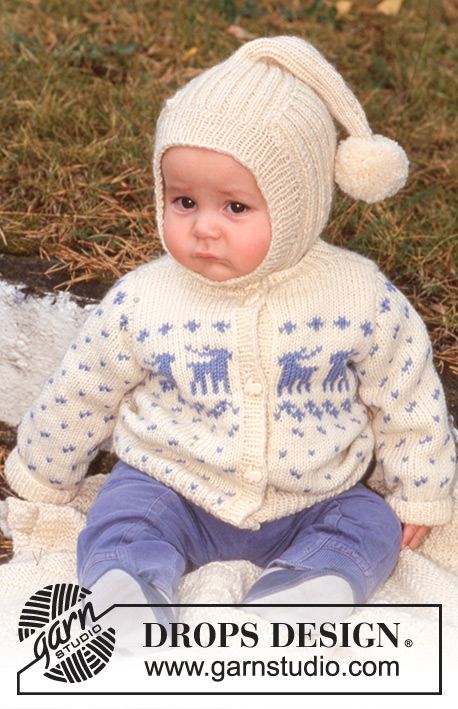
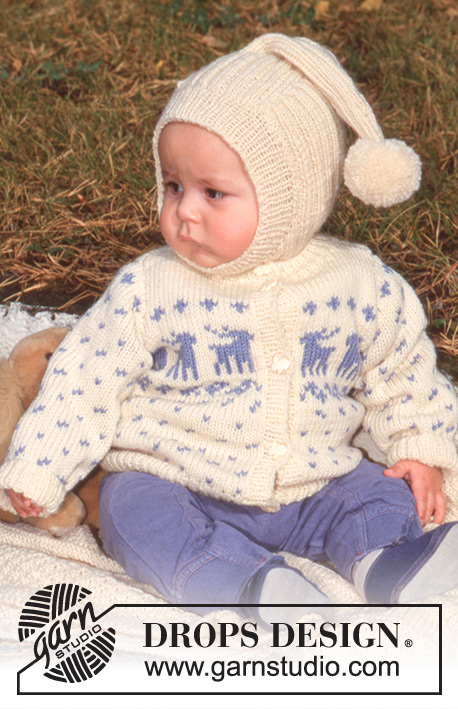
Maglione con motivo con le renne, cappello con la ‘coda’ e coperta in Karisma Superwash. Tema: Coperta per bambini.
DROPS Children 9-20 |
|||||||||||||
|
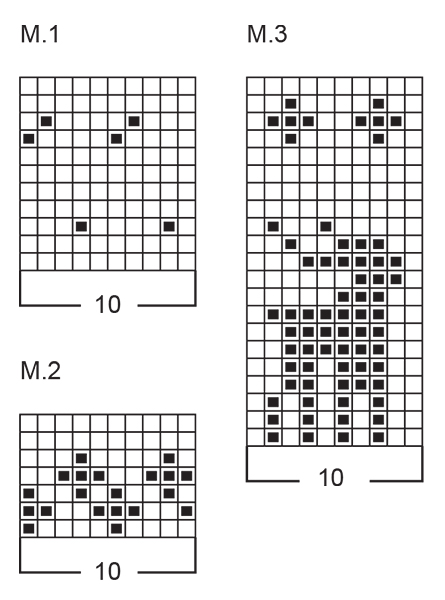
CAMPIONE: 22 m x 30 f con Karisma con i f n° 3,5 mm a m rasata = 10 x 10 cm. COSTE: * 1 m dir, 1 m rov *, ripetere *-*. M LEGACCIO (avanti e indietro): Lavorare tutti i f a dir. MOTIVO: Vedere il diagramma. Tutto il motivo è lavorato a m rasata. -------------------------------------------------------- CORPO: Lavorato avanti e indietro sui f circolari dal centro davanti. Avviare 122-132-142 (162-182) m (compresa 1 m di vivagno a ogni lato verso il centro davanti) con i f circolari n° 2,5 mm in panna e lavorare a coste. Dopo 3-3-3 (4-4) cm passare ai f circolari n° 3,5 mm e continuare in M.1 su tutte le m (m di vivagno a m legaccio per tutto il lavoro). FARE ATTENZIONE ALLA TENSIONE DEL LAVORO! Quando il lavoro misura 15-17-20 (20-22) cm lavorare M.2. Dopo M.2 lavorare il f successivo come segue: 1 m di vivagno, 30-30-30 (40-40) m di M.3, 0-5-10 (0-10) m in panna (= sotto manica), 30-30-30 (40-40) m di M.3, 30-30-30 (40-40) m di M.4, 0-5-10 (0-10) m con il panna (= cotto manica), 30-30-30 (40-40) m di M.4, 1 m di vivagno. Continuare con il motivo, ALLO STESSO TEMPO quando il lavoro misura 19-20-23 (23-25) cm intrecciare per lo scalfo come segue: lavorare 29-31-33 (38-43) m = davanti, intrecciare 4-5-6 (6-6) m per lo scalfo, lavorare 56-60-64 (74-84) m = dietro, intrecciare 4-5-6 (6-6) m per lo scalfo, lavorare 29-31-33 (38-43) m = davanti. Finire ogni parte in modo separato. DAVANTI DESTRO: = 29-31-33 (38-43) m. Intrecciare per lo scalfo a f alterni: 2 m 2-2-0 (2-2) volte, 1 m 3-2-4 (2-4) volte = 22-25-29 (32-35) m. Dopo M.3 e M.4 finire il lavoro in panna. Quando il lavoro misura 28-29-33 (34-36) cm trasferire 7-8-9 (11-12) m su un fermamaglie al centro davanti per il collo e diminuire per modellare la scollatura a f alterni: 2 m 3 volte = 9-11-14 (15-17) m rimaste sulla spalla. Intrecciare quando il lavoro misura 30-32-36 (37-40) cm. DAVANTI SINISTRO: Lavorare come per il destro, ma a specchio. DIETRO: = 56-60-64 (74-84) m. Intrecciare per lo scalfo come descritto per il davanti = 42-48-56 (62-68) m. Quando il lavoro misura 29-31-35 (36-39) cm intrecciare le 20-22-24 (28-30) m centrali per il collo e intrecciare 2 m sul f successivo verso la scollatura = 9-11-14 (15-17) m rimaste su ogni spalla. Intrecciare quando il lavoro misura 30-32-36 (37-40) cm. MANICA: Avviare 40-40-40 (44-44) m con i f a doppia punta n° 2,5 mm con il panna. Lavorare 3-3-3 (4-4) cm a coste. Passare ai f a doppia punta n° 3,5 mm e continuare in M.1, ALLO STESSO TEMPO aumentare 0-0-0 (1-1) m = 40-40-40 (45-45) m sul 1° giro. ALLO STESSO TEMPO aumentare 2 m al centro sotto il braccio: 2-4-6 (6-8) volte ogni 23-12-9 (10-9) f = 44-48-52 (57-61) m. Quando il lavoro misura 18-20-22 (25-29) cm intrecciare 6 m al centro sotto il braccio e finire la manica avanti e indietro sui f. Intrecciare per l’arrotondamento della manica a ogni lato a f alterni: 2 m 1-2-2 (3-3) volta, 1 m 5-3-2 (2-1) volte, 2 m 1-2-3 (3-3) volte, 3 m 1-1-1 (1-2) volte. ALLO STESSO TEMPO quando mancano circa 7 f delle diminuzioni lavorare M.5 ma aggiustare a M.1 – ci devono essere 4 f in panna tra i puntini in M.1 e M.5. Alla fine di tutte le diminuzioni per l’arrotondamento della manica ci sono 14-14-16 (17-17) m rimaste sul f, intrecciare, la manica misura circa 24-26-28 (32-36) cm. CONFEZIONE: Riprendere circa 70 - 90 m sui f n° 2,5 mm con il panna lungo il bordo davanti sinistro (riprendere le m entro le m di vivagno). Lavorare 2 cm a coste e intrecciare. Ripetere lungo il bordo davanti destro, ma dopo 0,5 cm intrecciare per 5 - 6 asole distribuite in modo uniforme sul f – asola sopra e sotto = 1 cm dal bordo. 1 asola = intrecciare 2 m, avviare 2 nuove m sulle m intrecciate sul f successivo. Cucire i margini delle spalle. Riprendere circa 70-100 m attorno alla scollatura sui bordi davanti (comprese le m sui fermamaglie) con i f n° 2,5 mm con il panna. Lavorare a coste, dopo 0,5-0,5-0,5 (1-1) cm intrecciare per 1 asola sul lato destro in linea con le asole sul bordo davanti. Lavorare fino a quando il collo misura 2-2-2 (3-3) cm, intrecciare. Attaccare le maniche e cucire i bottoni. ___________________________________________________________________ CAPPELLO Taglie, mesi: 1/3 -6/9 - 12/18 Taglie, anni: (2 - 3/4). Circonferenza del cappello: 42-44-46 (48-50) cm. Materiali: DROPS Karisma Superwash di Garnstudio 150-150-150 (150-200) g colore n° 01, panna. FERRI DROPS A DOPPIA PUNTA n° 2,5 mm e 3 mm. CAMPIONE: 23 m x 32 f con i f n° 3 mm e a m rasata = 10 x 10 cm. 10 cm a coste-2, non tirate, con i f n° 3 mm = larghezza circa 34 m. M LEGACCIO (avanti e indietro): Lavorare tutti i f a dir. COSTE-1: * 1 m dir, 1 m rov *, ripetere *-*. COSTE-2: * 2 m dir, 2 m rov *, ripetere *-*. -------------------------------------------------------- DAVANTI: Avviare 23-25-27 (29-31) m con i f n° 3 mm con il panna e lavorare 4 f a m legaccio. Poi lavorare a m rasata con 3 m a m legaccio a ogni lato – ALLO STESSO TEMPO aumentare 1 m a ogni lato prima/dopo le 3 m a m legaccio a f alterni: 4-5-5 (5-7) volte = 31-35-37 (39-45) m. Quando il lavoro misura 7-8-9 (10-11) cm metterlo da parte. DIETRO: Lavorare come per il davanti. CAPPELLO: Riportare tutte le m sui f a doppia punta n° 2,5 mm = 62-70-74 (78-90) m (= spacco a ogni lato). Continuare in tondo. Lavorare 3 cm a COSTE-1, ALLO STESSO TEMPO distribuire 10 aumenti in modo uniforme sul 1° giro = 72-80-84 (88-100) m. Misurare il lavoro da qui! Passare ai f a doppia punta n° 3 mm e lavorare a COSTE-2, ALLO STESSO TEMPO distribuire 12-16-16 (20-20) aumenti in modo uniforme sul 1° giro = 84-96-100 (108-120) m. Quando il lavoro misura 2-2-3 (3-3) cm intrecciare 6-6-6 (10-10) m al centro davanti – sulle 3 taglie più piccole intrecciare 2 m rov, 2 m dir, 2 m rov, sulle 2 taglie più grandi intrecciare 2 m rov, 2 m dir, 2 m rov, 2 m dir, 2 m rov = 78-90-94 (98-110) m sul f. Continuare avanti e indietro sui f e intrecciare 1 m a ogni lato verso il davanti a f alterni: 3-5-7 (5-7) volte = 72-80-80 (88-96) m. Continuare a coste con 1 m a ogni lato verso il davanti a m legaccio. Quando il lavoro misura 18,5-20-22 (24-24,5) cm intrecciare 23-27-27 (27-31) m a ogni lato. Trasferire le 26-26-26 (34-34) m rimaste al centro dietro su un f ausiliario, mettere il lavoro da parte. PARTE SUPERIORE: Avviare 28-28-28 (36-36) m con i f n° 3 mm e lavorare il 1° f come segue: 1 m a m legaccio, 26-26-26 (34-34) m a COSTE-2, 1 m a m legaccio. Continuare fino a quando il lavoro misura circa 6,5-8-8 (8-9) cm. PARTE DELLA "CODA": Riportare le 26-26-26 (34-34) m del centro dietro e le 28-28-28 (36-36) m della parte superiore sui f a doppia punta = 54-54-54 (70-70) m. Continuare a coste con 1 m a ogni lato sulla parte superiore a m legaccio. ALLO STESSO TEMPO diminuire a ogni lato della m a m legaccio come segue: trasferire la m a m legaccio su un f ausiliario sul davanti del lavoro, lavorare insieme a dir la m prima e dopo poi accavallare la m legaccio sopra quelle appena lavorate. Ripetere queste diminuzioni ogni 4-4-5 (4-5) giri fino a quando rimangono 10 m. La coda ora misura circa 14-14-17 (19-19) cm. Far passare un filo doppio attraverso queste m e affrancare. Cucire i lati della parte superiore sul cappello. Fare un pompon con un diametro di circa 5 cm e attaccarlo alla fine della coda. Riprendere circa 80-100 m attorno all’apertura della faccia con i f a doppia punta n° 2,5 mm e lavorare 1 giro rov (visto dal diritto del lavoro) poi lavorare 2 cm a COSTE-1, o 5 cm se si vuole risvoltare il bordo a coste verso il rovescio del lavoro alla fine. Intrecciare senza stringere e, se opportuno, risvoltare il bordo a coste verso il rovescio del lavoro e cucire. _____________________________________________________________________ COPERTA: Misure: circa 60 x 75 cm. Materiali: DROPS Karisma Superwash di Garnstudio 350 g colore n° 01, panna. FERRI DROPS n° 3,5 mm. -------------------------------------------------------- CAMPIONE: 21 m con i f n° 3,5 e il motivo = larghezza 10 cm. Ricordarsi che il n° dei ferri è solo indicativo! MOTIVO: Vedere il diagramma (1 diagramma = 1 ripetizione). Il motivo è visto dal diritto del lavoro. M LEGACCIO (avanti e indietro): Lavorare tutti i f a dir. -------------------------------------------------------- COPERTA: Avviare 128 m con il panna con i f n° 3,5 mm e lavorare 1 cm a m legaccio. Ora, lavorare il motivo sulle 120 m centrali (a m legaccio sulle 4 m più esterne a ogni lato) come segue: 8 cm di A.3, A.4, 10 cm di A.1 (aggiustarlo alla fine del motivo), A.4, 8 cm di A.2, A.4, 16 cm di A.3, A.4, 10 cm di A.1 (aggiustarlo alla fine del motivo), A.4, 8 cm di A.2, A.4, 8 cm di A.3, 1 cm a m legaccio. Intrecciare. |
|||||||||||||
Spiegazioni del diagramma |
|||||||||||||
|
|||||||||||||
 |
|||||||||||||
 |
|||||||||||||
 |
|||||||||||||
 |
|||||||||||||
Avete terminato questo modello?Allora taggate le vostre foto con #dropspattern #littledancerjacket o inviatele alla #dropsfan gallery. Avete bisogno di aiuto con questo modello?Troverete 22 video tutorial, una sezione per i commenti/domande e molto altro guardando il modello su www.garnstudio.com © 1982-2026 DROPS Design A/S. Ci riserviamo tutti i diritti. Questo documento, compreso tutte le sue sotto-sezioni, è protetto dalle leggi sul copyright. Potete leggere quello che potete fare con i nostri modelli alla fine di ogni modello sul nostro sito. |
|||||||||||||


Con oltre 40 anni di esperienza nel design di modelli di maglia e uncinetto, DROPS Design offre la più estesa collezione di modelli gratuiti su internet - tradotti in 17 lingue. Ad oggi vi possiamo fornire 324 cataloghi e 12290 modelli - 9561 dei quali sono tradotti in Italiano.
Ci stiamo impegnando molto per darvi il meglio che vi possiamo offrire in termini di maglia e uncinetto, ispirazioni e consigli così come filati di grande qualità ad un prezzo incredibile! Volete utilizzare i nostri modelli per qualcosa d'altro oltre al vostro uso personale? Potete leggere tutto ciò che è consentito nel testo sul Copyright in basso su tutte le pagine dei nostri modelli. Buon lavoro!
Lasciare un commento sul modello DROPS Children 9-20
Noi saremmo felici di ricevere i tuoi commenti e opinioni su questo modello!
Se vuoi fare una domanda, fai per favore attenzione a selezionare la categoria corretta nella casella qui sotto per velocizzare il processo di risposta. I campi richiesti sono indicati da *.