
Categorie popolari
State cercando un filato?


Commenti / Domande (89)
![]() France ha scritto:
France ha scritto:
Merci de m’avoir répondu. Malheureusement je comprends vos explications mais ça s’avère impossible de réaliser le deuxième rang en se fiant à celles ci. Ça ne concorde pas pour la continuité du motif. Est ce possible qu’il y ait une erreur dans ce patron. Merci
19.02.2026 - 14:56DROPS Design ha risposto:
Bonjour France, après les mailles du raglan, au début des manches, du dos et du devant, vous allez tricoter la nouvelle maille comme la maille précédente du diagramme: si vous commencez par 2 m end, les 2 premières augmentations seront des m env, puis 2 m end et ainsi de suite; à la fin du dos, devant, manches, si vous terminez par 2 m env, les 2 premières augm. seront des m end, puis 2 m env et ainsi de suite. Bon tricot!
20.02.2026 - 07:40
![]() France ha scritto:
France ha scritto:
Quels point doit on tricoter lorsque l’on fait des augmentations raglan. On donne la directive point de fantaisie mais Je trouve très compliqué d’agencer quand on travaille la grille point de fantaisie.
16.02.2026 - 22:25DROPS Design ha risposto:
Bonjour France, les augmentations du raglan doivent être incorporées au point fantaisie, ainsi, tricotez la comme la maille précédente du diagramme (lisez le diagramme de droite à gauche) après les mailles du raglan, au début du dos, devant et des manches, et à la fin du dos, du devant et des manches, tricotez les augmentations comme la maille suivante du diagramme. Le motif va ainsi s'élargir sur les côtés. Bon tricot!
17.02.2026 - 15:28
![]() Lone ha scritto:
Lone ha scritto:
Jeg strikker str 134/140. Jeg kan ikke få maskeantallet til at passe efter udtagningerne når jeg skal dele krop og ærmer, mine udtagninger er først 10 gange og så 14 gange, jeg har 288 masker opskriften siger 296 masker ??
29.11.2025 - 12:02DROPS Design ha risposto:
Hei Lone. Første økning er forklart i oppskriften (=8 økte masker) = 96+8 = 104 masker. Så står det at økningen skal gjenta 10 ganger til = 8 x 10 = 80 økte masker = 104 + 80 = 184 masker. Så skal det økes 14 ganger til = 8 masker x 14 ganger = 112 masker. 184 masker + 112 masker = 296 masker, som det stå i oppskriften. mvh DROPS Design
01.12.2025 - 14:27
![]() Jessica ha scritto:
Jessica ha scritto:
Goedendag, Ik brei de trui voor 9/10 jaar en ben bezig met het lijf. Ik moet nu tot 48 cm door breien vanaf de schouders gemeten. Is dat inclusief de boord er bij?
30.10.2025 - 21:08DROPS Design ha risposto:
Dag Jessica,
Ja, dat is inclusief de boord. Je meet altijd vanaf de opzetrand tenzij anders aangegeven.
01.11.2025 - 15:01
![]() Boulan Evelyne ha scritto:
Boulan Evelyne ha scritto:
Désolé mais ce n'est pas ce qui est écrit. 4 aug avant la pose des marqueurs. Relisez votre modèle.
10.10.2025 - 18:17DROPS Design ha risposto:
Bonjour Mme Boulan, je cite à nouveau, en soulignant le nombre d'augmentations: Tricoter A-1, EN MÊME TEMPS au 1er tour, augmenter 1 m de chaque côté des 4 marqueurs pour le raglan(= 8 augmentations) - VOIR AUGMENTATIONS ! Répéter ces augmentations encore 7-7-9-10-11 foistous les tours et 11-13-13-14-15 fois tous les 2 tours, donc en taille 9/10 ans: 1 fois + 10 + 14 = 25 fois au total. Bon tricot!
15.10.2025 - 07:27
![]() Évelyne ha scritto:
Évelyne ha scritto:
Il est indiqué d'aug 4 m au 92 m départ. Ça fait bien 96. Puis on dit d'augmentation 10 fois + 14 fois = 24 fous 8 m. Y a erreur.
09.10.2025 - 16:13DROPS Design ha risposto:
Bonjour Évelyne, vous augmentez d'abord 1 fois de chaque côté des 4 marqueurs puis, je cite: encore 10 fois tous les tours et 14 fois tous les 2 tours = on obtient 296 mailles soit: 1+10+14=25 fois et pas seulement 24. Bon tricot!
10.10.2025 - 08:01
![]() Boulan ha scritto:
Boulan ha scritto:
Sur le modèle Paulina je fais la taille 9/10 ans, de 92 m +4 =96 m puis aug 10 fois 8 m = 80 m puis 14 fois 8 m = 112 m. Total 288 m et non 296 m comme mentionné es-ce une erreur ??
09.10.2025 - 09:10DROPS Design ha risposto:
Bonjour Mme Boulan, en taille 9/10 ans, on va augmenter 25 fois 8 mailles au total (d'abord 1 fois comme indiqué puis encore 10 fois tous les tours et enfin14 fois tous les 2 tours), on aura ainsi: 96+(25x8)=296 mailles. Bon tricot!
09.10.2025 - 15:59
![]() Carole ha scritto:
Carole ha scritto:
Je suis plutôt débutante dans le tricot et je voulais savoir à partir d'où mesurer les 8 cm de "EN MÊME TEMPS, à 8 cm de hauteur à partir du milieu devant"? Est-ce a partir du début du col sur le devant (toute la hauteur du tricot jusqu'à present sur le devant) ou a partir du bas du col? Merci beaucoup!
08.10.2025 - 09:31DROPS Design ha risposto:
Bonjour Carole, mesurez au milieu du devant, à partir du rang de montage, autrement dit, avec les côtes du col. Bon tricot!
08.10.2025 - 16:27
![]() REINE MARIE ha scritto:
REINE MARIE ha scritto:
Un grand merci beaucoup je vais voir .Bonne soirée
25.03.2025 - 17:56
![]() REINE MARIE ha scritto:
REINE MARIE ha scritto:
Bonjour ,merci pour votre message mais c\'est dommage,il me semblait que ce modèle pouvez exister pour femme aussi ,il est tellement joli et plait beaucoup .Si par hasard ,je faisais le modèle homme en taille( S) ,en faisant moins grand en hauteur pourrait peut être marcher ? Merci de votre conseil .Bonne après-midi
25.03.2025 - 15:43DROPS Design ha risposto:
Bonjour Reine Marie, fort probablement, dans ce point de la FAQ modèles nous expliquons comment adapter un modèle femme pour homme, vous pourrez suivre un modèle homme pour femme en ajustant simplement les longueurs (basez-vous sur un pull dont elle aime la forme). Bon tricot!
25.03.2025 - 15:52
|
|||||||
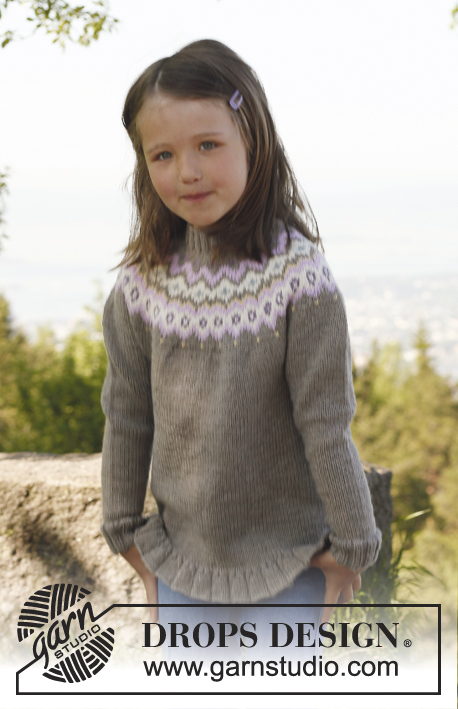
Paulina#paulinasweater |
|||||||
|
|
|||||||
Maglione lavorato ai ferri con raglan, lavorato dall’alto in basso in DROPS Merino Extra Fine. Taglie: dai 3 ai 12 anni.
DROPS Children 23-7 |
|||||||
|
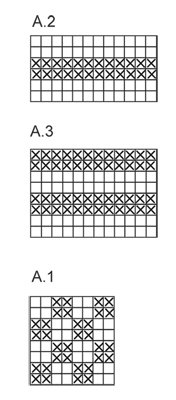
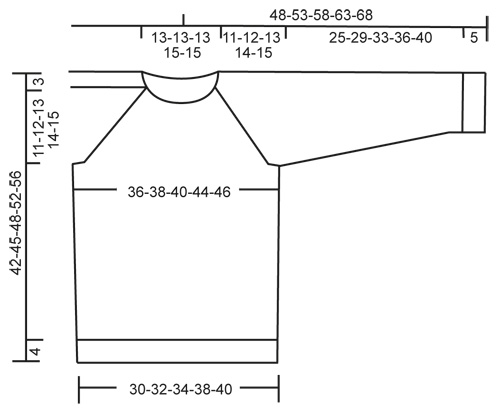
SUGGERIMENTO PER GLI AUMENTI (applicato al raglan): Lavorare fino a quando rimane 1 m. prima del segnapunti: fare 1 gettato, 2 m. dir. (il segnapunti è al centro di queste 2 m.), fare 1 gettato. Sul giro successivo lavorare il gettato a dir. ritorto (cioè lavorarlo nel filo dietro della m. anziché in quello davanti) per evitare buchi. Lavorare le m. aumentate secondo il motivo. MOTIVO: Vedere i diagrammi A.1, A.2 e A.3. I diagrammi mostrano il motivo dal diritto del lavoro. SUGGERIMENTO PER LE DIMINUZIONI (applicato al corpo e alle maniche): Lavorare fino a quando rimangono 2 m. prima del segnapunti, 2 m. insieme a dir., segnapunti, 2 m. insieme a dir. ritorto (cioè lavorarle nel filo dietro della m. anziché in quello davanti). -------------------------------------------------------- MAGLIONE: Lavorato in tondo, dall’alto in basso. SPRONE: Avviare 84-84-84-92-92 m. con i ferri circolari corti misura 3 mm con il filato Merino Extra Fine. Inserire un segnapunti all’inizio del giro (= centro dietro). Lavorare 1 giro a dir. Poi lavorare a coste = 2 m. dir./2 m. rov. per 3 cm. Poi lavorare un’alzata sul dietro del collo come segue (continuare a coste): lavorare 8 m. dopo il segnapunti, girare, tirare il filo e lavorare 16 m. indietro, girare, tirare il filo e lavorare 24 m., girare, continuare a lavorare 8 m. in più ad ogni giro fino a quando sono state lavorate un totale di 64 m., girare e lavorare 1 giro ancora fino al segnapunti al centro dietro. LEGGERE TUTTA LA SEZIONE SEGUENTE PRIMA DI CONTINUARE! Passare ai ferri circolari misura 4 mm e lavorare 1 giro a m. rasata e allo stesso tempo distribuire 4 aumenti in modo uniforme = 88-88-88-96-96 m. Ora inserire 4 nuovi segnapunti (per il raglan) come segue: Lavorare 15-15-15-17-17 m. dal segnapunti al centro dietro, inserire qui il primo segnapunti (allo stesso tempo rimuovere il segnapunti al centro dietro), lavorare altre 14 m. (= manica), inserire il secondo segnapunti, lavorare 30-30-30-34-34 m. (= davanti) e inserire il terzo segnapunti, lavorare 14 m. (= manica), inserire il quarto segnapunti e lavorare ancora fino al primo segnapunti (ci sono 30-30-30-34-34 m. tra i segnapunti sul dietro). Lavorare A-1, ALLO STESSO TEMPO sul primo giro, aumentare 1 m. da ogni lato dei 4 segnapunti per il raglan (= 8 aumenti) – LEGGERE IL SUGGERIMENTO PER GLI AUMENTI! Ripetere gli aumenti ogni giro altre 7-7-9-10-11 volte e poi ogni 2 giri 11-13-13-14-15 volte = 240-256-272-296-312 m. sul f. ALLO STESSO TEMPO quando il lavoro misura 8-8-8-9-9 cm dal centro davanti, lavorare A.2 1 volta in verticale, poi lavorare ancora A.1. Alla fine di tutti gli aumenti, lavorare il giro successivo come segue: lavorare fino al primo segnapunti, trasferire le 52-56-60-64-68 m. tra il primo e il secondo segnapunti sul fermamaglie, avviare 8 nuove m. sul fermamaglie, lavorare fino al terzo segnapunti, trasferire le 52-56-60-64-68 m. tra il terzo e il quarto segnapunti su un fermamaglie, avviare 8 nuove m. sul fermamaglie, lavorare ancora fino al primo segnapunti = 152-160-168-184-192 m. sul f. CORPO: Continuare con A.1 – ALLO STESSO TEMPO inserire un segnapunti al centro delle 8 nuove m. da ogni lato. Quando il lavoro misura 3 cm da dove le m. delle maniche sono state messe sul fermamaglie, lavorare A-3 1 volta in verticale, poi continuare a m. rasata. ALLO STESSO TEMPO quando sono stati lavorati 4cm da dove le m. per le maniche sono state messe sul fermamaglie, diminuire 1 m. da ogni lato dei segnapunti ai lati – LEGGERE IL SUGGERIMENTO PER LE DIMINUZIONI! Ripetere le diminuzioni ogni 3-4-4-5-5 cm altre 4 volte = 132-140-148-164-172 m. Continuare a lavorare fino a quando il lavoro misura 38-41-44-48-52 cm dalla spalla. Lavorare 1 giro e ALLO STESSO TEMPO distribuire 4 aumenti in modo uniforme = 136-144-152-168-176 m. Passare ai ferri circolari misura 3 mm e lavorare a coste = 2 m. dir./2 m. rov. per 4 cm. Intrecciare SENZA STRINGERE con dir. su dir. e rov. su rov. Il lavoro misura circa 42-45-48-52-56 cm dalla spalla. MANICA: Trasferire le m. da un fermamaglie sui f. a doppia punta misura 4 mm e avviare in più 8 nuove m. al centro sotto la manica = 60-64-68-72-76 m. Inserire un segnapunti al centro sotto la manica (cioè al centro delle 8 nuove m.). ORA MISURARE IL LAVORO DA QUI! Continuare con A.1 fino a quando il lavoro misura 3 cm dal segnapunti, ora lavorare A.3 1 volta in verticale, poi lavorare a m. rasata. ALLO STESSO TEMPO quando è stato lavorato 1 cm di A.3, diminuire 1 m. da ogni lato del segnapunti – LEGGERE IL SUGGERIMENTO PER LE DIMINUZIONI! Ripetere le diminuzioni ogni 4-3-4-4-3½ cm altre 5-7-7-7-9 volte = 48-48-52-56-56 m. Continuare a lavorare fino a quando la manica misura 25-29-33-36-40 cm. Passare ai ferri a doppia punta misura 3 mm e lavorare a coste = 2 m. dir./2 m. rov. per 5 cm. Poi intrecciare SENZA STRINGERE con dir. su dir. e rov. su rov. Lavorare l’altra manica nello stesso modo. CONFEZIONE: Cucire le aperture sotto le maniche. |
|||||||
Spiegazioni del diagramma |
|||||||
|
|||||||
 |
|||||||
 |
|||||||
Avete terminato questo modello?Allora taggate le vostre foto con #dropspattern #paulinasweater o inviatele alla #dropsfan gallery. Avete bisogno di aiuto con questo modello?Troverete 12 video tutorial, una sezione per i commenti/domande e molto altro guardando il modello su www.garnstudio.com © 1982-2026 DROPS Design A/S. Ci riserviamo tutti i diritti. Questo documento, compreso tutte le sue sotto-sezioni, è protetto dalle leggi sul copyright. Potete leggere quello che potete fare con i nostri modelli alla fine di ogni modello sul nostro sito. |
|||||||


Con oltre 40 anni di esperienza nel design di modelli di maglia e uncinetto, DROPS Design offre la più estesa collezione di modelli gratuiti su internet - tradotti in 17 lingue. Ad oggi vi possiamo fornire 324 cataloghi e 12290 modelli - 9561 dei quali sono tradotti in Italiano.
Ci stiamo impegnando molto per darvi il meglio che vi possiamo offrire in termini di maglia e uncinetto, ispirazioni e consigli così come filati di grande qualità ad un prezzo incredibile! Volete utilizzare i nostri modelli per qualcosa d'altro oltre al vostro uso personale? Potete leggere tutto ciò che è consentito nel testo sul Copyright in basso su tutte le pagine dei nostri modelli. Buon lavoro!
Lasciare un commento sul modello DROPS Children 23-7
Noi saremmo felici di ricevere i tuoi commenti e opinioni su questo modello!
Se vuoi fare una domanda, fai per favore attenzione a selezionare la categoria corretta nella casella qui sotto per velocizzare il processo di risposta. I campi richiesti sono indicati da *.