
Categorie popolari
State cercando un filato?


Commenti / Domande (24)
![]() VU ha scritto:
VU ha scritto:
Bonsoir madame, Pourriez vous m'indiquer quand on doit faire les rangs pour les raccourcis pour la pointe. Merci
13.12.2024 - 21:37DROPS Design ha risposto:
Bonjour Mme Vu, tous les 2 rangs sur l'endroit, autrement dit, tricotez 2 rangs sur toutes les mailles, puis au rang sur l'endroit suivant, tricotez jusqu'à ce qu'il reste 6,8 ou 10 mailles sur l'aiguille gauche, tournez et tricotez le rang retour sur l'envers; répétez ces 4 rangs ainsi tout du long. Bon tricot!
16.12.2024 - 09:46
![]() Lilou ha scritto:
Lilou ha scritto:
J'ai choisi ce modèle sur 2 aiguilles, ne m'en sortant absolument pas avec les doubles pointes, ce qui est la majorité des explications de vos chaussettes, mais je m'aperçois que ce n'est pas plus simple sur 2 aiguilles!!... je crois que je vais définitivement abandonner de faire des chaussettes avec lesexplications des modèles drops. Mais merci quand même pour tous les autres
08.10.2020 - 09:22DROPS Design ha risposto:
Bonjour Lilou, nous sommes désolés que vous rencontriez autant de souci avec nos modèles de chaussettes, avez-vous pensé à consulter les différentes vidéos et leçons? Rappelez-vous que pour toute assistance personnalisée et individuelle, vous pouvez vous adresser à votre magasin, même par mail ou téléphone on saura vous aider; Bon tricot!
08.10.2020 - 10:59
![]() LILOU ha scritto:
LILOU ha scritto:
Bonjour. je ne comprends absolument pas dans l'explication : toutes les tailles "tricoter 4 rgs sur toutes les mailles (ne pas oublier les rangs raccourcis .... coté opposé...."????je trouve que tout est mélangé je n'ai rien compris. Merci de m'éclairer.
08.10.2020 - 09:07DROPS Design ha risposto:
Bonjour Lilou, pour former la pointe du chausson, vous devez tricoter des rangs raccourcis: 2 rangs sur toutes les mailles, 2 rangs en laissant les 6-8-10 m côté pointe non tricotées. Ainsi, on a moins de rangs côté pointe = à gauche de l'ouvrage vu sur l'endroit; Bon tricot!
08.10.2020 - 10:57
![]() Selam ha scritto:
Selam ha scritto:
I mean what happens to the st. On helping thread?
14.02.2020 - 15:50DROPS Design ha risposto:
Dear Selam, the stitches from the stitch holder at the end of the socks are sewn together to the cast on edge - see ASSEMBLY. Happy knitting!
14.02.2020 - 16:21
![]() Selam ha scritto:
Selam ha scritto:
I get that but what happens to the 68 st. Before the 10 new cast ons ? Bottom of the socks?
14.02.2020 - 13:52DROPS Design ha risposto:
Dear Selam, do you mean under LEG part? These 10 stitches are for the flap on the leg part, ie cast on these 10 stitches, pick up 40 to 50 sts along the sock, work garter stitch for 10 cm, cast off. Then sew buttons throught the 10 stitch-section and in the other side of leg part - see picture. Hope this helps. Happy knitting!
14.02.2020 - 14:11
![]() Selam Belay ha scritto:
Selam Belay ha scritto:
Do I cast of the 68 before the new 10 sts?
13.02.2020 - 23:38DROPS Design ha risposto:
Dear Mrs Belay, in 2nd size you cast on 67 stitches then work short rows starting with 10 sts. Happy knitting!
14.02.2020 - 08:36
![]() Jette Simonsen ha scritto:
Jette Simonsen ha scritto:
Hej, jeg har brug for hjælp til at forstå denne opskrift. Jeg har slået 60 m op på p 5, så langt så godt, men hvad skal jeg så - skal der startes med vende pinde med det samme ?
26.01.2016 - 11:51DROPS Design ha risposto:
Hej Jette, ja du fortsætte ifølge opskriften; Strik 10 m vend osv... God fornøjelse!
26.01.2016 - 16:10
![]() Selam ha scritto:
Selam ha scritto:
Thanks for the previous response. Im not sure how the leg is worked, could you please explain 10 new St and pick up 40( for example) Not sure where these 40 st are coming from? Thanks
16.12.2014 - 22:04DROPS Design ha risposto:
Dear Selam, the text under "leg" refers to the edge worked around the top of the sock, ie you first cast on 10 sts, then pick up 40 sts (in 1st size) along the upper edge of socks (side where you previously worked the first and last short rows for elevation on back) and work 10 cm garter sts over these 50 sts (in 1st size). The 10 sts are the flap that will be sewn with buttons. Happy knitting!
17.12.2014 - 08:42
![]() Selam ha scritto:
Selam ha scritto:
Hi when do i start with ..."remember short rows towards the toe - i.e. in the opposite side of elevation"? thanks
14.12.2014 - 14:15DROPS Design ha risposto:
Dear Selam, that's correct, the short rows towards the toe are on the opposite side of short rows worked at very beg of sock (and worked again at the end of socks). Happy knitting!
14.12.2014 - 16:38
![]() Petra Gröger ha scritto:
Petra Gröger ha scritto:
Liebes Drops-Team, diese Socke gefällt mir sehr gut, würde Sie aber gerne in einem Sockenwollgarn stricken und mit dünneren Nadeln. Habt Ihr eine Anleitung für z.B. Drops Delight ? Oder wie kann ich es mir selbst umrechnen ? Liebe Grüße von einem großen Garnstudio - Drops Fan Petra aus Dresden
23.11.2013 - 15:31DROPS Design ha risposto:
Liebe Petra, das Modell ist nicht ganz einfach umzurechnen. Alle Anleitungen für dünnere Sockenwolle (DROPS Fabel oder Delight) finden Sie in unserer Musterdatenbank.
25.11.2013 - 07:49
|
|
Nightfall#nightfallsocks |
|
|
|
|
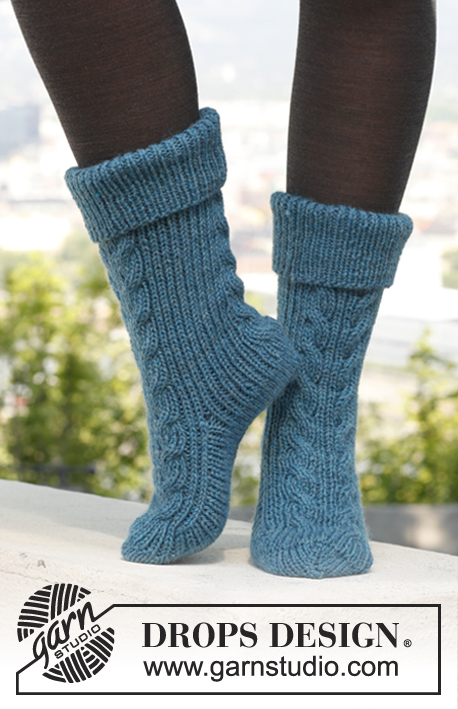
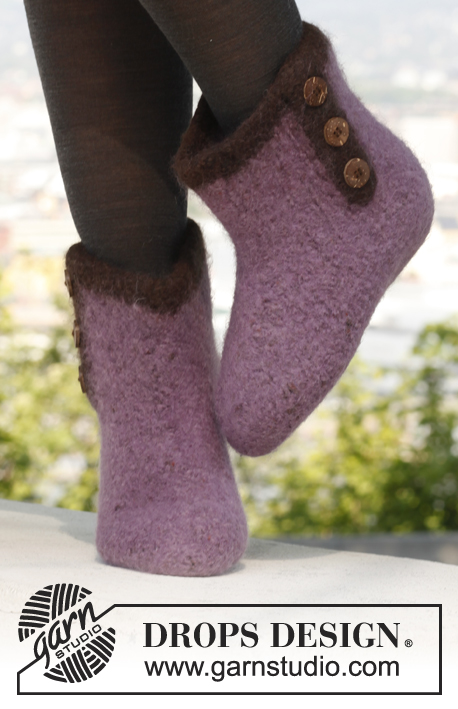
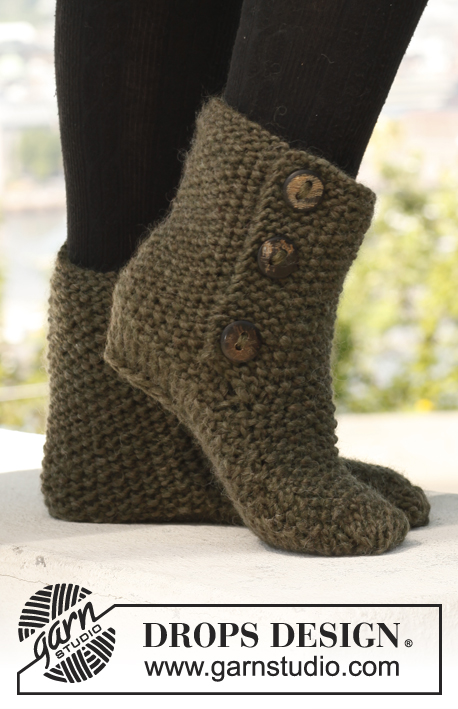
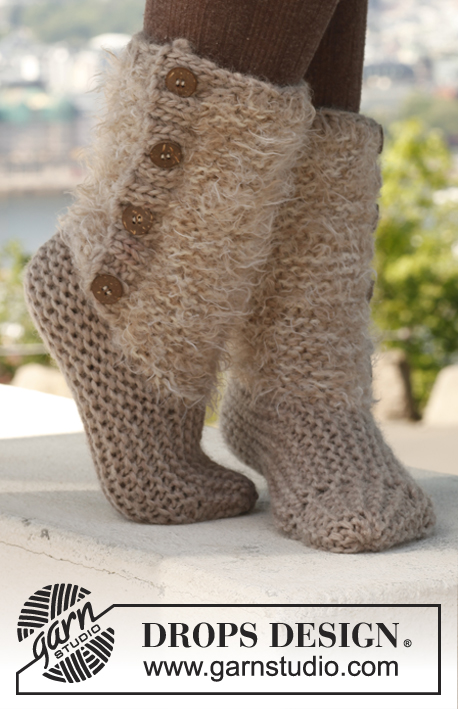
Calze DROPS ai ferri in "Big Fabel". Taglie: Dalla 35 alla 42.
DROPS 142-34 |
|
|
PUNTO LEGACCIO (avanti e indietro sui ferri): Lavorare tutti i ferri a dir. 1 “costa” a legaccio = 2 ferri a dir. SUGGERIMENTO PER IL LAVORO: Quando si gira il lavoro nel corso del ferro (ferri accorciati), passare la 1a m senza lavorarla, stringere il filo e lavorare il ferro di ritorno. In questo modo non si formano dei piccoli buchi nel punto in cui viene girato il lavoro. SUGGERIMENTO PER LA CONFEZIONE: La punta è cucita; per fare questo, inserire un filo nell’asola anteriore della m più esterna verso la punta e far seguire questo filo verso l’alto, man mano che si lavora. Usare questo filo per cucire le m della punta, alla fine del lavoro. ---------------------------------------------------------- CALZE : Ricordarsi la tensione del lavoro! Si lavorano avanti e indietro sui ferri iniziando al centro, sotto il piede; si lavora poi la parte superiore del piede e si finisce con l’altra metà della pianta del piede. Lavorare tutta la calza a PUNTO LEGACCIO - vedere le spiegazioni sopra. Si lavora la punta della calza a ferri accorciati come segue: Ferro 1: Lavorare tutte le m. Ferro 2: Lavorare tutte le m. Ferro 3: Lavorare finché non rimangono 6-8-10 m, girare – vedere il suggerimento per il lavoro. Ferro 4: Lavorare il ferro di ritorno. Ripetere questi 4 ferri fino alla fine del lavoro. Avviare 60-67-74 m sui ferri n° 5 con il filato Big Fabel. Lavorare un’alzata sul dietro come segue: Lavorare 10 m, girare, passare 1 m a dir senza lavorarla, lavorare 9 m. Lavorare 15 m, girare, passare 1 m a dir senza lavorarla, lavorare 14 m. Lavorare 20 m, girare, passare 1 m a dir senza lavorarla, lavorare 19 m. Taglia 40/42: Lavorare 25 m, girare, passare 1 m a dir senza lavorarla, lavorare 24 m. Tutte le taglie: Lavorare 4 ferri su tutte le m (ricordarsi i ferri accorciati verso la punta : quindi dalla parte opposta rispetto all’alzata). Vedere il SUGGERIMENTO PER LA CONFEZIONE! Diminuire ora per il tallone come segue: inserire un segno nella 23a-27a-30a m (a partire dal lato con l’alzata). Diminuire 1 m da ciascun lato della m con il segno ogni 2 ferri, per un totale di 7 volte = 46-53-60 m. Lavorare a punto legaccio finché il lavoro non misura 8-10-12 cm dall’ultima diminuzione. Aumentare ora per il tallone come segue: inserire un segno nella 16a-20a-23a m (a partire dal lato con l’alzata). Aumentare 1 m da ciascun lato della m con il segno ogni 2 ferri, per un totale di 7 volte = 60-67-74 m. Lavorare 4 ferri su tutte le m. Lavorare ora un’alzata sul dietro come segue: Taglia 40/42: Lavorare 25 m, girare, passare 1 m a dir senza lavorarla, lavorare 24 m. Tutte le taglie: Lavorare 20 m, girare, passare 1 m a dir senza lavorarla, lavorare 19 m. Lavorare 15 m, girare, passare 1 m a dir senza lavorarla, lavorare 14 m. Lavorare 10 m, girare, passare 1 m a dir senza lavorarla, lavorare 9 m. Mettere tutte le m in attesa su un ferma maglie. Lavorare la seconda calza. GAMBA: Avviare 10 nuove m sul ferro e riprendere 40-44-50 m sul diritto del lavoro lungo il bordo superiore della calza (lato corto con le alzate) = 50-54-60 m. Lavorare a punto legaccio per 10 cm, intrecciare le m. Sull’altra calza lavorare come segue: riprendere 40-44-50 m sul diritto del lavoro lungo il bordo superiore della calza (lato corto con le alzate) e avviare 10 nuove m alla fine del ferro = 50-54-60 m. lavorare a punto legaccio per 10 cm; intrecciare le m. CONFEZIONE: Cucire insieme le m messe in attesa sul ferma maglie alle m del bordo di avvio, a punto maglia. La cucitura sarà quindi sulla pianta del piede e lungo il dietro della gamba. Intrecciare la punta. Cucire 2 bottoni per intrecciare la parte della gamba, passando attraverso entrambi gli strati del lavoro. |
|
Avete terminato questo modello?Allora taggate le vostre foto con #dropspattern #nightfallsocks o inviatele alla #dropsfan gallery. Avete bisogno di aiuto con questo modello?Troverete 8 video tutorial, una sezione per i commenti/domande e molto altro guardando il modello su www.garnstudio.com © 1982-2026 DROPS Design A/S. Ci riserviamo tutti i diritti. Questo documento, compreso tutte le sue sotto-sezioni, è protetto dalle leggi sul copyright. Potete leggere quello che potete fare con i nostri modelli alla fine di ogni modello sul nostro sito. |


Con oltre 40 anni di esperienza nel design di modelli di maglia e uncinetto, DROPS Design offre la più estesa collezione di modelli gratuiti su internet - tradotti in 17 lingue. Ad oggi vi possiamo fornire 324 cataloghi e 12290 modelli - 9561 dei quali sono tradotti in Italiano.
Ci stiamo impegnando molto per darvi il meglio che vi possiamo offrire in termini di maglia e uncinetto, ispirazioni e consigli così come filati di grande qualità ad un prezzo incredibile! Volete utilizzare i nostri modelli per qualcosa d'altro oltre al vostro uso personale? Potete leggere tutto ciò che è consentito nel testo sul Copyright in basso su tutte le pagine dei nostri modelli. Buon lavoro!
Lasciare un commento sul modello DROPS 142-34
Noi saremmo felici di ricevere i tuoi commenti e opinioni su questo modello!
Se vuoi fare una domanda, fai per favore attenzione a selezionare la categoria corretta nella casella qui sotto per velocizzare il processo di risposta. I campi richiesti sono indicati da *.