
Categorie popolari
State cercando un filato?


Commenti / Domande (27)
![]() Joyce ha scritto:
Joyce ha scritto:
I just finished one slipper (of the pair). I would suggest "rounding the heel" a bit to conform to foot. Maybe I made it a bit too big so that might account for the "tailoring" I had to do. If you have any suggestions about how to modify pattern to round the heel, I'd love to know. I really like the pattern ! Thanks
18.02.2026 - 22:36
![]() Sandrine ha scritto:
Sandrine ha scritto:
Bonjour, Est-ce qu'il n'y a pas un souci sur le nombre de rangs pour les 10 cm de l'échantillon, svp ? Et serait-il possible d'avoir les mesures sur le schéma ? Ce serait super pratique. Merci par avance
06.12.2021 - 21:58DROPS Design ha risposto:
Bonjour Sandrine, non c'est bien exact et les chaussons rendent bien pour les avoir faits personnellement; pensez juste bien à tricoter avec 2 fils Fabel et adaptez la taille des aiguilles si nécessaire. Nous n'avons pas les mesures correspondantes mais si vous avez bien la bonne tension en largeur et en hauteur, alors vous obtiendrez des chaussons qui iront à la taille souhaitée. Cette vidéo montre comment tricoter des chaussons similaires (rayés et non "unis"), cela pourra peut-être vous aider. Bon tricot!
07.12.2021 - 07:25
![]() Barbara Lowell ha scritto:
Barbara Lowell ha scritto:
Is there somewhere on your site a translator for these questions and all your other patterns? I only speak read and write English and a little Polish. Cannot decipher comments at all.
21.02.2020 - 14:35DROPS Design ha risposto:
Dear Mrs Lowell, you can use an online translator if you wish too, it won't be perfect but can give you an idea, but you are also welcome to ask your question here, and/or contact your DROPS store - even per mail or téléphone - for any further informations. This video might also help you to understand how the slippers are worked and sewn together. Happy knitting!
21.02.2020 - 15:28
![]() Linda ha scritto:
Linda ha scritto:
Thank you for the answer...the cast off 1 and continue and I thought ?? continue what? hahaha Okay I had a duh moment haha thanks so much for the answer
05.11.2018 - 22:36
![]() Linda ha scritto:
Linda ha scritto:
So..when you get to the cast off 1 stitch do you use another needle or put one half on a stitch holder?? I am confused with how this pattern is worded
05.11.2018 - 04:05DROPS Design ha risposto:
Dear Linda, you put the sts on one side of a thread or a stich holder and you finish the first side, then when first side is finished, slip the sts from the thread/st holder back on needle and work the 2nd side. Happy knitting!
05.11.2018 - 10:05Josie Pietraroia ha scritto:
Hi. I would like to make these for my son who has a size 14 foot. that about 33cms long, can you give me some guidance for the increasing please. regards Josie
24.02.2018 - 01:48DROPS Design ha risposto:
Dear Mrs Pietraroia, we are unfortunately not able to adjust every pattern to each individual request. For any further assistance adapting this pattern you are welcome to request help from your store or from any knitting forum. Happy knitting!
26.02.2018 - 07:46
![]() Natasja ha scritto:
Natasja ha scritto:
Hej. Når i skriver man skal strikke de første 32 m retstrik, tage 1 m ind og igen strikke resten retstrik. Når man skal tage 1 m ind i hver side, skal man så ikke tage flere m ind i midten for at få det V sutskoen laver ? Er det så kun i start og slut af hver anden p ? Og skal de resterende m på en anden pind ?
26.11.2016 - 17:54DROPS Design ha risposto:
Hej Natasja. Du strikker 32 m, lukker 1 m af, og strikker de resterende 32 m. Nu strikker du de to dele separat videre. Du fortsaetter i retstrik og tager nu ind i hver side i hver anden p 14 gange (dvs, de 32 m ender med 4 m). Du gör det samme med den anden side (de andre 32 m)
28.11.2016 - 17:02
![]() Karen ha scritto:
Karen ha scritto:
On the increase row, do I increase at the beginning of the row and again at the end of the row or is the increase all the way across the row?
15.06.2016 - 15:32DROPS Design ha risposto:
Dear Karen, when you continue each part separately, you dec 1 st in each side every other row, ie work K2 tog at the beg + at the end of row until 5-4 sts remain (see size). Then work the last 3 rows as stated for your size. Happy knitting!
15.06.2016 - 16:37
![]() Sara ha scritto:
Sara ha scritto:
Buenas noches, no entiendo bien las instrucciones en esta parte del patrón: Tejer como antes sobre los primeros 29-32-34 pts, rem 1 pt, tejer los 29-32-34 pts restantes en la ag izquierda. A partir de ahora la pieza es tejida en dos partes por separado. ¿Cómo hago el remate?¿se deben tejer los puntos en la aguja izquierda justo después del remate? No entiendo como retomaría los puntos de la aguja izquierda después, pues no tendría hilo en ese lado si sólo tejo el lado derecho.¡Gracias!
18.02.2016 - 20:05DROPS Design ha risposto:
Hola Sara. Primero se trabajan los pts de la 2ª parte, alli donde esta el hilo, hasta finalizar las medidas. Ahora volvemos a los pts de la primera parte y trabajamos con hilo nuevo.
21.02.2016 - 23:02
![]() Amandine ha scritto:
Amandine ha scritto:
Bonjour, Je ne comprends pas:"tricoter les 29-32-34 m restantes sur l'aiguille gauche." Tricoter sur l'aiguille de gauche, que cela veux-t-il dire? En effet, si nous commençons à partir de là à séparer les deux côtés, je devrais avoir besoin d'une 3ème aiguille à tricoter n°4 pour tricoter sur l'aiguille gauche? De plus, mon fils à tricoter doit être coupé pour que je puisse le prendre à gauche, car il est sur l'aiguille droite non? Merci.
06.12.2015 - 16:18DROPS Design ha risposto:
Bonjour Amandine, à partir de ce rang, on continue chaque côté séparément. Les premières m que vous avez tricotées seront reprises ensuite après que la 1ère partie (les mailles qui restent sur l'aiguille gauche) soient faite. À la fin de cette partie, on coupe le fil, on reprend les mailles laissées en attente et on termine ce côté là. Bon tricot!
07.12.2015 - 10:51
|
|||||||
Splash#splashslippers |
|||||||
 |
 |
||||||
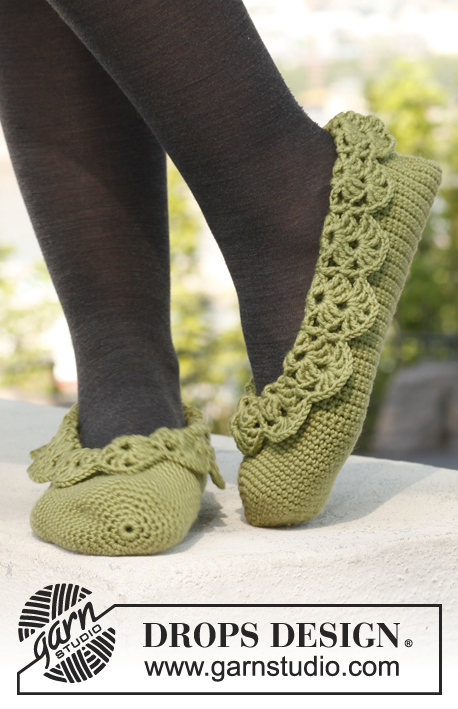
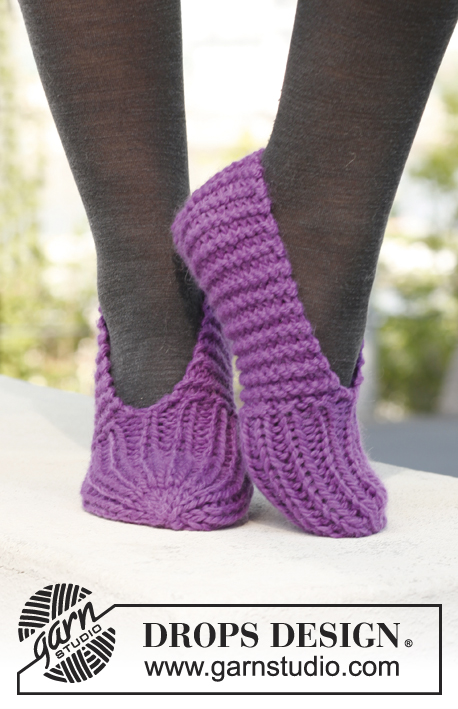
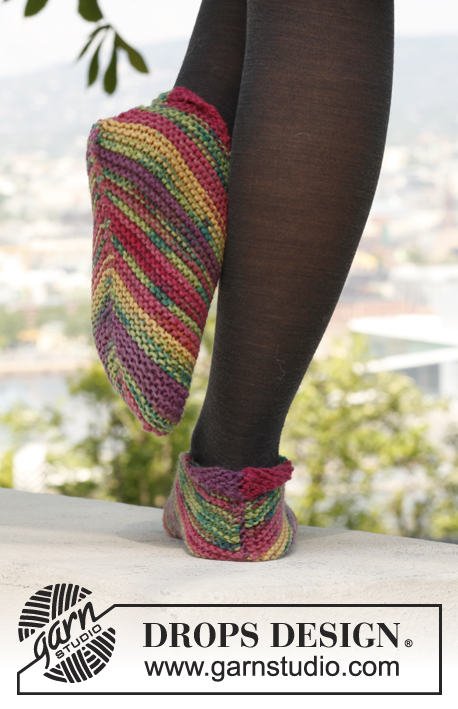
Pantofole DROPS in "Big Fabel".
DROPS 142-39 |
|||||||
|
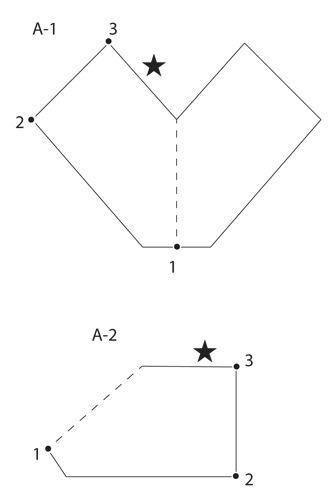
M. LEGACCIO (avanti e indietro sui f.): lavorare a dir. tutti i f. DIAGRAMMA: Vedere i diagrammi A.1 e A.2 per la confezione. ---------------------------------------------------------- PANTOFOLA: Lavorata dalle dita verso il tallone, tutta la pantofola è lavorata a m. legaccio. Avviare 19-21-23 m. e lavorare a m. legaccio avanti e indietro, ALLO STESSO TEMPO aumentare 1 m. (lavorare 2 m. in 1 m.) da ogni lato ogni 2 ferri per un totale di 20-22-23 volte = 59-65-69 m. Il lavoro misura circa 13-14-15 cm. Lavorare come prima sulle prime 29-32-34 m., intrecciare 1 m., lavorare le 29-32-34 m. rimaste sul f. sinistro. Da adesso il lavoro viene lavorato in 2 parti separate. Continuare a m. legaccio e diminuire 1 m. (lavorare 2 m. insieme a dir.) da ogni lato ogni 2 ferri per un totale di 12-14-15 volte = 5-4-4 m. rimaste. Poi diminuire come segue: 35/37: 2 m. insieme a dir., 1 m. dir., 2 m. insieme a dir. Lavorare 1 f. Sul f. successivo passare 1 m. a dir. senza lavorarla, 2 m. insieme a dir., accavallare la m. passata sopra quella appena lavorata. 38/39 e 40/42: 2 m. insieme a dir. 2 volte. Lavorare 1 f. Sul f. successivo lavorare 2 m. insieme a dir. Tagliare il filo e farlo passare nell’ultima m. Finire l’altro lato nello stesso modo. Il lavoro misura circa 21-23-26 cm in totale. CONFEZIONE: Vedere i diagrammi A.1 e A.2 per l’illustrazione. Piegare la pantofola a metà e cucire insieme in modo ordinato nel filo davanti della m. più esterna dal punto 1 attraverso il punto 2 fino al punto 3. Piegare il bordo in basso 2 cm sul dietro e mettere un piccolo punto per tenere la piega. |
|||||||
Spiegazioni del diagramma |
|||||||
|
|||||||
 |
|||||||
Avete terminato questo modello?Allora taggate le vostre foto con #dropspattern #splashslippers o inviatele alla #dropsfan gallery. Avete bisogno di aiuto con questo modello?Troverete 5 video tutorial, una sezione per i commenti/domande e molto altro guardando il modello su www.garnstudio.com © 1982-2026 DROPS Design A/S. Ci riserviamo tutti i diritti. Questo documento, compreso tutte le sue sotto-sezioni, è protetto dalle leggi sul copyright. Potete leggere quello che potete fare con i nostri modelli alla fine di ogni modello sul nostro sito. |
|||||||


Con oltre 40 anni di esperienza nel design di modelli di maglia e uncinetto, DROPS Design offre la più estesa collezione di modelli gratuiti su internet - tradotti in 17 lingue. Ad oggi vi possiamo fornire 325 cataloghi e 12298 modelli - 9569 dei quali sono tradotti in Italiano.
Ci stiamo impegnando molto per darvi il meglio che vi possiamo offrire in termini di maglia e uncinetto, ispirazioni e consigli così come filati di grande qualità ad un prezzo incredibile! Volete utilizzare i nostri modelli per qualcosa d'altro oltre al vostro uso personale? Potete leggere tutto ciò che è consentito nel testo sul Copyright in basso su tutte le pagine dei nostri modelli. Buon lavoro!
Lasciare un commento sul modello DROPS 142-39
Noi saremmo felici di ricevere i tuoi commenti e opinioni su questo modello!
Se vuoi fare una domanda, fai per favore attenzione a selezionare la categoria corretta nella casella qui sotto per velocizzare il processo di risposta. I campi richiesti sono indicati da *.