
Categorie popolari
State cercando un filato?


Commenti / Domande (143)
![]() Gail ha scritto:
Gail ha scritto:
How do you decrease before and after markers? I thought I had it right but the directions are confusing. It says for Raglan decrease beg 3 stitches BEFORE marker: P2 tog, K2 ( marker is between these 2 stitches) , p2 twisted together. On the knitting instructions it says to decrease as follows after 2nd and 4th marker and before 3rd and 1st marker. There are no instructions for decrease after the marker on the Raglan . Can you please explain how to decrease after the markers .
27.12.2015 - 17:54DROPS Design ha risposto:
Dear Gail, dec as stated under Raglan dec but adjust if you have to dec before and/or after marker following instructions because the dec on body and the dec on sleeve are not made all at the same time. When you dec after marker from RS: marker, K1 and P2 twisted tog, and when dec before marker, start 3 sts before marker and work P2 tog, K1 (marker). Happy knitting!
02.01.2016 - 14:07
![]() Linda ha scritto:
Linda ha scritto:
Liebes Team von Drops, In der Beschreibung für die Raglanschrägung stricke ich doch 2 Maschen vor UND nach der Markierung zusammen, aber laut Strickanleitung vom Pullover soll ich die Abnahme entweder vor ODER nach dem Markierer stricken. Wie geht das?? Liebe Grüße, Linda
13.12.2015 - 11:29DROPS Design ha risposto:
Es gilt das, was in der Anleitung steht. Der Raglantipp beschreibt, auf welche Weise die M zusammenzustricken sind (also entweder normal zusammen oder überzogen zusammen). Und teilweise nehmen Sie ja auch vor UND nach den Markierern ab, denn jede 4. Rd ist ja auch eine 2. Rd. Es wird an den Ärmeln und an Vorder-/Rückenteil in unterschiedlichen Rhythmus abgenommen, damit die Formgebung passender wird.
13.12.2015 - 13:58
![]() Kerstin Belander ha scritto:
Kerstin Belander ha scritto:
Hej, jag förstår inte beskrivningen av Raglanintagningen under "Oket", de fyra sista raderna där. Hur menas; "Minska så här efter 2:a....." och så "Maska av så här efter 1:a...."? Ska man först minska enligt det första och sedan maska av för halsen enligt det sista?
02.12.2015 - 21:22DROPS Design ha risposto:
Hej. Det var fel i den svenska översättningen. Det ska vara "minska" på båda ställen, det är nu rättat. Tack för info.
03.12.2015 - 10:10Gail Walsh ha scritto:
Hello. On the instructions for Raglan it is written From RS: beg 3 stitches before marker : p 2 tog , k2 ( marker is between these 2 stitches), p2 twisted together. That is fine but then the pattern has instructions From WS: If the sleeves and body are worked in the round wouldn't every decrease for raglan be on the RS , or am I missing something Thank you very much
02.12.2015 - 19:53DROPS Design ha risposto:
Dear Mrs Walsh, yoke is worked in the round until the neckline, when you cast off mid sts for neck you then continue working back and forth in pattern and with dec for raglan as before. Happy knitting!
03.12.2015 - 09:10
![]() Martine ha scritto:
Martine ha scritto:
Hei! Jeg lurer på en ting ang oppskriften. Jeg har strikket vrangbord med 252m i 4cm på bolen og nå står det at jeg skal felle 52m. Er ikke dette veldig mye? Blir ikke 200m lite for en herregenser? Martine
06.10.2015 - 19:59DROPS Design ha risposto:
Hej Martine, Hvis du overholder strikkefastheden får du målene som står nederst i måleskitsen for den størrelse du følger. God fornøjelse!
09.10.2015 - 15:20Kreso ha scritto:
Addition to my comment: I am using wool that is comparable to DROPS Safran, cotton, 50g = 160 m
07.09.2015 - 15:56DROPS Design ha risposto:
Dear Mrs Kreso, the suggested yarns DROPS Lima & Merino Extra Fine belong both to group B, while DROPS Safran belongs to group A (see all groups here, you can re-calculate based on your own tension and the measurements or search for another pattern more adapted to your tension. Happy knitting!
07.09.2015 - 16:04Kreso ha scritto:
Hi, I have a thread that is recommended to knit with needles size 3. Can I still knit this sweater using 3.5 and 4 size needles? Am I going to have a size reduction and if yes, how to re-size? I want to knit L, so should I knit as if working for XL? Many thanks.
07.09.2015 - 15:26DROPS Design ha risposto:
Dear Mrs Kreso, this pattern is worked with a tension of 21 sts x 28 rows in stocking st = 10 x 10 cm, if you have a different tension you will have to adapt/adjust calculating with your own tension or look a another pattern with a similar tension. Happy knitting!
07.09.2015 - 16:02Selam ha scritto:
1 more question how do i decrease before and after the markers on on purle stiches from right side Thank you
20.06.2015 - 00:38DROPS Design ha risposto:
Dear Selam, you dec with P2 tog before marker and K1, with P2 twisted tog after marker and K1 - see also "RAGLAN" at the beg of written pattern. Happy knitting!
20.06.2015 - 11:39Selam ha scritto:
Im going to start on the reglan for the xl size. How can i keep track without erros? Please explain to me.
19.06.2015 - 23:46DROPS Design ha risposto:
Dear Selam, in size XL, you will dec for raglan as follows: After 2nd and 4th marker + before 3rd and 1st marker (= sleeves): Dec every 4 rows: 6 times and then every other row: 19 times. After 1st and 3rd marker and before 2nd and 4th marker (= on front and back piece). Dec every other row: 25 times and then every row: 6 times. You can write every dec row and mark it with a line when worked. Happy Knitting!
20.06.2015 - 11:35
![]() Francesca ha scritto:
Francesca ha scritto:
Sono arrivata al collo e non capisco cosa intendete con "riprendere 56 maglie intorno allo scollo". Si riprendono dalle 14 intrecciate al centro davanti più altre 42 tra i 72 rimasti alla fine del raglan? Oppure si riprendono lungo tutto il giro in modo uniforme? Sono impaziente di finirlo!!! Grazie
20.04.2015 - 23:15DROPS Design ha risposto:
Buonasera Francesca. Sui ferri ci sono 72 m. Deve riprendere le 56 m ai due lati dello scollo e sulle 14 m intrecciate sul davanti, al centro, per lo scollo. Sui ferri avrà così 128 m e lavorerà il collo in tondo. Buon lavoro!
21.04.2015 - 01:24
|
|||||||
Celtic Ballad#celticballadsweater |
|||||||
 |
 |
||||||
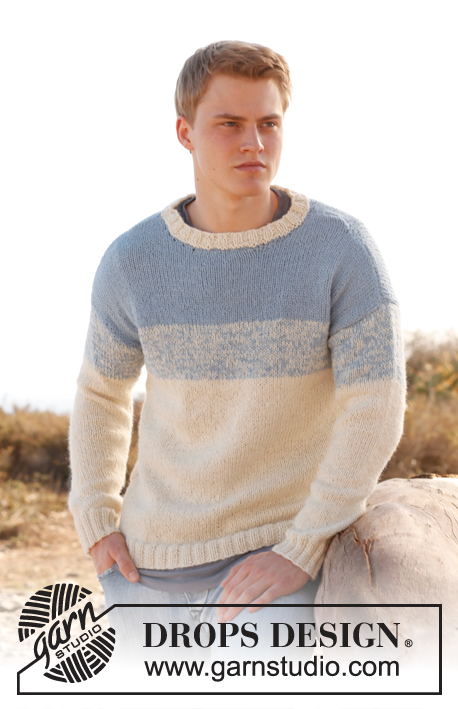
Maglione da uomo DROPS a maglia di riso doppia e raglan, in "Lima" o in "Merino Extra Fine". Taglie: dalla S alla XXXL.
DROPS Extra 0-851 |
|||||||
|
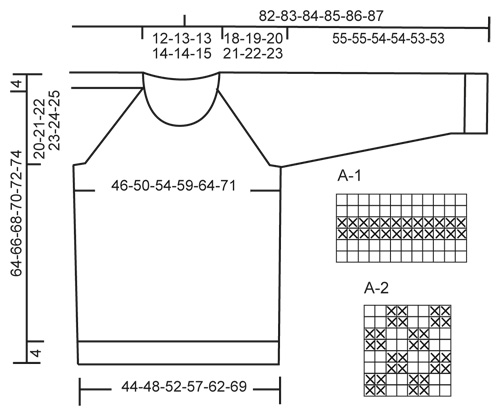
MOTIVO: Vedere i diagrammi A.1 e A.2. I diagrammi mostrano tutti ferri del motivo visto sul diritto. RAGLAN: Sul diritto: Cominciare 3 m prima del segnapunti: 2 m insieme a rov, 2 m dir (il segnapunti si trova in mezzo a queste 2 maglie), 2 m insieme a rov ritorto. Sul rovescio: Cominciare 3 m prima del segnapunti: 2 m insieme a dir ritorto, 2 m rov (il segnapunti si trova in mezzo a queste 2 maglie), 2 m insieme a dir. SUGGERIMENTO: Se la tensione del lavoro è troppo stretta, la manica a raglan sarà troppo corta e gli scalfi troppo piccoli. In questi casi, aggiungere a intervalli regolari 1 ferro senza diminuzioni tra i ferri con diminuzioni. -------------------------------------------------------- CORPO (DAVANTI & DIETRO): Si lavora in tondo sui ferri circolari dal basso verso l’alto. Avviare 232-252-272-296-320-360 m con i ferri circolari 3,5 e Lima. Lavorare a coste = 2 m dir / 2 m rov per 4 cm. Cambiare ferri e continuare con i ferri circolari 4, lavorare il giro seguente a dir, ALLO STESSO TEMPO, distribuire uniformemente 48-52-56-60-64-72 diminuzioni = 184-200-216-236-256-288 m. Continuare a maglia rasata. RICORDARSI DELLA TENSIONE DEL LAVORO! Inserire un segnapunti ad ogni lato = 92-100-108-118-128-144 m tra i 2 segni. Quando il lavoro misura 6 cm, aumentare 1 m ad ogni lato dei 2 segnapunti (= 4 aumenti). Ripetere questi aumenti quando il lavoro misura 15-16-17-18-19-20 cm e 24-25-26-27-28-29 cm = 196-212-228-248-268-300 m. Quando il lavoro misura 26-27-28-29-30-31 cm seguire A.1, dopo aver lavorato A.1 1 volta in altezza, continuare con A.2. Lavorare A.2 per 10 cm, poi lavorare A.1 1 volta. Continuare con A.2. Quando il lavoro misura 44-45-46-47-48-49 cm, intrecciare 4 m ad ogni lato di ogni segnapunti = 90-98-106-116-126-142 m sul davanti e il dietro. Mettere da parte il lavoro e lavorare le maniche. MANICHE: Si lavora in tondo sui ferri a doppia punta. Avviare 68-68-72-72-76-76 m con i ferri a doppia punta 3,5 e Lima. Lavorare a coste = 2 m dir / 2 m rov per 4 cm. Cambiare ferri e continuare con i ferri a doppia punta 4, lavorare il ferro seguente a dir, ALLO STESSO TEMPO, distribuire uniformemente 14-12-14-12-14-12 diminuzioni = 54-56-58-60-62-64 m. Inserire 1 segnapunti all’inizio del giro = in mezzo sotto la manica. Quando il lavoro misura 8 cm aumentare 1 m ad ogni lato del segnapunti. Ripetere questi aumenti ogni 11-8-7-6-4-3½ cm altre 4-5-6-7-10-11 volte = 64-68-72-76-84-88 m. ALLO STESSO TEMPO. Quando il lavoro misura 37-37-36-36-35-35 cm, lavorare il diag A.1, dopo aver lavorato A.1 1 volta in altezza, continuare con A.2. Lavorare A.2 per 10 cm, poi lavorare A.1 1 volta. Continuare con A.2 – man mano si aumentano le maglie, lavorare le m aumentate in punto fantasia seguendo i motivi. Quando il lavoro misura 55-55-54-54-53-53 cm (misura più corta per le taglie più grandi perché la spalla è più larga), aggiustare perché ti trovi allo stesso giro di A.2 come per il corpo, intrecciare 4 m ad ogni lato del segnapunti = 56-60-64-68-76-80 m. Mettere da parte il lavoro e lavorare 1 altra manica identica. SPRONE: LEGGERE TUTTO IL RESTO PRIMA DI CONTINUARE IL LAVORO! Trasferire le m delle maniche sullo stesso ferro circolare (quello del corpo) là dove sono state intrecciate le maglie per gli scalfi = 292-316-340-368-404-444 m. Continuare con A.2, ALLO STESSO TEMPO, quando il lavoro misura 46-47-48-49-50-51 cm, cominciare le diminuzioni a RAGLAN – ved. Spiegazioni sopra e VEDERE SUGGERIMENTO! Inserire 1 segnapunti in tutte le transizioni/passaggi tra maniche e corpo (= 4 segnapunti). Il 1° segnapunti = nella transizione tra il davanti e la manica sinistra. Le diminuzioni sono diverse sul corpo e le maniche. Diminuire così dopo il 2° ed il 4° segnapunti e prima del 3° ed il 1° segnapunti (= diminuzioni delle maniche) Diminuire ogni 4 giri: 7-7-6-6-4-2 volte, poi ogni 2 giri: 12-14-17-19-25-29 volte. Diminuire così dopo il 1° e il 3° segnapunti e prima del 2° ed il 4° segnapunti (= diminuzioni del davanti e del dietro). Diminuire ogni 2 giri: 24-24-25-25-25-22 volte, poi ogni giro: 3-5-6-9-12-21 volte. SCOLLO: ALLO STESSO TEMPO, quando il lavoro misura 59-61-63-65-67-69 cm, intrecciare le 10-14-18-22-26-30 m centrali sul davanti, e continuare avanti e indietro sul f. Continuare con il motivo e il Raglan, ALLO STESSO TEMPO, diminuire per lo scollo ad ogni lato così ogni 2 ferri: 2 m 2 volte e 1 m 4 volte. Dopo tutte le diminuzioni per il raglan e per lo scollo ci sono 82-86-90-94-98-102 m sul ferro. Lavorare 1 giro a dir, allo stesso tempo, distribuire 12-14-16-18-20-22 diminuzioni uniformemente = rimangono 70-72-74-76-78-80 m sul f. COLLO: Si lavora in tondo. Riprendere 54-56-58-60-62-64 m intorno allo scollo con il f 3,5 = 124-128-132-136-140-144 m sul f. Lavorare 2 f a dir e 2 f a rov, poi lavorare le coste 2 m dir / 2 m rov. Continuare così e intrecciare senza stringere con il dir sopra il dir e il rov sopra il rov quando le coste misurano 3,5 cm (in totale, compresi i 4 primi ferri). CONFEZIONE: Cucire le aperture sotto le maniche. |
|||||||
Spiegazioni del diagramma |
|||||||
|
|||||||
 |
|||||||
Avete terminato questo modello?Allora taggate le vostre foto con #dropspattern #celticballadsweater o inviatele alla #dropsfan gallery. Avete bisogno di aiuto con questo modello?Troverete 30 video tutorial, una sezione per i commenti/domande e molto altro guardando il modello su www.garnstudio.com © 1982-2026 DROPS Design A/S. Ci riserviamo tutti i diritti. Questo documento, compreso tutte le sue sotto-sezioni, è protetto dalle leggi sul copyright. Potete leggere quello che potete fare con i nostri modelli alla fine di ogni modello sul nostro sito. |
|||||||


Con oltre 40 anni di esperienza nel design di modelli di maglia e uncinetto, DROPS Design offre la più estesa collezione di modelli gratuiti su internet - tradotti in 17 lingue. Ad oggi vi possiamo fornire 324 cataloghi e 12290 modelli - 9561 dei quali sono tradotti in Italiano.
Ci stiamo impegnando molto per darvi il meglio che vi possiamo offrire in termini di maglia e uncinetto, ispirazioni e consigli così come filati di grande qualità ad un prezzo incredibile! Volete utilizzare i nostri modelli per qualcosa d'altro oltre al vostro uso personale? Potete leggere tutto ciò che è consentito nel testo sul Copyright in basso su tutte le pagine dei nostri modelli. Buon lavoro!
Lasciare un commento sul modello DROPS Extra 0-851
Noi saremmo felici di ricevere i tuoi commenti e opinioni su questo modello!
Se vuoi fare una domanda, fai per favore attenzione a selezionare la categoria corretta nella casella qui sotto per velocizzare il processo di risposta. I campi richiesti sono indicati da *.