
Categorie popolari
State cercando un filato?


Commenti / Domande (266)
![]() Anke Gerlach ha scritto:
Anke Gerlach ha scritto:
In het patroon staat bij het achterpand net na de boord : begin met telpatroon A 4 maar dat is er niet kan het een vergissing zijn?
13.03.2020 - 16:45DROPS Design ha risposto:
Dag Anke,
Deze staat (een beetje verstopt :) onder de maattekening, zeg maar onder de mouw. Het is een klein telpatroontje voor dubbele gerstekorrel.
22.03.2020 - 12:25
![]() Van Damme ha scritto:
Van Damme ha scritto:
Bj comment faire après le point mousse et côtés 2/2 pour que le point de fantaisie soit dans le même sens pour le modèle rambling man devant droit merci
04.03.2020 - 15:55DROPS Design ha risposto:
Bonjour Mme Van Damme, je ne suis pas sûre de bien comprendre votre question, dans cette veste, on rabat les mailles point mousse des bordures des devants, et on continue les torsades comme avant. Tout à la fin, on va relever les mailles du col (le long de la fin des devants et de l'encolure dos) et les tricoter en côtes 2/2 puis les assembler aux mailles point mousse rabattues. Bon tricot!
04.03.2020 - 16:58
![]() Deni ha scritto:
Deni ha scritto:
May I ask how many sts should I have (beside ones in A1)after binding off stitches for sleeve size M?
16.01.2020 - 15:59DROPS Design ha risposto:
Dear Mrs Deni, the number of remaining stitches after all bind off for sleeve will depend on your tension in height, most important is here the height in cm so that the sleeve has the right length. Happy knitting!
17.01.2020 - 07:57
![]() Armelle Follin ha scritto:
Armelle Follin ha scritto:
Bonjour, je termine le modèle LI-014 et je ne comprends pas les augmentations du col châle. Je dois ajouter 16 mailles à raison d'1 maille par section (soit 16 rangs ?), mais comme il s'agit de côtes 2x2, comment faut-il procéder ? Faut-il ajouter la maille au milieu ? Maille endroit ou maille envers, est-ce important ? Merci de votre réponse.
07.01.2020 - 16:01DROPS Design ha risposto:
Bonjour Mme Follin, vous augmentez le nombre de mailles envers (vues sur l'endroit) des côtes = vous augmentez 16 m sur un seul rang, vous aurez ainsi 16 fois 3 m env, mais les autres mailles seront 2 m end et 2 m env comme avant. Bon tricot!
08.01.2020 - 08:09
![]() Amy Kaufman ha scritto:
Amy Kaufman ha scritto:
I made the Rambling Man sweater into a knee length coat so I eliminated the ribbing on the sleeves and bottom of the coat. I replaced the ribbing on the sleeve with garter stitch. My question is about the collar. If I wanted to use garter stitch on the shawl part would I follow the same directions in terms of increases and number of stitches? With no other ribbing on the sweater I thought the change might look better. Your thoughts.
29.12.2019 - 18:22DROPS Design ha risposto:
Dear Amy, what you descrile is posible, but be aware and take it into consideration that while ribbing pulls the stitches in, the garter stitch pushes them apart a little bit, so the collar with garter stitch might sit a bit off, somewhat wavy. Happy Knitting!
29.12.2019 - 20:34
![]() Beth Hayes ha scritto:
Beth Hayes ha scritto:
This question concerns men's DROPS Rambling Man 0-850 pattern. I am working on the right front piece. The garter (band) stitches do not lie as flat as the K2 P2 rib, so the bottom of the sweater is uneven. How can I make the two different parts of the bottom of the sweater even? Thanks very much.
23.12.2019 - 03:20DROPS Design ha risposto:
Dear Bethm try knitting the rows with garter stitch with a different sized needle. Generally, using smaller needles for garter stitch helps with the unevennes. I hope this helps. Happy Knitting!
24.12.2019 - 17:05
![]() Monique Labatut ha scritto:
Monique Labatut ha scritto:
Bonjour , Je ne comprends pas que faire quand vous notez:" augmenter une maille dans chacune des 14 sections envers centrales ( = encolure dos ) , vu sur endroit = 162m. Modele: Rambling Man explication du col chale. Merci pour votre reponse
11.12.2019 - 14:03DROPS Design ha risposto:
Bonjour Mme Labatut, vous tricotez d'abord le col en côtes 2 m end/2 m env, avec 2 m end et 1 m lis au point mousse de chaque côté (vu sur l'endroit). Pour que le col se retourne joliment, on va augmenter dans les 14 ou 16 (cf tailles) sections 2 m envers du milieu du col (= côté encolure dos) et on aura ainsi des côtes 2 m end/2 m env comme avant, puis 14 ou 16 fois 2 m end/3 m env au milieu du rang et on termine ensuite par des côtes 2 m end/2 m env. Bon tricot!
11.12.2019 - 14:34
![]() Dusica ha scritto:
Dusica ha scritto:
I'm knitting size M and need help with sleeves.Hiw to work yarn overs in pattern? For example, I work 1 row by making k1,than p,k,p...than A1....Second row k1,p,k,p...A1....on 3rd I will increase by making YO..How to work them in pattern afterwards?
28.11.2019 - 08:44DROPS Design ha risposto:
Dear Dusica, see answer below, make sure that the pattern is always the same, ie you should always have 2 rows K over K, P over P, then on next row, P over K, K over P, and 4th row with K over K and P over P. Happy knitting!
28.11.2019 - 09:56
![]() Dusica ha scritto:
Dusica ha scritto:
Hello, I'm knitting size M and need help with sleeves.At the part where it says increase by making YO and than work yarn overs in pattern. Can you give me a clue?For example, I work first row as indicated k1,(p,k...)than A1 ....second row k1,p,k...now on 3rd row I will increase by making YO.How do I continue in row 4 by working yarn covers in pattern?
28.11.2019 - 08:41DROPS Design ha risposto:
Dear Dusica, the increases should be worked in pattern A.4, ie the first yarn over at the beg of row from WS should be purled if the next stitch should be knitted, and it should be knitted if the next stitch should be purled. Same at the end of the row: if the last stitch in A.4 is a P stitch, K the yarn over, if the last st is a K stitch, P the yarn over - remember to K or P twisted (= into back of loop) to avoid holes. Happy knitting!
28.11.2019 - 09:53
![]() Monique Labatut ha scritto:
Monique Labatut ha scritto:
Bonjour, D'abord merci pour tous ses modèles magnifique. Il me manque 4 pelotes de LIMA colour: 9010 Dyelot: 392183 puis-je être sure d'accord le même bain en le recommandant sur internet. Merci d'avance pour votre réponse
15.11.2019 - 20:42DROPS Design ha risposto:
Bonjour Mme Labatut, nous vous recommandons de vous adresser directement à votre magasin (même par mail ou téléphone) pour toute information complémentaire sur le réassort d'un même bain, n'hésitez pas à en contacter plusieurs si besoin. Bon tricot!
18.11.2019 - 08:27
|
||||||||||||||||
Rambling Man#ramblingmancardigan |
||||||||||||||||
 |
 |
|||||||||||||||
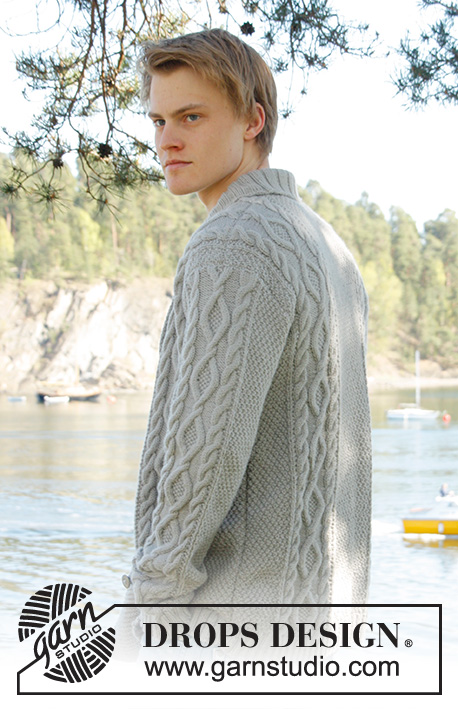
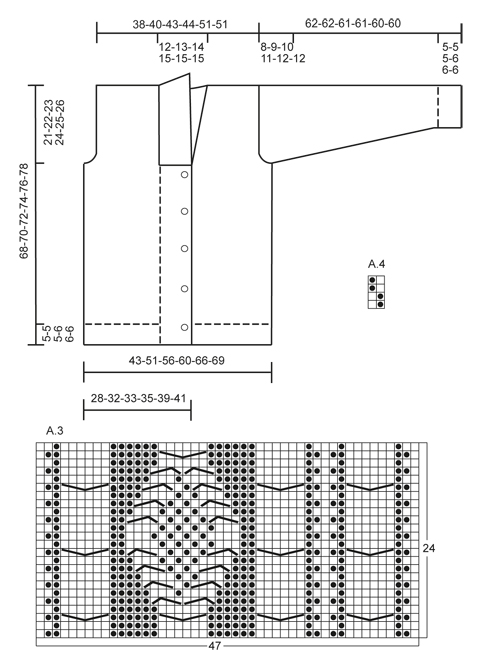
Cardigan da uomo DROPS, con trecce e collo a scialle, in "Lima". Taglia: dalla S alla XXXL.
DROPS Extra 0-850 |
||||||||||||||||
|
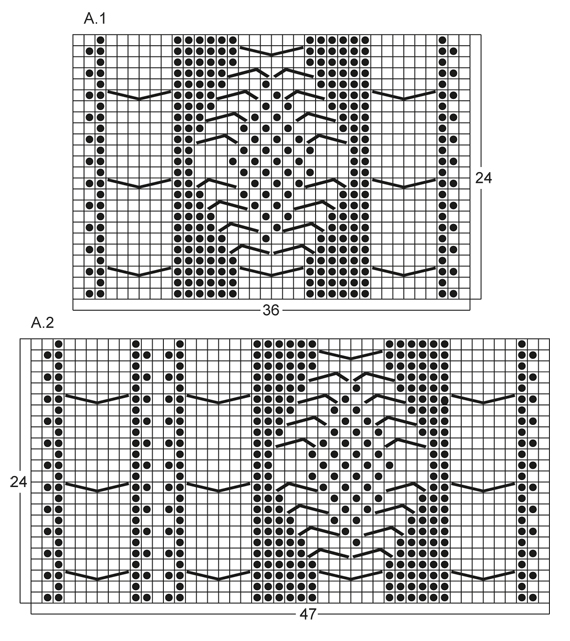
SUGGERIMENTO PER IL LAVORO: Questo modello prevede le asole sul bordo davanti destro; se preferite le asole classiche per uomo, è sufficiente intrecciare le m per le asole sul bordo davanti sinistro. PUNTO LEGACCIO (avanti e indietro sul ferro): Lavorare tutti i ferri a diritto NOTA: Tutte le m vivagno si lavorano a punto legaccio! MOTIVO: Vedere i diagrammi A.1 a A.4, i diagrammi dimostrano tutti i ferri (sul dir e sul rov), e 1 motivo da ripetere, sul diritto. FERRI ACCORCIATI: DAVANTI DESTRO: Lavorare 1 ferro accorciato ogni ferro n° 3 di ognuna delle ripetizione del motivo fino alla fine così: Al 3° ferro del motivo (= diritto), lavorare 26-26-26-26-30-30 m del bordo davanti, girare e lavorare a dir il ferro di ritorno. Lavorare poi tutte le maglie come prima. DAVANTI SINISTRO: Lavorare 1 ferro accorciato ogni ferro n° 2 di ognuna delle ripetizione del motivo fino alla fine così: Al 2° ferro del motivo (= rovescio), lavorare 26-26-26-26-30-30 m del bordo davanti, girare e lavorare a dir il ferro di ritorno. Lavorare poi tutte le maglie come prima. ASOLE: Intrecciare per 5 asole sul diritto del bordo davanti destro. 1 asola = intrecciare la 7° e l’8° m dal bordo (in mezzo davanti) e avviare 2 nuove m sopra le m intrecciate al ferro successivo. Posizionare le asole quando il lavoro misura: TAGLIA S: 14, 22, 30, 38 e 46 cm. TAGLIA M: 15, 23, 31, 39 e 47 cm. TAGLIA L: 16, 24, 32, 40 e 48 cm. TAGLIA XL: 17, 25, 33, 41 e 49 cm. TAGLIA XXL: 18, 26, 34, 42 e 50 cm. TAGLIA XXXL: 19, 27, 35, 43 e 51 cm. AUMENTI: Aumentare facendo 1 gettato, al ferro seguente, lavorare il gettato a dir ritorto per evitare buchi. ---------------------------------------------------------- DIETRO: Si lavora avanti e indietro sui ferri. Avviare 136-156-168-180-196-204 m (incl 1 m vivagno ad ogni lato) con il filato Lima e ferri circolari 3,5. Lavorare le coste così (1° ferro = diritto): 1 m vivagno a PUNTO LEGACCIO – vedere le spiegazioni sopra, * 2 m dir, 2 m rov *, ripetere da *-*, terminare con 2 m dir e 1 m vivagno a legaccio. Continuare così finché le coste non misurino 5-5-5-6-6-6 cm. All’ultimo ferro sul rovescio, lavorare a rov – ALLO STESSO TEMPO, distribuire uniformemente 20-22-24-26-26-26 diminuzioni = 116-134-144-154-170-178 m. Continuare poi con i ferri 4 e lavorare il ferro successivo, sul diritto, così: 1 m vivagno, 8-16-20-24-20-24 m A.4, lavorare A.1 1 volta per le taglie S - XL, lavorare A.2 1 volta per le taglie XXL e XXXL, 26-28-30-32-34-34 m A.4, poi lavorare A.1 1 volta per le taglie S - XL, lavorare A.3 1 volta per le taglie XXL e XXXL, terminare con 8-16-20-24-20-24 m A.4 e 1 m vivagno a legaccio. RICORDATI LA TENSIONE DEL LAVORO! Continuare così finché il lavoro non misuri 47-48-49-50-51-52 cm. Intrecciare poi per gli scalfi all’inizio di ogni ferro ad ogni lato così: Intrecciare 3 m 0-1-1-2-2-2 volte, 2 m 1-1-1-2-2-2 volte, 1 m 4-7-9-8-4-8 volte = 104-110-116-118-142-142 m. Continuare con il motivo come prima finché il lavoro non misuri 66-68-70-72-74-76 cm. Intrecciare ora le 20-22-24-26-28-28 m centrali per lo scollo e terminare ogni parte separatamente. Intrecciare 2 m al f seguente (lato scollo) = rimangono 40-42-44-44-55-55 m per le spalle. Continuare con il motivo come prima. Intrecciare tutte le m senza stringere con il dir sopra il dir e il rov sopra il rov quando il lavoro misura 68-70-72-74-76-78 cm. DAVANTI DESTRO: Si lavora avanti e indietro sui f. Avviare 83-91-95-99-111-115 m (incl 1 m vivagno al lato) con il filato Lima ed i ferri circolari 3,5. Lavorare le coste così (1° ferro = diritto): 26-26-26-26-30-30 m punto legaccio (= m del bordo davanti), * 2 m dir, 2 m rov *, ripetere da *-*, terminare con 1 m vivagno a punto legaccio. Continuare con le coste con il bordo davanti in punto legaccio finché le coste non misurino 5-5-5-6-6-6 cm. All’ultimo ferro sul rovescio, lavorare rov sopra tutte le maglie delle coste – ALLO STESSO TEMPO, distribuire uniformemente 12-12-12-12-13-13 diminuzioni sopra queste m (non diminuire sopra le maglie del bordo davanti) = 71-79-83-87-98-102 m. Continuare con i ferri 4 e lavorare al ferro seguente sul diritto così: 26-26-26-26-30-30 m di bordo davanti, lavorare A.1 1 volta per le taglie S - XL, lavorare A.3 1 volta per le taglie XXL e XXXL, 8-16-20-24-20-24 m A.4 e 1 m vivagno a legaccio. Al ferro seguente sul diritto (= 3° ferro del motivo) lavorare i FERRI ACCORCIATI – vedere le spiegazioni sopra. Continuare con il motivo e le m del bordo davanti – ALLO STESSO TEMPO, lavorare 1 ferro accorciato al 3° ferro in ognuna delle ripetizioni del diagramma in altezza fino alla fine. Quando il lavoro misura 14-15-16-17-18-19 cm, iniziare ad intrecciare per le ASOLE sul bordo davanti destro – vedere le spiegazioni sopra! Continuare finché il lavoro non misuri 47-48-49-50-51-52 cm. Intrecciare poi all’inizio del ferro seguente sul diritto così: Intrecciare le prime 25-25-25-25-29-29 m, inserire 1 segnapunti (indica dove si inizia a riprendere le maglie per il collo), lavorare le m rimanenti sul ferro. Intrecciare poi per gli scalfi ogni ferro sul rovescio del lavoro così: 3 m 0-1-1-2-2-2 volte, 2 m 1-1-1-2-2-2 volte, 1 m 4-7-9-8-4-8 volte = rimangono 40-42-44-44-55-55 m per le spalle. Continuare con il motivo come prima. Intrecciare tutte le m senza stringere con il dir sopra il dir e il rov sopra il rov quando il lavoro misura 68-70-72-74-76-78 cm. DAVANTI SINISTRO: Avviare e lavorare le coste come per il davanti destro – ma all’contrario (vuol dire * 2 m rov, 2 m dir *, ripetere da *-*), con 26-26-26-26-30-30 m del bordo davanti in punto legaccio. Continuare finché le coste non misurino 5-5-5-6-6-6 cm. All’ultimo ferro sul rovescio, lavorare a rov sopra tutte le maglie delle coste – ALLO STESSO TEMPO, distribuire uniformemente 12-12-12-12-13-13 diminuzioni m (non diminuire sopra le m del bordo davanti) = 71-79-83-87-98-102 m. Continuare con i ferri 4 e lavorare al ferro seguente, sul diritto, così: 1 m vivagno a legaccio, 8-16-20-24-20-24 m A.4, lavorare A.1 1 volta per le taglie S - XL, lavorare A.2 1 volta per le taglie XXL e XXXL, 26-26-26-26-30-30 m di m del bordo davanti a legaccio. Al ferro successivo, sul rovescio (= 2° f del motivo) lavorare i FERRI ACCORCIATI – vedere le spiegazioni sopra. Continuare come per il davanti destro, ma senza le asole. MANICHE: Si lavorano avanti e indietro sui ferri. Avviare 74-78-82-86-90-90 m (incl 1 m vivagno ad ogni lato) con i ferri circolari 3,5 e Lima. Lavorare le coste così (1° ferro = diritto): 1 m vivagno a punto legaccio, * 2 m dir, 2 m rov *, ripetere da *-* e terminare con 1 m vivagno a legaccio. Continuare così finché le coste non misurino 5-5-5-6-6-6 cm. All’ultimo ferro sul rovescio, lavorare a rov sopra tutte le maglie delle coste – ALLO STESSO TEMPO, distribuire uniformemente 12-14-16-18-18-18 m diminuzioni = 62-64-66-68-72-72 m. Continuare con i ferri 4 e lavorare al ferro seguente, sul diritto, così: 1 m vivagno a legaccio, 12-13-14-15-17-17 m A.4, lavorare A.1 1 volta, 12-13-14-15-17-17 m A.4, terminare con 1 m vivagno a legaccio. ALLO STESSO TEMPO, quando il lavoro misura 6 cm, aumentare 1 m all’interno di 1 m vivagno ad ogni lato – VEDERE AUMENTI. NOTA: Lavorare gli aumenti seguendo A.4. Ripetere gli aumenti ogni 3½-3-2½-2½-2½-2½ cm in totale 14-15-16-17-16-17 volte = 90-94-98-102-104-106 m. Continuare finché il lavoro non misuri 54-53-51-50-48-48 cm (misura più corta per le taglie grandi siccome l’arrotondamento della manica è più lungo e le spalle più larghe) intrecciare all’inizio di ogni ferro ad ogni lato così: 3 m 1-1-1-2-2-2 volte, 2 m 1-1-2-2-2-2 volte e 1 m 2-2-3-3-4-4 volte. Intrecciare poi 2 m ad ogni lato finché il lavoro non misuri 61-61-60-60-59-59 cm, poi intrecciare 3 m 2 volte ad ogni lato. Intrecciare tutte le m senza stringere con il dir sopra il dir e il rov sopra il rov quando il lavoro misura ca 62-62-61-61-60-60 cm. CONFEZIONE: Cucire le spalle e attaccare le maniche e cucire nella maglia all’interno della m vivagno. Cucire le maniche ed i lati nella maglia all’interno della m vivagno. Attaccare i bottoni sul davanti sinistro, ca 2½ cm dall’ultima m dir del motivo. COLLO A SCIALLE: Riprendere le maglie sul diritto all’interno della maglia vivagno con i ferri circolari 3,5. Cominciare in mezzo davanti al segnapunti sul davanti destro così: Riprendere ca 60 - 70 m fino alla spalla, poi 30 - 40 m lungo il collo dietro, e 60 - 70 m scendendo lungo il davanti sinistro fino al segnapunti = 150 - 180 m. Lavorare 1 f a dir sul rovescio del lavoro, ALLO STESSO TEMPO, aggiustare il numero di maglie a 144-148-156-164-172-180 m. Lavorare poi le coste al ferro seguente sul dir così: 1 m punto legaccio, * 2 m dir, 2 m rov *, ripetere da *-* e terminare con 2 m dir e 1 m punto legaccio. Continuare così finché il collo non misuri ca 5-5-5-6-6-6 cm. Aumentare ora 1 m in ognuna delle 14-14-14-16-16-16 sezioni di m rov centrali (=collo dietro), visto sul diritto = 158-162-170-180-188-196 m. Continuare finché il collo non misuri ca 12-12-12-12-14-14 cm, poi intrecciare tutte le m senza stringere con il dir sopra il dir e il rov sopra il rov. Cucire il collo sul rovescio (perché la cucitura sia invisibile sul diritto) ad ogni lato, in basso, dalla parte dei bordi davanti, - cucire bordo contro bordo per evitare che la cucitura non sia troppo spessa. |
||||||||||||||||
Spiegazioni del diagramma |
||||||||||||||||
|
||||||||||||||||
 |
||||||||||||||||
 |
||||||||||||||||
Avete terminato questo modello?Allora taggate le vostre foto con #dropspattern #ramblingmancardigan o inviatele alla #dropsfan gallery. Avete bisogno di aiuto con questo modello?Troverete 23 video tutorial, una sezione per i commenti/domande e molto altro guardando il modello su www.garnstudio.com © 1982-2026 DROPS Design A/S. Ci riserviamo tutti i diritti. Questo documento, compreso tutte le sue sotto-sezioni, è protetto dalle leggi sul copyright. Potete leggere quello che potete fare con i nostri modelli alla fine di ogni modello sul nostro sito. |
||||||||||||||||


Con oltre 40 anni di esperienza nel design di modelli di maglia e uncinetto, DROPS Design offre la più estesa collezione di modelli gratuiti su internet - tradotti in 17 lingue. Ad oggi vi possiamo fornire 324 cataloghi e 12290 modelli - 9561 dei quali sono tradotti in Italiano.
Ci stiamo impegnando molto per darvi il meglio che vi possiamo offrire in termini di maglia e uncinetto, ispirazioni e consigli così come filati di grande qualità ad un prezzo incredibile! Volete utilizzare i nostri modelli per qualcosa d'altro oltre al vostro uso personale? Potete leggere tutto ciò che è consentito nel testo sul Copyright in basso su tutte le pagine dei nostri modelli. Buon lavoro!
Lasciare un commento sul modello DROPS Extra 0-850
Noi saremmo felici di ricevere i tuoi commenti e opinioni su questo modello!
Se vuoi fare una domanda, fai per favore attenzione a selezionare la categoria corretta nella casella qui sotto per velocizzare il processo di risposta. I campi richiesti sono indicati da *.