Commenti / Domande (262)
![]() Beverley Bell-Rowbotham ha scritto:
Beverley Bell-Rowbotham ha scritto:
I have just started Rambling Man men's jacket, and am very excited by the pattern. However, I do not have a chart or any instructions about how to do A.4. I have looked at various websites that have this pattern, but A.4 is never included or described. Thanks for your help.
16.01.2017 - 19:07DROPS Design ha risposto:
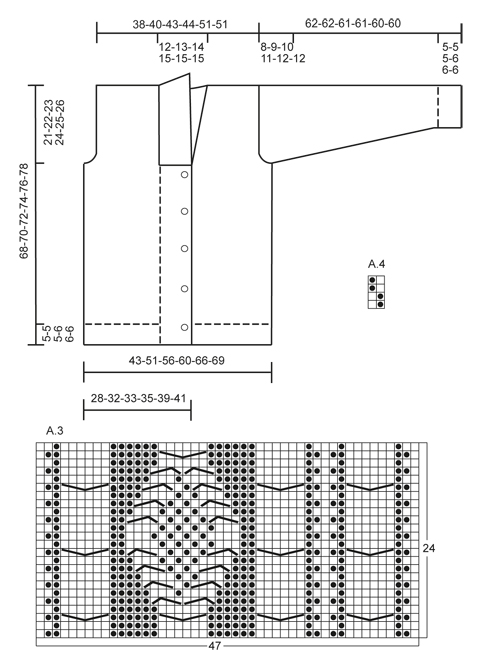
Dear Mrs Bell-Rowbotham, you will find A.4 beside the measurement chart (under sleeve), it's a small diagram worked over 2 sts and 4 rows. Happy knitting!
17.01.2017 - 09:32Marcos ha scritto:
Sorry my English, I'm Brazilian. I would like to understand the function of short rows in band. I am doing every 3 row of A.1 repetition, but the Band is tilting to low, because these short rows add rows in garter stitich (26 garter stitch in RS = 1 row, turn in K WS = 2 row, 26 garter Stich and follow A1 RS = 3 row). Turn in K adds 1 row is correct? What is the function of this in band? Thanks for answering.
07.12.2016 - 19:52DROPS Design ha risposto:
Dear Marcos, the short rows on band will be worked only when working row 3 in A1 - when you have to work row 3 in A.1 on right front piece, K26 sts (= band), turn and K 26 on return row, then work all sts as before (= row 3 in A.1). Continue with garter st and diagram until next time you will work row 3 in A.1 then repeat. You will then compensate the height difference between garter st and pattern (band sts will not contract piece in height). Happy knitting!
08.12.2016 - 08:45
![]() Brigitte B. ha scritto:
Brigitte B. ha scritto:
Je ne comprends pas la phrase suivante concernant les diminutions des manches: "Rabattre ensuite 2 m de chaque côté jusqu'à ce que l'ouvrage mesure 61-61-60-60-59-59 cm,...": Quand faut-il rabattre 2m de chaque côté et est-ce une ou plusieurs fois? Je l'ai fait autant de fois qu'il était possible jusqu'à 60 cm, et cette manche a une forme curieuse... Merci de votre aide.
04.12.2016 - 17:23DROPS Design ha risposto:
Bonjour Brigitte, le nbe de fois où vous allez rabattre 2 m de chaque côté dépend de votre nbe de rangs (tension). Quand la manche mesure 60 cm de hauteur totale (= 9-10 cm depuis le début de l'arrondi de la manche), rabattez 2 x 3 m de chaque côté et rabattez ensuite les mailles restantes. Bon tricot!
05.12.2016 - 09:42
![]() Marie-Lyse ha scritto:
Marie-Lyse ha scritto:
Hi, I do not understand the pattern. Do you have this pattern in writing (not a diagram) I understand to read right to left for RS and read left to right for WS rows. What I don't understand is the the white square reads K from RS, P from WS.Does this mean when I'm on the odd number rows the WS of the knitting I am to k when I see a square and P when I see a dot and when I am on the odd number of rows the WS of the knitting I am to P when I see a square and K when I see a dot.
07.10.2016 - 17:04DROPS Design ha risposto:
Dear Marie-Lyse, from RS work the white square in stocking st = K from RS and then P from WS (= row 1,3,5 etc.. in diagram) and work the black dots in reverse stocking st, ie P from RS and K from WS (= row 2,4,6, etc.. in diagram). Happy knittting!
10.10.2016 - 08:47
![]() Marie-Lyse ha scritto:
Marie-Lyse ha scritto:
Need help with pattern LI-014. I understand all odd number rows are to be read from right to left and I knit what I see on the diagram. It's the even number rows I'm not sure. Rows #2-4-6...represents the wrong side of the sweater. Do i read the pattern from left to right and do I knit what I see on the diagram or I knit the opposite of what I see on the diagram?
05.10.2016 - 06:19DROPS Design ha risposto:
Dear Marie-Lyse, 1st row at the bottom of the diagram is worked from RS = row 1, 3, 5, 7 ... will be all worked from RS, starting from bottom corner on the right side and read towards the left. Rows 2, 4, 6 etc. will be worked from WS, ie read from the left towards the right. So that cables will be done from RS. Happy knitting!
05.10.2016 - 08:58
![]() Heather Walton ha scritto:
Heather Walton ha scritto:
For the ribbing at the base of Sweater, you state continue in *K2,P2 pattern until it measures... I am guessing that for WS you reverse to *P2,K2 after the edge stitch?
26.09.2016 - 15:37DROPS Design ha risposto:
Dear Mrs Walton, that's right when working from RS: K2,P2, from WS you will have to work: P2, K2, ie work P over P and K over K. Happy knitting!
26.09.2016 - 16:21
![]() Anja Van De Wetering ha scritto:
Anja Van De Wetering ha scritto:
Ben met de kraag bezig en kom dan de zin: Meerder nu 1 st en elke van de middelste 14 av-delen gezien aan de goede kant tegen. Wat betekend 14 av-delen?
23.09.2016 - 09:31DROPS Design ha risposto:
Hoi Anja. Je breit de kraag met 2 r, 2 av. 2 av = 1 av-deel. Je meerdert in de middelste 14 av-delen van de kraag.
27.09.2016 - 16:16
![]() Anja Van De Wetering ha scritto:
Anja Van De Wetering ha scritto:
Ik vind 86 steken opzetten voor de mouw heel veel, de mouw is ook ontzettend ruim. Klopt dit wel?
12.09.2016 - 15:51DROPS Design ha risposto:
Hoi Anja. Ja, dit klopt wel. Boordsteek trekt zich veel meer samen dan bijvoorbeeld tricotsteek. Je mindert ook na de boordsteek na 68 st, met de juiste stekenverhouding geeft dat een omtrek van ca. 32 cm + dat het patroon ook een beetje meer zal samentrekken dan bij alleen tricotsteek.
13.09.2016 - 10:21Christine Lindop ha scritto:
I'm beginning the front and notice that the garter stitch section pulls up tighter than the rib section, so that there will be a visible difference in the level of the lower edge of the garment. Looking at some of the jackets people have made you can see this. Will I be able to block this out and even up the front edge? Thanks for your help.
24.07.2016 - 22:11DROPS Design ha risposto:
Dear Mrs Lindop, to avoid front band sts from contracting, you will work some short rows on the front band sts in garter st only - see under front pieces + "Short rows" at the beg of the pattern. Happy knitting!
25.07.2016 - 10:11
![]() Janne Alne ha scritto:
Janne Alne ha scritto:
Blir det ikke ulikt når en skal strikke en forkortet pinne på hver 3 omgang på høyre forstykket og hver 2 omgang på venstre forstykket
24.02.2016 - 20:21DROPS Design ha risposto:
Hej, Der strikkes forkortede pinde i hver mønsterrapport, det vil sige lige mange på højre og venstre, men i den ene side bliver det på 3.p og i den anden side bliver det på 2.p i rapporten. God fornøjelse!
25.02.2016 - 15:12
Rambling Man#ramblingmancardigan |
||||||||||||||||
 |
 |
|||||||||||||||
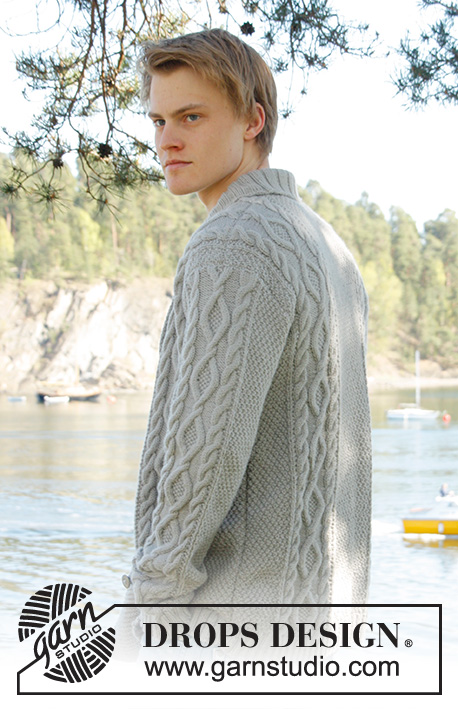
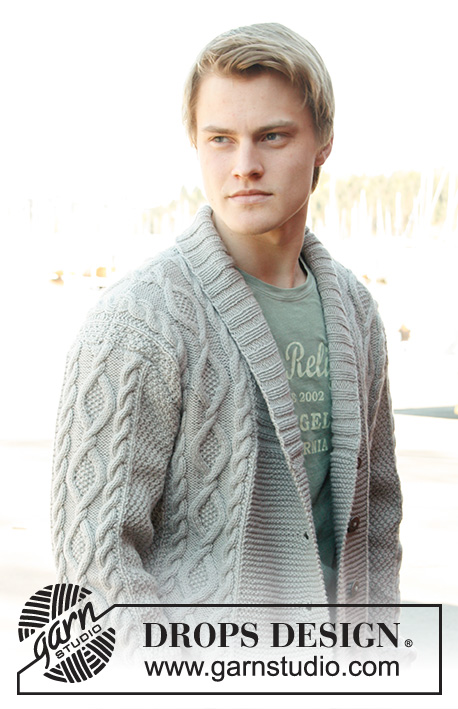
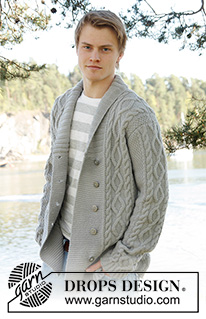
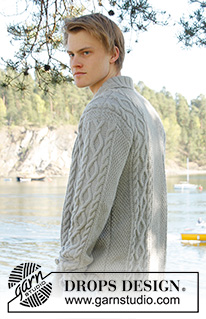
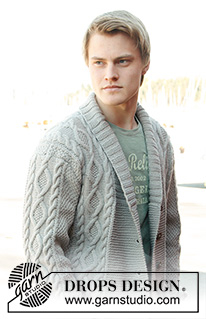
Cardigan da uomo DROPS, con trecce e collo a scialle, in "Lima". Taglia: dalla S alla XXXL.
DROPS Extra 0-850 |
||||||||||||||||
|
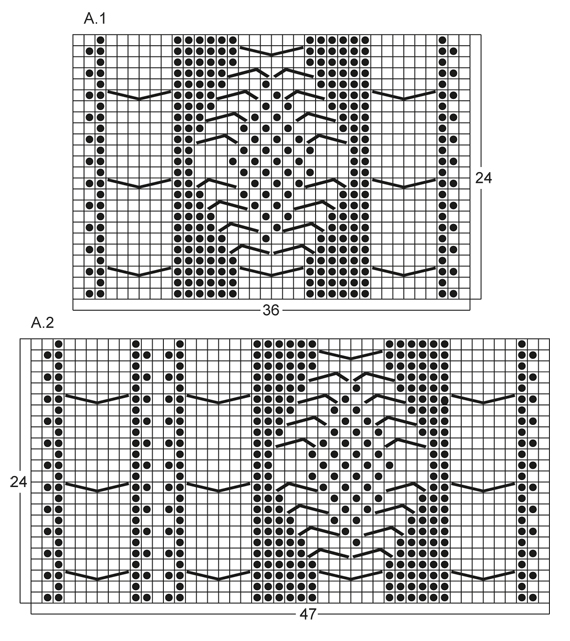
SUGGERIMENTO PER IL LAVORO: Questo modello prevede le asole sul bordo davanti destro; se preferite le asole classiche per uomo, è sufficiente intrecciare le m per le asole sul bordo davanti sinistro. PUNTO LEGACCIO (avanti e indietro sul ferro): Lavorare tutti i ferri a diritto NOTA: Tutte le m vivagno si lavorano a punto legaccio! MOTIVO: Vedere i diagrammi A.1 a A.4, i diagrammi dimostrano tutti i ferri (sul dir e sul rov), e 1 motivo da ripetere, sul diritto. FERRI ACCORCIATI: DAVANTI DESTRO: Lavorare 1 ferro accorciato ogni ferro n° 3 di ognuna delle ripetizione del motivo fino alla fine così: Al 3° ferro del motivo (= diritto), lavorare 26-26-26-26-30-30 m del bordo davanti, girare e lavorare a dir il ferro di ritorno. Lavorare poi tutte le maglie come prima. DAVANTI SINISTRO: Lavorare 1 ferro accorciato ogni ferro n° 2 di ognuna delle ripetizione del motivo fino alla fine così: Al 2° ferro del motivo (= rovescio), lavorare 26-26-26-26-30-30 m del bordo davanti, girare e lavorare a dir il ferro di ritorno. Lavorare poi tutte le maglie come prima. ASOLE: Intrecciare per 5 asole sul diritto del bordo davanti destro. 1 asola = intrecciare la 7° e l’8° m dal bordo (in mezzo davanti) e avviare 2 nuove m sopra le m intrecciate al ferro successivo. Posizionare le asole quando il lavoro misura: TAGLIA S: 14, 22, 30, 38 e 46 cm. TAGLIA M: 15, 23, 31, 39 e 47 cm. TAGLIA L: 16, 24, 32, 40 e 48 cm. TAGLIA XL: 17, 25, 33, 41 e 49 cm. TAGLIA XXL: 18, 26, 34, 42 e 50 cm. TAGLIA XXXL: 19, 27, 35, 43 e 51 cm. AUMENTI: Aumentare facendo 1 gettato, al ferro seguente, lavorare il gettato a dir ritorto per evitare buchi. ---------------------------------------------------------- DIETRO: Si lavora avanti e indietro sui ferri. Avviare 136-156-168-180-196-204 m (incl 1 m vivagno ad ogni lato) con il filato Lima e ferri circolari 3,5. Lavorare le coste così (1° ferro = diritto): 1 m vivagno a PUNTO LEGACCIO – vedere le spiegazioni sopra, * 2 m dir, 2 m rov *, ripetere da *-*, terminare con 2 m dir e 1 m vivagno a legaccio. Continuare così finché le coste non misurino 5-5-5-6-6-6 cm. All’ultimo ferro sul rovescio, lavorare a rov – ALLO STESSO TEMPO, distribuire uniformemente 20-22-24-26-26-26 diminuzioni = 116-134-144-154-170-178 m. Continuare poi con i ferri 4 e lavorare il ferro successivo, sul diritto, così: 1 m vivagno, 8-16-20-24-20-24 m A.4, lavorare A.1 1 volta per le taglie S - XL, lavorare A.2 1 volta per le taglie XXL e XXXL, 26-28-30-32-34-34 m A.4, poi lavorare A.1 1 volta per le taglie S - XL, lavorare A.3 1 volta per le taglie XXL e XXXL, terminare con 8-16-20-24-20-24 m A.4 e 1 m vivagno a legaccio. RICORDATI LA TENSIONE DEL LAVORO! Continuare così finché il lavoro non misuri 47-48-49-50-51-52 cm. Intrecciare poi per gli scalfi all’inizio di ogni ferro ad ogni lato così: Intrecciare 3 m 0-1-1-2-2-2 volte, 2 m 1-1-1-2-2-2 volte, 1 m 4-7-9-8-4-8 volte = 104-110-116-118-142-142 m. Continuare con il motivo come prima finché il lavoro non misuri 66-68-70-72-74-76 cm. Intrecciare ora le 20-22-24-26-28-28 m centrali per lo scollo e terminare ogni parte separatamente. Intrecciare 2 m al f seguente (lato scollo) = rimangono 40-42-44-44-55-55 m per le spalle. Continuare con il motivo come prima. Intrecciare tutte le m senza stringere con il dir sopra il dir e il rov sopra il rov quando il lavoro misura 68-70-72-74-76-78 cm. DAVANTI DESTRO: Si lavora avanti e indietro sui f. Avviare 83-91-95-99-111-115 m (incl 1 m vivagno al lato) con il filato Lima ed i ferri circolari 3,5. Lavorare le coste così (1° ferro = diritto): 26-26-26-26-30-30 m punto legaccio (= m del bordo davanti), * 2 m dir, 2 m rov *, ripetere da *-*, terminare con 1 m vivagno a punto legaccio. Continuare con le coste con il bordo davanti in punto legaccio finché le coste non misurino 5-5-5-6-6-6 cm. All’ultimo ferro sul rovescio, lavorare rov sopra tutte le maglie delle coste – ALLO STESSO TEMPO, distribuire uniformemente 12-12-12-12-13-13 diminuzioni sopra queste m (non diminuire sopra le maglie del bordo davanti) = 71-79-83-87-98-102 m. Continuare con i ferri 4 e lavorare al ferro seguente sul diritto così: 26-26-26-26-30-30 m di bordo davanti, lavorare A.1 1 volta per le taglie S - XL, lavorare A.3 1 volta per le taglie XXL e XXXL, 8-16-20-24-20-24 m A.4 e 1 m vivagno a legaccio. Al ferro seguente sul diritto (= 3° ferro del motivo) lavorare i FERRI ACCORCIATI – vedere le spiegazioni sopra. Continuare con il motivo e le m del bordo davanti – ALLO STESSO TEMPO, lavorare 1 ferro accorciato al 3° ferro in ognuna delle ripetizioni del diagramma in altezza fino alla fine. Quando il lavoro misura 14-15-16-17-18-19 cm, iniziare ad intrecciare per le ASOLE sul bordo davanti destro – vedere le spiegazioni sopra! Continuare finché il lavoro non misuri 47-48-49-50-51-52 cm. Intrecciare poi all’inizio del ferro seguente sul diritto così: Intrecciare le prime 25-25-25-25-29-29 m, inserire 1 segnapunti (indica dove si inizia a riprendere le maglie per il collo), lavorare le m rimanenti sul ferro. Intrecciare poi per gli scalfi ogni ferro sul rovescio del lavoro così: 3 m 0-1-1-2-2-2 volte, 2 m 1-1-1-2-2-2 volte, 1 m 4-7-9-8-4-8 volte = rimangono 40-42-44-44-55-55 m per le spalle. Continuare con il motivo come prima. Intrecciare tutte le m senza stringere con il dir sopra il dir e il rov sopra il rov quando il lavoro misura 68-70-72-74-76-78 cm. DAVANTI SINISTRO: Avviare e lavorare le coste come per il davanti destro – ma all’contrario (vuol dire * 2 m rov, 2 m dir *, ripetere da *-*), con 26-26-26-26-30-30 m del bordo davanti in punto legaccio. Continuare finché le coste non misurino 5-5-5-6-6-6 cm. All’ultimo ferro sul rovescio, lavorare a rov sopra tutte le maglie delle coste – ALLO STESSO TEMPO, distribuire uniformemente 12-12-12-12-13-13 diminuzioni m (non diminuire sopra le m del bordo davanti) = 71-79-83-87-98-102 m. Continuare con i ferri 4 e lavorare al ferro seguente, sul diritto, così: 1 m vivagno a legaccio, 8-16-20-24-20-24 m A.4, lavorare A.1 1 volta per le taglie S - XL, lavorare A.2 1 volta per le taglie XXL e XXXL, 26-26-26-26-30-30 m di m del bordo davanti a legaccio. Al ferro successivo, sul rovescio (= 2° f del motivo) lavorare i FERRI ACCORCIATI – vedere le spiegazioni sopra. Continuare come per il davanti destro, ma senza le asole. MANICHE: Si lavorano avanti e indietro sui ferri. Avviare 74-78-82-86-90-90 m (incl 1 m vivagno ad ogni lato) con i ferri circolari 3,5 e Lima. Lavorare le coste così (1° ferro = diritto): 1 m vivagno a punto legaccio, * 2 m dir, 2 m rov *, ripetere da *-* e terminare con 1 m vivagno a legaccio. Continuare così finché le coste non misurino 5-5-5-6-6-6 cm. All’ultimo ferro sul rovescio, lavorare a rov sopra tutte le maglie delle coste – ALLO STESSO TEMPO, distribuire uniformemente 12-14-16-18-18-18 m diminuzioni = 62-64-66-68-72-72 m. Continuare con i ferri 4 e lavorare al ferro seguente, sul diritto, così: 1 m vivagno a legaccio, 12-13-14-15-17-17 m A.4, lavorare A.1 1 volta, 12-13-14-15-17-17 m A.4, terminare con 1 m vivagno a legaccio. ALLO STESSO TEMPO, quando il lavoro misura 6 cm, aumentare 1 m all’interno di 1 m vivagno ad ogni lato – VEDERE AUMENTI. NOTA: Lavorare gli aumenti seguendo A.4. Ripetere gli aumenti ogni 3½-3-2½-2½-2½-2½ cm in totale 14-15-16-17-16-17 volte = 90-94-98-102-104-106 m. Continuare finché il lavoro non misuri 54-53-51-50-48-48 cm (misura più corta per le taglie grandi siccome l’arrotondamento della manica è più lungo e le spalle più larghe) intrecciare all’inizio di ogni ferro ad ogni lato così: 3 m 1-1-1-2-2-2 volte, 2 m 1-1-2-2-2-2 volte e 1 m 2-2-3-3-4-4 volte. Intrecciare poi 2 m ad ogni lato finché il lavoro non misuri 61-61-60-60-59-59 cm, poi intrecciare 3 m 2 volte ad ogni lato. Intrecciare tutte le m senza stringere con il dir sopra il dir e il rov sopra il rov quando il lavoro misura ca 62-62-61-61-60-60 cm. CONFEZIONE: Cucire le spalle e attaccare le maniche e cucire nella maglia all’interno della m vivagno. Cucire le maniche ed i lati nella maglia all’interno della m vivagno. Attaccare i bottoni sul davanti sinistro, ca 2½ cm dall’ultima m dir del motivo. COLLO A SCIALLE: Riprendere le maglie sul diritto all’interno della maglia vivagno con i ferri circolari 3,5. Cominciare in mezzo davanti al segnapunti sul davanti destro così: Riprendere ca 60 - 70 m fino alla spalla, poi 30 - 40 m lungo il collo dietro, e 60 - 70 m scendendo lungo il davanti sinistro fino al segnapunti = 150 - 180 m. Lavorare 1 f a dir sul rovescio del lavoro, ALLO STESSO TEMPO, aggiustare il numero di maglie a 144-148-156-164-172-180 m. Lavorare poi le coste al ferro seguente sul dir così: 1 m punto legaccio, * 2 m dir, 2 m rov *, ripetere da *-* e terminare con 2 m dir e 1 m punto legaccio. Continuare così finché il collo non misuri ca 5-5-5-6-6-6 cm. Aumentare ora 1 m in ognuna delle 14-14-14-16-16-16 sezioni di m rov centrali (=collo dietro), visto sul diritto = 158-162-170-180-188-196 m. Continuare finché il collo non misuri ca 12-12-12-12-14-14 cm, poi intrecciare tutte le m senza stringere con il dir sopra il dir e il rov sopra il rov. Cucire il collo sul rovescio (perché la cucitura sia invisibile sul diritto) ad ogni lato, in basso, dalla parte dei bordi davanti, - cucire bordo contro bordo per evitare che la cucitura non sia troppo spessa. |
||||||||||||||||
Spiegazioni del diagramma |
||||||||||||||||
|
||||||||||||||||
 |
||||||||||||||||
 |
||||||||||||||||
Avete terminato questo modello?Allora taggate le vostre foto con #dropspattern #ramblingmancardigan o inviatele alla #dropsfan gallery. Avete bisogno di aiuto con questo modello?Troverete 23 video tutorial, una sezione per i commenti/domande e molto altro guardando il modello su www.garnstudio.com © 1982-2025 DROPS Design A/S. Ci riserviamo tutti i diritti. Questo documento, compreso tutte le sue sotto-sezioni, è protetto dalle leggi sul copyright. Potete leggere quello che potete fare con i nostri modelli alla fine di ogni modello sul nostro sito. |
||||||||||||||||






Lasciare un commento sul modello DROPS Extra 0-850
Noi saremmo felici di ricevere i tuoi commenti e opinioni su questo modello!
Se vuoi fare una domanda, fai per favore attenzione a selezionare la categoria corretta nella casella qui sotto per velocizzare il processo di risposta. I campi richiesti sono indicati da *.