Commenti / Domande (262)
Maggi Page ha scritto:
Doing the largest size ready to shape armholes. require further information. ( at the beg of every row in each side as follows bind off 3 sts 0-1-1-2-2-2 times, 2 sts 1-1-1-2-2-2 times, 1 st 4-7-9-8-4-8 times does that mean cast off 3 sts at beg of next 4 rows. followed by 2 sts at beg of next 4rows etc
26.10.2018 - 15:19DROPS Design ha risposto:
Dear Mrs Page, correct, you should have cast off a total of 3 sts x 2 + 2 sts x 2 + 1 st x 8 on each side. Happy knitting!
26.10.2018 - 16:28Rushd Khatib ha scritto:
Am stuck at collar. Am not getting as to how much stitches i have to increase and where? Do i have to increase all stitches at once?
24.10.2018 - 16:24DROPS Design ha risposto:
Dear Mrs Khatib, mark the middle 14-16 P-sections on collar and increase 1 stitch in each of these P-sections = you will increase 14-16 sts in total and continue working ribbing K2/P2 as before over the sts before these 14-16 P-sections and after these, and work K2/P3 (from RS) over the middle 14-16 P-sections. Happy knitting!
25.10.2018 - 08:05
![]() Linda Contino ha scritto:
Linda Contino ha scritto:
Hi its Linda again. I am getting close to finishing the back and have completed 28 3/8" of the back and I now need to bind off the middle 26 sts for neck and finish each part separately then I need to bind off 2 sts on next row from neck =44 sts remaining on shoulder. i am a bit confused how to proceed with these rows namely "bind off the middle 26 sts for neck and finish each part separately". Any help is much appreciated. Thank you. Linda
06.10.2018 - 21:10DROPS Design ha risposto:
Hi Linda, Once you have bound off the stitches for the neck you work one shoulder at a time, binding off 2 more stitches on the neck-side of the shoulder you are working on the next row. When you have finished this shoulder, cut the strand and work the other shoulder, again binding off 2 more stitches on the neck side on the first row. I hope this helps and happy knitting!
08.10.2018 - 08:19
![]() Annelies Staal ha scritto:
Annelies Staal ha scritto:
Ik ben met patroon A3 begonnen maar ik vraag me nu af. Is alleen de heengaande naald het patroon en de teruggaande naald averecht of moet ik in de teruggaande naald ook het patroon volgen?
20.09.2018 - 14:53
![]() ESPUGNE-DARSES Jacqueline ha scritto:
ESPUGNE-DARSES Jacqueline ha scritto:
Col châle : Que veux dire augmenter maintenant 1 m dans chacune des "14 sections envers centrales" (encolure dos) vu sur l'endroit. Remerciements.
18.09.2018 - 17:18DROPS Design ha risposto:
Bonjour Mme Espugne-Darses, marquez la partie des côtes au milieu du col avec 14 fois 2 m envers, vous allez augmenter 1 m env dans ces sections 2 m env des côtes, vous aurez ainsi toujours 2 m end/ 2 m env avant et après, et 14 fois 2 m end/ 3 m env au milieu du col. Bon tricot!
19.09.2018 - 09:09
![]() Linda Contino ha scritto:
Linda Contino ha scritto:
Hi, i completed working 19 3/4\" of the back to the cardigan and now I need to begin to bind off to shape armholes. The pattern states that I bind off at the beg. of every row in each side. For how many rows do I follow this binding off at the beg. of every row in each side? And when I bind off do I bind off as a K stitch or do I bind off as a pattern stitch? Thanks
30.08.2018 - 23:26DROPS Design ha risposto:
Hi Linda, You bind off on each side as follows: 3 stitches 1 time (so 2 consecutive rows), 2 stitches 1 time and 1 stitch 9 times. You bind off with a pattern stitch. Happy knitting!
31.08.2018 - 07:47
![]() Annelies Staal ha scritto:
Annelies Staal ha scritto:
Ik ga het vest breien in de maat XXXL. Over de buik is dat de goede maat. Ik heb het vermoeden dat de boord erg ruim wordt en daardoor zal lubberen. Mijn idee is om de boord op te zetten met de steken van XL of evt XXl en dan uiteindelijk wél te minderen tot 178 resp. 102 steken voor het patroon in XXXL. Ik wil de boordaanpassing doen voor voor- achterpand(en)en waarschijnlijk ook de mouw. Is dat een goed idee?
23.08.2018 - 15:56DROPS Design ha risposto:
Dag Annelies, Ja, je kan de boord inderdaad wat strakker maken, als je maar op het juiste aantal steken zit wanneer je aan de kabel begint.
23.08.2018 - 17:44
![]() Anthea ha scritto:
Anthea ha scritto:
Waarom wordt patroon A.4 niet gewoon dubbele gerstekorrelsteek genoemd? Ik denk dat patroon A.1-3 overzichtelijker zouden zijn als de dambordstukjes in het midden één teken zouden krijgen met de uitleg 'gerstekorrelsteek', waarbij dan wordt aangegeven of men met recht of averecht begint. Ik print patronen zelf liever niet uit, maar dit soort patronen op een scherm bekijken is nogal vermoeiend.
26.07.2018 - 14:38DROPS Design ha risposto:
Dag Anthea, In dit geval is er door het designteam voor gekozen om de gerstekorrel in een teltekening te zetten. Als je alleen de telpatronen af wilt drukken en niet het hele patroon, kun je dat doen door eerst met de rechter muisknop op de afbeelding te klikken en dan te kiezen voor 'Afbeelding openen in een nieuw tabblad'
29.07.2018 - 10:50
![]() Quinton ha scritto:
Quinton ha scritto:
Je voudrais réaliser ce modèle avec des aiguilles en 4. 1/2pour les cotes et 5.1/2 pour le reste et dimension du bas de la manche (largeur).pouvez vous m,envoyer ces explications par mail.merci
08.07.2018 - 07:22DROPS Design ha risposto:
Bonjour Mme Quinton, ce modèle se tricote sur la base d'un échantillon de 21 m x 28 rangs, si vous n'avez pas la bonne tension, regardez parmi les modèles correspondant à votre échantillon, nous ne sommes malheureusement pas en mesure de pouvoir adapter chaque modèle à chaque demande individuelle. Pour toute assistance complémentaire, merci de bien vouloir contacter le magasin où vous avez acheté votre laine. Bon tricot!
09.07.2018 - 08:29Rushd ha scritto:
I have made the sweater with Large size instruction but unfortunatly the needle size n yarn did not match n it ended up in very big n heavy one. I almosy had to use 19 balls of 100 gms each. So my question is if i use larger size needle 5.5 mm and 6 mm respectively since my yarn is thick one will it be ok?
25.06.2018 - 12:17DROPS Design ha risposto:
Dear Mrs Rushd, this pattern has been written for a tension of 21 sts x 28 rows = 10 x 10 cm, we are unfortunately unable to adjust every single pattern to each individual request, for any individual assistance, you are welcome to contact the store where you bought your yarn. Happy knitting!
25.06.2018 - 15:56
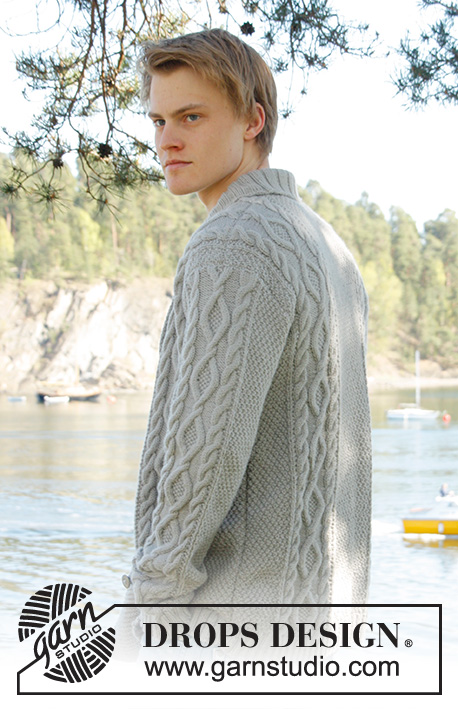
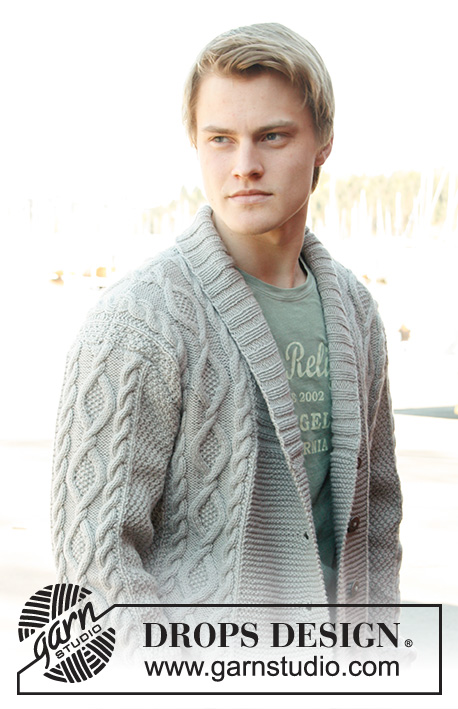
Rambling Man#ramblingmancardigan |
||||||||||||||||
 |
 |
|||||||||||||||
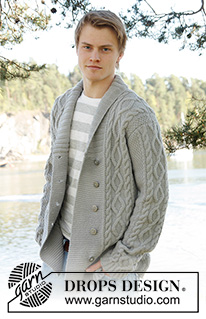
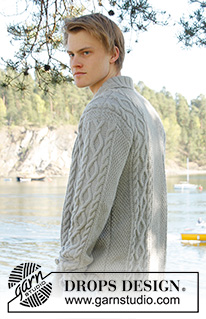
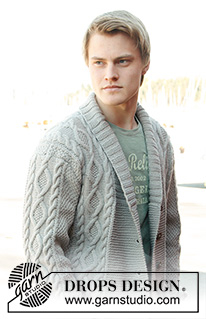
Cardigan da uomo DROPS, con trecce e collo a scialle, in "Lima". Taglia: dalla S alla XXXL.
DROPS Extra 0-850 |
||||||||||||||||
|
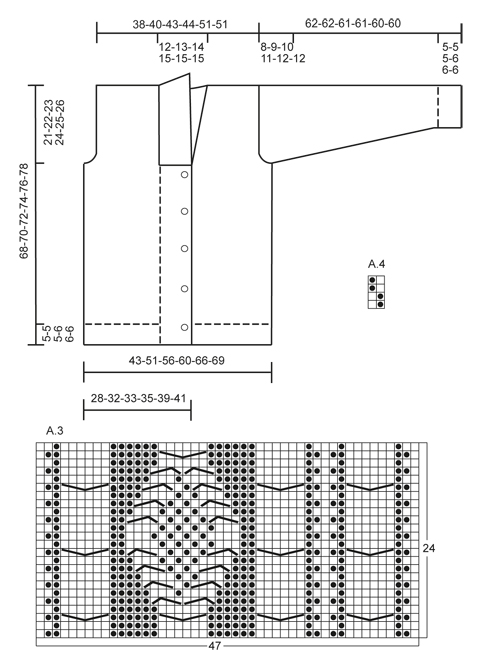
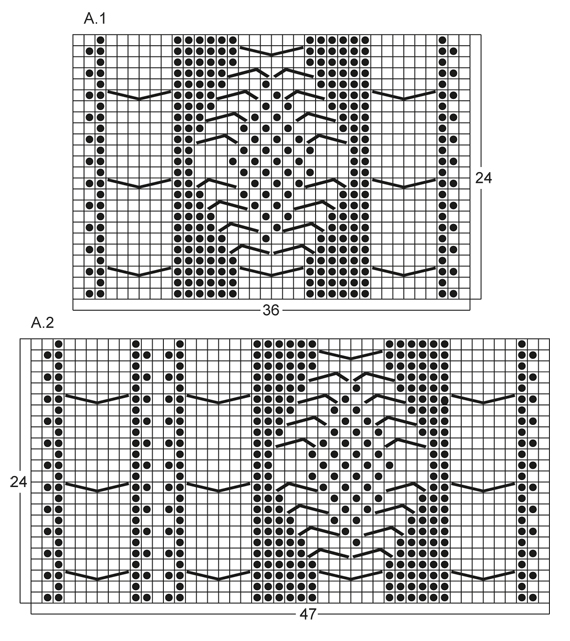
SUGGERIMENTO PER IL LAVORO: Questo modello prevede le asole sul bordo davanti destro; se preferite le asole classiche per uomo, è sufficiente intrecciare le m per le asole sul bordo davanti sinistro. PUNTO LEGACCIO (avanti e indietro sul ferro): Lavorare tutti i ferri a diritto NOTA: Tutte le m vivagno si lavorano a punto legaccio! MOTIVO: Vedere i diagrammi A.1 a A.4, i diagrammi dimostrano tutti i ferri (sul dir e sul rov), e 1 motivo da ripetere, sul diritto. FERRI ACCORCIATI: DAVANTI DESTRO: Lavorare 1 ferro accorciato ogni ferro n° 3 di ognuna delle ripetizione del motivo fino alla fine così: Al 3° ferro del motivo (= diritto), lavorare 26-26-26-26-30-30 m del bordo davanti, girare e lavorare a dir il ferro di ritorno. Lavorare poi tutte le maglie come prima. DAVANTI SINISTRO: Lavorare 1 ferro accorciato ogni ferro n° 2 di ognuna delle ripetizione del motivo fino alla fine così: Al 2° ferro del motivo (= rovescio), lavorare 26-26-26-26-30-30 m del bordo davanti, girare e lavorare a dir il ferro di ritorno. Lavorare poi tutte le maglie come prima. ASOLE: Intrecciare per 5 asole sul diritto del bordo davanti destro. 1 asola = intrecciare la 7° e l’8° m dal bordo (in mezzo davanti) e avviare 2 nuove m sopra le m intrecciate al ferro successivo. Posizionare le asole quando il lavoro misura: TAGLIA S: 14, 22, 30, 38 e 46 cm. TAGLIA M: 15, 23, 31, 39 e 47 cm. TAGLIA L: 16, 24, 32, 40 e 48 cm. TAGLIA XL: 17, 25, 33, 41 e 49 cm. TAGLIA XXL: 18, 26, 34, 42 e 50 cm. TAGLIA XXXL: 19, 27, 35, 43 e 51 cm. AUMENTI: Aumentare facendo 1 gettato, al ferro seguente, lavorare il gettato a dir ritorto per evitare buchi. ---------------------------------------------------------- DIETRO: Si lavora avanti e indietro sui ferri. Avviare 136-156-168-180-196-204 m (incl 1 m vivagno ad ogni lato) con il filato Lima e ferri circolari 3,5. Lavorare le coste così (1° ferro = diritto): 1 m vivagno a PUNTO LEGACCIO – vedere le spiegazioni sopra, * 2 m dir, 2 m rov *, ripetere da *-*, terminare con 2 m dir e 1 m vivagno a legaccio. Continuare così finché le coste non misurino 5-5-5-6-6-6 cm. All’ultimo ferro sul rovescio, lavorare a rov – ALLO STESSO TEMPO, distribuire uniformemente 20-22-24-26-26-26 diminuzioni = 116-134-144-154-170-178 m. Continuare poi con i ferri 4 e lavorare il ferro successivo, sul diritto, così: 1 m vivagno, 8-16-20-24-20-24 m A.4, lavorare A.1 1 volta per le taglie S - XL, lavorare A.2 1 volta per le taglie XXL e XXXL, 26-28-30-32-34-34 m A.4, poi lavorare A.1 1 volta per le taglie S - XL, lavorare A.3 1 volta per le taglie XXL e XXXL, terminare con 8-16-20-24-20-24 m A.4 e 1 m vivagno a legaccio. RICORDATI LA TENSIONE DEL LAVORO! Continuare così finché il lavoro non misuri 47-48-49-50-51-52 cm. Intrecciare poi per gli scalfi all’inizio di ogni ferro ad ogni lato così: Intrecciare 3 m 0-1-1-2-2-2 volte, 2 m 1-1-1-2-2-2 volte, 1 m 4-7-9-8-4-8 volte = 104-110-116-118-142-142 m. Continuare con il motivo come prima finché il lavoro non misuri 66-68-70-72-74-76 cm. Intrecciare ora le 20-22-24-26-28-28 m centrali per lo scollo e terminare ogni parte separatamente. Intrecciare 2 m al f seguente (lato scollo) = rimangono 40-42-44-44-55-55 m per le spalle. Continuare con il motivo come prima. Intrecciare tutte le m senza stringere con il dir sopra il dir e il rov sopra il rov quando il lavoro misura 68-70-72-74-76-78 cm. DAVANTI DESTRO: Si lavora avanti e indietro sui f. Avviare 83-91-95-99-111-115 m (incl 1 m vivagno al lato) con il filato Lima ed i ferri circolari 3,5. Lavorare le coste così (1° ferro = diritto): 26-26-26-26-30-30 m punto legaccio (= m del bordo davanti), * 2 m dir, 2 m rov *, ripetere da *-*, terminare con 1 m vivagno a punto legaccio. Continuare con le coste con il bordo davanti in punto legaccio finché le coste non misurino 5-5-5-6-6-6 cm. All’ultimo ferro sul rovescio, lavorare rov sopra tutte le maglie delle coste – ALLO STESSO TEMPO, distribuire uniformemente 12-12-12-12-13-13 diminuzioni sopra queste m (non diminuire sopra le maglie del bordo davanti) = 71-79-83-87-98-102 m. Continuare con i ferri 4 e lavorare al ferro seguente sul diritto così: 26-26-26-26-30-30 m di bordo davanti, lavorare A.1 1 volta per le taglie S - XL, lavorare A.3 1 volta per le taglie XXL e XXXL, 8-16-20-24-20-24 m A.4 e 1 m vivagno a legaccio. Al ferro seguente sul diritto (= 3° ferro del motivo) lavorare i FERRI ACCORCIATI – vedere le spiegazioni sopra. Continuare con il motivo e le m del bordo davanti – ALLO STESSO TEMPO, lavorare 1 ferro accorciato al 3° ferro in ognuna delle ripetizioni del diagramma in altezza fino alla fine. Quando il lavoro misura 14-15-16-17-18-19 cm, iniziare ad intrecciare per le ASOLE sul bordo davanti destro – vedere le spiegazioni sopra! Continuare finché il lavoro non misuri 47-48-49-50-51-52 cm. Intrecciare poi all’inizio del ferro seguente sul diritto così: Intrecciare le prime 25-25-25-25-29-29 m, inserire 1 segnapunti (indica dove si inizia a riprendere le maglie per il collo), lavorare le m rimanenti sul ferro. Intrecciare poi per gli scalfi ogni ferro sul rovescio del lavoro così: 3 m 0-1-1-2-2-2 volte, 2 m 1-1-1-2-2-2 volte, 1 m 4-7-9-8-4-8 volte = rimangono 40-42-44-44-55-55 m per le spalle. Continuare con il motivo come prima. Intrecciare tutte le m senza stringere con il dir sopra il dir e il rov sopra il rov quando il lavoro misura 68-70-72-74-76-78 cm. DAVANTI SINISTRO: Avviare e lavorare le coste come per il davanti destro – ma all’contrario (vuol dire * 2 m rov, 2 m dir *, ripetere da *-*), con 26-26-26-26-30-30 m del bordo davanti in punto legaccio. Continuare finché le coste non misurino 5-5-5-6-6-6 cm. All’ultimo ferro sul rovescio, lavorare a rov sopra tutte le maglie delle coste – ALLO STESSO TEMPO, distribuire uniformemente 12-12-12-12-13-13 diminuzioni m (non diminuire sopra le m del bordo davanti) = 71-79-83-87-98-102 m. Continuare con i ferri 4 e lavorare al ferro seguente, sul diritto, così: 1 m vivagno a legaccio, 8-16-20-24-20-24 m A.4, lavorare A.1 1 volta per le taglie S - XL, lavorare A.2 1 volta per le taglie XXL e XXXL, 26-26-26-26-30-30 m di m del bordo davanti a legaccio. Al ferro successivo, sul rovescio (= 2° f del motivo) lavorare i FERRI ACCORCIATI – vedere le spiegazioni sopra. Continuare come per il davanti destro, ma senza le asole. MANICHE: Si lavorano avanti e indietro sui ferri. Avviare 74-78-82-86-90-90 m (incl 1 m vivagno ad ogni lato) con i ferri circolari 3,5 e Lima. Lavorare le coste così (1° ferro = diritto): 1 m vivagno a punto legaccio, * 2 m dir, 2 m rov *, ripetere da *-* e terminare con 1 m vivagno a legaccio. Continuare così finché le coste non misurino 5-5-5-6-6-6 cm. All’ultimo ferro sul rovescio, lavorare a rov sopra tutte le maglie delle coste – ALLO STESSO TEMPO, distribuire uniformemente 12-14-16-18-18-18 m diminuzioni = 62-64-66-68-72-72 m. Continuare con i ferri 4 e lavorare al ferro seguente, sul diritto, così: 1 m vivagno a legaccio, 12-13-14-15-17-17 m A.4, lavorare A.1 1 volta, 12-13-14-15-17-17 m A.4, terminare con 1 m vivagno a legaccio. ALLO STESSO TEMPO, quando il lavoro misura 6 cm, aumentare 1 m all’interno di 1 m vivagno ad ogni lato – VEDERE AUMENTI. NOTA: Lavorare gli aumenti seguendo A.4. Ripetere gli aumenti ogni 3½-3-2½-2½-2½-2½ cm in totale 14-15-16-17-16-17 volte = 90-94-98-102-104-106 m. Continuare finché il lavoro non misuri 54-53-51-50-48-48 cm (misura più corta per le taglie grandi siccome l’arrotondamento della manica è più lungo e le spalle più larghe) intrecciare all’inizio di ogni ferro ad ogni lato così: 3 m 1-1-1-2-2-2 volte, 2 m 1-1-2-2-2-2 volte e 1 m 2-2-3-3-4-4 volte. Intrecciare poi 2 m ad ogni lato finché il lavoro non misuri 61-61-60-60-59-59 cm, poi intrecciare 3 m 2 volte ad ogni lato. Intrecciare tutte le m senza stringere con il dir sopra il dir e il rov sopra il rov quando il lavoro misura ca 62-62-61-61-60-60 cm. CONFEZIONE: Cucire le spalle e attaccare le maniche e cucire nella maglia all’interno della m vivagno. Cucire le maniche ed i lati nella maglia all’interno della m vivagno. Attaccare i bottoni sul davanti sinistro, ca 2½ cm dall’ultima m dir del motivo. COLLO A SCIALLE: Riprendere le maglie sul diritto all’interno della maglia vivagno con i ferri circolari 3,5. Cominciare in mezzo davanti al segnapunti sul davanti destro così: Riprendere ca 60 - 70 m fino alla spalla, poi 30 - 40 m lungo il collo dietro, e 60 - 70 m scendendo lungo il davanti sinistro fino al segnapunti = 150 - 180 m. Lavorare 1 f a dir sul rovescio del lavoro, ALLO STESSO TEMPO, aggiustare il numero di maglie a 144-148-156-164-172-180 m. Lavorare poi le coste al ferro seguente sul dir così: 1 m punto legaccio, * 2 m dir, 2 m rov *, ripetere da *-* e terminare con 2 m dir e 1 m punto legaccio. Continuare così finché il collo non misuri ca 5-5-5-6-6-6 cm. Aumentare ora 1 m in ognuna delle 14-14-14-16-16-16 sezioni di m rov centrali (=collo dietro), visto sul diritto = 158-162-170-180-188-196 m. Continuare finché il collo non misuri ca 12-12-12-12-14-14 cm, poi intrecciare tutte le m senza stringere con il dir sopra il dir e il rov sopra il rov. Cucire il collo sul rovescio (perché la cucitura sia invisibile sul diritto) ad ogni lato, in basso, dalla parte dei bordi davanti, - cucire bordo contro bordo per evitare che la cucitura non sia troppo spessa. |
||||||||||||||||
Spiegazioni del diagramma |
||||||||||||||||
|
||||||||||||||||
 |
||||||||||||||||
 |
||||||||||||||||
Avete terminato questo modello?Allora taggate le vostre foto con #dropspattern #ramblingmancardigan o inviatele alla #dropsfan gallery. Avete bisogno di aiuto con questo modello?Troverete 23 video tutorial, una sezione per i commenti/domande e molto altro guardando il modello su www.garnstudio.com © 1982-2025 DROPS Design A/S. Ci riserviamo tutti i diritti. Questo documento, compreso tutte le sue sotto-sezioni, è protetto dalle leggi sul copyright. Potete leggere quello che potete fare con i nostri modelli alla fine di ogni modello sul nostro sito. |
||||||||||||||||






Lasciare un commento sul modello DROPS Extra 0-850
Noi saremmo felici di ricevere i tuoi commenti e opinioni su questo modello!
Se vuoi fare una domanda, fai per favore attenzione a selezionare la categoria corretta nella casella qui sotto per velocizzare il processo di risposta. I campi richiesti sono indicati da *.