
Categorie popolari
State cercando un filato?


Commenti / Domande (266)
![]() Dusica ha scritto:
Dusica ha scritto:
Can you explain the part oh short rows where it says work 1 short row on row 2 of every pattern repetition, for left front piece.dies this mean that within 1 pattern which has 24 rows I have to make 12 short rows?Thank you.
06.08.2019 - 13:43DROPS Design ha risposto:
Dear Dusica, you wil work short rows every time you will work the row 2 from the diagram. Diagram is 24 rows, work first row as explained, work then row 2 in diagram, work the short rows over the front band sts, and continue diagram to the end. Repeat short row on next row 2 in diagram. Happy knitting!
07.08.2019 - 11:56
![]() Wil Buddingh ha scritto:
Wil Buddingh ha scritto:
De mouwkop is met een lengte van 10 cm veel te kort. Moet de totale lengte van de mouw 76 cm zijn, of doe ik iets verkeerd?
09.06.2019 - 12:02DROPS Design ha risposto:
Dag Wil,
De totale lengte van de mouw staat onderaan in de tekening aangegeven en deze is afhankelijk van je maat ergens tussen de 62 en 60
09.06.2019 - 14:21
![]() Susann ha scritto:
Susann ha scritto:
Guten Morgen, ich habe ein Problem mit den verkürzten Reihen, hatte bereits angefangen ab Bündchen in jeder 2. Reihe bzw. 3. Reihe die verkürzte Reihe zu stricken. Nun habe ich gelesen im Rapport soll dies gemacht werden, der Rapport ist das Muster? Wenn das richtig ist, würde ich an der Blende am Bündchen gar keine verkürzte Reihe stricken und dann erst beim Beginn des Musters und dies dann bei jeden weiteren Beginn des Musters wiederholen, sprich alle 24 Reihen?
31.03.2019 - 07:59DROPS Design ha risposto:
Liebe Susan, die verkürzten Reihen über die Blende werden gestrickt, nur wenn man die 3. Reihe im Muster gestrickt wird, dh das erste Mal Sie stricken die 3. Reihe im Diagram, dann stricken Sie Diagram bis zur Ende (ohne verkürzte Reihen), dann Diagram von 1. Reihe wiederholen und bei der 3. Reihe die verkürzten Reihen wiederholen. Viel Spaß beim stricken!
01.04.2019 - 13:06
![]() Linda Contino ha scritto:
Linda Contino ha scritto:
Hi i am beginning to work on left front. is there an error in the pattern? on right front it says switch to size 4 mm needle and work next row from RS (26 band sts in garter, work A1 x 1, 24 sts in A4 and 1 edge sts) for left front it says to switch to size 4mm needle and work next row from RS (1 edge st, 24 sts in A4, work A1, 26 in garter) this does not make sense and will not match properly. Please advise. thank you
28.03.2019 - 04:49DROPS Design ha risposto:
Hi Linda, You work the left front from the opposite end of the row (reversed), so then the 2 front pieces will match. Happy knitting!
28.03.2019 - 07:03
![]() Anna MICHAŁOWSKA ha scritto:
Anna MICHAŁOWSKA ha scritto:
Short rows (Right front) Should I knit short row knitting every 3rd row from diagram A1? I am knitting L size? It is not clear for me where to add short row, what means" every 3rd row of the pattern repetition" Is it every 3 row of diagram A1? Am I right?
10.03.2019 - 16:27DROPS Design ha risposto:
Dear Mrs Michalowska, when working right front, work the short rows over the 26 first sts on right front piece every time you work row 3 in diagram in height (= one more ridge over the front band sts compared to the pattern). Happy knitting!
11.03.2019 - 11:46
![]() Anna MICHAŁOWSKA ha scritto:
Anna MICHAŁOWSKA ha scritto:
Short rows (Right front) Should I knit short row knitting every 3rd row from diagram A1? I am knitting L size? It is not clear for me where to add short row, what means" every 3rd row of the pattern repetition" Is it every 3 row of diagram A1? Am I right?
10.03.2019 - 16:26
![]() Linda Contino ha scritto:
Linda Contino ha scritto:
Then I must have done something wrong because on the extra rows side (ie buttonhole side), from cast on, it is longer than the other front side this is what I am asking which side do you measure from?
22.02.2019 - 15:51DROPS Design ha risposto:
Dear Mrs Contino, the short rows on the front band sts are worked to avoid garter stitch from contracting piece (tension in height is different when working garter stitch or cable pattern). Make sure to work the short rows every time you work row 3 from diagram. Happy knitting!
22.02.2019 - 16:36
![]() Linda Contino ha scritto:
Linda Contino ha scritto:
As a follow-up to your answer above,, my question may not have been clear, do you measure 19 3/4” from the rib end or from the band end of your work? thank you
22.02.2019 - 15:08DROPS Design ha risposto:
Dear Mrs Contino, you should measure from cast on row, height should be the same on the side and towards front band due to the extra rows (short rows) worked on front band sts. Happy knitting!
22.02.2019 - 15:34
![]() Linda Contino ha scritto:
Linda Contino ha scritto:
Hi, i am working on the right front and it says when piece measures 193/4" (xl), begin to bind off, etc. Is the 193/4" measured from cast on row to top of band side or from cast on row to top of rib side? Thank you
21.02.2019 - 18:28DROPS Design ha risposto:
Dear Mrs Contino, these 19 3/4" should be measured from cast on edge. Happy knitting!
22.02.2019 - 08:59
![]() Mina ha scritto:
Mina ha scritto:
Hello;I live in Iran .I can not buy this pattern(**) since people in my country do not have credit card. is it possible to send me this pattern to my email.please help me.I want to knitt this jacket for my hasbands birthday.
30.01.2019 - 11:34DROPS Design ha risposto:
Dear Mina, you can print this pattern for free, just click on the printer icon to launch printing (choose a virtual printer to save it as a .PDF). Happy knitting!
30.01.2019 - 11:39
|
||||||||||||||||
Rambling Man#ramblingmancardigan |
||||||||||||||||
 |
 |
|||||||||||||||
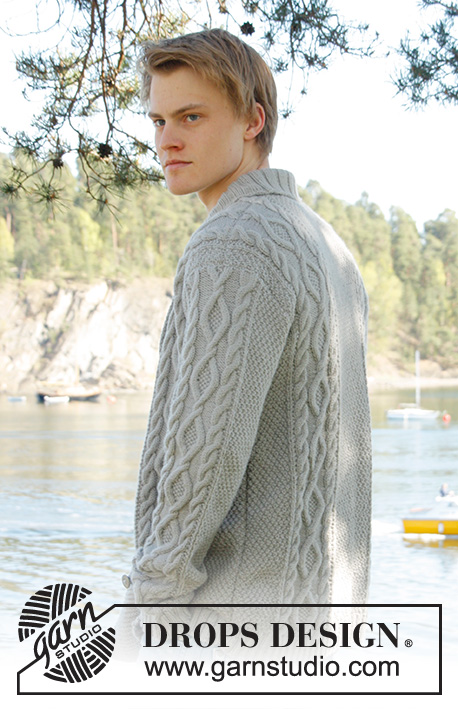
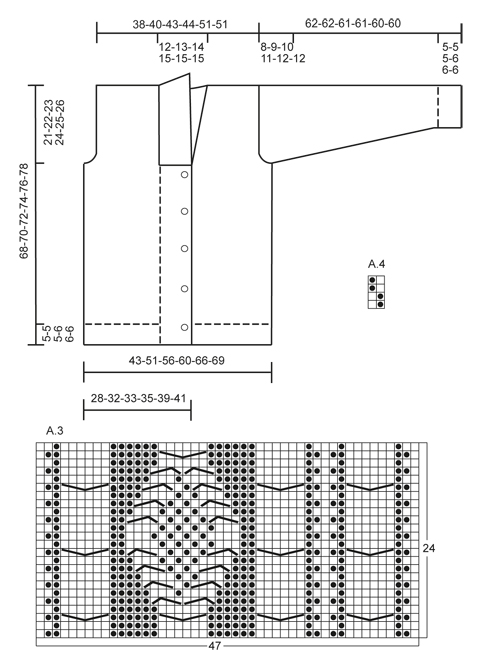
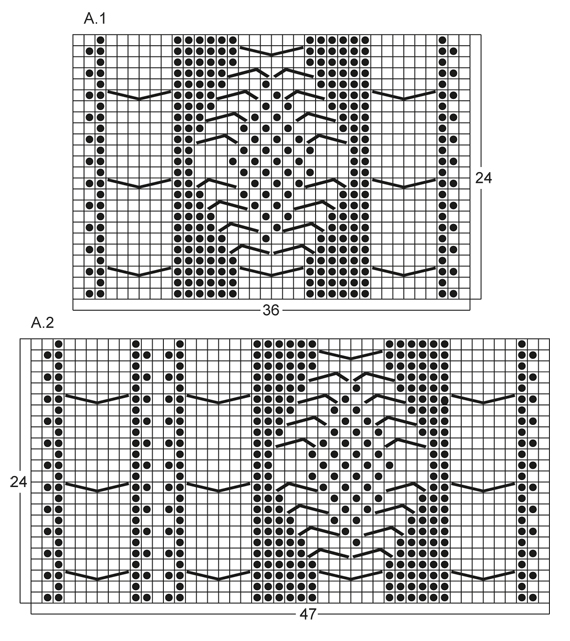
Cardigan da uomo DROPS, con trecce e collo a scialle, in "Lima". Taglia: dalla S alla XXXL.
DROPS Extra 0-850 |
||||||||||||||||
|
SUGGERIMENTO PER IL LAVORO: Questo modello prevede le asole sul bordo davanti destro; se preferite le asole classiche per uomo, è sufficiente intrecciare le m per le asole sul bordo davanti sinistro. PUNTO LEGACCIO (avanti e indietro sul ferro): Lavorare tutti i ferri a diritto NOTA: Tutte le m vivagno si lavorano a punto legaccio! MOTIVO: Vedere i diagrammi A.1 a A.4, i diagrammi dimostrano tutti i ferri (sul dir e sul rov), e 1 motivo da ripetere, sul diritto. FERRI ACCORCIATI: DAVANTI DESTRO: Lavorare 1 ferro accorciato ogni ferro n° 3 di ognuna delle ripetizione del motivo fino alla fine così: Al 3° ferro del motivo (= diritto), lavorare 26-26-26-26-30-30 m del bordo davanti, girare e lavorare a dir il ferro di ritorno. Lavorare poi tutte le maglie come prima. DAVANTI SINISTRO: Lavorare 1 ferro accorciato ogni ferro n° 2 di ognuna delle ripetizione del motivo fino alla fine così: Al 2° ferro del motivo (= rovescio), lavorare 26-26-26-26-30-30 m del bordo davanti, girare e lavorare a dir il ferro di ritorno. Lavorare poi tutte le maglie come prima. ASOLE: Intrecciare per 5 asole sul diritto del bordo davanti destro. 1 asola = intrecciare la 7° e l’8° m dal bordo (in mezzo davanti) e avviare 2 nuove m sopra le m intrecciate al ferro successivo. Posizionare le asole quando il lavoro misura: TAGLIA S: 14, 22, 30, 38 e 46 cm. TAGLIA M: 15, 23, 31, 39 e 47 cm. TAGLIA L: 16, 24, 32, 40 e 48 cm. TAGLIA XL: 17, 25, 33, 41 e 49 cm. TAGLIA XXL: 18, 26, 34, 42 e 50 cm. TAGLIA XXXL: 19, 27, 35, 43 e 51 cm. AUMENTI: Aumentare facendo 1 gettato, al ferro seguente, lavorare il gettato a dir ritorto per evitare buchi. ---------------------------------------------------------- DIETRO: Si lavora avanti e indietro sui ferri. Avviare 136-156-168-180-196-204 m (incl 1 m vivagno ad ogni lato) con il filato Lima e ferri circolari 3,5. Lavorare le coste così (1° ferro = diritto): 1 m vivagno a PUNTO LEGACCIO – vedere le spiegazioni sopra, * 2 m dir, 2 m rov *, ripetere da *-*, terminare con 2 m dir e 1 m vivagno a legaccio. Continuare così finché le coste non misurino 5-5-5-6-6-6 cm. All’ultimo ferro sul rovescio, lavorare a rov – ALLO STESSO TEMPO, distribuire uniformemente 20-22-24-26-26-26 diminuzioni = 116-134-144-154-170-178 m. Continuare poi con i ferri 4 e lavorare il ferro successivo, sul diritto, così: 1 m vivagno, 8-16-20-24-20-24 m A.4, lavorare A.1 1 volta per le taglie S - XL, lavorare A.2 1 volta per le taglie XXL e XXXL, 26-28-30-32-34-34 m A.4, poi lavorare A.1 1 volta per le taglie S - XL, lavorare A.3 1 volta per le taglie XXL e XXXL, terminare con 8-16-20-24-20-24 m A.4 e 1 m vivagno a legaccio. RICORDATI LA TENSIONE DEL LAVORO! Continuare così finché il lavoro non misuri 47-48-49-50-51-52 cm. Intrecciare poi per gli scalfi all’inizio di ogni ferro ad ogni lato così: Intrecciare 3 m 0-1-1-2-2-2 volte, 2 m 1-1-1-2-2-2 volte, 1 m 4-7-9-8-4-8 volte = 104-110-116-118-142-142 m. Continuare con il motivo come prima finché il lavoro non misuri 66-68-70-72-74-76 cm. Intrecciare ora le 20-22-24-26-28-28 m centrali per lo scollo e terminare ogni parte separatamente. Intrecciare 2 m al f seguente (lato scollo) = rimangono 40-42-44-44-55-55 m per le spalle. Continuare con il motivo come prima. Intrecciare tutte le m senza stringere con il dir sopra il dir e il rov sopra il rov quando il lavoro misura 68-70-72-74-76-78 cm. DAVANTI DESTRO: Si lavora avanti e indietro sui f. Avviare 83-91-95-99-111-115 m (incl 1 m vivagno al lato) con il filato Lima ed i ferri circolari 3,5. Lavorare le coste così (1° ferro = diritto): 26-26-26-26-30-30 m punto legaccio (= m del bordo davanti), * 2 m dir, 2 m rov *, ripetere da *-*, terminare con 1 m vivagno a punto legaccio. Continuare con le coste con il bordo davanti in punto legaccio finché le coste non misurino 5-5-5-6-6-6 cm. All’ultimo ferro sul rovescio, lavorare rov sopra tutte le maglie delle coste – ALLO STESSO TEMPO, distribuire uniformemente 12-12-12-12-13-13 diminuzioni sopra queste m (non diminuire sopra le maglie del bordo davanti) = 71-79-83-87-98-102 m. Continuare con i ferri 4 e lavorare al ferro seguente sul diritto così: 26-26-26-26-30-30 m di bordo davanti, lavorare A.1 1 volta per le taglie S - XL, lavorare A.3 1 volta per le taglie XXL e XXXL, 8-16-20-24-20-24 m A.4 e 1 m vivagno a legaccio. Al ferro seguente sul diritto (= 3° ferro del motivo) lavorare i FERRI ACCORCIATI – vedere le spiegazioni sopra. Continuare con il motivo e le m del bordo davanti – ALLO STESSO TEMPO, lavorare 1 ferro accorciato al 3° ferro in ognuna delle ripetizioni del diagramma in altezza fino alla fine. Quando il lavoro misura 14-15-16-17-18-19 cm, iniziare ad intrecciare per le ASOLE sul bordo davanti destro – vedere le spiegazioni sopra! Continuare finché il lavoro non misuri 47-48-49-50-51-52 cm. Intrecciare poi all’inizio del ferro seguente sul diritto così: Intrecciare le prime 25-25-25-25-29-29 m, inserire 1 segnapunti (indica dove si inizia a riprendere le maglie per il collo), lavorare le m rimanenti sul ferro. Intrecciare poi per gli scalfi ogni ferro sul rovescio del lavoro così: 3 m 0-1-1-2-2-2 volte, 2 m 1-1-1-2-2-2 volte, 1 m 4-7-9-8-4-8 volte = rimangono 40-42-44-44-55-55 m per le spalle. Continuare con il motivo come prima. Intrecciare tutte le m senza stringere con il dir sopra il dir e il rov sopra il rov quando il lavoro misura 68-70-72-74-76-78 cm. DAVANTI SINISTRO: Avviare e lavorare le coste come per il davanti destro – ma all’contrario (vuol dire * 2 m rov, 2 m dir *, ripetere da *-*), con 26-26-26-26-30-30 m del bordo davanti in punto legaccio. Continuare finché le coste non misurino 5-5-5-6-6-6 cm. All’ultimo ferro sul rovescio, lavorare a rov sopra tutte le maglie delle coste – ALLO STESSO TEMPO, distribuire uniformemente 12-12-12-12-13-13 diminuzioni m (non diminuire sopra le m del bordo davanti) = 71-79-83-87-98-102 m. Continuare con i ferri 4 e lavorare al ferro seguente, sul diritto, così: 1 m vivagno a legaccio, 8-16-20-24-20-24 m A.4, lavorare A.1 1 volta per le taglie S - XL, lavorare A.2 1 volta per le taglie XXL e XXXL, 26-26-26-26-30-30 m di m del bordo davanti a legaccio. Al ferro successivo, sul rovescio (= 2° f del motivo) lavorare i FERRI ACCORCIATI – vedere le spiegazioni sopra. Continuare come per il davanti destro, ma senza le asole. MANICHE: Si lavorano avanti e indietro sui ferri. Avviare 74-78-82-86-90-90 m (incl 1 m vivagno ad ogni lato) con i ferri circolari 3,5 e Lima. Lavorare le coste così (1° ferro = diritto): 1 m vivagno a punto legaccio, * 2 m dir, 2 m rov *, ripetere da *-* e terminare con 1 m vivagno a legaccio. Continuare così finché le coste non misurino 5-5-5-6-6-6 cm. All’ultimo ferro sul rovescio, lavorare a rov sopra tutte le maglie delle coste – ALLO STESSO TEMPO, distribuire uniformemente 12-14-16-18-18-18 m diminuzioni = 62-64-66-68-72-72 m. Continuare con i ferri 4 e lavorare al ferro seguente, sul diritto, così: 1 m vivagno a legaccio, 12-13-14-15-17-17 m A.4, lavorare A.1 1 volta, 12-13-14-15-17-17 m A.4, terminare con 1 m vivagno a legaccio. ALLO STESSO TEMPO, quando il lavoro misura 6 cm, aumentare 1 m all’interno di 1 m vivagno ad ogni lato – VEDERE AUMENTI. NOTA: Lavorare gli aumenti seguendo A.4. Ripetere gli aumenti ogni 3½-3-2½-2½-2½-2½ cm in totale 14-15-16-17-16-17 volte = 90-94-98-102-104-106 m. Continuare finché il lavoro non misuri 54-53-51-50-48-48 cm (misura più corta per le taglie grandi siccome l’arrotondamento della manica è più lungo e le spalle più larghe) intrecciare all’inizio di ogni ferro ad ogni lato così: 3 m 1-1-1-2-2-2 volte, 2 m 1-1-2-2-2-2 volte e 1 m 2-2-3-3-4-4 volte. Intrecciare poi 2 m ad ogni lato finché il lavoro non misuri 61-61-60-60-59-59 cm, poi intrecciare 3 m 2 volte ad ogni lato. Intrecciare tutte le m senza stringere con il dir sopra il dir e il rov sopra il rov quando il lavoro misura ca 62-62-61-61-60-60 cm. CONFEZIONE: Cucire le spalle e attaccare le maniche e cucire nella maglia all’interno della m vivagno. Cucire le maniche ed i lati nella maglia all’interno della m vivagno. Attaccare i bottoni sul davanti sinistro, ca 2½ cm dall’ultima m dir del motivo. COLLO A SCIALLE: Riprendere le maglie sul diritto all’interno della maglia vivagno con i ferri circolari 3,5. Cominciare in mezzo davanti al segnapunti sul davanti destro così: Riprendere ca 60 - 70 m fino alla spalla, poi 30 - 40 m lungo il collo dietro, e 60 - 70 m scendendo lungo il davanti sinistro fino al segnapunti = 150 - 180 m. Lavorare 1 f a dir sul rovescio del lavoro, ALLO STESSO TEMPO, aggiustare il numero di maglie a 144-148-156-164-172-180 m. Lavorare poi le coste al ferro seguente sul dir così: 1 m punto legaccio, * 2 m dir, 2 m rov *, ripetere da *-* e terminare con 2 m dir e 1 m punto legaccio. Continuare così finché il collo non misuri ca 5-5-5-6-6-6 cm. Aumentare ora 1 m in ognuna delle 14-14-14-16-16-16 sezioni di m rov centrali (=collo dietro), visto sul diritto = 158-162-170-180-188-196 m. Continuare finché il collo non misuri ca 12-12-12-12-14-14 cm, poi intrecciare tutte le m senza stringere con il dir sopra il dir e il rov sopra il rov. Cucire il collo sul rovescio (perché la cucitura sia invisibile sul diritto) ad ogni lato, in basso, dalla parte dei bordi davanti, - cucire bordo contro bordo per evitare che la cucitura non sia troppo spessa. |
||||||||||||||||
Spiegazioni del diagramma |
||||||||||||||||
|
||||||||||||||||
 |
||||||||||||||||
 |
||||||||||||||||
Avete terminato questo modello?Allora taggate le vostre foto con #dropspattern #ramblingmancardigan o inviatele alla #dropsfan gallery. Avete bisogno di aiuto con questo modello?Troverete 23 video tutorial, una sezione per i commenti/domande e molto altro guardando il modello su www.garnstudio.com © 1982-2026 DROPS Design A/S. Ci riserviamo tutti i diritti. Questo documento, compreso tutte le sue sotto-sezioni, è protetto dalle leggi sul copyright. Potete leggere quello che potete fare con i nostri modelli alla fine di ogni modello sul nostro sito. |
||||||||||||||||


Con oltre 40 anni di esperienza nel design di modelli di maglia e uncinetto, DROPS Design offre la più estesa collezione di modelli gratuiti su internet - tradotti in 17 lingue. Ad oggi vi possiamo fornire 324 cataloghi e 12290 modelli - 9561 dei quali sono tradotti in Italiano.
Ci stiamo impegnando molto per darvi il meglio che vi possiamo offrire in termini di maglia e uncinetto, ispirazioni e consigli così come filati di grande qualità ad un prezzo incredibile! Volete utilizzare i nostri modelli per qualcosa d'altro oltre al vostro uso personale? Potete leggere tutto ciò che è consentito nel testo sul Copyright in basso su tutte le pagine dei nostri modelli. Buon lavoro!
Lasciare un commento sul modello DROPS Extra 0-850
Noi saremmo felici di ricevere i tuoi commenti e opinioni su questo modello!
Se vuoi fare una domanda, fai per favore attenzione a selezionare la categoria corretta nella casella qui sotto per velocizzare il processo di risposta. I campi richiesti sono indicati da *.