
Categorie popolari
State cercando un filato?


Commenti / Domande (76)
![]() CARLA KOK ha scritto:
CARLA KOK ha scritto:
Hallo ik wil dit vestje breien maar kan ik dat ook gewoon op 2 naalden breien... kun je me dan vertellen hoe ik dat doe...gr carla kok
05.01.2018 - 14:16DROPS Design ha risposto:
Hallo Carla, Dat zou kunnen door het voor -en achterpand op te splitsen en later in de zijkant aan elkaar te naaien. Via deze link vind je informatie over het aanpassen van een patroon van rondebreinaalden naar rechte naalden.
08.01.2018 - 10:02
![]() Roman ha scritto:
Roman ha scritto:
Hi, for the diagram M.1,reading it vertically means from the right side and up the diagram? BR/Roman
29.10.2017 - 08:32DROPS Design ha risposto:
Dear Roman, start reading diagram beginning in the bottom corner on the right side and read towards the left from RS (and from the left towards the right from RS). Happy knitting!
30.10.2017 - 09:38Louise Odendaal ha scritto:
Hi there. When knitting the rib, do I reverse the pattern on the wrong side rows, so that actually looks like a rib? ROW 1 (RS): K1, P2, *K10, P4* ROW 2 (WS): K1, K2, *P10, K4* ? Thank you
22.10.2017 - 19:30DROPS Design ha risposto:
Dear Louise, yes, when you knit the ribbing, on the wrong side rows, you knit stitches as they show themselves.So, if you see a stitch that looks like a purl (it was done as a knit stitch from the RS, you should knit it as a purl. Happy Knitting!
22.10.2017 - 20:26Roman ha scritto:
Hi, "Work 1 row from WS with K over K and P over P. Switch to circular needle size 3 mm. " unfortunately i think that my work ended on RS not WS, but the count is correct the remaining is 170 st on the needles. don't know what to do?? Regards, Roman
18.09.2017 - 12:19DROPS Design ha risposto:
Dear Roman, last dec row is made from RS = 170 sts, work next row from WS with K over K and P over P, then switch to needle size 3 mm and K 1 row from RS dec evenly. Happy knitting!
18.09.2017 - 13:01Roman ha scritto:
How to work WS on circular needle?? Thats the confusing thing. Regards
26.08.2017 - 05:01DROPS Design ha risposto:
Hello Roman. It's suggested to work on circular needles, but you work backwards and forward, as if you were using straight needles. So to work on WS you just turn the work with the wrong side towards you, and knit the return row as stated. Happy knitting!
26.08.2017 - 09:02Roman ha scritto:
Hi So confusing, i dont know to work it "Work 1 row from WS with K over K and P over P. " Regards.
25.08.2017 - 11:42DROPS Design ha risposto:
Dear Roman, on the wrong side you work knit stitch over knit stitch, and purl stitch over purl stitch (like in the rib). Happy knitting!
25.08.2017 - 22:48Reem ha scritto:
I figured the slip k passo, but the pattern says wor the dec 4 times, however i worked 2 times and the remaining in knit section were 3 after the dec. So is there something wrong i do? Regards,
25.08.2017 - 09:13DROPS Design ha risposto:
Dear Reem, you are dec 2 sts over the K10 sts, after 1st dec, K8 remain, after 2nd dec, K6 sts remain, and so on until K4 remain. Happy knitting!
29.08.2017 - 11:45Reem ha scritto:
Slip 1 st as if to K, K 1, psso, K until 2 sts remain, K 2 tog. Please i do not figure this? Regards, Reem
24.08.2017 - 15:02Roman ha scritto:
Work rib as follows: 1 st in GARTER ST – see explanation above -, P 2, * K 10, P 4 *, repeat from *-* until 13 sts remain and finish with K 10, P 2 and 1 st in GARTER ST. My question is: Is it means to work 1st stitch in the row K and then 2 purls and continue as instructed or work the whole row K wise and then purl 2 at the beginning of the new row? Regards Reem
21.08.2017 - 15:14DROPS Design ha risposto:
Hello Roman. You must knit 1st stitch, purl the next 2 sts and then follow the instructions given. Happy knitting!
21.08.2017 - 17:40
![]() Ritva Korpi ha scritto:
Ritva Korpi ha scritto:
Toista tällaiset kavennukset joka 2. krs yht. 4 kertaa = 158-170- (182 ? 142 !) (194-206) s (= 2 o/4 n). Neulo seuraavalla krs:lla s:t siten miltä ne näyttävät. Vaihda pyöröpuikkoon nro 3. Neulo 1 krs oikein oikealta puolelta ja kavenna SAMALLA tasavälein 44-44-40 (40-36) s = 114-126- (? 142 !) (154-170) s.
08.08.2017 - 11:19
|
|||||||
Lea#leajacket |
|||||||
|
|
|||||||
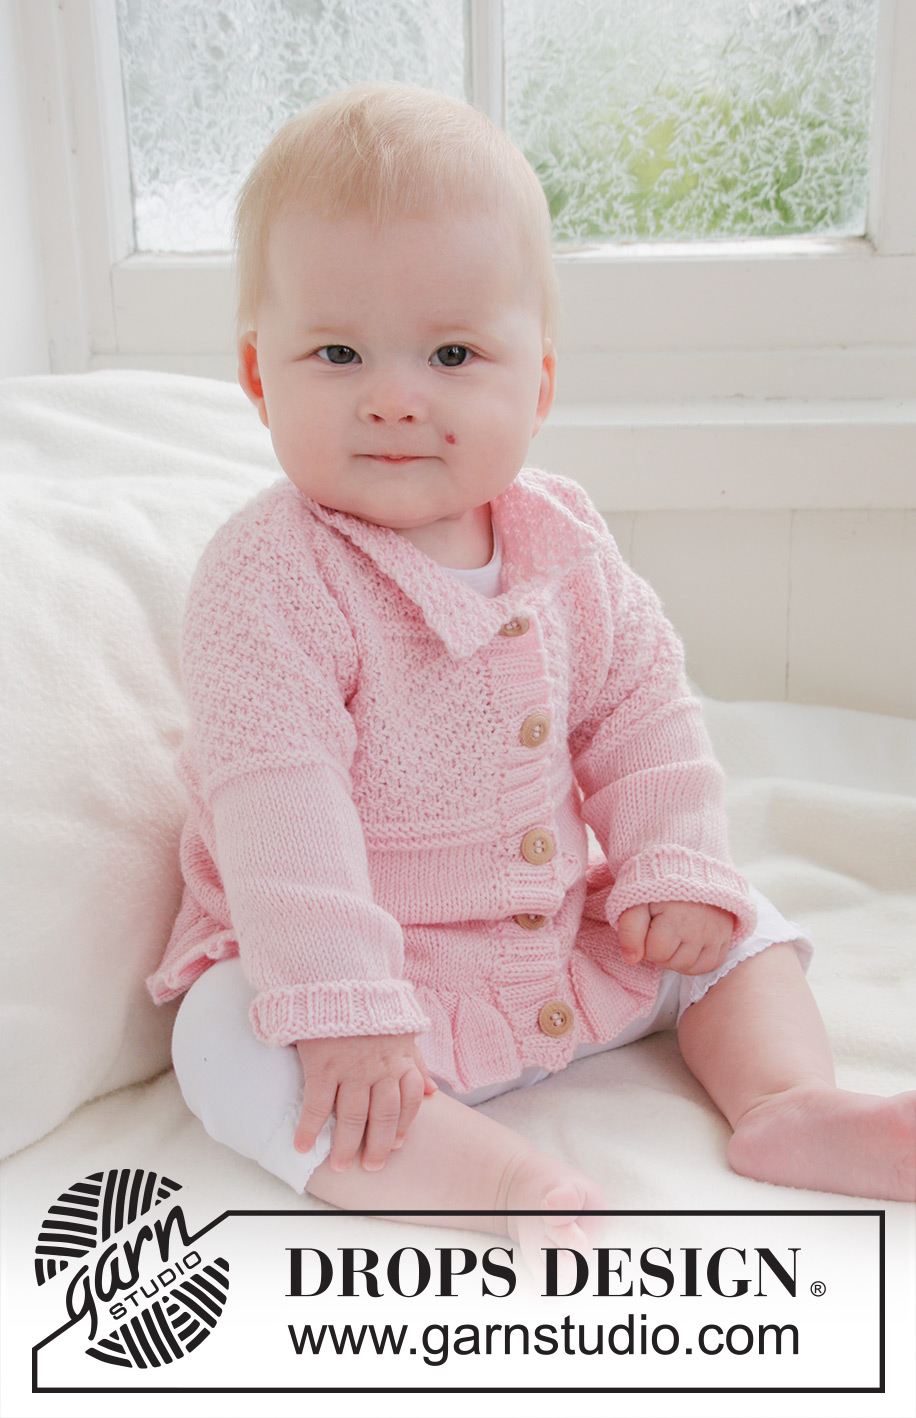
Cardigan lavorato ai ferri con bordo a onde e motivo a punto fantasia, per neonati e bambini, in DROPS BabyAlpaca Silk.
DROPS Baby 21-14 |
|||||||
|
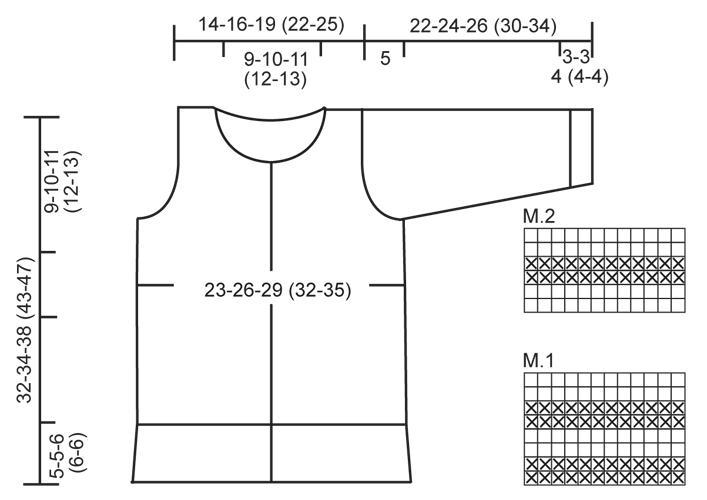
-------------------------------------------------------- MAGLIA A GRANA DI RISO DOPPIA: 1° ferro: * 2 dir., 2 rov. *, ripetere da *-*. 2° ferro: dir. su dir. e rov. su rov. 3° ferro: rov. su dir. e dir. su rov. 4° ferro: come il secondo ferro. Ripetere i ferri 1-4. SUGGERIMENTO PER LE DIMINUZIONI: Diminuire come segue prima del segnapunti: iniziare 2 m. prima del segnapunti. Passare 1 m. a dir., 1 dir., accavallare la m. passata sopra quella appena lavorata. Diminuire come segue dopo il segnapunti: lavorare 2 m. insieme a dir. MAGLIA A LEGACCIO (avanti e indietro sui ferri): lavorare a dir. tutti i f. MOTIVO: Vedere i diagrammi M.1 e M.2. I diagrammi mostrano il motivo dal diritto del lavoro. -------------------------------------------------------- GIACCHINO: Lavorato avanti e indietro con i ferri circolari. Con i ferri misura 2,5 mm e il filato Baby Alpaca Silk avviare 366-394-422 (450-478) m. Lavorare a coste come segue: 1 m. a M. LEGACCIO – leggere la spiegazione sopra -, 2 rov., * 10 dir., 4 rov. *, ripetere da *-* fino a quando rimangono 13 m. e finire con 10 dir., 2 rov. e 1 m. a M. LEGACCIO. Continuare in questo modo fino a quando sono stati lavorati 8-8-12 (12-12) f. a coste. Ora diminuire 1 m. per ogni lato delle sezioni a dir. lavorando tutte le 10 m. a dir. come segue (4 rov. come prima): passare 1 m. a dir., 1 dir., accavallare la m. passata sopra quella appena lavorata, lavorare a dir. fino a quando rimangono 2 m., lavorare 2 m. insieme a dir. Ripetere le diminuzioni a f. alterni per un totale di 4 volte = 158-170-182 (194-206) m. (= 2 dir./4 rov.). Lavorare 1 f. dal rovescio del lavoro con dir. su dir e rov. su rov. Passare ai ferri circolari misura 3 mm. Ora lavorare 1 f. a dir. dal diritto del lavoro e ALLO STESSO TEMPO distribuire 44-44-40 (40-36) diminuzioni in modo uniforme = 114-126-142 (154-170) m. Inserire un segnapunti dopo 29-32-36 (39-43) m. e un segnapunti dopo 85-94-106 (115-127) m. (indica il centro dei lati). Dietro = 56-62-70 (76-84) m. Ora misurare il lavoro da qui. Continuare a m. rasata e 1 m. a legaccio per lato verso il centro fino a quando il lavoro misura 10-11-12 (16-18) cm dal segnapunti. Ora lavorare il diagramma M.1. Quando il diagramma M.1 è stato lavorato 1 volta in verticale, continuare a M. A GRANA DI RISO DOPPIA – leggere la spiegazione sopra. Quando il lavoro misura 18-19-21 (25-28) cm dal segnapunti, intrecciare 6 m. a ogni lato (cioè 3 m. a ogni lato di ogni segnapunti) per gli scalfi. Poi finire il davanti e il dietro separatamente. DIETRO: = 50-56-64 (70-78) m. Continuare avanti e indietro a M. A GRANA DI RISO DOPPIA. ALLO STESSO TEMPO intrecciare per gli scalfi a ogni lato a f. alterni: 2 m. 1 volta e 1 m. 2 volte = 42-48-56 (62-70) m. Quando il lavoro misura 21-22-24 (28-31) cm, lavorare il diagramma M.2 su tutte le m. Quando il diagramma M.2 è stato lavorato 1 volta in verticale, continuare a m. a grana di riso doppia fino a quando il lavoro misura 25-27-30 (35-39) cm. Ora intrecciare le 20-22-24 (26-28) m. centrali per il collo e finire ogni parte separatamente. Continuare a diminuire 1 m. sul ferro successive verso il collo = 10-12-15 (17-20) m. rimaste su ogni spalla. Continuare fino a quando il lavoro misura 27-29-32 (37-41) cm dal segnapunti. Intrecciare senza stringere. Il lavoro misura 32-34-38 (43-47) cm in totale. DAVANTI SX: = 26-29-33 (36-40) m. Continuare avanti e indietro a m. a grana di riso doppia. ALLO STESSO TEMPO diminuire per lo scalfo a lato come per il dietro = 22-25-29 (32-36) m. Poi quando il lavoro misura 21-22-24 (28-31) cm, lavorare il diagramma M.2 su tutte le m. Quando il diagramma M.2 è stato lavorato 1 volta in verticale, continuare a m. a grana di riso doppia. ALLO STESSO TEMPO quando il lavoro misura 23-25-27 (31-34) cm dal segnapunti, trasferire le 6-7-7 (7-8) m. verso il centro davanti su un ferro ausiliario per il collo. Continuare a intrecciare per il collo all’inizio di ogni f. dal collo: 2 m. 2 volte e 1 m. 2-2-3 (4-4) volte = 10-12-15 (17-20) m. rimaste per la spalla. Continuare fino a quando il lavoro misura 27-29-32 (37-41) cm dal segnapunti. Intrecciare senza stringere. Il lavoro misura 32-34-38 (43-47) cm in totale. DAVANTI DX: Lavorare come il davanti sx ma al contrario. MANICA: Con i ferri misura 2,5 mm e il filato Baby Alpaca Silk avviare 44-44-44 (50-50) m. Lavorare 1 f. a rov. dal rovescio del lavoro. Poi lavorare a coste (primo f. = dal diritto del lavoro) 4 rov./2 dir. con 1 m. di vivagno per ogni lato. Quando le coste misurano 3-3-4 (4-4) cm, lavorare 1 f. a dir. dal diritto del lavoro e ALLO STESSO TEMPO distribuire 6-4-4 (8-6) diminuzioni in modo uniforme = 38-40-40 (42-44) m. Passare ai ferri misura 3 mm. Lavorare avanti e indietro a m. rasata con 1 m. di vivagno per ogni lato. ALLO STESSO TEMPO quando il lavoro misura 5 cm, aumentare 1 m. per lato ogni 4-2½-2 (2-2) cm per un totale di 3-5-7 (9-10) volte = 44-50-54 (60-64) m. ALLO STESSO TEMPO quando il lavoro misura 11-13-14 (17-19) cm, lavorare il diagramma M.1. Quando il diagramma M.1 è stato lavorato 1 volta in verticale, continuare a M. A GRANA DI RISO DOPPIA. NOTA! Aggiustarlo in modo che la m. a grana di riso doppia sia la tessa su ogni lato all’inizio del lavoro. Continuare ad aumentare da ogni lato – lavorare le m. aumentate a m. a grana di riso doppia. Lavorare fino a quando il lavoro misura 17-19-21 (25-29) cm. Ora intrecciare 3 m. per lato per l’aletta delle maniche. Continuare a intrecciare per l’aletta delle maniche a ogni lato all’inizio di ogni f.: 3 m. 0-0-0 (1-1) volte, 2 m. 2-3-3 (3-3) volte e 1 m. 3-1-0 (0-0) volte. Poi intrecciare 2 m. da ogni lato fino a quando il lavoro misura 21-23-25 (29-33) cm. Ora intrecciare 3 m. per ogni lato 1 volta. Il lavoro ora misura circa 22-24-26 (30-34) cm. Intrecciare le m. rimaste. CONFEZIONE: Cucirei margini delle spalle. Cucire i margini delle maniche insieme all’interno della m. di vivagno e attaccare le maniche. BORDO SX: Iniziare dall’alto del collo. Con i ferri misura 2,5 mm riprendere 82-86-94 (106-118) m. dal diritto del lavoro all’interno della m. di vivagno giù lungo il davanti sx. Lavorare 1 f. a dir. dal rovescio del lavoro. Poi lavorare a coste come segue (dal diritto del lavoro): * 2 rov., 2 dir. *, ripetere da *-* e finire con 2 m. a M. LEGACCIO. Continuare a lavorare in questo modo fino a quando il bordo misura circa 2-2-2 (2½-2½) cm. Intrecciare senza stringere con dir. su dir. e rov. su rov. BORDO DX: Lavorare come per il bordo sx ma quando le coste misurano circa 1 cm, intrecciare per 5-5-6 (6-7) asole. Intrecciare per l’asola più in alto circa 1 cm dal collo, intrecciare per l’asola più in basso circa 2 cm dal margine inferiore. Intrecciare per le altre asole circa 6-7-6 (7-6) cm di distanza l’uno dall’altra. Tutte le asole sono intrecciate sulle sezioni a 2 rov. lavorando 2 m. insieme a rov. e facendo un gettato. Poi lavorare a coste come prima fino a quando misura circa 2-2-2 (2½-2½) cm. Intrecciare le m. senza stringere con dir. su dir. e rov. su rov. COLLETTO: Con i ferri misura 3 mm riprendere da 68 a 96 m. dal diritto del lavoro (comprese le m. sui ferri ausiliari) e comprese le m. sui bordi per ogni lato (sui bordi riprendere nel filo davanti della m. più esterna). Lavorare 1 f. a dir. dal rovescio del lavoro. Lavorare 1 f. a dir. dal diritto del lavoro e ALLO STESSO TEMPO aggiustare il n° di m. a 76-84-92 (100-108). Lavorare 1 f. a dir. dal rovescio del lavoro. Continuare a M. A GRANA DI RISO DOPPIA su tutte le m. fino a quando il lavoro misura circa 4 cm. Intrecciare senza stringere. |
|||||||
Spiegazioni del diagramma |
|||||||
|
|||||||
 |
|||||||
Avete terminato questo modello?Allora taggate le vostre foto con #dropspattern #leajacket o inviatele alla #dropsfan gallery. Avete bisogno di aiuto con questo modello?Troverete 15 video tutorial, una sezione per i commenti/domande e molto altro guardando il modello su www.garnstudio.com © 1982-2026 DROPS Design A/S. Ci riserviamo tutti i diritti. Questo documento, compreso tutte le sue sotto-sezioni, è protetto dalle leggi sul copyright. Potete leggere quello che potete fare con i nostri modelli alla fine di ogni modello sul nostro sito. |
|||||||


Con oltre 40 anni di esperienza nel design di modelli di maglia e uncinetto, DROPS Design offre la più estesa collezione di modelli gratuiti su internet - tradotti in 17 lingue. Ad oggi vi possiamo fornire 325 cataloghi e 12298 modelli - 9569 dei quali sono tradotti in Italiano.
Ci stiamo impegnando molto per darvi il meglio che vi possiamo offrire in termini di maglia e uncinetto, ispirazioni e consigli così come filati di grande qualità ad un prezzo incredibile! Volete utilizzare i nostri modelli per qualcosa d'altro oltre al vostro uso personale? Potete leggere tutto ciò che è consentito nel testo sul Copyright in basso su tutte le pagine dei nostri modelli. Buon lavoro!
Lasciare un commento sul modello DROPS Baby 21-14
Noi saremmo felici di ricevere i tuoi commenti e opinioni su questo modello!
Se vuoi fare una domanda, fai per favore attenzione a selezionare la categoria corretta nella casella qui sotto per velocizzare il processo di risposta. I campi richiesti sono indicati da *.